Feel Healthy Today
  • Home
  • Recipes
  • Health News
  • Fitness News
  • Weight Loss
  • Contact
  • Subscribe

Recipes

One Simply Terrific Thing: Maldon Sea Salt Flakes

11/13/2020

2 Comments

 
One Simply Terrific Thing: Maldon Sea Salt Flakes
https://ift.tt/3ptCmNa

Maldon Sea Salt Flakes aren’t just a fancy salt; they’re a cooking essential and deserve a space in every home cook’s pantry.

Print

Photography Credit: Sheela Prakash

Welcome to One Simply Terrific Thing, our ongoing series highlighting the small tools, kitchen goods, and ingredients that make life better!

I am someone who will add more items to my online shopping cart in order to get free shipping—which is exactly how a box of Maldon Sea Salt Flakes ($6 for an 8.5 ounce box) landed in my kitchen.

I was dubious about bringing another salt into my kitchen. Isn’t one enough? But my food friends had been singing the praises of Maldon for years, so I was curious what the fuss was all about.

Now I am so glad I added it to my cart, because I’ve joined them in the praise!

FINISHING SALT VS COOKING SALT

Maldon’s flaky sea salt is a finishing salt, not a cooking salt—which is what distinguishes it from kosher salt, table salt, and other salts you may have in your pantry.

When you sprinkle salt all over chicken or vegetables before roasting, you do it with a cooking salt to season food while it cooks. But a finishing salt is used to season food at the end of cooking instead of at the beginning.

There are three reasons why Maldon is specifically a finishing salt.

  1. Its texture is wildly unique: Rather than evenly-sized granules, Maldon sea salt flakes are irregularly-shaped, pyramid-like crystals. Not only are they pretty to look at, they lend a lovely crunch to dishes.
  2. Their flavor isn’t all salt. In fact, it’s quite delicate and a bit briny.
  3. It’s sold in small quantities: The box of Maldon sea salt flakes is quite small, so it would be a waste to lose the crunch and flavor by dissolving it into soups or sauces.

HOW TO USE MALDON SEA SALT FLAKES IN YOUR COOKING

There are endless ways to use Maldon sea salt flakes! Every night, I sprinkle a pinch on our basic green salad that graces the table, which always makes it a lot more interesting. Scrambled eggs usually get a sprinkle when they’re on my plate, too, as does avocado toast, simple seared steak or fish, and pretty much all sautéed veggies.

Where the real fun comes in, though, is dessert! Top your favorite chocolate chip cookies or brownies with a pinch before they head into the oven, or try a sprinkle on a bowl of your favorite pudding (chocolate or butterscotch are especially well-suited).

Since the salt crystals are large and you’re sprinkling the salt right on top, they won’t dissolve into your treat. Rather, you’ll be left with a lightly salty crunch that offsets the sweetness beautifully.

This post may contain links to Amazon or other partners; your purchases via these links can benefit Simply Recipes. Read more about our affiliate linking policy.

Sheela Prakash

Sheela Prakash is a food and wine writer, recipe developer, and the author of Mediterranean Every Day. Her writing and recipes can be found in numerous online and print publications, including Kitchn, Epicurious, Food52, Serious Eats, Tasting Table, The Splendid Table, Culture Cheese Magazine, Clean Plates, and Slow Food USA.

Sheela received her master's degree from the University of Gastronomic Sciences in Italy, holds Level 2 and Level 3 Awards in Wines from the Wine & Spirit Education Trust (WSET), graduated from New York University's Department of Nutrition and Food Studies, and is also a Registered Dietitian.

More from Sheela


Recipes

via Simply Recipes https://ift.tt/2F9fkDA

November 13, 2020 at 09:30AM
#recipies
2 Comments

Homemade Campari

11/13/2020

0 Comments

 
Homemade Campari
https://ift.tt/3eYuQFb

Campari is an herbaceous, bittersweet Italian liqueur that took the 1860s by storm and whose popularity continues today. Campari gives the Negroni its bouquet of orange and grapefruit, and plenty of other drinks their elan vital.

Make your own with this easy recipe. Keep the bottle for your own home bar, or generously give it away as a gift.

WHAT IS CAMPARI?

Campari is a blend of between ten and seventy herbs, flowers, and roots infused into a high-proof alcohol and sweetened with sugar syrup. The Campari you find on store shelves is still made outside Milan, Italy according to Gaspare Campari’s original 1860 recipe.

While their recipe is a closely held secret – it’s said that outside of the factory director, not a soul knows all of the herbs included – gentian, oranges, rhubarb, and ginseng will get you in the vicinity. The rest of the ingredients simply help add more body, complexity, and brightness to the liquor.

HOMEMADE CAMPARI IS AFFORDABLE AND EASY

Why make your own Campari? Aside from being able to customize the sweetness, bitterness, citrus, and proof of your Campari, there is the affordability: for the cost of a single bottle of store-bought Campari and a scant amount of time, you could easily make 5 half-bottles (375ml) of your own.

Making homemade Campari also requires just 20 minutes of hands-on time: Order your ingredients online, and once they arrive, all you need to do is infuse, strain, and you’re good to go with one of the most desired liqueurs in the world. It’s beautiful.

A round tray with spices, herbs and oranges set around it to make Campari.

WHAT INGREDIENTS DO YOU NEED?

Your ingredients fall into a few categories:

  • BITTERING AGENTS: These that do just that: contribute the bitter complexity that stimulates the appetite and adds shape to sweetness. Gentian, the main source of our bitterness here, gives a radiating, resonant and tangy bitterness. Wild Cherry Bark is more balanced in its bitterness, and introduces some fruit tastes. Angelica root introduces a bold, grapefruit and pepper tone, while ginseng brings a more clean, earthy bite. Wormwood, more famous for its association with absinthe, includes just a hint of anise or sweet licorice with its intense bitterness.
  • FLAVORING BOTANICALS: These add depth and layers of complexity, and they contribute to a more flavorful experience overall. Our (dried) lemon peel, orange peel, and rhubarb root bring style to the overall taste. (Note: this is dried rhubarb root, different from fresh rhubarb stalks available in grocery stores.)
  • COLOR: As for that bright red color associated with Campari? Until recently this color came from dried cochineal beetles, though today it’s produced using artificial coloring. What a world! Carmine or beetles are still available for your recipe, but you may also go with red food coloring for an easier time of it.
  • SWEETNESS: Campari is a surprisingly sweet liqueur that just happens to be so bitter that you’d never noticed. If you are careful enough in adding a rich simple syrup to your water volume, you can even match the brix value (or sweetness) of store-bought Campari, but easier still is adjusting to your own tastes.

WHERE TO BUY INGREDIENTS FOR THIS RECIPE

You can order all of your ingredients from the following online stores:

Two mason jars filled with ingredients for campari.

WHAT ALCOHOLS DO YOU NEED TO MAKE CAMPARI?

You need but one alcohol to make your own Campari: An extremely high-proof neutral grain spirit.

Galen’s 151 and Everclear Grain Alcohol 151 are ever-reliable options, and fairly widely available. While you can certainly try out darker spirits, the neutral grain spirits allow the flavors to develop more fully and better stand out.

150 proof or higher is definitely recommended. The higher alcohol content will more effectively and quickly draw out the flavor from those ingredients – but you could go as low as 100 proof before you would see the alcohol failing to extract the flavor you so critically need.

WHAT’S THE BASIC PROCESS FOR MAKING CAMPARI?

The liberating pleasure here is in just how simple it can be to make your own Campari.

  1. Begin by combining the dry ingredients with your high-proof spirit. Seal the jar and shake. Set aside for 14 – 21 days, shaking once each day. The mixture is ready anytime within this time period. The color will slowly turn brown, and the taste will be so bitter as to be undrinkable. Don’t worry, all is well.
  2. After that steeping, strain the mixture using a sieve, then filter through cheesecloth, coffee filter, or a mesh superbag. The bitter, high-alcohol base that results is the heart of your Campari, and needs only a bit of sweetness, and some water to bring down the proof.
  3. To match the 28.5% alcohol-by-volume (ABV) of Italian Campari, we’ll need to “water down” that alcohol some. And to match the sweetness, we’ll need to introduce some sugar. You can do both at once by bringing 4 cups of water to a simmer in a saucepan and stirring in sugar. After it has fully dissolved, turn off the heat and let it cool.
  4. When your syrup has cooled, slowly stir it into the bitter, infused alcohol. You will likely need all of it, but once you have added half, taste it frequently, and choose your own stopping point. Hint: It should taste great.
  5. If you are put off by the color, and/or simply want it to resemble the Campari to which you’ve grown so accustomed, add red food coloring until it settles at that bright, rosy hue you recognize.

Glass jar filled with Campari substitute. A whiskey glass with a cocktail inside is to the right.

THE BEST BOTTLES FOR CAMPARI

When it comes to storing your Campari, so long as you are storing these out of direct sunlight, you can get by with any clear glass bottle or jar. That said, darker bottles do a better job of preventing light from gradually causing oxidization and evaporation. It may take months or even well over a year to notice a change, but you don’t have any other concerns outside of that.

Your best bet would be to find something that seems easy to use and enjoyable to look at. The rest will work out.

For more bespoke bottles, Crate and Barrel has decanters that are what you once imagined your adulthood would look like, while Specialty Bottle has a nearly endless selection of jars and bottles. This recipe will yield five 375ml bottles – perfect for giving away four as gifts, and saving one for yourself.

HOW TO USE HOMEMADE CAMPARI

If you’re looking for inspiration, there are a small number of core cocktails to turn to first:

  • Americano: The mother of the Negroni, the Americano is a simple but most-refreshing blend of 1oz Campari and 1oz sweet vermouth, topped with soda water.
  • Negroni: Evolved from the Americano, the Negroni is the flagship cocktail of Campari, typically an equal parts mix of gin, Campari, and sweet vermouth.
  • Boulevardier: The Negroni, this time with bourbon filling in for gin.
  • Old Pal: A Boulevardier, but with a drier, spicier rye substituting for bourbon.
  • Old Friend: Further afield than the above, this is a bright, beautiful blend of gin, grapefruit juice, Campari, and St Germain elderflower liqueur.

A person holding two glass jars with homemade campari inside.

HOW LONG WILL THIS HOMEMADE CAMPARI LAST?

Your bottle of Campari will never truly go bad if kept in a cool, dry place and out of direct sunlight. If you are storing half-empty bottles in the light for over a year, you may notice changes owing to oxidization and an eventual evaporation, but I’m confident you will have consumed your homemade Campari long before then.

As for temperature, Campari is high-enough proof that you needn’t refrigerate it, but know that warmer temperatures will make it come across as sweeter. That one comes down to preference!

MORE DELIGHTFUL DIY PROJECTS

This post may contain links to Amazon or other partners; your purchases via these links can benefit Simply Recipes. Read more about our affiliate linking policy.


Recipes

via Simply Recipes https://ift.tt/2F9fkDA

November 13, 2020 at 09:05AM
#recipies
0 Comments

7 Day Healthy Meal Plan (Nov 16-22)

11/13/2020

0 Comments

 
7 Day Healthy Meal Plan (Nov 16-22)
https://ift.tt/32J6EC5

7 Day Healthy Meal Plan (Nov 16-22)

posted November 13, 2020 by Gina

A free 7-day, flexible weight loss meal plan including breakfast, lunch and dinner and a shopping list. All recipes include calories and updated WW Smart Points.

7 Day Healthy Meal Plan (Nov 16-22)

7-Day Healthy Meal Plan

If you didn’t get a chance to watch the

Today Show

this past week, I shared a Turkey Breast recipe from Skinnytaste Meal Prep Cookbook!

Here’s the episode

if you missed it.

Why Should Everyone Meal Plan?

Meal planning is a great way to organize your meals for the week ahead. You also save time and money in the supermarket! And of course, planning ahead helps you stick to your goals!

About The Meal Plan

If you’re new to my meal plans, I’ve been sharing these free, 7-day flexible healthy meal plans (you can see my previous meal plans here) that are meant as a guide, with plenty of wiggle room for you to add more food, coffee, beverages, fruits, snacks, dessert, wine, etc or swap recipes out for meals you prefer, you can search for recipes by course in the index. You should aim for around 1500 calories* per day.

There’s also a precise, organized grocery list that will make grocery shopping so much easier and much less stressful. Save you money and time. You’ll dine out less often, waste less food and you’ll have everything you need on hand to help keep you on track.

Lastly, if you’re on Facebook join my Skinnytaste Facebook Community where everyone’s sharing photos of recipes they are making, you can join here. I’m loving all the ideas everyone’s sharing! If you wish to get on the email list, you can subscribe here so you never miss a meal plan!

Also, if you don’t have the Skinnytaste Meal Planner, now would be a great time to get one to get organized for 2020! There was a print error last year, but it’s perfect now! You can order it here!

THE DETAILS:

Breakfast and lunch Monday-Friday, are designed to serve 1 while dinners and all meals on Saturday and Sunday are designed to serve a family of 4. Some recipes make enough leftovers for two nights or lunch the next day. While we truly believe there is no one size fits all meal plan, we did our best to come up with something that appeals to a wide range of individuals. Everything is Weight Watchers friendly, I included the updated WW Blue SP for your convenience, feel free to swap out any recipes you wish or just use this for inspiration!

The grocery list is comprehensive and includes everything you need to make all meals on the plan. I’ve even included brand recommendations of products I love and use often. Cross check your cabinets because many condiments you’ll notice I use often, so you may already have a lot of them.

And last, but certainly not least, this meal plan is flexible and realistic. There’s plenty of wiggle room for cocktails, healthy snacks, dessert and dinner out. And if necessary, you can move some things around to make it work with your schedule. Please let me know if you’re using these plans, this will help me decide if I should continue sharing them!

MONDAY (11/16)
B: Overnight Oats in a Jar (5B 5G 3P)
L: Chopped Salad with Shrimp, Blue Cheese and Bacon* (7B 9G 7P)
D: Creamy Pumpkin Ginger Soup (3B 4G 3P) and ½ a grilled cheese* (8B 8G 8P)
Totals: WW Points 23B 26G 21P, Calories 1,003**

TUESDAY (11/17)
B: Cinnamon Apple Yogurt Bowls (6B 9G 6P)
L: Chopped Salad with Shrimp, Blue Cheese and Bacon (7B 9G 7P)
D: Turkey Taco Spaghetti Squash Boats (4B 4G 4P) with 1 ounce avocado (1B 1G 1P) and Instant Pot Refried Beans
(0B 3G 0P)

Totals: WW Points 18B 26G 18P, Calories 965**

WEDNESDAY (11/18)
B:  Cinnamon Apple Yogurt Bowls (6B 9G 6P)
L: LEFTOVER Turkey Taco Spaghetti Squash Boats (4B 4G 4P) with Instant Pot Refried Beans (0B 3G 0P)
D: Baked Chicken Parmesan (4B 6G 4P) with 1 cup whole wheat spaghetti (5B 5G 5P) and Roasted Broccoli with Smashed Garlic (2B 2G 2P)

Totals: WW Points 21B 29G 21P, Calories 1,103**

THURSDAY (11/19)
B: Overnight Oats in a Jar (5B 5G 3P)
L: Open-Faced Tuna Melt Sandwich (4B 5G 4P) with an apple (0B 0G 0P)
D: LEFTOVER Baked Chicken Parmesan (4B 6G 4P) with 2 cups arugula (0B 0G 0P), ½ an ounce shaved parmesan cheese (2B 2G 2P) and 1 tablespoon light balsamic vinaigrette (1B 1G 1P)
Totals: WW Points 16B 19G 14P, Calories 900**

FRIDAY (11/20)
B: 2 hard-boiled eggs (0B 4G 0P) a pear (0B 0G 0P)
L: Open-Faced Tuna Melt Sandwich (4B 5G 4P) with an apple (0B 0G 0P)
D: Salmon Avocado Salad (5B 8G 5P) with 2 ounces multigrain baguette (3B 3G 3P)
Totals: WW Points 12B 20G 12P, Calories 1,024**

SATURDAY (11/21)
B: Pumpkin Pecan Banana Bread (4B 4G 4P) with an orange (0B 0G 0P)
L: Quick Beef Chili (4B 6G 4P) with 2 tablespoons shredded reduced fat Mexican blend cheese (1B 1G 1P) and 1 tablespoon light sour cream (1B 1G 1P)
D: ORDER IN!

Totals: WW Points 10B 12G 10P, Calories 582**

SUNDAY (11/22)
B: LEFTOVER Pumpkin Pecan Banana Bread (4B 4G 4P) with an apple (0B 0G 0P)
L: Kale Salad with Quinoa and Cranberries (7B 7G 5P)
D: Slow Cooker Turkey Breast with Gravy (1B 3G 1P) with Stuffing Muffins (3B 3G 3P) and String Beans with Garlic and Oil # (2B 2G 2P)

Totals: WW Points 17B 19G 15P, Calories 847**

*Prep salad Sunday night, if desired. Grilled cheese includes 1 slice whole grain bread and 1ounce cheddar cheese.

**This is just a guide, women should aim for around 1500 calories per day. Here’s a helpful calculator to estimate your calorie needs. I’ve left plenty of wiggle room for you to add more food such as coffee, beverages, fruits, snacks, dessert, wine, etc.
# Adjust green bean serving size accordingly if serving a crowd.

*Google Doc

Shopping List

Produce

  • 1 small and 3 medium bananas
  • 7 medium apples (any variety)
  • 1 medium pear (any variety)
  • 1 (6-ounce) container fresh blueberries
  • 4 medium oranges
  • 3 medium limes
  • 1 medium lemon
  • 2 small (5-ounce) and 1 large (7-ounce) Hass avocados
  • 2 medium heads garlic
  • 1 small, 3 medium and 2 large shallots
  • 1 (2-inch) piece ginger
  • 1 (3-pound) sugar pumpkin3 small (24-ounce) spaghetti squashes
  • 1 small ear of corn (can sub frozen if fresh isn’t available)
  • 1 small jalapeno
  • 1 large red bell pepper
  • 1 ½ pounds broccoli florets
  • 1 pound fresh string beans
  • 1 small bunch celery
  • 1 small and 1 medium carrot
  • 1 small head Romaine lettuce
  • 1 head butter lettuce
  • 1 (10-ounce) clamshell/bag arugula
  • 1 medium bunch Lacinato kale
  • ½ head small purple cabbage (or 1 small bag pre-shredded)
  • 1 small bunch fresh Italian parsley
  • 1 small bunch fresh cilantro
  • 1 small bunch/container fresh thyme
  • 1 medium bunch/container fresh sage
  • 1 small bunch/container fresh chives (can sub scallion greens for garnish on Pumpkin Soup, if desired)
  • 1 small bunch scallions
  • 1 dry pint cherry or grape tomatoes
  • 2 medium vine-ripened tomatoes
  • 1 small red onion
  • 1 small and 2 medium yellow onions

Meat, Poultry and Fish

  • 1 package center-cut bacon
  • 3 ounces diced pancetta (can sub bacon in Stuffing Muffins, if desired)
  • 1/2 pound peeled and deveined shrimp
  • 1 pound 93% lean ground turkey
  • 2 pounds (4) boneless, skinless chicken breasts
  • 1 pound 93% lean ground beef
  • 1 pound (4) wild salmon fillets
  • 1 (5-pound) bone-in turkey breast

Grains*

  • 1 small package quick oats
  • 1 loaf sliced whole grain bread
  • 1 package whole wheat spaghetti
  • 1 package seasoned breadcrumbs
  • 1 package unbleached all-purpose or white whole wheat flour
  • 1 package dry quinoa (or 1 cup pre-cooked)
  • 1 (8-ounce) multigrain baguette
  • 1 (12-ounce) loaf whole wheat French bread

Condiments and Spices

  • Extra virgin olive oil
  • Canola oil
  • Cooking spray
  • Olive oil spray (or get a Misto oil mister)
  • Kosher salt (I like Diamond Crystal)
  • Pepper grinder (or fresh peppercorns)
  • NuNaturals liquid vanilla stevia or your favorite sweetener
  • Cinnamon
  • Nutmeg
  • Garlic powder
  • Cumin
  • Chili powder
  • Paprika
  • Oregano
  • Cayenne (optional, for Refried Beans)
  • Light mayonnaise
  • Red wine vinegar
  • Light balsamic vinaigrette dressing (or make your own with ingredients in list)
  • Dijon mustard
  • Apple cider vinegar (I like Bragg’s)
  • Pumpkin pie spice
  • Dried parsley
  • Vanilla extract
  • Pure maple syrup
  • Bay leaves
  • Bell’s Seasoning (or poultry seasoning)

Dairy & Misc. Refrigerated Items

  • 1 dozen large eggs
  • 1 small package blue cheese or gorgonzola
  • 1 package sliced cheddar cheese
  • 1 package reduced fat sliced cheddar cheese (can sub regular cheddar in Tuna Melt, if desired)
  • 1 box unsalted butter
  • 1 small tub light sour cream
  • 1 medium wedge fresh Parmesan cheese
  • 1 (8-ounce) bag shredded reduced fat Mexican cheese blend
  • 1 (8-ounce) bag shredded reduced fat mozzarella cheese (I like Polly-O)
  • 1 (6-ounce) container plain nonfat Greek yogurt
  • 1 (32-ounce) container plain nonfat Stonyfield yogurt
  • 1 (8-ounce) container unsweetened almond milk (or milk of your choice)

Canned and Jarred

  • 1 (8-ounce) can tomato sauce
  • 1 (10-ounce) can mild diced tomatoes with green chilies
  • 1 (15-ounce) can pumpkin puree
  • 1 small jar unsweetened apple sauce
  • 1 (15-ounce) can reduced sodium black beans
  • 1 (4.5-ounce) can tuna in water
  • 1 small jar marinara (or ingredients to make your own)
  • 1 (32-ounce) carton vegetable broth
  • 1 (32-ounce) carton low sodium chicken broth
  • 1 (15-ounce) can chicken broth (can sub low sodium broth in Stuffing Muffins, if desired)

Misc. Dry Goods

  • 1 small package chia seeds (if buying from bulk bin, you need 1 tablespoon)
  • 1 small package pepitas (optional garnish for Pumpkin Soup)
  • 1 bottle dry white wine
  • 1 bottle light beer, such as Corona (can sub reduced sodium beef broth in Beef Chili, if desired)
  • 1 package dry pinto beans
  • 1 (6-ounce) package chopped pecans
  • 1 (2.25-ounce) bag sliced almonds
  • 1 small package raw sugar
  • 1 small package brown sugar
  • 1 small package golden raisins (if buying from bulk bin, you need 1 tablespoon)
  • 1 small package dried cranberries (if buying from bulk bin, you need ¼ cup)
  • Baking soda

*You can buy gluten free, if desired

posted November 13, 2020 by Gina


Recipes

via Skinnytaste https://ift.tt/2ix3Luq

November 13, 2020 at 08:13AM
#recipies
0 Comments

Easy Classic Sweet Potato Casserole

11/13/2020

1 Comment

 
Easy Classic Sweet Potato Casserole
https://ift.tt/3pswrbt

Easy classic sweet potato casserole made with only 6 ingredients. Topped with mini marshmallows and perfectly sweet, this recipe is sure to be a family favorite.

Sweet potato casserole has always been my favorite dish! My mom made it at least three times a year growing up and I was always a huge fan. Her version has a brown sugar pecan topping (which I’ve already shared a healthy remake of!) but Isaac grew up with traditional sweet potato casserole with mini marshmallows on top.

Without fail, every year Isaac requests the classic version so I finally decided to give it a go and… whoa, it turned out to be so delicious! I am honestly kind of surprised at how much I liked this version. Usually I’m all about the crunch of the pecan topping. That said, the marshmallows actually get a little crisp with this version so maybe that’s why I’m a fan.

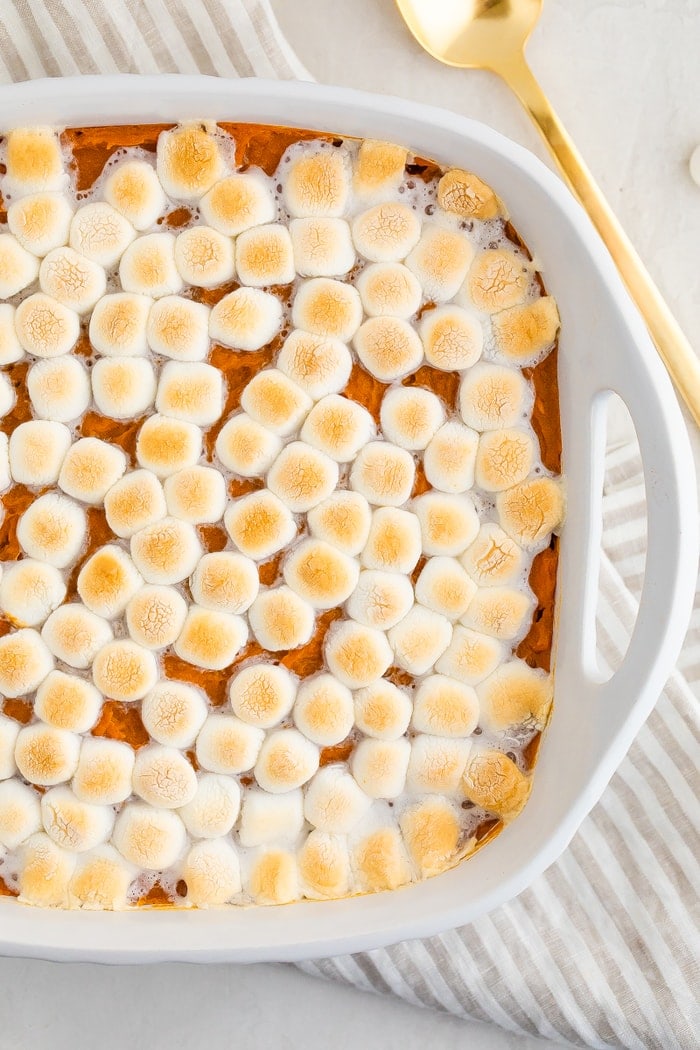
Sweet potato casserole topped with marshmallows.

Classic Sweet Potato Casserole Ingredients

You only need 6 simple ingredients for this traditional sweet potato casserole! I didn’t make any healthy subs for this recipe… well, except for the coconut sugar! I did use real deal (organic) butter and regular mini marshmallows, but you could easily make this dairy-free and vegan by using vegan butter (or coconut oil) and vegan marshmallows.

  • sweet potatoes 
  • coconut sugar – light brown sugar works too.
  • unsalted butter – use vegan butter or coconut oil if needed.
  • sea salt
  • vanilla extract
  • miniature marshmallows – I used regular, but vegan marshmallows will also work. Try the Dandie’s brand.

Buying & Storing Sweet Potatoes

When shopping for sweet potatoes, look for firm, unwrinkled skins. Sweet potatoes come in all different colors – creamy white, deep orange and purple. I usually buy Beauregard, Jewel or Garnet sweet potatoes just because those varieties are typically available at my local grocery stores. That said, Beauregard sweet potatoes tend to be stringier so when given the option I go for Jewel or Garnet.

Store you sweet potatoes in your pantry or on the counter top at room temperature. They’ll last about a week before they start to go bad (which usually means getting wrinkly and soft).

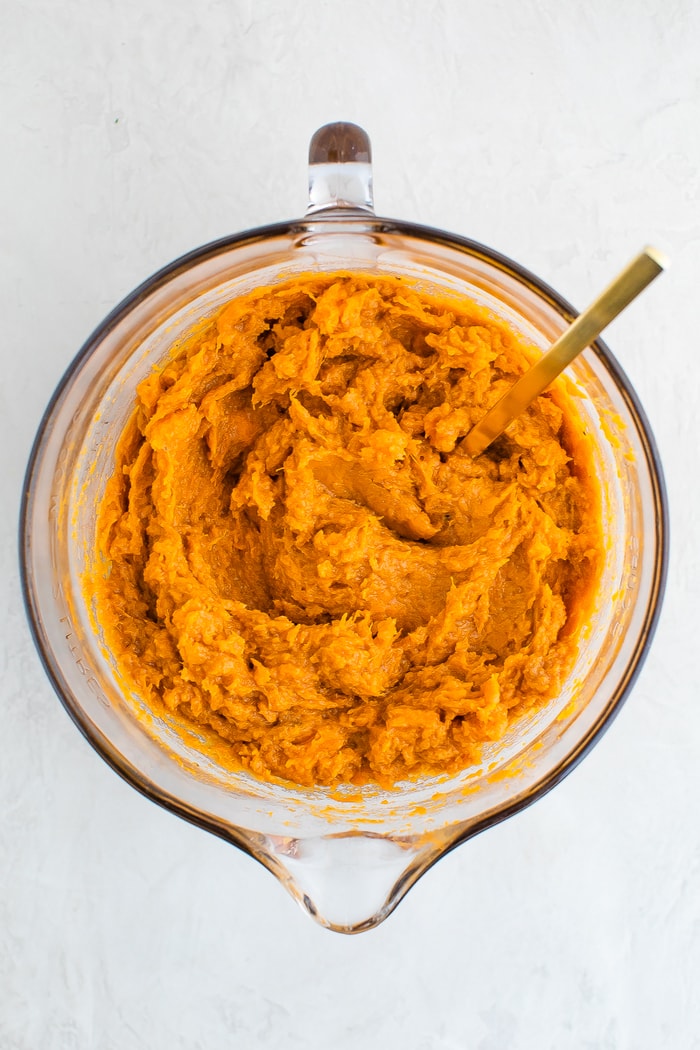
Mixing bowl with sweet potato mixture for sweet potato

4 Ways to Cook Sweet Potatoes Before Mashing

  • Bake – Pierce the sweet potato 4-6 times with a fork. Place potato on a baking sheet and bake at 400ºF for about 45-65 minutes.
  • Boil – Peel and cube the sweet potatoes. Place in a large saucepan and add water to cover the potatoes. Bring to a boil, reduce heat and cook, uncovered until tender. It should take about 15 minutes depending on the size.
  • Microwave – Pierce the sweet potatoes 3-4 times with a fork. Place potatoes in a microwave-safe dish and microwave on high for five minutes, flipping halfway through. If your potatoes aren’t tender after 5 minutes, microwave for 30 second increments until softened. I personally don’t recommend this method because microwaved sweet potatoes don’t taste great, in my opinion.
  • Instant Pot – Add one cup of water to the bottom of your Instant Pot. Place the trivet on top and then the sweet potatoes on the trivet. Cook for 18 minutes on high pressure (for medium-sized potatoes), let naturally steam naturally release for 10 minutes and then quick release any remaining pressure.

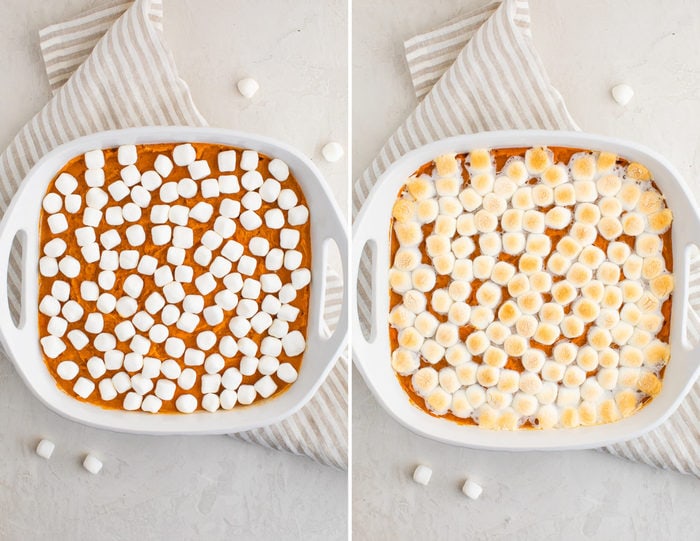
Side by side photos of sweet potato casserole with marshmallows before being baked and after being baked.

How to make Traditional Sweet Potato Casserole

Classic sweet potato casserole is so dang easy to make. Here’s how:

  1. Cook sweet potatoes – Use any of the methods listed above to cook your sweet potatoes prior to mashing. Measure out 6 cups of mashed sweet potato.
  2. Combine – Place the mashed sweet potatoes in a large bowl. Add sugar, softened butter, salt and vanilla. Stir to combine or use a stand mixer to mix well.
  3. Bake – Transfer the sweet potato mixture into a 9 x 9 inch baking dish coated with cooking spray. Use a spoon to spread mixture evenly. Top with marshmallows and bake at 375ºF for 20-25 minutes or until marshmallows are golden brown.

How to Make Sweet Potato Casserole Ahead of Time

You can certainly prep this sweet potato casserole ahead of time to make things easier for holiday meals!

  • One option is to cook your sweet potatoes in advance. Once cooked, let cool and store in the fridge for up to 3 days before making the casserole.
  • Another option is to prep the recipe according to the instructions through step four, cover the casserole dish with foil or plastic wrap and keep in the fridge for 1-2 days. On the day of serving, bring the dish out and let it come to room temp (about 10-15 minutes), top with marshmallows and bake ins 375°F oven for 20-25 minutes or until potatoes are warm and marshmallows are golden.

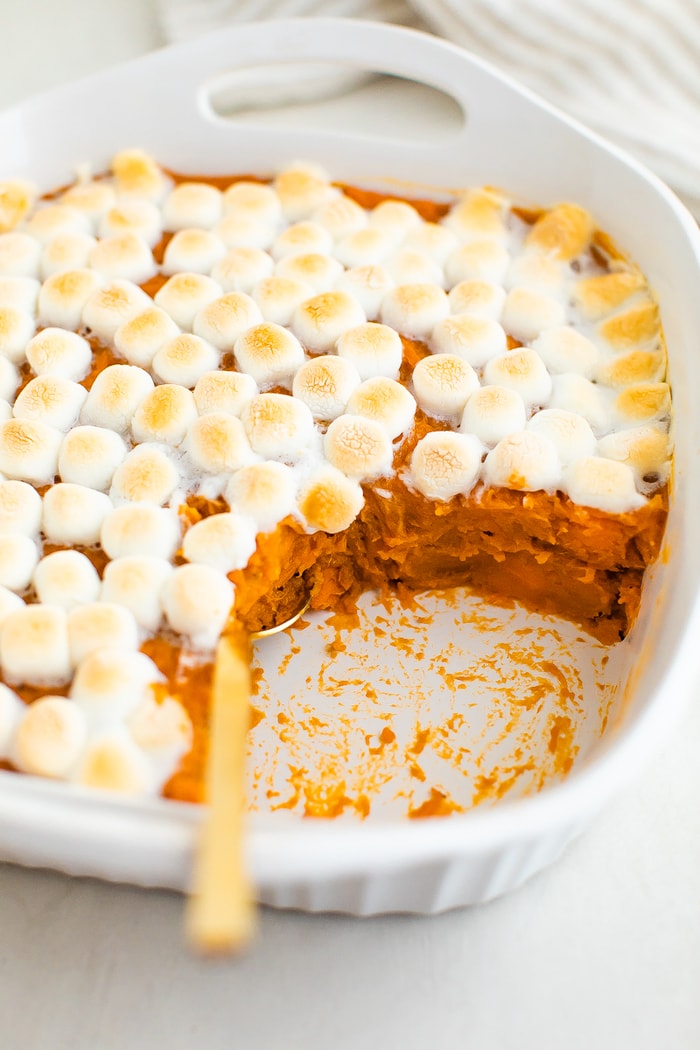
Sweet potato casserole topped with marshmallows. A spoon is in the casserole scooping a portion out.

More Holiday Sides:

  • Healthy Mashed Cauliflower
  • Shredded Kale and Brussels Sprout Salad
  • Apple Cider Vinegar Roasted Brussels Sprouts
  • Butternut Squash Quinoa Stuffing

More Sweet Potato Recipes to Try:

  • Healthy Sweet Potato Casserole (with pecan topping)
  • Dessert Baked Sweet Potato
  • Sweet Potato Breakfast Cookies
  • Sweet Potato Brownie Bites
  • Roasted Sweet Potato Salad
  • Sweet Potato Baked Oatmeal

If you try this classic sweet potato casserole please be sure to leave a comment and star rating below letting me know how it turned out. Your feedback is super helpful for the EBF team and other readers. 

Print
Sweet potato casserole topped with marshmallows.

Classic Sweet Potato Casserole


  • Author: Brittany Mullins
  • Prep Time: 1 hour 10 minutes
  • Cook Time: 20 minutes
  • Total Time: 1 hour 30 minutes
  • Yield: 16
  • Diet: Gluten Free
Print Recipe
Pin Recipe

Description

Easy classic sweet potato casserole made with only 6 ingredients. Topped with mini marshmallows and perfectly sweet, this recipe is sure to be a family favorite.


Ingredients

  • 6 cups mashed sweet potatoes (about 4 large sweet potatoes)
  • 1/2 cup coconut sugar (or brown sugar)
  • 1/4 cup unsalted butter, softened
  • 1 teaspoon sea salt
  • 1/2 teaspoon vanilla
  • 2 cups miniature marshmallows

Instructions

  1. Bake sweet potatoes: Heat oven to 400°F. Pierce sweet potatoes with a fork several times. place sweet potatoes on baking sheet. Roast 1 hour or until tender. Let cool and remove skin from the sweet potatoes and discard. Place flesh into medium bowl, mash with a fork and measure 6 cups. Save any extra for another use.
  2. Reduce oven temperature to 375° F.
  3. Combine: Place mashed sweet potatoes in a large bowl. Add sugar, softened butter, salt and vanilla. Stir to combine. You can do this in a stand mixer if you’d like.
  4. Transfer sweet potato mixture into a 9 x 9-inch baking dish coated with cooking spray. Use a spoon to make sure the mixture is evenly distributed.
  5. Bake: Top with marshmallows and bake for 20-25 minutes or until marshmallows are golden. Serve warm.

Notes

  • You can also boil the sweet potatoes if you prefer. To do so, peel and cube sweet potatoes. Place in a large saucepan; add water to cover. Bring to a boil. Reduce heat; cook, uncovered, until tender, 15 minutes, depending on size. Drain potatoes, mash and measure 6 cups for the recipe.
  • If you’re like me and love pecans, you can sprinkle 1/4 cup pecans on top of the sweet potato mixture with the marshmallows.
  • Category: Sides
  • Method: Bake
  • Cuisine: American

Nutrition

  • Serving Size: 1
  • Calories: 135
  • Sugar: 15g
  • Sodium: 159mg
  • Fat: 3g
  • Saturated Fat: 2g
  • Unsaturated Fat: 1g
  • Trans Fat: 0g
  • Carbohydrates: 28g
  • Fiber: 1g
  • Protein: 1g
  • Cholesterol: 8mg

Keywords: sweet potato casserole

Did you make this recipe?

Tag @eatingbirdfood on Instagram and hashtag it #eatingbirdfood

The post Easy Classic Sweet Potato Casserole appeared first on Eating Bird Food.


Recipes

via Eating Bird Food https://ift.tt/1L45wsH

November 13, 2020 at 07:06AM
#recipies
1 Comment

Turkey Pot Pie with Stuffing Crust

11/12/2020

0 Comments

 
Turkey Pot Pie with Stuffing Crust
https://ift.tt/3eQNxLd

Turkey Pot Pie with Stuffing Crust

Turkey Pot Pie with Stuffing Crust is a fun twist on a turkey pot pie, made with diced turkey and veggies simmered in a creamy sauce and finished with a stuffing topping.

Turkey Pot Pie with Stuffing Crust

This Turkey Pot Pie with Stuffing Crust is a great way to get your favorite Thanksgiving foods in one meal. Plus, it’s perfect for using up leftover turkey. A mix of turkey and vegetables in a creamy sauce is covered with stuffing and baked until the crust is golden. For some other ways to use Thanksgiving turkey, try my Leftover Turkey Pot Pie Empanadas, Open-Faced Turkey Melts, and Baked Turkey Croquettes.

Turkey Pot Pie on a plate

This recipe is a lighter take on traditional turkey pot pie with a fun twist. It’s loaded with veggies and lean turkey breast. To get the sauce creamy, I skip the milk and mix broth with corn starch instead. And if you would prefer to make a chicken pot pie, feel free to use leftover chicken. You can easily halve or quarter this recipe depending on how much leftover turkey you have.

How do you make turkey pot pie from scratch?

  1. Make the stuffing by sautéing the veggies and then add to the bread.
  2. To make the filling, sauté the fresh vegetables and herbs.
  3. Add in the frozen veggies, turkey, and broth and simmer for 10 minutes
  4. Mix the remaining broth with cornstarch, add it to the turkey mixture, and stir until thick.
  5. Pour the turkey filling into a 9 x 13-inch baking dish and cover with stuffing.
  6. Bake for 30-45 minutes until the crust is golden and the filling is hot and bubbling.

What goes good with turkey pot pie?

The great thing about this turkey pot pie is that it’s a whole meal in one: veggies, protein, and carbs all in the same dish. To round out the meal, serve it with a side salad and some cranberry sauce.

turkey pot pie ingredientsturkey pot pie ingredientsturkey pot pieTurkey Pot Pie with Stuffing Crust is a fun twist on a turkey pot pie which is made with chopped turkey and veggies simmered in a creamy sauce  finished with a stuffing topping.

More Leftover Turkey Recipes You’ll Love:

Turkey Pot Pie with Stuffing Crust

Prep Time: 15 mins

Cook Time: 1 hr 15 mins

Total Time: 1 hr 30 mins

Turkey Pot Pie with Stuffing Crust is a fun twist on a turkey pot pie, made with diced turkey and veggies simmered in a creamy sauce and finished with a stuffing topping.

  • 5 cups cooked diced turkey breast, (about 2 1/2 pounds)
  • 1 tablespoon olive oil
  • 2 large shallots, chopped (3/4 cup)
  • 1/4 cup chopped fresh parsley
  • 2 tablespoons chopped fresh thyme
  • 2 tablespoons chopped fresh sage
  • 3 celery stalks, chopped
  • 8 ounce package frozen mixed vegetables
  • 3 cups turkey or chicken broth
  • 1/2 teaspoon kosher salt
  • 1/8 teaspoon black pepper
  • 1/4 cup cornstarch

For the Stuffing Crust:

  • 10 ounces whole wheat french bread, cut into small cubes
  • 1 tablespoon butter
  • 1 medium onion, minced
  • 2 large stalks celery, minced
  • 8 fresh sage leaves, minced
  • 1/2 cup chopped parsley
  • 1 teaspoon Bell's turkey seasoning
  • 1/4 teaspoon kosher salt and fresh pepper, to taste
  • 1 large egg, beaten
  • 1 1/2 cups chicken broth

For the stuffing crust:

  • Stale cubed bread works best here, you can cut the bread the night before and let it sit to harden.

  • If your bread is fresh, preheat the oven and bake the bread cubes on 2 baking sheets at 250°F for about 30 minutes, stirring half way until the bread is completely firm.

  • In a large, deep nonstick skillet over medium heat and add the butter; when melted add onions, celery, parsley, sage, Bell’s turkey seasoning, 1/4 teaspoon salt and pepper and saute on medium low until soft, about 5-10 minutes.

  • Remove from heat and let cool a few minutes then transfer to a large bowl and add the toasted bread. Combine egg and broth in a bowl and whisk, add to the stuffing and mix to combine.

For the filling:

  • Preheat oven to 425F.

  • Wipe the skillet and add oil over medium heat. Add the shallots, parsley, thyme and sage and cook until almost soft about 2 to 3 minutes.

  • Add the celery and cook until the vegetables are soft, about 3 to 5 minutes.

  • Add the frozen mixed vegetables, turkey, 2 cups turkey broth, 1/2 teaspoon salt and black pepper and bring to a boil. Stir and simmer over medium-low heat 10 minutes, stirring until the flavors meld.

  • Meanwhile combine 1 1/4 cups turkey broth with the corn starch and mix well to dissolve.

  • Add to the turkey and cook over medium-low heat, stirring until thickened, about 4 to 6 minutes. Remove from heat and transfer to an oven safe, deep 9 x 13-inch baking dish.

  • In a medium bowl whisk the egg and 1 1/2 cups broth. Place the stuffing over the turkey filling, add egg/broth mixture and mix well. Bake 30 to 45 minutes, or until the crust is golden and the filling is hot and bubbling.

Serving: 11/2 cups, Calories: 390kcal, Carbohydrates: 29.5g, Protein: 49.5g, Fat: 7.5g, Saturated Fat: 2g, Cholesterol: 140.5mg, Sodium: 760.5mg, Fiber: 4g, Sugar: 2g

Blue Smart Points: 4

Green Smart Points: 8

Purple Smart Points: 4

Keywords: thanksgiving casserole, turkey pot pie, turkey pot pie stuffing crust

posted November 12, 2020 by Gina

Get new free recipes and exclusive content delivered right to your inbox:


Recipes

via Skinnytaste https://ift.tt/2ix3Luq

November 12, 2020 at 10:28AM
#recipies
0 Comments

Italian Gnocchi Skillet with Chicken and Pesto

11/12/2020

0 Comments

 
Italian Gnocchi Skillet with Chicken and Pesto
https://ift.tt/3ph5szv

This post is written in partnership with Perdue. 

We’re entering the busy holiday season: can you feel it?

And with that comes weeknights when we want to get a healthy meal on the table for our family, but honestly just don’t have the energy or bandwidth. Never fear! This Italian Gnocchi Skillet with Chicken and Pesto is a filling and protein-rich meal that literally comes together in mere minutes.

Because sometimes when the Zoom calls end and the days feel increasingly shorter, assembling a meal versus cooking it from scratch is a welcome change.

And who doesn’t love classic Italian flavors and very few dishes? We can raise a glass to that any day of the week.

What kind of Gnocchi Should I Buy?

Fun fact: Gnocchi is not pasta, but a kind of potato dumpling. It doesn’t have much flavor on its own, but like pasta, it welcomes sauces like tomato sauce and pesto to really let it shine.

While potato gnocchi are the most traditional, you’ll also encounter cauliflower gnocchi in some grocery stores. Choose whichever type you like, but if the gnocchi are frozen, follow the cooking instructions on each package, as they can vary quite a bit.

WHY PERDUE® SHORT CUTS® Chicken Strips?

For this supper, we’re relying on PERDUE® SHORT CUTS® Carved Chicken Breast Strips to help get dinner on the table.

The fully-cooked chicken strips are juicy and tender, and we feel good about serving them to our family because Perdue raises their birds without antibiotics and they’re given an all-vegetarian diet.

Bonus? Perdue has done all the work for you: the chicken is pre-roasted and cut into strips, so you have boneless, skinless chicken ready to add to just about anything.

How Do I Make an Italian Gnocchi Skillet?

Again, your mantra here is: assembling, not cooking. So gather your ingredients and a skillet and let’s get going!

First, you’re going to warm some store-bought gnocchi, either shelf stable from your supermarket’s refrigerated case or frozen. Instead of using several pans and boiling the gnocchi, just warm it in the skillet with a little boiling water for a few seconds.

Potato gnocchi are delicate, so you don’t want to overcook them because they will cook a little more later with the other ingredients as well.

Drain them and toss them with store-bought pesto. Add them to the skillet with the chicken, stir in some spinach and halved cherry tomatoes, and finish the skillet dish with tangy goat cheese.

Dinner is served! Leftovers? Unlikely. Buon Appetito!

This post may contain links to Amazon or other partners; your purchases via these links can benefit Simply Recipes. Read more about our affiliate linking policy.


Recipes

via Simply Recipes https://ift.tt/2F9fkDA

November 12, 2020 at 09:01AM
#recipies
0 Comments

Cranberry Sauce

11/12/2020

0 Comments

 
Cranberry Sauce
https://ift.tt/32DcUeF

Cranberry Sauce

Confession: I made homemade cranberry sauce for the first time this fall. Crazy, right?! You would think that someone who’s as obsessed with seasonal produce as I am would have tried a cranberry sauce recipe years ago. Nope! My family has always served canned cranberry sauce at Thanksgiving, and it’s never been my favorite part of the meal. In fact, I usually pass it up in favor of a second helping of stuffing and two slices of pumpkin pie. Can you blame me?

But this fall, some fresh, locally-grown cranberries at our farmers market caught my eye, and I decided to give homemade cranberry sauce a try. If there’s anyone else out there who hasn’t made fresh cranberry sauce before, here’s my advice to you: do it!

This cranberry sauce recipe is quick and easy to make. It comes together in right around 20 minutes, and it calls for 4 basic ingredients. It has a thick, jammy texture and sweet-tart flavor that gets extra complexity from pure maple syrup and orange zest. Try it once, and you’ll never get the canned kind again.

Cranberry sauce recipe ingredients

Cranberry Sauce Recipe Ingredients

You only need 4 basic ingredients to make this cranberry sauce recipe:

  • Cranberries – Fresh or frozen cranberries will work here. If you’re using frozen berries, there’s no need to thaw them fully before you start to cook.
  • Maple syrup – It sweetens this cranberry sauce naturally and adds rich depth of flavor.
  • Orange zest – The orange flavor is mild here – it adds bright depth to the sweet-tart sauce. If you like a stronger orange flavor, feel free to add more zest to taste!
  • Salt – Just a pinch! It makes all the flavors pop.

Combine the cranberries, maple syrup, orange zest, and salt in a medium saucepan with 1/4 cup water. Bring the mixture to a simmer over medium-low heat, stirring often so that the syrup doesn’t burn. As the cranberries begin to burst, reduce the heat to low and cook for 15 to 20 minutes, stirring frequently, until the sauce thickens. It will continue to thicken as it sits.

Find the complete recipe with measurements below.

Homemade cranberry sauce

Homemade Cranberry Sauce Recipe Tips

  • Cook it how you like it. Homemade cranberry sauce thickens as it cools, so keep that it mind as you make this recipe. Stop cooking when the sauce is slightly thinner than you’d like it to be. I like my sauce to be fairly thick, with a mix of whole and burst berries, so I cook it for around 18 minutes. If you like your sauce to be thinner, or to have more whole berries, cook it for less time, about 12 to 15 minutes.
  • Taste and adjust. Make sure to taste this cranberry sauce before you serve it. I like mine nice and tart, but if you prefer a sweeter or zestier cranberry sauce, feel free to adjust it! Add additional maple to make your sauce sweeter, or stir in extra orange zest for a stronger orange flavor.
  • Make it in advance. This homemade cranberry sauce keeps well in an airtight container in the fridge for up to 4 days. If you make it ahead of time, allow it to come to room temperature before serving.
  • Save the leftovers! Have a little sauce leftover from a holiday feast? Don’t let it go to waste! Think of the leftover sauce as a thick, tart jam. Dot it onto oatmeal or overnight oats, top it onto pancakes or French toast, or spread it onto a sweet and savory autumn sandwich. If you have more serving ideas, let me know in the comments!

Homemade cranberry sauce recipe

More Favorite Holiday Recipes

Looking for more side dishes to round out your holiday menu? These recipes are some of my favorites:

  • Green Bean Casserole
  • Sweet Potato Casserole
  • Mashed Sweet Potatoes
  • Roasted Garlic Mashed Potatoes
  • Garlic Mashed Cauliflower
  • Mushroom Gravy
  • Roasted Brussels Sprouts
  • Or any of these 50 Thanksgiving Side Dishes!
Click here to browse more recipes!

Other posts you may enjoy...


Pomegranate Rice Salad


Butternut Squash Soup


Balsamic Roasted Brussels Sprouts


Roasted Beets with Citrus


Kale & Olive Oil Vegan Mashed Potatoes


Garlic Mashed Cauliflower
Click here to browse more recipes!

The post Cranberry Sauce appeared first on Love and Lemons.


Recipes

via Love and Lemons https://ift.tt/2h2Uz32

November 12, 2020 at 08:21AM
#recipies
0 Comments

Perfect Baked Sweet Potatoes

11/12/2020

0 Comments

 
Perfect Baked Sweet Potatoes
https://ift.tt/3nkqxHA

Here’s how to make the perfect baked sweet potato in the oven! With crisp skin and a warm and soft center, baked sweet potatoes are a delicious side dish served savory or sweet.

I feel like one of the first things I mastered when I started my healthy eating journey was sweet potatoes. They’re packed with flavor and nutrients and seem to be viewed higher than regular potatoes in the health world. I have absolutely nothing against white potatoes (I love them too!) but I have a special spot for sweet potatoes.

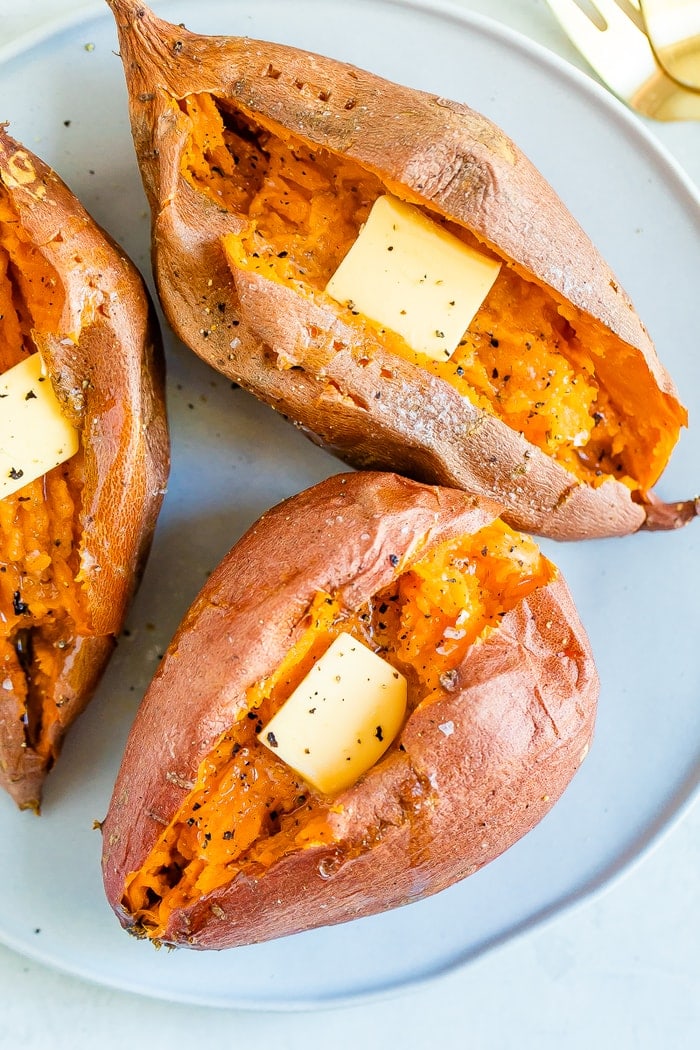
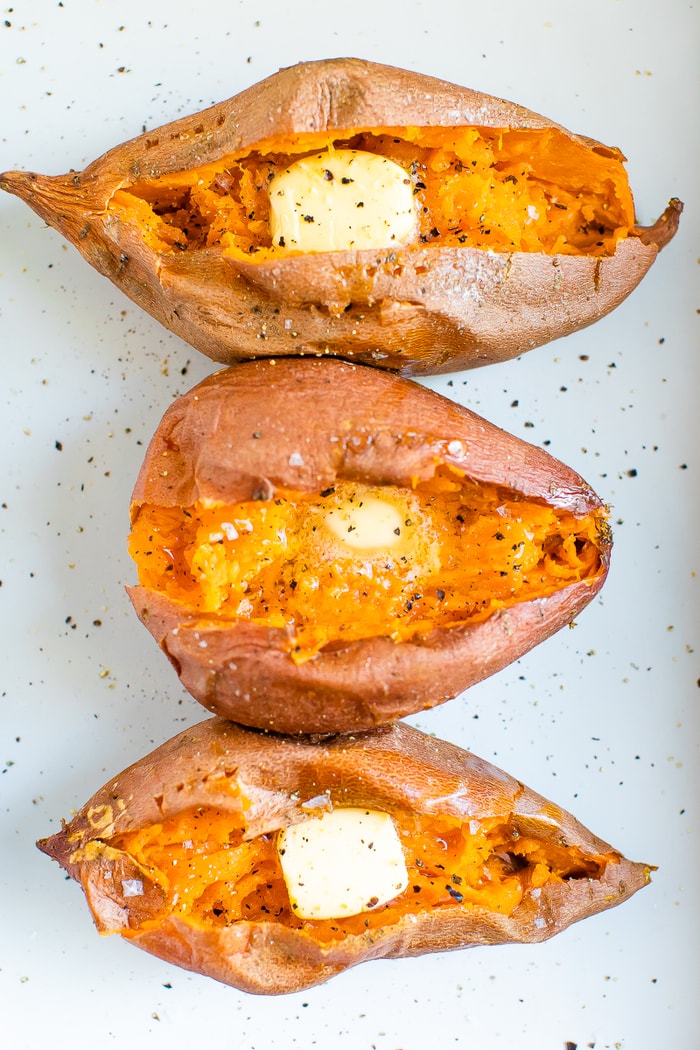
Three baked sweet potatoes on a plate topped with butter, salt and pepper.

As with all health foods, if you prepare something incorrectly, it can taste quite boring. That’s why I wanted to share my basic recipe for baked sweet potatoes that turn out delicious, every single time. They are such a healthy and cozy side dish for the fall and winter months. I personally love them served savory with a little butter, salt and pepper or served sweet with butter, cinnamon and salt. That said, I’ve been know to eat baked sweet potatoes plain or with just a sprinkle of Maldon sea salt flakes… so good!!

Buying & Storing Sweet Potatoes

When shopping for sweet potatoes, look for firm, unwrinkled skins. Sweet potatoes come in all different colors – creamy white, deep orange and purple. I usually buy Beauregard, Jewel or Garnet sweet potatoes just because those varieties are typically available at my local grocery stores. That said, Beauregard sweet potatoes tend to be stringier so when given the option I go for Jewel or Garnet.

Store you sweet potatoes in your pantry or on the counter top at room temperature. They’ll last about a week before they start to go bad (which usually means getting wrinkly and soft).

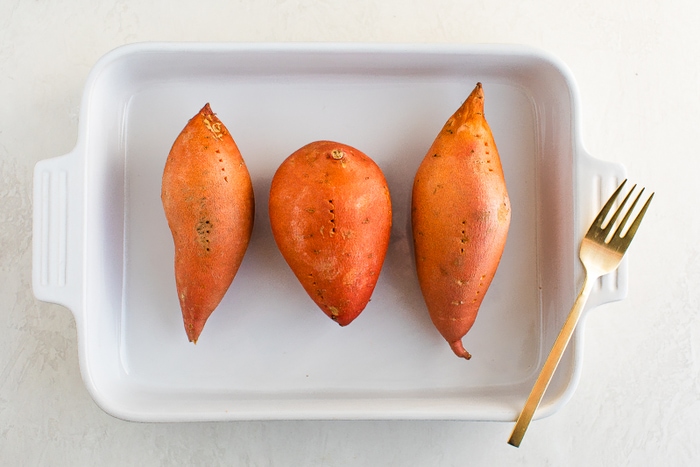
Three sweet potatoes pierced with a fork in a baking dish.

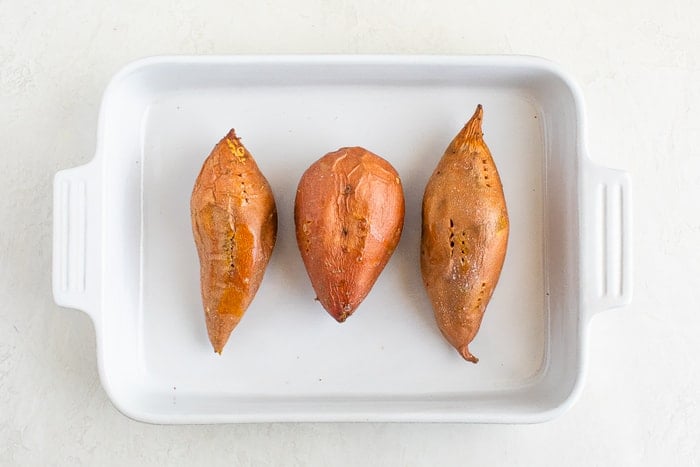
Three baked sweet potatoes in a baking dish.

How to Make Perfect Baked Sweet Potatoes

Baking sweet potatoes is crazy simple. You don’t need to slice or chop them, just wash, season and bake!

Prep your potato – rinse and scrub the sweet potatoes. Use a clean kitchen towel or paper towel to pat dry. Use a fork to polk holes in each potato – I usually do 4-8 holes depending on how big the potato is.

Add oil and salt – Rub a little bit of oil on each potato and sprinkle with salt. You can totally skip the oil and sea salt if you want. The skin won’t be as crisp, but the baked sweet potatoes will still be delicious.

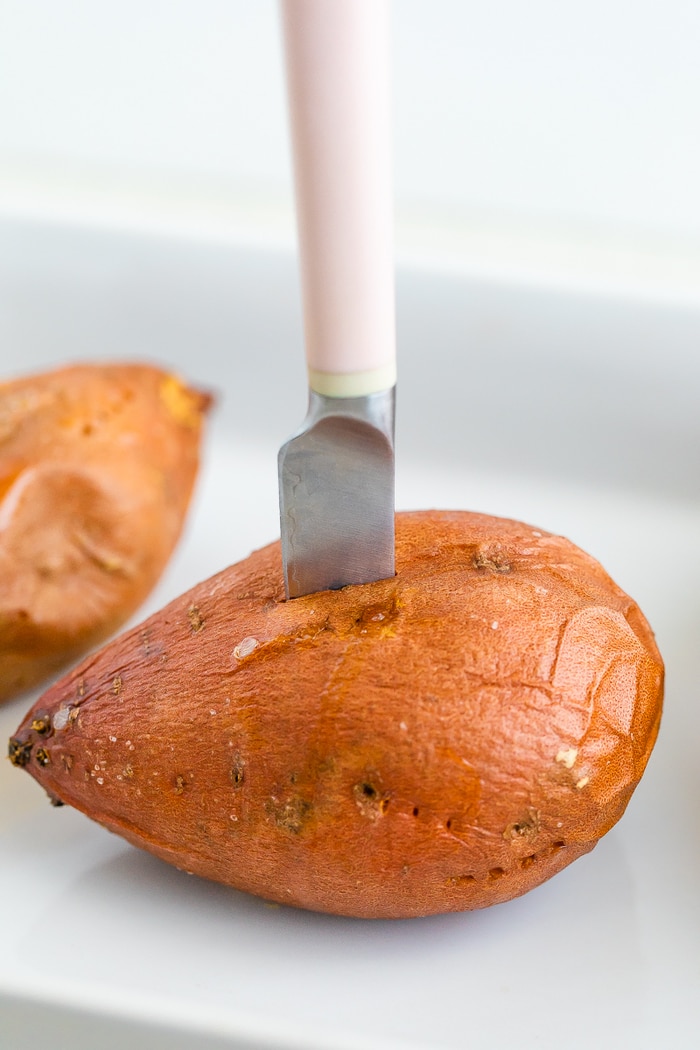
Bake – Place the potatoes in a baking dish or rimmed baking sheet and place in the oven. Bake at 400ºF for 60-80 minutes, depending on how big your potatoes are. Flip the potatoes over about halfway through cooking. They’re ready when the flesh is soft. You can test it with a knife!

Three baked sweet potatoes topped with butter, salt and pepper.

Don’t Wrap Your Potatoes in Aluminum Foil

I grew up with my mom wrapping potatoes in foil before baking, but I’ve since learned that not only is it unnecessary, it also steams the potatoes and makes the skin soggy and soft rather than crisp the way I like it. I know it feels weird to put a naked potato in the oven, but trust me… they taste so much better this way. It’s also better for food safety because there’s potential for bacteria to grow if you leave the potatoes in foil and let them cool down while still wrapped in the aluminum foil.

Some people will recommend placing the potatoes directly on the oven rack for baking, but I do recommend placing them on a baking sheet (or at least having a baking sheet on the rack below). This is especially true when baking sweet potatoes because they tend to release sticky, sugary juice while baking and it can make your oven pretty messy.

And Don’t Microwave Your Sweet Potatoes Either!

I know some people recommend “baking” sweet potatoes in the microwave because it’s so quick and easy, but I’m here to tell you that it is a terrible idea! Microwaved sweet potatoes taste dull because the natural sugars in the sweet potato don’t get a chance to caramelize like they do in the oven, the skin doesn’t crisp up and the texture of the flesh is mushy and blah. Long story short… do NOT nuke your sweet potatoes. Plan ahead and bake them in the oven!

Knife cutting a baked sweet potato open

Baked Sweet Potato Topping Variations

Here’s where it gets fun. After baking your sweet potato you can make so many delicious creations. Here are some ideas:

  • Classic baked potato toppings – Add sour cream, cheese, bacon, green onions… whatever your heart desires! It’s also delicious with just butter. Feel free to use vegan sour cream or vegan butter if needed.
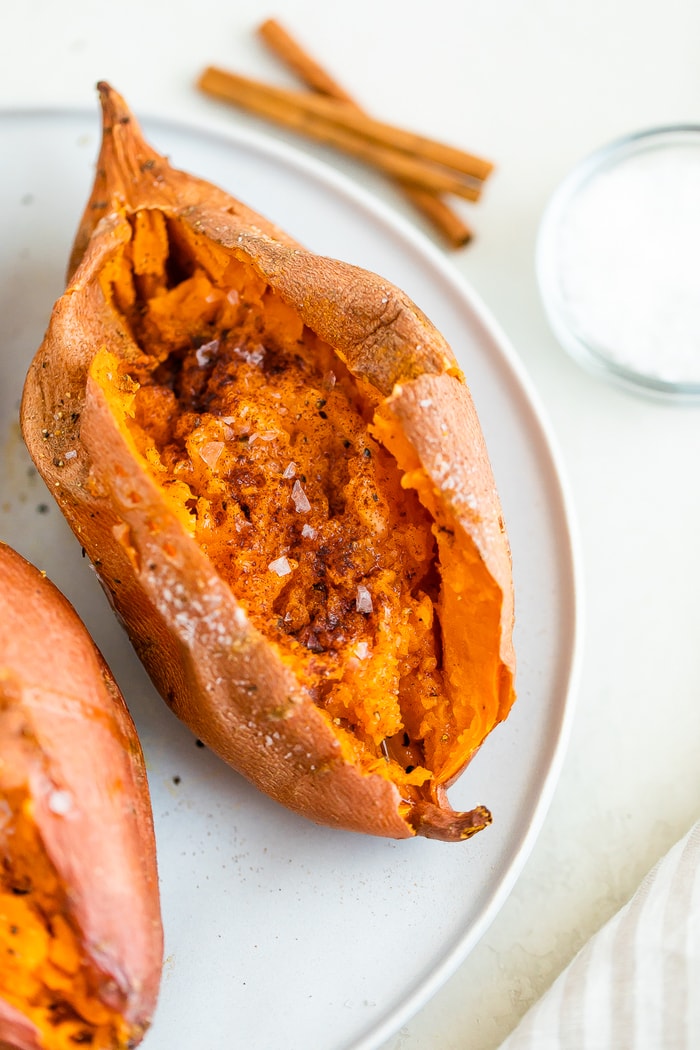
  • Sweet cinnamon – I personally love topping my baked sweet potatoes with butter, cinnamon and salt. You can also add an extra hint of sweetness with a sprinkle of coconut sugar or a drizzle of maple syrup or honey. For a vegan version without butter, try using coconut butter. It’s delish!
  • Healthy Sweet Potato Skins – Make an upgraded game day snack by filling sweet potato skins with cashew sour cream and tempeh bacon.
  • Dessert Baked Sweet Potato – The sweetness of the potato pairs perfectly with sweet toppings like coconut butter, almond butter and chocolate.
  • Mexicali Stuffed Sweet Potato – This veggie stuffed sweet potato is loaded with black beans, bell pepper, mushrooms and topped with a zesty tahini dressing.
  • Upgraded breakfast – Add scrambled eggs and your favorite breakfast foods! I’d add breakfast sausage or bacon, shredded cheese, sliced avocado and hot sauce.
  • Chili stuffed – Add a few scoops of chili to the center of the sweet potato. Top with traditional chili toppings and enjoy! Try this with my healthy turkey chili or my easy vegetarian chili.

Baked sweet potato on a plate and topped with cinnamon and salt.

More Sweet Potato Recipes to Try:

  • Healthy Sweet Potato Casserole
  • Healthy Sweet Potato Pie
  • Roasted Sweet Potato Salad
  • Mexicali Stuffed Sweet Potatoes
  • Sweet Potato Hash
  • 5-Ingredient Sweet Potato Curry
  • Sweet Potato Toast 4-Ways
  • Roasted Sweet Potato Kale Frittata
  • Sweet Potato Baked Oatmeal

If you make these baked sweet potatoes, please be sure to leave a comment and star rating below. Your feedback is super helpful for the EBF team and other readers who are thinking about making the recipe. 

Print
Three baked sweet potatoes on a plate topped with butter, salt and pepper.

Perfect Baked Sweet Potato


  • Author: Brittany Mullins
  • Prep Time: 5 minutes
  • Cook Time: 60 minutes
  • Total Time: 1 hour 5 minutes
  • Yield: 3
  • Diet: Vegetarian
Print Recipe
Pin Recipe

Description

Here’s how to make the perfect baked sweet potato every time! With crisp skin and a warm and soft center, baked sweet potatoes a delicious side dish served savory or sweet.


Ingredients

  • 3 sweet potatoes
  • 1 teaspoon avocado or olive oil, more or less to taste*
  • 1/2 teaspoon sea salt, more or less to taste
  • toppings of choice (see above for ideas)

Instructions

  1. Preheat oven to 400°F.
  2. Clean potatoes: Rinse and scrub sweet potatoes, pat dry. Use a fork to poke holes in each potato. I like to do 4-8 holes, depending on how big the potato is.
  3. Rub a little bit of oil on each potato and sprinkle with sea salt. Place potatoes in a baking dish or rimmed baking sheet and place in the oven.
  4. Bake: Bake for 60-80 minutes depending on how big your potatoes are. Flip the potatoes over about halfway through cooking. You’ll know they’re done when a knife easily slides through the flesh.
  5. Once cooked through, remove from the oven, cut open and top with your favorite toppings.

Notes

  • You can totally skip the oil and sea salt if you want. The sweet potato skin won’t be as crisp, but the baked sweet potatoes will still be delicious.
  • Category: Side
  • Method: Bake
  • Cuisine: American

Nutrition

  • Serving Size: 1 potato
  • Calories: 126
  • Sugar: 5g
  • Sodium: 465mg
  • Fat: 2g
  • Saturated Fat: 0g
  • Unsaturated Fat: 1g
  • Trans Fat: 0g
  • Carbohydrates: 26g
  • Fiber: 4g
  • Protein: 2g
  • Cholesterol: 0mg

Keywords: baked sweet potato

Did you make this recipe?

Tag @eatingbirdfood on Instagram and hashtag it #eatingbirdfood

The post Perfect Baked Sweet Potatoes appeared first on Eating Bird Food.


Recipes

via Eating Bird Food https://ift.tt/1L45wsH

November 12, 2020 at 07:07AM
#recipies
0 Comments

Everything Double Scoop Cookies

11/11/2020

0 Comments

 
Everything “Double Scoop” Cookies
https://ift.tt/2UgnqUv
These Everything “Double Scoop” Cookies have everything but the kitchen sink in them — or so the saying goes. Not really. I mean, these delightful, flavor-packed vegan cookies are kinda like traditional chocolate chip cookies with a sprinkle of magic. Magic in the form of rustic rolled oats, toasty walnuts, buttery pecans, perky pumpkin seeds,... The post Everything “Double Scoop” Cookies appeared first on HealthyHappyLife.com.

This is a summary, images and full post available on HHL website!


Recipes

via HealthyHappyLife.com https://ift.tt/2X1PMCd

November 11, 2020 at 06:14PM
#recipies
0 Comments

Lion House Rolls

11/11/2020

0 Comments

 
Lion House Rolls
https://ift.tt/3eSmvmK

Lion House rolls are a regional specialty made famous by Utah’s Lion House restaurant. Like the more well-known Parker House roll, these rolls are soft and rich with butter, except with its signature spiral that unravels into feathery layers. They make the perfect carb-laden pillow for sopping up all sorts of sauces and soups.

WHAT ARE LION HOUSE ROLLS?

These rolls are made with an enriched dough—meaning in addition to flour, water, and yeast, this dough is enriched with egg, fat, and dairy.

In the case of these rolls, we use dry milk powder which is called for in almost all Lion House roll recipes we found in our research. In addition to the milk powder (aka powdered milk), there’s an egg and LOTS of butter in the dough brushed between the layers and brushed on top warm from the oven.

Adding fat in the form of butter and eggs helps keep the dough tender by preventing some of the gluten formation—the more gluten, the chewier the finished product. This is great for things like pizza or sourdough, but we want fluffy, soft rolls here.

Utah's famous lion house rolls on a baking sheet with a jar of melted butter to the left.

WHAT IF I DON’T HAVE MILK POWDER?

Even though milk powder is a common ingredient in Lion House rolls, you can replace both the milk powder and the water with 1 1/2 cups of whole milk. I made a test batch using that version with great success.

HOW TO KNOW IF YOUR YEAST IS DEAD OR ALIVE?

It’s so disappointing to bake a recipe only to discover your rolls didn’t rise and your yeast is dead.

New bakers can accidentally kill yeast by adding it to water or milk that’s too hot. You want the liquid to be between 80°F – 100°F. If you don’t have a thermometer, just keep it a little above room temperature and cool enough for you to comfortably keep your finger submerged in before you add the yeast and you should be OK.

To make sure your yeast is still alive and kicking, you should see the yeast dissolve into the liquid mixture (a few dry granules here and there are okay). After about five minutes the yeast should become foamy and float on top of the milk mixture. If it is just sunken to the bottom and it doesn’t look frothy, then the yeast is probably dead and it’s best to start over.

Four lion house dinner rolls in a basket with blue linens.

HOW TO MAKE LION HOUSE ROLLS AHEAD OF TIME

It’s best to bake Lion House rolls the same day you want to serve them. They are especially good after being out of the oven for about 20 minutes.

You can still prepare the dough and either give it a slow rise the night before or freeze it to get a head start on some of your prep work.

To give the dough a slow rise: The dough for these rolls can be made the night before and left in the refrigerator for a slow first rise. This will firm the butter in the dough considerably, and it will be super silky and easy to roll out. (If you’re short on time, you can do a room temperature rise, but the chilled dough is much easier to work with.) The next day bake them off and serve.

To freeze the lion house rolls: Make them through the shaping stage, and instead of giving them a second rise, freeze them on a sheet pan. Once completely frozen, pop them into a freezer bag. They will last at least a month in the freezer.

To bake from frozen: Place the rolls on a baking sheet as instructed in the recipe, cover with plastic and set in a warm place (in the oven with just the light on is a great place) until doubled in size. (This could take a few hours, depending on how warm the ambient temperature is.) Once risen, bake according to the recipe instructions.

Lion House Roll on a plate with its swirls facing out. A basket of additional rolls is behind the plate.

HOW TO DOUBLE THIS RECIPE

If you need to make more rolls than this recipe calls for, it’s best to make multiple single batches. You could technically double this recipe, but it would make very hard work for even the largest capacity home stand mixer, so I don’t recommend it.

MORE BREAD RECIPES


Recipes

via Simply Recipes https://ift.tt/2F9fkDA

November 11, 2020 at 09:03AM
#recipies
0 Comments
<<Previous

    The Flat Belly Detox Drink Fix


    The Flat Belly Fix

    This is the only 21-day rapid weight loss system that allows you to easily lose an average of 1 lb a day for 21 days without feeling hungry or deprived. The unique and brand new techniques used in this System are proven SAFE. And they do not cause the rebound weight gain common to all the other rapid weight loss systems that are not backed by the latest science. The Flat Belly Fix System takes advantage of a recent scientific discovery that proves the effective weight loss power of an ancient spice. Combined with other cutting-edge ingredients in the patent-pending Flat Belly Fix Tea™ — that you can make right in your own kitchen in minutes — this System is the quickest, easiest and most enjoyable way to quickly get the body you desire and deserve. Click Here

    Categories

    All
    Gluten Free
    Pancakes
    Protein

    Archives

    November 2020
    October 2020
    September 2020
    August 2020
    July 2020
    June 2020
    May 2020
    April 2020
    March 2020
    February 2020
    January 2020
    December 2019
    November 2019
    October 2019
    September 2019
    August 2019
    July 2019
    June 2019
    May 2019
    April 2019
    March 2019
    February 2019
    January 2019
    December 2018
    November 2018
    October 2018
    September 2018
    August 2018
    July 2018
    June 2018
    May 2018
    April 2018
    March 2018
    February 2018
    January 2018
    December 2017
    November 2017

    RSS Feed

Powered by Create your own unique website with customizable templates.
  • Home
  • Recipes
  • Health News
  • Fitness News
  • Weight Loss
  • Contact
  • Subscribe