
|
Cuban Sandwich (Cubano)
https://ift.tt/37CL6HH The Cuban sandwich, better known as a Cubano, begins with soft, slightly sweet Cuban bread. Heaps of heavily seasoned pork roast and sliced ham alternating between layers of Swiss cheese and sour pickles. The sandwich is cemented together with yellow mustard and a garlic butter schmear. I mean, it’s practically complete meal you can eat while walking? Sign me up for all of that. There’s nothing fancy about this sandwich, yet, it’s a culinary God-send. Then the regional variations start and there’s when people get passionate! Miami Vs Tampa Cuban SandwichesWhen I want to liven up a house party, I ask my friends which one makes the best Cuban Sandwich. One friend is from Miami and the other from Tampa and both believe their city makes the best Cubano. The difference between the Miami and Tampa Cubano variations is minimal. It lies in one ingredient: salami. Chances are if you eat a Cuban Sandwich in Tampa it will have salami, and in Miami it won’t. The Tampa contingent believes salami adds another layer of saltiness to the sandwich, which (according to them) is what makes theirs superior. On the Miami side simple is best. The second I pose the question, my friends start comparing everything that makes their sandwich the best! It’s great fun for me, and even better if I can get one of them to make a sandwich to prove it! I totally understand why these Floridians are so fiercely loyal to their versions of the Cubano. It’s a sandwich anyone would be proud of. WHERE DID THE CUBAN SANDWICH ORIGINATE?The funny thing is the sandwich didn’t originate in Miami or Tampa. It’s actually believed to be a Cuban creation that was brought to Florida by travelers and immigrant workers. The hard-working laborers needed a midday meal to fuel them through their workday, but also one that wasn’t overly fussy and could be toted around with them while they worked. The folks in Key West picked up on the idea and Cubano made its U.S. debut. The original Key West version called a “mixto” or mix has a whole host of other things like shredded lettuce and tomatoes. Way too fussy for me! Because the Cubano was created for on-the-go eating, I don’t think it should frilly. Sorry, Key West. WHAT IS CUBAN BREAD?The foundation of the Cuban Sandwich is the slightly, sweet, soft but still crusty Cuban bread. It’s similar in shape to Italian bread, except that it has a crisper crust like a French baguette. Cuban bread tastes sweeter than you’d think it would. It’s that tiny bit of sweetness that gives the Cuban sandwich an added dimension of flavor. If you don’t have a Cuban or Hispanic bakery where you can buy Cuban bread, you can make this Pan Sobao bread from my personal blog Sense and Edibility, or just use Italian bread. Ultimately, you want to choose bread that can be easily squished down. WHAT’S THE BEST HAM FOR CUBANO SANDWICHES?Diving deeper into the Cubano, the ham I prefer to use is Black Forest ham. It’s cured with more seasonings and spices than a boiled, sliced ham or even a Virginia ham. If you can’t find Black Forest ham, then my second choice is smoked ham. We’re looking to build a flavorful Cubano, so let’s add flavor at every step! WHAT’S THE BEST ROAST PORK FOR CUBAN SANDWICHES?Only two types of roast pork should be used in a traditional Cubano: Mojo marinated pork (Cuban pork) or Pernil (roasted pork leg or shoulder). These Latin American roasts are loaded with the intoxicating flavors of garlic and herbs. The boldly seasoned, slow roasted pork peeks through the brininess of the pickles and the Swiss cheese in a way you’ll miss if you skip this step. I guess what I’m trying to say is: The roast makes the Cubano. If I’ve made a roast pork for Sunday dinner, this is what I’m making with the leftovers. You can be sure of that. WHAT IF YOU DON’T EAT PORK?Can you make an authentic Cubano without roasted pork? In short, no. If you have a dietary restriction or aversion to pork, you can, however, make a version of a Cubano using shredded chicken and sliced turkey, using the same mojo marinade to flavor the poultry. NO PANINI PRESS? NO PROBLEM!Cuban sandwiches are heated on a panini press, which most of us don’t have lying around (I know I don’t). My frugal ingenuity led me to create my very own press with two heavy cast iron skillets. I just nestle one in the other and allow both to heat up on my stovetop. When it’s time to cook my Cubanos, I press the sandwich between the two hot pans and bam! Panini-press, what? You can mimic a panini-griddle by pressing your sandwich on a regular griddle underneath a cast iron skillet (or similarly heavy pan), a foil-wrapped brick, or a burger press, as well. If you do have a panini-press use that of course, you fortunate soul, you. While most Cuban sandwich-makers wrap their sandwiches in foil prior to toasting, I find that a bit unnecessary if I’m eating it right away. I mean, sure, if you want super-gooey cheese it will help, but I’m all about easy access to my sandwich and fiddling around with foil just doesn’t do it for me. MAKE AHEAD TIPS FOR CUBANOSParts of the Cubanos can be assembled ahead of time.
WHAT TO SERVE WITH CUBANOS?Cubanos are most often served with a side of plain ol’ chips and sometimes a crisp dill pickle. Again, nothing too fancy. I’m sure when those hard-working guys and gals who stopped to pick up a Cubano on their way to work ate their sandwiches at lunch, they found they weren’t hot yet they still enjoyed them. That proves to me that Cubanos may be served hot or at room temperature. That makes them great for large crowds or to serve as party-fare. TRY THESE OTHER GREAT SANDWICH RECIPES!Recipes via Simply Recipes https://ift.tt/2F9fkDA January 29, 2020 at 09:06AM #recipies
0 Comments
Cuban-Style Roast Pork
https://ift.tt/38L4zGj If you’ve never had the pleasure of taking a bite of mojo-marinated Cuban roast pork, I’m about to become godmother to your future children. When I say mojo, I don’t mean the vibe lost when you get older, I mean mojo (pronounced mo-HO) the citrusy, garlicky marinade/sauce beloved by many Hispanics in the Caribbean and, soon enough, it will be loved by you too! People of Caribbean descent, be they Cuban, Puerto Rican, or Jamaican, are passionate about bold flavors and ample seasoning. This roast pork will give you an insider’s view into our love of flavorful food. The mojo marinade, with its heavy hand of garlic and tart blend of citrus juices, creates a succulent piece of meat and doubles as a sauce when spooned over the finished roast. WHAT IS THE BEST CUT FOR ROAST PORK?Cuban roast pork can be made with either pork shoulder or Boston butt. The difference between the two cuts of meat are minimal. Boston butts come from the top of the pig’s forelegs, just above the pork shoulder. I prefer a bone-in Boston butt, because it cooks faster and is more tender than the shoulder. The shoulder is tougher, so it will require an additional 30 minutes of cooking time to make it tender. Despite shoulder meat being slightly tougher, if I find pork shoulder on sale, I’m going with that over the Boston butt, because, I mean, your girl likes to save money. Bone, or no bone? That is the question! When it comes to whether or not you should purchase and roast meat on the bone—always go bone-in. The truth is, the more a cut of meat is processed, the more it’s going to cost. My grocery store was charging $2.69 a pound for a boneless, skinless Boston butt and only $1.49 per pound for bone-in with a minimal fat cap. Yeah, I have twins to put through college, so that dollar-twenty is valuable to my bank account. Not only will choosing a bone-in roast save you a few coins, the bone also helps retain some of the juice that would otherwise be lost during the cooking process. The more muscle that’s exposed to heat (as happens when solid roast is cut open to remove the bone), the faster it will dry out during cooking. Cost and juiciness are enough to make the bone worth dealing with, right? FAT = FLAVOR
Boston butt has fat marbled throughout the meat and usually has a fat cap on the surface. Make sure you select a butt that has that fat cap on it, and don’t trim it before roasting. The fat melts down into the butt, adding flavor and basting the meat as it cooks, which also lowers the chances of ending up with a bone-dry roast. WHAT IS MOJO MARINADE?I polled my friends and family, and there’s no English translation for mojo. Sorry, I tried. No matter! The explanation is simple: Mojo is just a garlic and bitter orange-based marinade with lots of oregano. Mojo is used to flavor a wide variety of meats in Caribbean cuisine prior to cooking. When simmered long enough to cut through the bite of that raw garlic, mojo can also be used as a sauce on finished dishes. We sometimes dip fried plantains in raw mojo, but you have to be really comfortable in your personal relationships to pull that move—the garlic is so strong in raw mojo that it’s straight up vampire-repellant. HOW TO MAKE MOJO WITHOUT BITTER ORANGESMojo is traditionally made using the juice from bitter oranges. If you have access to them, it’s worth seeking out the difficult-to-find bitter orange to make “authentic” mojo. But the bitter orange is not easily found in the contiguous United States, and I don’t want you to miss out on the flavor bounty of this dish just because you can’t find them. So, for this recipe, I omitted the bitter orange juice, increased the amount of lime juice and added grapefruit juice to end up with not quite authentic, but still great results. Hey, sometimes you have to work with what you’ve got! HOW LONG TO MARINATE CUBAN PORK ROAST?Mojo is a highly acidic marinade, which means the longer the pork is allowed to marinate, the more the enzymes in the marinade will break down the meat, eventually turning it into a mushy mess. I recommend marinating the roast for at least four hours, and for the sweet spot, 12 hours (or overnight). Don’t marinate the pork for more than 24 hours, or you’ll risk mushy meat. HOW TO MAKE MOJO PORK ROAST IN THE SLOW COOKERIf you’re pressed for time and want to leave this roast to do its thing while you’re at work or busy with life, throw it in the slow cooker for eight hours on low, or four hours on high. You won’t have the caramelized crust at the end of roasting, but it won’t leave you wanting for anything in terms of flavor. WHAT TO SERVE WITH CUBAN PORK ROAST?Make like an islander, and serve this Cuban pork roast with white rice and stewed beans, Spanish rice, or fried plantains. A cool, crunchy slaw is another great accompaniment to slices of roasted pork. Be sure to ladle over a generous amount of the mojo sauce, as well. WHAT TO DO WITH LEFTOVER PORK ROAST?Leftovers are one of the blessings this recipe provides. Cuban pork roast may be kept for about three days and reheated by sautéing it until you’ve warmed it through. But, my favorite way to repurpose Cuban pork roast is in sandwiches or quesadillas. If you have leftovers, you must chop some up to use in Cubano sandwiches. Cuban (a.k.a Cubano) sandwiches combine Cuban roast pork, ham, Swiss cheese, and pickles on soft bread to form a whole higher plane of amazingness. There’s no if, ands, or buts about it! In fact, I’ve made this Cuban pork roast for the sole purpose of making Cubanos! Another way to repurpose leftovers is to layer the meat with cheese between flour tortillas to create a Cuban quesadilla. Be sure to have mojo sauce on hand for dipping! MAKE AHEAD TIPS FOR CUBAN PORK ROASTIf you need to feed a crowd, marinate and roast your pork; then slice or shred the meat from the bone. Store the cooked, shredded pork in freezer bags for up to two months. When you’re ready to serve it, thaw it under refrigeration and reheat as needed. You can also make the marinade up to one day before you want to marinade the pork. NEED MORE PORK ROAST RECIPES?Recipes via Simply Recipes https://ift.tt/2F9fkDA January 29, 2020 at 09:06AM #recipies
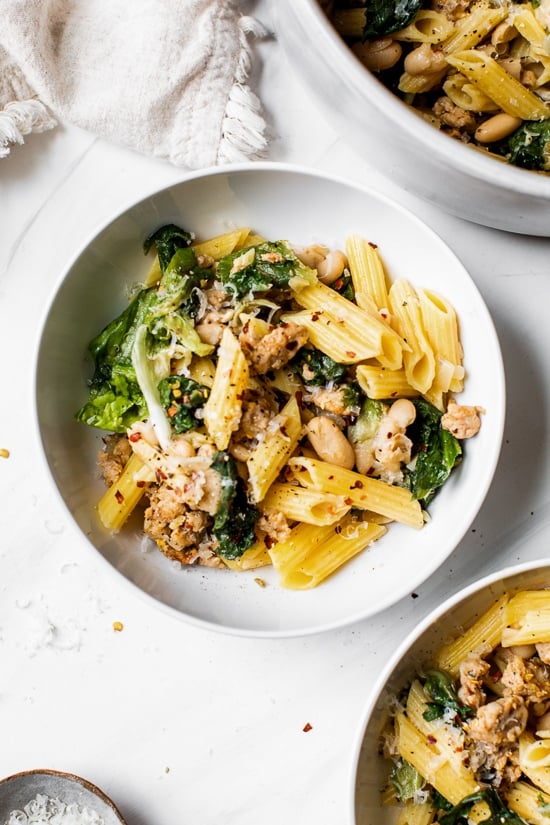
Pasta with Italian Chicken Sausage, Escarole and Beans
https://ift.tt/3aUJkU6 Pasta with Italian Chicken Sausage, Escarole and Beans is ridiculously good made with lots of garlic, lean Italian chicken sausage, and white cannellini beans.
|


 Almond & Cinnamon Coffee Cake |
 Coconut Loaf |
 Chocolate Almond Breeze Smoothie |
 Jessica's Pistachio Oat Squares |
 Peanut Butter Chocolate Chip Cookie Bars |
 No Bake Cookies |
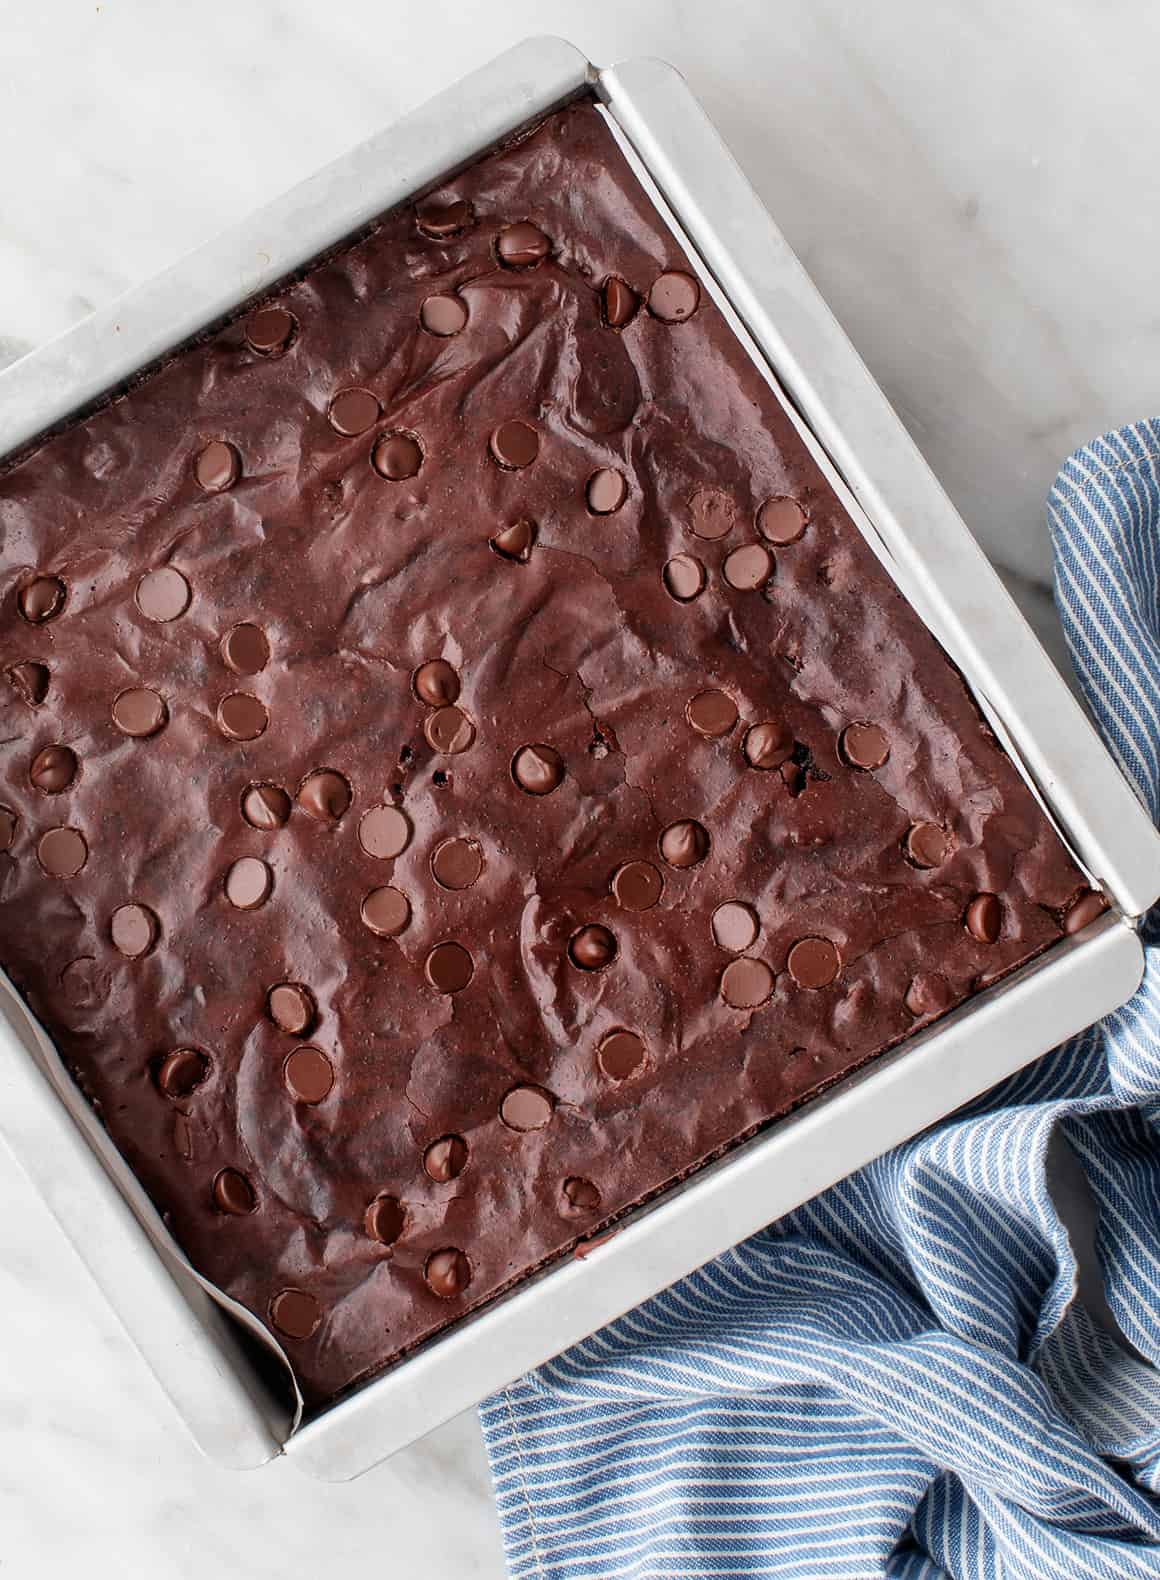
The post Best Homemade Brownies appeared first on Love and Lemons.
Recipes
via Love and Lemons https://ift.tt/2h2Uz32
January 28, 2020 at 08:49AM
#recipies
Easy Veggie Chili
https://ift.tt/38O45Pt
Chili and cornbread is one of my favorite meals. Chili provides a delicious way for me to consume a few extra beans in my diet, and with this Easy Veggie Chili – some vegetables too! This recipe packs 17g of plant-based protein per serving and 15g fiber. Six servings in one big pot. Or if... The post Easy Veggie Chili appeared first on HealthyHappyLife.com.
This is a summary, images and full post available on HHL website!


Recipes
via HealthyHappyLife.com https://ift.tt/2X1PMCd
January 27, 2020 at 05:51PM
#recipies
https://ift.tt/38O45Pt
Chili and cornbread is one of my favorite meals. Chili provides a delicious way for me to consume a few extra beans in my diet, and with this Easy Veggie Chili – some vegetables too! This recipe packs 17g of plant-based protein per serving and 15g fiber. Six servings in one big pot. Or if... The post Easy Veggie Chili appeared first on HealthyHappyLife.com.
This is a summary, images and full post available on HHL website!
Recipes
via HealthyHappyLife.com https://ift.tt/2X1PMCd
January 27, 2020 at 05:51PM
#recipies
Oven Baked Sweet Potato Fries
https://ift.tt/2RyIlBz
Recipes
via Simply Recipes https://ift.tt/2F9fkDA
January 27, 2020 at 04:13PM
#recipies
https://ift.tt/2RyIlBz
These oven baked sweet potato fries are so addictive! Wedges of sweet potatoes, tossed with oil, sprinkled with spices, and baked at high heat until browned and crispy at the edges.
Photography Credit: Elise Bauer
These. Are. So. Addictive.
And once you know how to make them, you will never have an excuse to not cook sweet potatoes again.
Those kids who won’t eat their veggies? Ha!
They’ll eat so many of these fries, their skin will turn yellow from beta carotene.
Munch. Yum. Munch. Yum. I’m still eating them in my mind. I brought these over for my father to try. I think he only got to eat one or two because he was also eating the rest of his dinner, the dinner I abandoned in favor of these.
How to Make Sweet Potato Fries
They’re really easy to make, too. Just peel a few sweet potatoes, cut them into wedges or rounds, toss with some olive oil, sprinkle with spices, and bake at a high temperature until lightly browned. So good!
How to Season Sweet Potato Fries
Sweet potato fries taste great with spices and seasonings such as chipotle powder, smoked paprika, Chinese five-spice, pumpkin pie spice, garam masala, or Cajun seasoning. But feel free to use what you like.
How to Tell When They’re Done
Sweet potatoes can take high heat, and you might see them and worry they’re burned. The browner they are, the crispier they will be, but there is a fine line between browned and burnt beyond edibility.
Even if they get really dark, they should still be good because of the natural sugars of the sweet potatoes caramelizing. But watch carefully to ensure that they don’t go from browned to burned.
Tips for the Best Sweet Potato Fries Ever
- Try to cut them evenly so they all cook at about the same rate.
- Preheat the oven with the baking sheet inside.
- For best browning results bake only one sheet at a time.
- For extra caramelization, sprinkle fries with a little sugar before putting in the oven.
- Swap out half of the oil with melted butter for some extra flavor
LOVE SWEET POTATOES? CHECK OUT THESE RECIPES
Oven Baked Sweet Potato Fries Recipe
The baking times are approximate; it depends on how thick you cut the wedges or rounds of sweet potatoes. Try to cut them evenly so they all cook at about the same rate. For best browning results, bake only one sheet at a time.
For extra caramelization, sprinkle fries with a little sugar before putting in the oven.
For extra flavor, try swapping out half of the oil with melted butter.
Ingredients
- 2 pounds orange fleshed sweet potatoes (yams), about 3 large ones
- 3 tablespoons extra virgin olive oil
- 1 1/2 teaspoons kosher salt
- 1 to 2 tablespoons spice or spice combination of your choice: chipotle powder, smoked paprika, Chinese five-spice, pumpkin pie spice, garam masala, Cajun seasoning, etc.
Method
1 Preheat oven and roasting pan: Preheat oven to 450°F. (For more crispiness, preheat your oven to 500°F.) Place a roasting pan or heavy duty baking sheet (one that can take high heat) in the oven to preheat.
2 Peel and cut sweet potatoes into wedges: Peel the sweet potatoes and cut off the ends. Cut the potatoes in half lengthwise and then, if they are very long, in half crosswise. Cut each piece into 1/4 to 1/2-inch thick wedges. Alternately, you can slice the peeled sweet potato into disks either with a mandoline or a sharp knife.

3 Toss with oil, salt, spices: Put the sweet potatoes into a large bowl and add the oil. Mix well to combine. Sprinkle with salt and spices of your choice. Use your hands to mix well, so all pieces are coated with oil and spices.
4 Spread out onto preheated pan: Remove the preheated baking sheet from the oven. Carefully spread the sweet potatoes out in a single layer on the baking sheet. (Watch out, the pan is hot!)

5 Bake: Bake for 15 to 25 minutes. After the first 10 minutes, remove the baking sheet from the oven and use tongs to turn over all of the sweet potato pieces.
Return to the oven and bake for another 5 to 15 minutes, or until they are well browned.
Cooking time depends on the temperature of the oven (500F will need less cooking time than 450F) and the size and thinness of the sweet potato wedges.
The browner they are, the crispier they will be, but there is a fine line between browned and burnt beyond edibility. Even if they get really dark, they should still be good because of the natural sugars of the sweet potatoes caramelizing. So watch carefully.
Let cool for 5 minutes before serving.

Hello! All photos and content are copyright protected. Please do not use our photos without prior written permission. Thank you!
Products We Love
This post may contain links to Amazon or other partners; your purchases via these links can benefit Simply Recipes. Read more about our affiliate linking policy.
Recipes
via Simply Recipes https://ift.tt/2F9fkDA
January 27, 2020 at 04:13PM
#recipies
Tex-Mex Shepherd’s Pie
https://ift.tt/37wRhgq
Recipes
via Simply Recipes https://ift.tt/2F9fkDA
January 27, 2020 at 09:07AM
#recipies
https://ift.tt/37wRhgq
1 Preheat the oven: to 425ºF. Have on hand a 9- x 13-inch or 2-quart, shallow baking dish.
2 Cook the potatoes: Wash and cut the potatoes into 1-inch chunks (peeling optional). Place them in a large pot. Fill the pot with cold water until there is about an inch of water above the potatoes.
Add 2 teaspoons salt and taste; the water should taste as briny as the sea. If it doesn’t, add a few more pinches of salt.
Bring to a boil over high heat. Reduce the heat to a simmer and cook the potatoes, uncovered, for 15 to 20 minutes, or until tender when pierced with the tip of a paring knife.
Drain in a colander and return to the potatoes to the pot. Set the pot over low heat and stir the potato chunks for 1 to 2 minutes to dry them.

3 Mash and season the potatoes: Add the butter to the pot of hot, drained potatoes (still over low heat) and mash well with a potato masher until the butter melts. There may be a few ‘rustic’ lumps. Push the potatoes to one side of the pot to make a space for the milk. Add the milk and heat it until hot (this only takes a few seconds.)
Use a sturdy whisk to stir in the milk, whisking until the potatoes are fluffy and adding more milk, 1 tablespoon at a time, if the potatoes seem dry. Stir in 1/2 cup of the cheese, 1/2 teaspoon salt and 1/8 teaspoon pepper. Taste, and add more salt, if you like.


4 Meanwhile, make the filling: In a large skillet over medium heat, heat the oil. Add the onions and garlic and cook for 5 minutes, or until softened. If the onions are cooking to fast reduce the heat to medium-low.
Add the oregano and cumin, and cook for 30 seconds. Add the beans, corn, chicken, and salsa to the skillet. Stir in 1/2 teaspoon salt. Taste and add more salt, if you like.


5 Assemble the casserole: Transfer the filling to the baking dish. Spread the mashed potatoes over the top and sprinkle with the remaining 1 cup cheese.


6 Bake the casserole: Bake for 25 to 30 minutes, or until the filling bubbles and the cheese is golden. Leftovers will keep in the fridge for up to 3 days.

Recipes
via Simply Recipes https://ift.tt/2F9fkDA
January 27, 2020 at 09:07AM
#recipies

The Flat Belly Fix
This is the only 21-day rapid weight loss system that allows you to easily lose an average of 1 lb a day for 21 days without feeling hungry or deprived. The unique and brand new techniques used in this System are proven SAFE. And they do not cause the rebound weight gain common to all the other rapid weight loss systems that are not backed by the latest science. The Flat Belly Fix System takes advantage of a recent scientific discovery that proves the effective weight loss power of an ancient spice. Combined with other cutting-edge ingredients in the patent-pending Flat Belly Fix Tea™ — that you can make right in your own kitchen in minutes — this System is the quickest, easiest and most enjoyable way to quickly get the body you desire and deserve. Click Here
Categories
All
Gluten Free
Pancakes
Protein
Archives
November 2020
October 2020
September 2020
August 2020
July 2020
June 2020
May 2020
April 2020
March 2020
February 2020
January 2020
December 2019
November 2019
October 2019
September 2019
August 2019
July 2019
June 2019
May 2019
April 2019
March 2019
February 2019
January 2019
December 2018
November 2018
October 2018
September 2018
August 2018
July 2018
June 2018
May 2018
April 2018
March 2018
February 2018
January 2018
December 2017
November 2017
 RSS Feed
