
|
Freezer Breakfast Burritos
https://ift.tt/2CApBtB These freezer breakfast burritos, stuffed with scrambled eggs, scallions, bell pepper, bacon and cheese, are a great way to start the day! Make them ahead and freeze them for meal prep so you can have them ready any day of the week.
|


 Almost-Spring Recipes |
 Vegetarian Memorial Day Recipes |
 Cool Summer Recipes for Hot Days |
 Top 10 Recipes of 2015 |
 9 Recipes To Make Before Summer Ends |
 Favorite Fall Squash Recipes |
The post 16 Recipes to Welcome Spring appeared first on Love and Lemons.
Recipes
via Love and Lemons https://ift.tt/2h2Uz32
March 26, 2019 at 09:01AM
How to Clean and Season Cast Iron Cookware
https://ift.tt/2UVowni
Recipes
via Simply Recipes https://ift.tt/2F9fkDA
March 26, 2019 at 09:00AM
https://ift.tt/2UVowni
People will tell you all sorts of things about cast iron. Don’t use soap! Don’t cook tomatoes in it! Don’t get it wet or feed it after midnight!
Relax. Cast iron care is simple. Here are the two biggest things to remember.
- Dry it before you put it away.
- Don’t put it in the dishwasher.
Easy, right? If want to learn about seasoning cast iron, or why cooking tomatoes in a cast iron skillet would even be problematic, keep reading.

WHAT IS THIS MYSTERIOUS “SEASONING”?
Seasoning is what makes cast iron black. The blacker a skillet, the better it is seasoned.
“Seasoning” refers to a finish, and also to the process of applying that finish. Generally speaking, Oil + Metal + Heat = Seasoning.
When thinly spread over the cast iron and heated for a long period of time, the fatty acids in oil change chemically, oxidizing and creating a slick layer over the surface of the pan. To the naked eye cast iron looks smooth, but it’s got teeny-tiny nooks and crannies where the oil gets trapped and then bonds with the iron.
So, when you season cast iron, you’re making a do-it-yourself nonstick coating. Cool, huh?
SEASONING GETS BETTER OVER TIME
The more you cook with cast iron, the better that coating gets. Cast iron is best suited for people who want an evolving relationship with their cookware. The process is the point.
For best results, get in the habit of seasoning your skillet after most uses. Routine seasoning isn’t hard, and it doesn’t take a lot of time.
Most new skillets these days come pre-seasoned and ready to use. We’ll get more into seasoning in a bit.

HOW TO CLEAN CAST IRON
About that soap: I occasionally wash my cast iron cookware with dish soap on purpose. It’s fine. It will not ruin your skillet. When your skillet is especially greasy, a little dish soap cuts right through it.
But often it’s not necessary to wash cast iron with soap. If you’ve been griddling pancakes, a simple wipe with a paper towel might be all you need. For gunky or saucy foods, keep reading.
SCRUB AWAY YOUR WORRIES
For gunky, saucy residue, a wet plastic scrubby or brush gets the job done nine times out of ten. Avoid metal bristles or pads, which can remove the skillet’s seasoning.
Once your skillet has cooled off some, fill it with water, scrub-a-dub-dub, rinse, and presto! It’s clean.
I save the plastic netting from bags of onions or fruit for single-use scrubbies—they work great, especially for crud like melted cheese or cooked egg residue.
Old-time cleaning methods include scouring the skillet with salt or cornmeal. Both of these abrasives are likewise safe and cheap.

HOW SHOULD I DRY MY SKILLET?
Don’t store your cast iron while it’s still wet because Iron + Water = Rust.
How do you dry a skillet? Sounds obvious, but with a towel (cloth or paper). You can let it air-dry, but that could lead to small spots of rust developing if the air circulation is poor.
Some people like to dry their skillets on the stove over low heat for half a minute or so. This works, but if you wander away and forget the skillet is on the stove, you can return to a smoking, red-hot skillet. Not like I’ve ever, ever done anything like that. (Note to self and others: set a timer.)
WHY CAN’T I PUT CAST IRON IN THE DISHWASHER?
I’d always heard dishwashers can strip away the seasoning and make cast iron rust. But I’d never tried it myself, so—with the thrill of rebellion—I did.
It’s not a myth: my skillet came out rusty, and I needed to re-season it.

HOW TO SEASON CAST IRON
I’d be lying if I said I seasoned my cast iron every time I used it. Routine seasoning after most uses is probably good enough.
Here’s how to do it: once your skillet is clean, set it on the stove over high heat until it’s dry. Add a small amount of oil—less than a teaspoon—and smear it around well with a paper towel or clean, lint-free rag. Take it off the burner. If it looks especially greasy still, wipe it out again. That’s it!
The seasoning on your skillet isn’t permanent. It can ebb and flow, depending on what you cook. Frying and sautéing, which involve heating oil, build the seasoning up. But after simmering liquids in your skillet, the seasoning will be duller and more vulnerable to rust. Dry-searing in your skillet—as well as unintentionally burning food—can also wear down the seasoning.
When your skillet isn’t looking like its normal self, give just it some extra love and a good massage with oil as described above. Think of it as its stint at the Skillet Spa.

WHAT OIL TO USE FOR SEASONING
Lard was once the fat of choice, but do you have lard around? Probably not. Also, animal fats (like lard or bacon grease) can go rancid. As can olive oil. This said, if you use your skillet every single day, then it’s fine to use these fats for seasoning.
But in general, you want to use an oil with a high smoke point when you season cast iron, particularly if the cast iron was in bad shape. So-called neutral oils like soybean oil, vegetable oil, and canola oil work fine.
For routine seasoning, I’d say don’t get too hung up on the specific kind of oil; it’s better to season with an oil that’s not the top choice than it is to neglect to care for your skillet.

HOW TO RESCUE A RUINED SKILLET
So you found an old skillet at a flea market. Or you put one in the dishwasher. Or you accidentally carbonized a block of tofu. In any case, now the skillet looks like something brought up from Titanic wreckage. Can you save it?
Probably!
- Step 1: Preheat the oven to 350°F.
- Step 2: Scour the skillet’s rusty spots with dry steel wool or a metal scrubby. You’ll wind up spreading the loosened rust particles around, and it might not look like you’re making headway. If you wipe away the rusty dust with a paper towel and you’ll see that you are.
- Step 3: Wash the skillet in warm water, scrubbing it with a stiff brush or scouring pad. You can use a little dish soap, if you like, but it’s not necessary.
- Step 4: Dry the skillet. If you see rough, rusty spots repeat steps 2 and 3.
- Step 5: Give your skillet a massage all over with neutral cooking oil such as canola or vegetable oil. Use a lint-free rag or paper towel. Don’t be skimpy, but don’t slather it, either—that can give your seasoning a sticky residue.
- Step 6: Put the skillet face-down on a rack in the middle of the oven (face-up might cause oil to pool, leaving a sticky residue). Lay a sheet of foil underneath to catch any drips. Bake the skillet for 1 hour. Turn off the oven, and let it cool with the skillet in it (put a Post-It on there so you don’t forget).
- Step 7: Once the cast iron has cooled, examine it. Repeat steps 5 to 6, if needed. If the situation still looks grim, it’s time for drastic measures.
COOKING ACIDIC FOODS IN CAST IRON
Acid—things like vinegar and tomato sauce—will react with the iron in the metal as they heat. This can cause a metallic taste.
The rule of thumb here is moderation: shorter cook times and mild acids. Reducing a bottle of balsamic vinegar in cast iron is a bad idea; tomato sauce simmered for half an hour or less should be fine. Also, sauces are less likely to pick up metallic tastes from well-seasoned pans.
Storing acidic foods in cast iron can also lead to a metallic taste. I noticed this after eating a berry cobbler I’d baked the day before and left in the skillet. You can avoid this by transferring the food to another container once it’s cool.

COMMONLY ASKED CAST IRON QUESTIONS!
- How do I store cast iron? If you have a pot rack, hanging it is the best way, because it allows air circulation for better drying in case there’s any water still on it. It’s also fine to stack skillets on top of each other in a cupboard. Some people like to put paper towels between skillets, but it’s not necessary; the seasoning won’t chip off.
- My cast iron skillet is sticky. You probably used too much oil when you seasoned it last. If it’s really bothering you, you can strip away the seasoning and start from scratch, using a lighter hand with the oil this time.
- My pan gets a little rusty every time I use it. You are probably not using enough oil when you season it. Or you’re just not seasoning it, period. Follow the directions we gave above and you’ll soon be in good shape.
- I have small charred spots of residue showing up in the food I cooked in my skillet. You have a film of burned food still in your skillet. You must have done a number on it last time you used it! Burned food is black, like your cast iron, so patches of it can be hard to spot. Boil water in your skillet for 5 minutes or so to loosen that residue, dump the water down the drain, and then scour the skillet with a brush or plastic scrubby once it’s cool enough to handle.
- When I cook eggs, they stick to my skillet. The proteins in egg whites tend to form bond with metal—particularly with iron—and this is what makes them stick. I’ve noticed older eggs with runnier whites tend to stick more—maybe because they cover more surface area, who knows. In any case, keep at it. Make sure you’re adding enough fat to the pan when you cook your eggs. Practice makes perfect. And the better the seasoning, the less eggs will stick.
- Can cooking acidic foods in cast iron add iron to my diet? Yes, if you can believe it. I’m anemic, which means the iron levels in my blood tend to be low. Cooking acidic foods in cast iron is a great way to get your iron intake up. Just how much depends on what you are making and what you serve it with (calcium-rich foods, for instance, inhibit your body’s absorption of iron).
- Can it add too much iron to my diet? Cooking acidic foods in cast iron won’t make you O.D. on iron. Any food that rich in iron would taste like old nails, so you’ll know at once if it’s a problem.
TRY THESE RECIPES FOR SOME QUALITY TIME WITH YOUR SKILLET!
Recipes
via Simply Recipes https://ift.tt/2F9fkDA
March 26, 2019 at 09:00AM
Charoset with Apples, Dates, and Walnuts
https://ift.tt/2TXRAhy
Recipes
via Simply Recipes https://ift.tt/2F9fkDA
March 25, 2019 at 09:02AM
https://ift.tt/2TXRAhy
Passover charoset recipes vary widely, but they all tend to include apples, nuts, and a splash of something sweet to tie it all together. Some are more of a finely chopped fruit and nut salad, while others are more of a spreadable paste.
Whichever version you choose will yield a sweet, nutty spread that’s delicious on top of matzo! You can’t go wrong!
THE MEANING OF CHAROSET FOR PASSOVER SEDER
Charoset is traditionally served as part of the Passover Seder. Seder means “order” in Hebrew, referring to the specific order in which we perform the rituals and readings of the Passover meal.
When it comes time to enjoy the charoset, it’s eaten spread on matzo by itself, or sandwiched between two pieces of matzo along with a layer of horseradish. That’s the classic Hillel Sandwich (it originally contained lamb, too, but in modern times we just include horseradish and charoset).
Charoset on matzo is meant to symbolize the mortar between the stones of the pyramids in Egypt.

MY FAVORITE CHAROSET RECIPE
My recipe is a mashup of Ashkenazi and Sephardic styles. I love how the paste-like, Sephardic-style charoset is bound with sticky-sweet dates to truly resemble the mortar it is meant to symbolize. Ashkenazi-style charoset, on the other hand, tends to be a looser mixture of chopped apples and nuts, sweetened with a glug or two of concord grape juice or Manischewitz wine.
With this recipe, you get the best of both worlds. The mixture sticks together and won’t fall off your matzo cracker, but there are juicy chunks of diced apple throughout to add crunch and offset the sweetness of the dates. I use orange juice instead of wine, which adds a little bit of tanginess and is kid-friendly, too.
Oh, and oranges are a modern Passover symbol, meant to acknowledge those who feel marginalized in the Jewish community.
MAKE-AHEAD CHAROSET
If you make charoset ahead of time, the flavors will have a chance to meld and mellow. It keeps for up to two days in the fridge. Just before serving, you can add a little more juice or a little more spice, to taste.
HOW TO BUY DATES
When buying dates, look for fresh ones — they should be dark brown, soft, and heavy for their size. If you are only able to find drier dates, you can soften them by letting them soak for 5 minutes in hot water. Drain the dates before proceeding with the recipe.

MAKE THIS RECIPE YOUR OWN!
You can also use this recipe as a template and get creative. Add some orange zest, swap in different chopped nuts (almonds and pecans are commonly used), or throw in a handful of raisins.
Leave out the dates for a more Ashkenazi-style charoset, or process the apples with the dates to get a more pasty, Sephardic-style spread. Oh, and feel free to add some Manischewitz if you just can’t imagine charoset without it!
MORE FAVORITE PASSOVER RECIPES
Products We Love
This post may contain links to Amazon or other partners; your purchases via these links can benefit Simply Recipes. Read more about our affiliate linking policy.
Recipes
via Simply Recipes https://ift.tt/2F9fkDA
March 25, 2019 at 09:02AM
Heather’s Buddha Bowl
https://ift.tt/2OnYQgE
Recipes
via Skinnytaste https://ift.tt/2ix3Luq
March 25, 2019 at 08:10AM
https://ift.tt/2OnYQgE
This easy Buddha Bowl is made with roasted broccoli, butternut squash, and onions piled on top of whole grain rice and topped with sliced avocado, a sunny-side fried egg, and crunchy pecans.
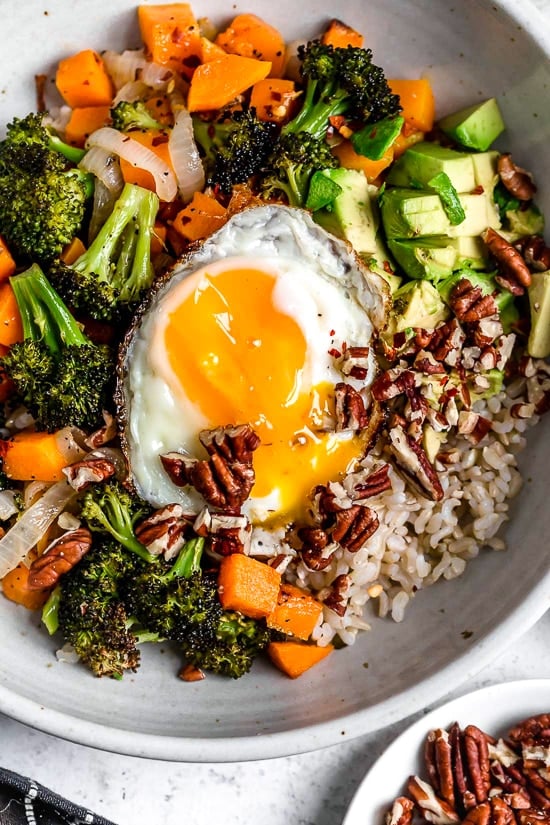
This all-in-one healthy and hearty bowl packed with veggies, whole grains and lean protein, is an easy weeknight dinner!
Recipes
via Skinnytaste https://ift.tt/2ix3Luq
March 25, 2019 at 08:10AM
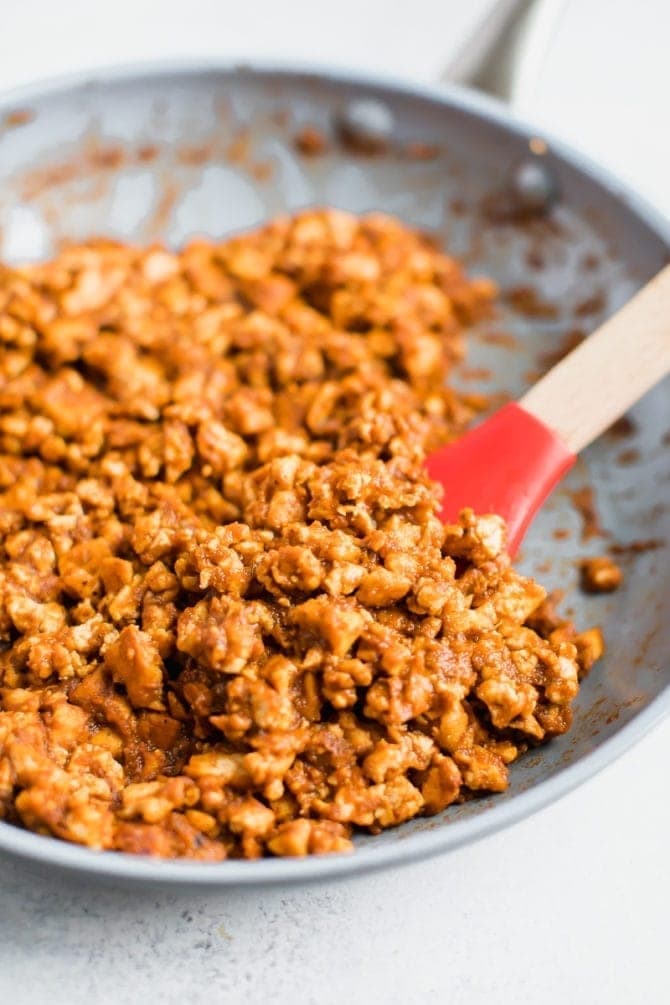
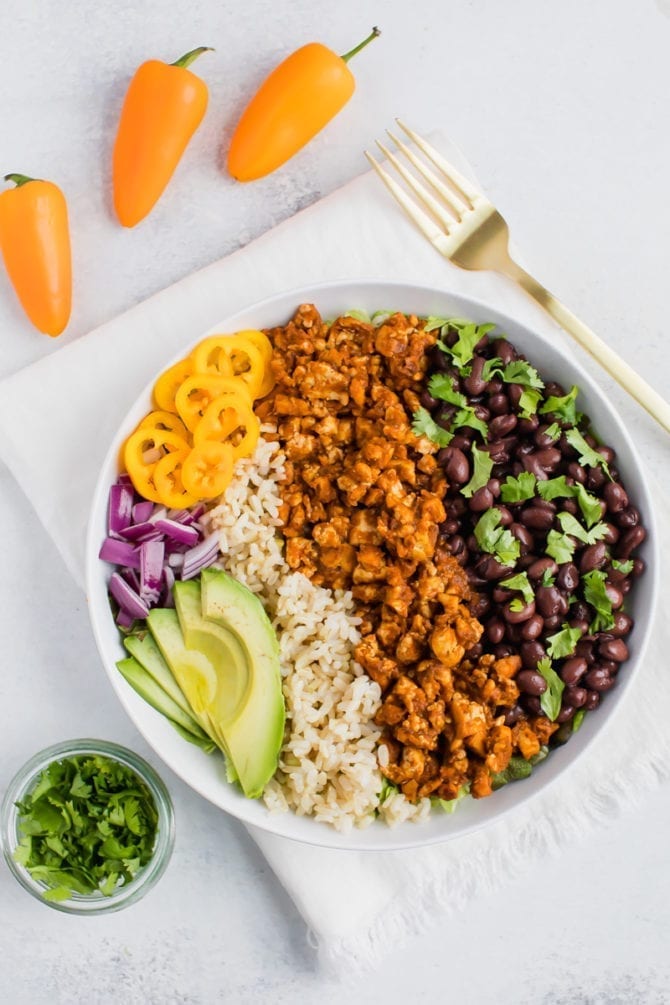
Copycat Chipotle Tofu Sofritas Burrito Bowls
https://ift.tt/2HGeTpB
Recipes
via Eating Bird Food https://ift.tt/1L45wsH
March 25, 2019 at 07:28AM
https://ift.tt/2HGeTpB
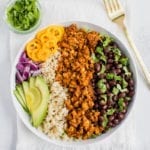
A delicious copycat recipe for Chipotle’s tofu sofritas that’s loaded with flavor and a hint of spice. It’s the perfect vegan protein option for homemade burrito bowls!
I don’t know about you, but I was so excited when Chipotle came out with their tofu sofritas a couple years ago. If you’re not familiar, sofritas are made of marinated and braised tofu and this addition to the menu gives vegetarians/vegans a meat-free option at this popular restaurant! Sure, you can totally just avoided meat and load up on rice, beans and veggies, but I love the added protein sofritas (aka tofu) can add to a meal. I’m not vegetarian, but I still get super excited with big chains start offering plant-based options.
And since Chipotle burrito bowls are so tasty (but kind of pricey) I figured I should create a copycat recipe so we can all have Chipotle burrito bowls at home on the reg.

How to Make Sofritas
The star ingredient in the sofritas recipe is the tofu. Look for extra firm tofu. I love the Twin Oaks brand, which is made locally, but any extra firm tofu will do.
You’ll want to drain and press your tofu before cooking. Not familiar with tofu prep? No worries! Cut a slit in the tofu package and drain all of the water out. Create a tofu press by wrapping the tofu block in paper towels or a clean dish towel and set on a baking sheet or cutting board – just make sure it’s a flat surface! Stack a few heavy items on top to press the extra moisture out. I love using a cast iron skillet, canned food or cookbooks. It can take 30-90 minutes to press most of the moisture out (depending how heavy your pressing items are!). Why press your tofu? It takes out all of the excess moisture so it will crisp nicely and absorb the flavors in the dish… #science. If you eat tofu often, it might be worth investing in a tofu press. I have one and love it.
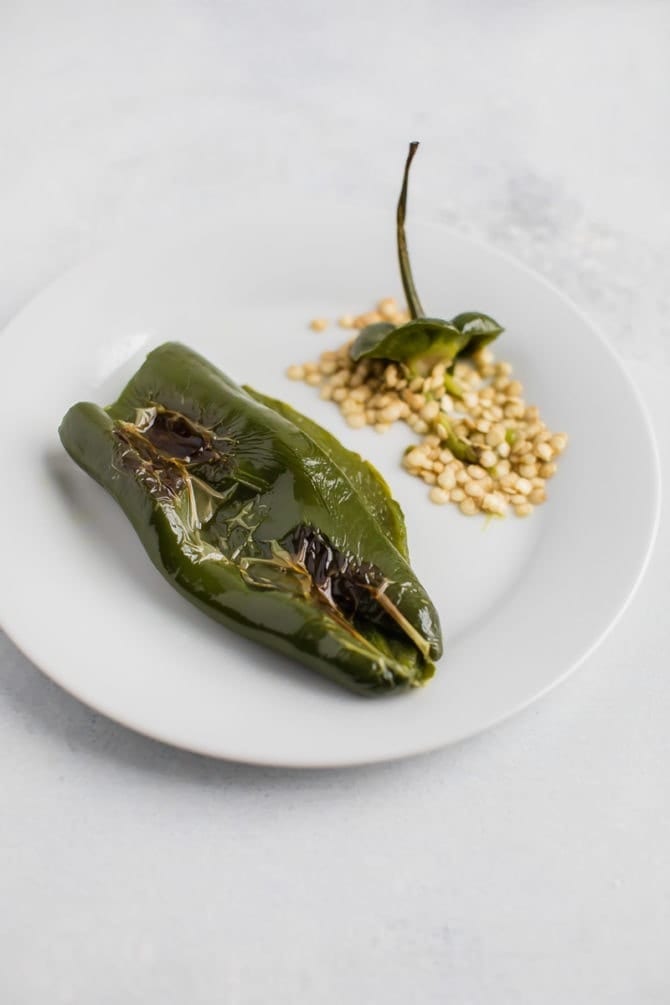
While your tofu is getting pressed, you can go ahead and prep the sauce. Start by blistering the poblano pepper. Again, this may seem intimidating but I promise it’s super simple! Simply hold over the flame of a gas range or broil it in the oven. Let cool then remove the stem and seeds. Blend the roasted poblano pepper, chipotle peppers in adobo sauce, onion, garlic, tomato paste, tamari, apple cider vinegar, water, sugar and salt.
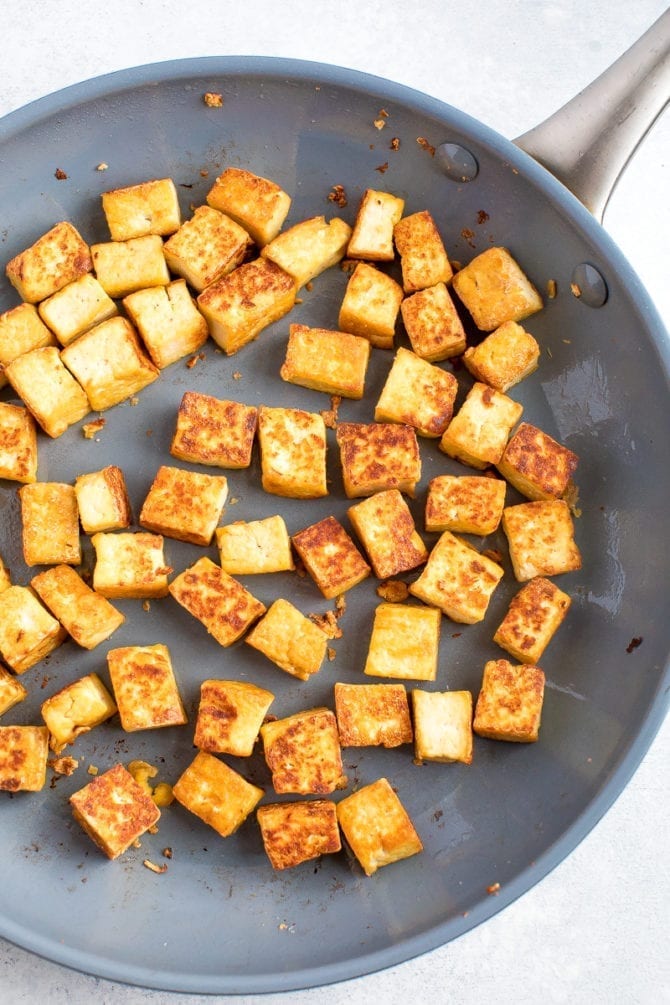
Once your tofu has been pressed, cut into cubes and add to a skillet with olive oil. Cook until the cubes are golden brown on all sides and then use your spatula to break up the cubes into crumbles. Stir in the sauce and simmer.
Assemble your bowls and voila! You’ve got a copycat Chipotle tofu sofritas burrito bowl.
If you make this Copycat Chipotle Tofu Sofritas recipe, be sure to leave a comment and star rating below letting me know how they turn out. Your feedback is super helpful for the EBF team and other EBF readers!
PrintDescription
A delicious copycat recipe for Chipotle’s tofu sofritas that’s loaded with flavor and a hint of spice. It makes a great vegan protein option for homemade burrito bowls!
Ingredients
Tofu Sofritas
- 1 medium poblano pepper
- 1 Tablespoon olive oil
- 1 16 oz package of package of tofu, drained, pressed and chopped into cubes
- 1 large or two small chipotle peppers (canned in adobo sauce)
- 2 Tablespoons extra adobo sauce
- 1/2 small yellow onion, chopped
- 3 cloves garlic, minced
- 2 Tablespoons tomato paste
- 1 Tablespoons low sodium tamari or soy sauce
- 1/2 Tablespoon apple cider vinegar
- 1/4 cup water
- 1/2 teaspoon organic sugar or coconut sugar
- 1/2 teaspoon sea salt
Burrito Bowls
- 8 cups romaine lettuce
- 2 cups brown rice
- 1 cup cooked black beans
- 1/2 cup chopped bell pepper
- 1/3 cup chopped red onion
- 1/3 cup fresh cilantro
Instructions
- Char poblano pepper by holding it over the flame of a gas range until it’s blistered and warm throughout or broil in the oven. For the oven method, rub a little olive oil over the outside of the pepper and heat on broil for about 15-20 minutes or until the pepper is soft and blistered. Let cool before removing the stem and seeds from the pepper. See photo. You can also remove the skin if you’d like, but I didn’t.
- In a food processor or high powered blender add roasted poblano pepper, chipotle peppers, adobo sauce, onion, garlic, tomato paste, tamari, apple cider vinegar, water, sugar and salt. Blend until smooth.
- Meanwhile in a large skillet heat 1 Tablespoon of olive oil over medium-high heat. Once hot add tofu cubes and cook until all sides of the tofu are golden brown. You’ll have to keep stirring the tofu throughout for this to happen. Once golden, use your spatula to crumble the tofu into small pieces. You can leave some cubes larger for more texture.
- Pour sauce into the skillet with the tofu and simmer for about 10 minutes, adding an additional 1/4 cup of water if needed for desired consistency. Taste and adjust seasonings if needed.
- To make bowls, add a base of romaine lettuce to each bowl and top with a portion of the tofu sofritas, 1/2 cup brown rice, red onion, cilantro and avocado.
Nutrition
- Serving Size: 1/4 of recipe
- Calories: 348
- Sugar: 5g
- Fat: 10g
- Carbohydrates: 46g
- Fiber: 10g
- Protein: 18g
Keywords: tofu sofritas
The post Copycat Chipotle Tofu Sofritas Burrito Bowls appeared first on Eating Bird Food.
Recipes
via Eating Bird Food https://ift.tt/1L45wsH
March 25, 2019 at 07:28AM
Bonus Downloadable Recipe Bundle!
https://ift.tt/2HQSYLJ
Click here to browse more recipes!
Click here to browse more recipes!
Recipes
via Love and Lemons https://ift.tt/2h2Uz32
March 24, 2019 at 01:20PM
https://ift.tt/2HQSYLJ

The countdown to cookbook 2 continues! If you haven’t heard, my second cookbook, Love & Lemons Every Day, is coming out April 2nd. I’ve worked SO hard on this book over the past three years and I’m excited to share it with you very soon! To celebrate, it’s free gift time!
Order the book from now through April 9th and get a limited time FREE Recipe Bundle with 5 exclusive bonus recipes. This downloadable, printable PDF contains high-quality full page color photographs for each recipe.
These recipes are NOT in the book, they won’t be on the blog, and you can only get them through April 9th, so now’s your chance!
Just to clarify – this isn’t a giveaway with just a few winners. If you order the book on or before April 9th, you will get the bonus recipes today. Simple as that.
Here’s how to get the free bonus recipe bundle:
Purchase the book anywhere, email a copy of your receipt to the address below, and we’ll send the Love & Lemons Bonus Recipe Bundle (in PDF form) to you. If you already pre-ordered the book (THANK YOU!), just email the receipt to the address below, and we’ll send you the bundle as well.
Here’s where to buy the book:
(You can also buy it at local bookstores throughout the U.S and Canada.)
U.S.
Amazon / Barnes & Noble / Indiebound
Canada:
Chapters Indigo / Amazon.ca
International:
Book Depository
eBook:
Apple Books / Google Play / Kindle
Kobo (US) / Kobo (Canada) / Nook
To get the recipe bundle:
- Pre-order the book, take a photo or screenshot of your receipt and email it to lnlbook2bundle@gmail.com.
- We will send you a link to download the bonus recipe bundle (PDF).
You are eligible for this free gift no matter where you live!
To read more about the book, click over to this post with a bunch of sneak peeks.
And now… here’s a peek at the bonus recipes!
These are all vegetarian, with vegan options.

Morning Glory Carrot Loaf
The morning glory muffin is one of my favorite bakery treats – a hearty carrot cake-like muffin studded with dried fruit, nuts, and seeds. This is my healthier take on it, which I turned into a loaf. It’s my new breakfast kick as well as a fun afternoon snack.
P.S. You can make this vegan by replacing the eggs with ½ cup mashed banana + 1 tablespoon ground flaxseed. It’s more dense than the egg version, but still delish.

Veggie “Chorizo” Stuffed Sweet Potatoes
These loaded sweet potatoes are an easy, hearty, and delicious weeknight dinner. The smoky vegan “chorizo” is also a great recipe to have on hand for tacos, burrito bowls, or loaded nachos.

Vegan Butternut Squash Mac (also pictured at the top of this post)
Ooey gooey vegan mac and cheese! I’ve tested countless versions of creamy vegan mac & cheese sauce and this one is the best!

Chickpea Cauliflower Tikka Masala
When you’re vegetarian, you may think you’re missing out on classic comfort foods like chicken tikka masala – but not anymore! Instead of chicken, I use chickpeas for protein, and I stir in roasted cauliflower to make this a hearty, veggie-forward meal. You’re going to love this tangy, tikka masala-like sauce!

Double Chocolate Olive Oil Cookies
These might be my favorite cookies of all time. Also, they just so happen to be both vegan and gluten-free! They have all of the fudgy goodness of a brownie with soft middles and lightly crisp bottoms. You’re going to want to make these every day!

Here’s where to buy the book:
(You can also buy it at local bookstores throughout the U.S and Canada.)
U.S.
Amazon / Barnes & Noble / Indiebound
Canada:
Chapters Indigo / Amazon.ca
International:
Book Depository
eBook:
Apple Books / Google Play / Kindle
Kobo (US) / Kobo (Canada) / Nook
To recap!
- Order your copy of Love & Lemons Every Day (from wherever you want or click the links above).
- Email a photo or screenshot of your receipt to lnlbook2bundle@gmail.com
- We’ll email you a link to download the recipe bundle with these 5 bonus recipes today!
Other posts you may enjoy...
 Eggplant & Squash Tian |
 Favorite cookbooks, by region |
 A Very Veggie Cookbook Guide |
The post Bonus Downloadable Recipe Bundle! appeared first on Love and Lemons.
Recipes
via Love and Lemons https://ift.tt/2h2Uz32
March 24, 2019 at 01:20PM
Swiss Chard Eggs Benedict
https://ift.tt/2HCtv9h
Recipes
via Skinnytaste https://ift.tt/2ix3Luq
March 24, 2019 at 10:32AM
https://ift.tt/2HCtv9h
I love this lighter take on Eggs Benedict made with Canadian bacon, Swiss chard and poached eggs on a whole wheat English muffin. Perfect for breakfast or brunch!
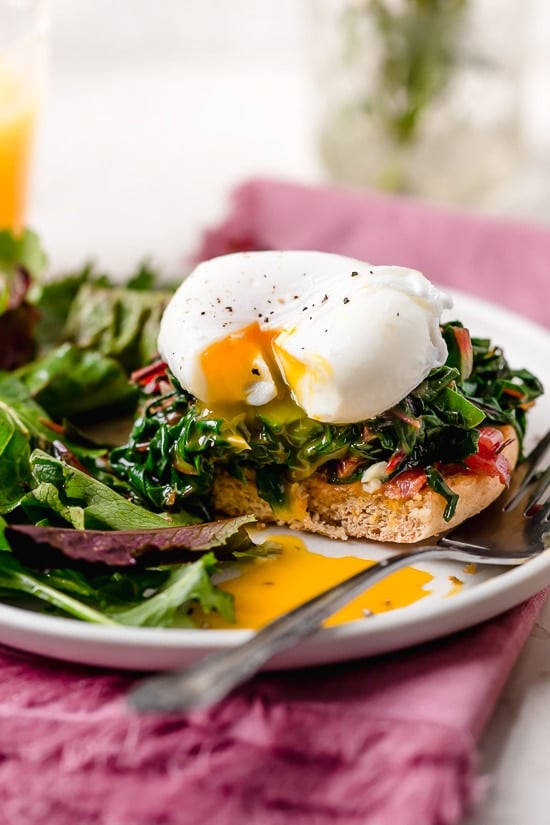
To lighten these, I skip the Hollandaise sauce which shaves off hundreds of calories, since the egg yolks are perfectly silky on their own! This is delicious, you won’t miss it!
Recipes
via Skinnytaste https://ift.tt/2ix3Luq
March 24, 2019 at 10:32AM
Use-It-Up Meal Plan! Chicken, Smoked Salmon & Pine Nuts
https://ift.tt/2OmuOd7

Recipes
via Simply Recipes https://ift.tt/2F9fkDA
March 24, 2019 at 09:04AM
https://ift.tt/2OmuOd7
Use-It-Up Meal Plan! Chicken, Smoked Salmon & Pine Nuts
Need a little help using up leftover ingredients? This meal plan is all about creating tomorrow's inspiring meals from the remains of last night's masterpiece! This week, we're focusing on recipes with chicken, smoked salmon, and pine nuts.
My goal with this meal plan is to help expand your cooking repertoire and learn a few ways to use up ingredients from last night’s dinner in tomorrow night’s dinner without feeling like you’re eating the same thing every day. This way you won’t get bored, but you’ll still make the best out of what you have on hand.
A CHICKEN, A SALMON AND A NUT WALK INTO A BAR
This week, I picked the following three ingredients to focus on – chicken, smoked salmon, and pine nuts. All of these ingredients can be workhorses in the kitchen, but smoked salmon and pine nuts are expensive. If I’m going to buy them, I want to know my money, my time and my food aren’t going to waste. This is my plan to use them up!
Whole Roast Chicken
Yes, I know you’ve made chicken before, but roasting a whole chicken can be intimidating to first timers. But once you’ve done it, you’ll wonder why you waited so long.
I have nothing against boneless, skinless chicken breasts, but you get a lot more out of your shopping budget and time spent at the stovetop when you know how to roast a whole bird: meat for dinner on night one, leftovers for salad the next day, and bones for stock to save for a rainy day.
Smoked Salmon
Smoked salmon always seems like a luxury to me. It’s an unexpected ingredient that can make a dish go from pedestrian to sensational! Maybe you’ve never used smoked salmon before, and you’re not sure how to use the leftovers in other dishes. Or the recipe only calls for 4 ounces, but the store only sells it in 8-ounce packages.
Never fear, we give you two recipes that call for smoked salmon. Hopefully, you’ll like them both, and you’ll use up that whole 8-ounce package.
Pine Nuts
When most people think of pine nuts, pesto is the first dish that comes to mind. Though delicious in a sauce rich with herbs, these creamy, crunchy nuts are also a wonderful way to add texture and flavor to things like pasta and wilted spinach.
Pine nuts are expensive. They aren’t something you want to relegate to a single use recipe. If, for some reason, you bought enough pine nuts to make it through a Zombie apocalypse, keep your pine nuts (and all other nuts) in your refrigerator. Nuts are high in fat, which means they can go rancid. Refrigeration slows this process.
READY TO COOK?!
Obviously, you aren’t going to use up every ingredient in every dish. This is a just a little menu guide to help you think about using up these three key ingredients in a couple of different ways!
This post may contain links to Amazon or other partners; your purchases via these links can benefit Simply Recipes. Read more about our affiliate linking policy.
Recipes
via Simply Recipes https://ift.tt/2F9fkDA
March 24, 2019 at 09:04AM
How to Make Pad Thai
https://ift.tt/2TVJIwM


Recipes
via Simply Recipes https://ift.tt/2F9fkDA
March 24, 2019 at 09:04AM
https://ift.tt/2TVJIwM
This classic dish of noodles, egg, veggies, and bean sprouts is one you encounter in almost all Thai restaurants—it’s a standard bearer. As 48-year-old Chef Pheraphat Phromsom (he goes by Peter) says, “If the pad Thai is good, the restaurant is good.”
But what if you’re miles away from a Thai restaurant and just want to recreate the experience at home? Well, that’s what I set out to do.
I spent some time talking with Chef Peter, who came to the United States from Bangkok via California and now runs the kitchen at 1001 Thai in Easton, PA, my favorite local Thai place. The recipe below is how he makes pad Thai.
What is Pad Thai?
Pad Thai is a popular rice noodle dish that is on the menu of nearly every Thai restaurant. It is indeed served in Thailand, usually with tofu. “This is like McDonald’s” for Thai people, says Peter, with a laugh. Which is to say it’s fast food; he says in Thailand it’s street food that cooks quickly in a very hot wok or pan.
Pad Thai is often served with chopped peanuts, bean sprouts, scallions, and sometimes carrots, cilantro and/or a wedge of lime. The sauce is key and is comprised of sugar, fish sauce, rice vinegar, and tamarind.
Pad Thai, more often than not, is served with tofu as its protein; shrimp is not uncommon either in Thailand. “Americans like their chicken, so we serve it that way here, too,” Peter says. In the recipe below I’m using shrimp, but you could really use any protein you prefer.
Pad Thai is Fast Food. Literally.
The only tricks, if there are any, have to do with timing. The actual dish itself takes less than 10 minutes to get to the table, which continued to surprise me, even as I was working on this recipe multiple times. All of a sudden, it’s ready! The key is to have your ingredients prepped and ready—and the table set for dinner.
Adapting Pad Thai for Home Cooking
Pad Thai is also typically made one serving at a time—but the average home cook isn’t going to want to repeat this procedure multiple times for every guest at their table.
This recipe serves four, and I highly recommend making it in two batches. The first time I made pad Thai following Peter’s recipe, that is what I did to serve myself and my two boys, and that seemed workable.
Cooking in two batches ensures the following:
- You have proper sauce distribution.
- The noodles don’t get gummy.
- The flavors can properly integrate when you bring the ingredients together.
No one wants to fight with a giant wad of noodles in a wok—or on their plate. Cooked this way, two servings at a time, it will taste more like the pad Thai you have in restaurants where everything is typically made to order.
Each batch of the pad Thai comes together very fast, so you could either serve a little bit of the first round to those who are waiting, or you could just wait and serve it all together. Personally, I am always a proponent of serving hot food when it’s hot, and Asian restaurants will often bring you food when it’s ready, not necessarily to time it with everyone else’s orders.
What Equipment You Need for Pad Thai
A large wok will make your life a lot easier when it comes to making pad Thai. It’s high on all sides, and you can load a lot of ingredients into it. Woks are also typically made of thin but highly conductive materials, which ensure even cooking over very high heat.
However, if you don’t have a wok, a large sauté pan (nonstick is great) with sides high enough to contain the ingredients will suffice. You need to be able to maneuver the ingredients easily; keep this in mind when you load up the pan. (It’s another reason to do two servings at a time.)
It’s also wise to have a sieve that can easily accommodate noodles as you cook them, and a pot that can easily accommodate your strainer. A standard 8-inch fine mesh strainer, like this one from OXO, should work just fine with a large stock pot.
How to Make Pad Thai Sauce
Pad Thai sauce is made typically with these four basic ingredients: tamarind, sugar, rice vinegar, and fish sauce. This makes a sauce that’s both sweet and sour, but also has some umami, earthy depth from the fish sauce. A good pad Thai sauce shouldn’t impart one strong flavor markedly over the other; it’s a balance.
Tamarind is a fruit that’s commonly found in Thailand and is a key ingredient used to make the pad Thai sauce. It grows in long pods and is often sold as pulp that’s been compacted into blocks, or bricks. To use it, you soak a block of the pulp in warm water for an hour or so or up to overnight. Then, you squeeze the pulp to break it up and push it gently through a fine mesh sieve. What ends up on the other side in your bowl is a dark reddish puree that looks like apple butter but smells way more tangy. It is velvety, sweet, and sour.
However, not everyone has access to this ingredient, plus it’s a little labor intensive for the home cook to prepare, so we developed this recipe using tamarind concentrate/tamarind paste, which is thick like molasses—and sticky like it, too. It’s also more widely available than the pulp, which you can easily buy online or in Asian grocers.
You should also be able to easily find the rice vinegar and fish sauce in the Asian section of most supermarkets.
Adjusting Your Sauce to Taste
Chef Peter cautions that tamarind will vary in taste from package to package or jar to jar. Sometimes it will be more sweet, sometimes more sour. This is why it’s very important to taste as you go when making the sauce—you may find the sauce is too sweet, and if so, add a little more acidity from rice vinegar, or some more fish sauce to give it some umami depth.
Similarly, fish sauce varies from brand to brand. He let me sample two that he had on hand at the restaurant, and one was much more pungent than the other. Golden Boy (the less assertively fishy) is the brand he recommended.
The more you make pad Thai and work with the sauce, the more you’ll be able to tell what your sauce needs, and how you like it to taste.
You can buy pad Thai sauce in a bottle, sure. I’ve even got a small bottle of it in my fridge made by a local condiment company, and it’s pretty awesome in a pinch. However, like most things, it just tastes so much better when you make it yourself.
Whatever sauce you don’t use, you can store in the refrigerator for up to six months in a lidded container. You’ll want to shake it well before using to mix up the ingredients again.
What Rice Noodles to Buy?
The rice noodles are key. You’re looking for wide rice noodles (about width of fettuccine), which usually come in nondescript looking plastic bags in the grocery store—they’re fairly easy to find, usually in the international aisle. Asian grocers will have them, too.
How to Prep the Rice Noodles for Pad Thai
Don’t bother looking at the directions on the package. They may or may not be in a language you can read (or reliable), and according to my Thai chef instructor, more often than not they don’t offer the best way to prep the noodles. Also, if you take the noodles out of the package and cook them straight away in boiling water, they’re more likely to end up overcooked and gummy once you put them in a hot pan with the other ingredients.
So what do you do? You soak them in cold water, which softens them just enough to cook them into a hot wok or pan with the rest of the ingredients. The noodles take about two to three hours to soften, but you can also set them in cold water in a lidded container, stick them in the fridge, and pull them out the next night for dinner with no problem whatsoever.
Trust me on this. I’ve learned it the hard way, and Chef’s tip about soaking them instead of cooking them first is a real game changer for pad Thai. All you need to do, once they’ve soaked, is quickly dip them in and out of a pot of boiling water to par-cook them (partially cook) before adding them to the pan with the rest of the ingredients.
Putting This Dish Together
When it’s time to serve, you want the noodles to be covered in sauce, but the dish isn’t saucy. The bean sprouts, Chef Peter says, help keep the noodles from sticking together. Serve with wedges of lime and a sprinkle of chopped cilantro and/or red pepper flakes, if you like.
How to Store and Reheat Leftovers
Leftovers keep for three to four days covered, in the fridge. Peter swears by microwaving pad Thai to reheat it. I can attest to this. You don’t even have to add any water to the noodles. I do mine in 30-second increments so it doesn’t make the shrimp rubbery.
This dish does not freeze well, but no one has complained about eating too much pad Thai in my house, so …
WANT MORE ASIAN RECIPES?
Recipes
via Simply Recipes https://ift.tt/2F9fkDA
March 24, 2019 at 09:04AM

The Flat Belly Fix
This is the only 21-day rapid weight loss system that allows you to easily lose an average of 1 lb a day for 21 days without feeling hungry or deprived. The unique and brand new techniques used in this System are proven SAFE. And they do not cause the rebound weight gain common to all the other rapid weight loss systems that are not backed by the latest science. The Flat Belly Fix System takes advantage of a recent scientific discovery that proves the effective weight loss power of an ancient spice. Combined with other cutting-edge ingredients in the patent-pending Flat Belly Fix Tea™ — that you can make right in your own kitchen in minutes — this System is the quickest, easiest and most enjoyable way to quickly get the body you desire and deserve. Click Here
Categories
All
Gluten Free
Pancakes
Protein
Archives
November 2020
October 2020
September 2020
August 2020
July 2020
June 2020
May 2020
April 2020
March 2020
February 2020
January 2020
December 2019
November 2019
October 2019
September 2019
August 2019
July 2019
June 2019
May 2019
April 2019
March 2019
February 2019
January 2019
December 2018
November 2018
October 2018
September 2018
August 2018
July 2018
June 2018
May 2018
April 2018
March 2018
February 2018
January 2018
December 2017
November 2017
 RSS Feed
