
|
The Coziest Bean Soup
https://ift.tt/2Uwx6uL Making this Coziest Bean Soup didn’t come naturally to me today. Soups and stews are usually recipes I like to make when I come home from a long day, when the weather is chilly and crisp. Or when I’m just needing some warming up of sorts. And being inside 24/7, toasty and warm, missing the... The post The Coziest Bean Soup appeared first on HealthyHappyLife.com. This is a summary, images and full post available on HHL website! Recipes via HealthyHappyLife.com https://ift.tt/2X1PMCd March 31, 2020 at 06:09PM #recipies
0 Comments
New Normal. (COVID-19 Diary)
https://ift.tt/3bIh2Ma A new normal. A little COVID-19 diary for you today… Current View Right now, it’s Monday night. I’m in bed early. Lights off, just the glow of my laptop and sunset-pink salt lamp on my nightstand. Sochi was curled up by my feet, but has since abandoned me for his dinner. The cats are effortlessly... The post New Normal. (COVID-19 Diary) appeared first on HealthyHappyLife.com. This is a summary, images and full post available on HHL website! Recipes via HealthyHappyLife.com https://ift.tt/2X1PMCd March 31, 2020 at 01:08PM #recipies
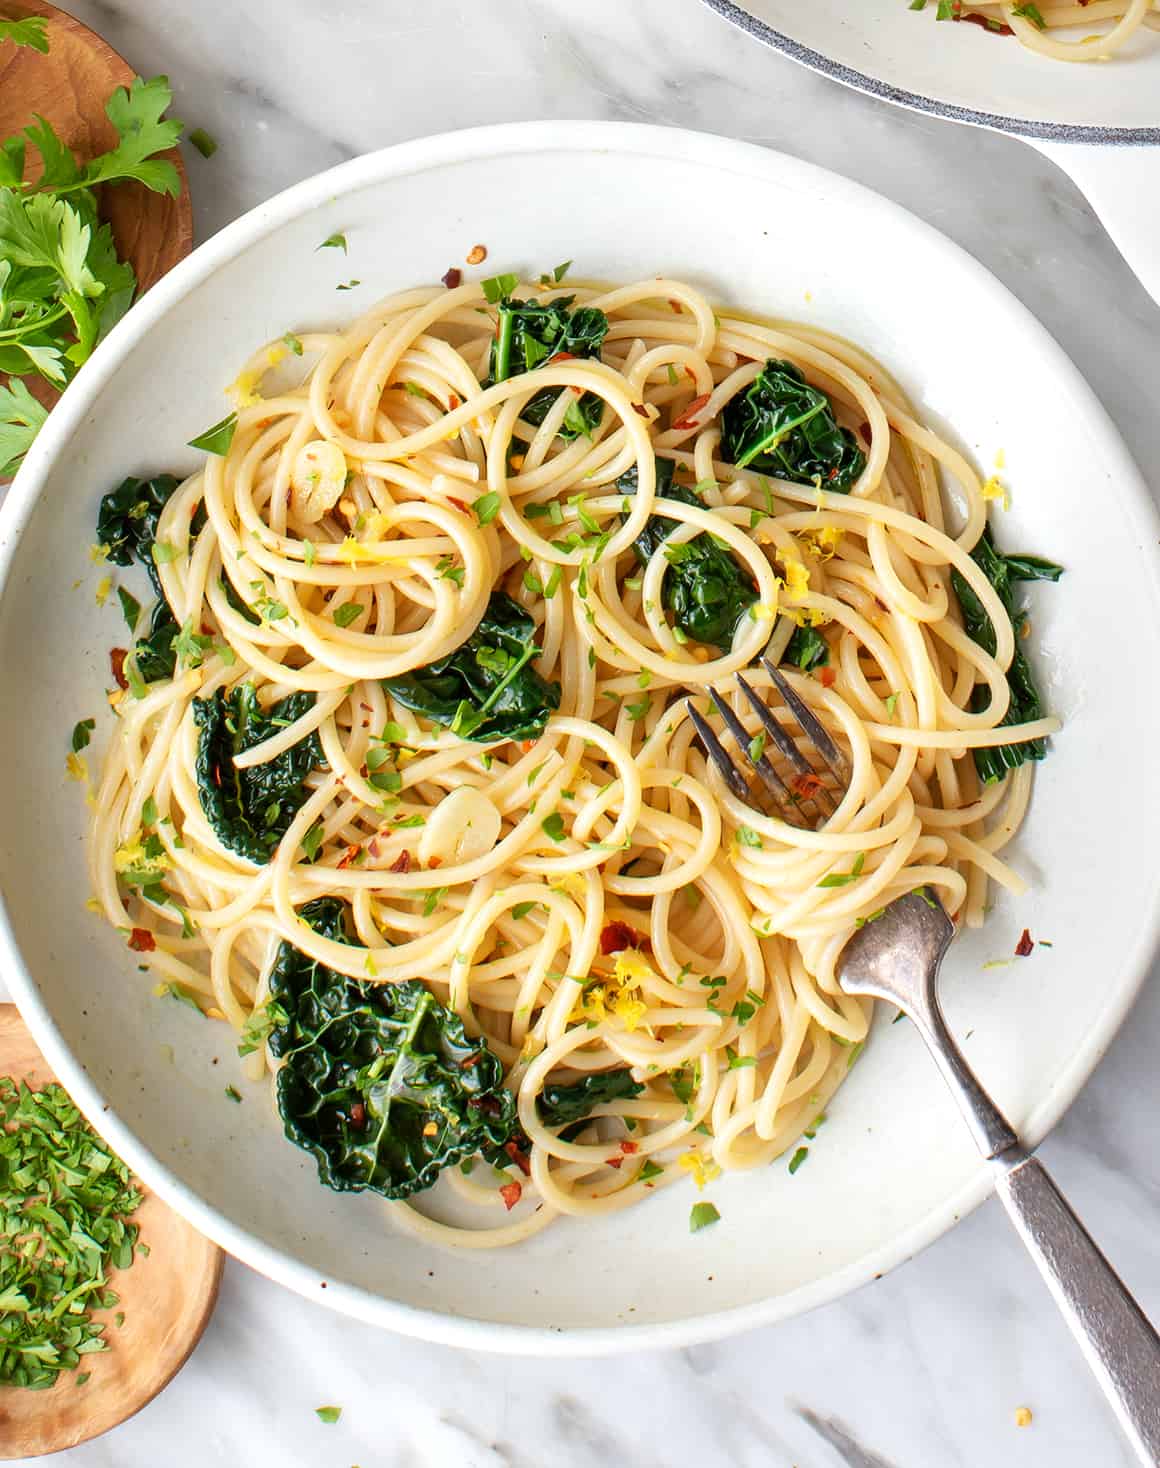
Spaghetti Aglio e Olio
https://ift.tt/3dKKoLO
Spaghetti aglio e olio translates to “spaghetti with garlic and oil.” The traditional dish contains little more than these ingredients. It might be finished with a sprinkle of parsley or a pinch of red pepper flakes, but even these are optional. In its simplest form, this classic Italian pasta features spaghetti, olive oil, garlic, salt, and pepper. But if you’ve ever tried it, you know that spaghetti aglio e olio is far more than the sum of its parts. The garlic infuses the oil with rich, nutty flavor, and salty, starchy pasta cooking water transforms it into a deeply flavorful sauce. Add perfect al dente pasta to the mix, and it’s absolute heaven. Spaghetti aglio e olio has been my go-to order at Italian restaurants for years, but recently, it’s become one of my favorite dishes to make at home. It comes together in just 20 minutes, it uses a handful of pantry ingredients, and it’s simply delicious. If you have pasta, garlic, and olive oil in your kitchen, try it tonight! If you’re anything like me, you’ll make it again the next night, and again the next. ? Yep, it’s that good.
Spaghetti Aglio e Olio Recipe IngredientsOf course, my spaghetti aglio e olio recipe includes a few fresh twists. I start with these traditional ingredients:
Then, I add these unconventional (but tasty!) ingredients:
(See the full measurements at the bottom of this post!)
How to Make Spaghetti Aglio e OlioThis simple pasta comes together in just 20 minutes! Follow these steps to make it (+ find the full recipe below!):
Garnish the pasta aglio e olio with parsley and Parmesan cheese, if desired. Enjoy it on its own, or serve it with a salad like my Caesar salad, Caprese salad, or citrus salad. It would also be delicious with roasted broccoli or cauliflower and homemade focaccia or no-knead bread for sopping up any leftover oil. Buon appetito!
More Favorite Pasta RecipesIf you love this spaghetti aglio e olio recipe, try one of these easy pasta recipes next:
Then, find 25 more favorite pastas here! Other posts you may enjoy...
The post Spaghetti Aglio e Olio appeared first on Love and Lemons. Recipes via Love and Lemons https://ift.tt/2h2Uz32 March 31, 2020 at 10:16AM #recipies
15 Homemade Sweet Treats for your Easter Basket
https://ift.tt/39vXcm5  15 Homemade Sweet Treats for your Easter BasketPersonalize your Easter baskets this year by making your own homemade sweet treats! It adds a little dash of charm and a personalized touch to make the day feel extra special. Easter baskets are so fun to put together. I honestly cherish thinking of my loved ones as I assemble their baskets. If you’re like me and are trying to stay away from all the candy, why not make your own sweet treats? It adds a personalized touch and it’s such a great way to show my family how much I love them. So, what kind of treats do you put in a basket? You can do anything from mini muffins, homemade candies, and even cookies. Package each one in a cellophane bag or wrap in parchment paper, tie with a string or ribbon and you’re good to go! Products We LoveThis post may contain links to Amazon or other partners; your purchases via these links can benefit Simply Recipes. Read more about our affiliate linking policy. Recipes via Simply Recipes https://ift.tt/2F9fkDA March 31, 2020 at 09:05AM #recipies
Ants on a Log
https://ift.tt/3bAcyr5 Going back to basics today with this classic Ants on a Log Snack. This old-school snack recipe is favorite of kids of all ages. I definitely remember eating this when I was still in single digits! The Goods. Rich in creamy peanut butter, a hint of chewy sweet raisins and of course a base of... The post Ants on a Log appeared first on HealthyHappyLife.com. This is a summary, images and full post available on HHL website! Recipes via HealthyHappyLife.com https://ift.tt/2X1PMCd March 30, 2020 at 04:41PM #recipies
Rosemary Focaccia
https://ift.tt/33X8wGA 1 Proof the yeast: Stir the yeast into the 1/3 cup of slightly warm-to-the-touch water and let it rest for 10 minutes. 2 Add olive oil to water, then add yeast: In a large bowl, pour in 2 1/4 cups of tepid water and 2 tablespoons olive oil. After the yeast has rested for 10 minutes and has begun to froth, pour it into the water-oil mixture.
3 Add flour and rosemary: Whisk in 2 cups of flour (either the bread flour or the all purpose, at this stage it doesn't matter which) and the tablespoon of salt. Add the rosemary. Cup by cup, whisk in the rest of the flour (both the bread flour and all-purpose). As the mixture goes from a batter to a thick dough, you'll want to switch from a whisk to a wooden spoon.
4 Knead the dough: By the time you get to adding the last cup of flour, you will be able to work the dough with your hands. Begin to knead it in the bowl – try to incorporate all the flour stuck to the sides and bottom of the bowl as you begin kneading. Once the bowl is pretty clean, turn the dough out onto a board and knead it well for 8 minutes. You might need some extra flour if the dough is sticky. Note that a KitchenAid mixer (or some other brand of upright electric mixer) works well for the mixing and kneading of the bread dough. About the time you add the last cup of flour you'll want to switch from the standard mixer attachment to the dough hook attachment. Just knead the dough using the dough hook on low speed for 8 minutes. If after a few minutes the dough is still a little sticky, add a little sprinkling of flour to it.
5 First rise: In a large clean bowl, pour in about a tablespoon of oil and put the dough on top of it. Spread the oil all over the dough. Cover the bowl with plastic wrap and set aside to rise (in a relatively warm spot or at room temp) for an hour and a half. It should just about double in size.
6 Spread dough in baking pan: Spread a little olive oil in your baking pan or baking sheet (will make it easier to remove the bread). Place the dough in your baking pans or form it into free-form rounds on a baking sheet. This recipe will make two nice-sized loaves or one big one and a little one. Cover the breads and set aside for another 30 minutes.
7 Dimple the bread: Dimple the breads with your thumb. Push in to about the end of your thumbnail, roughly 1/2-inch.
8 Second rise: Cover the dough again and leave it to rise for its final rise, about 2 hours. 9 Preheat oven: With 30 minutes to go before the rise finishes, preheat your oven to 400°F. If you have a pizza stone put it in. 10 Brush with olive oil, sprinkle with salt: Once the dough has done its final rise, gently paint the top with olive oil — as much as you want. Then sprinkle the coarse salt on top from about a foot over the bread; this lets the salt spread out better on its way down and helps reduce clumps of salt. 11 Bake: Put the bread in the oven. If you are doing free-form breads, put it right on the pizza stone. Bake at 400°F for a total of 20-25 minutes. If you have a water spritzer bottle, spritz a little water in the oven right before you put the bread in to create steam, and then a couple of times while the bread is baking.
12 Cool and serve: When the bread comes out of the oven, turn it out onto a rack within 3-5 minutes; this way you'll keep the bottom of the bread crispy. Let cool on a rack for 10 minutes before eating. Recipes via Simply Recipes https://ift.tt/2F9fkDA March 30, 2020 at 04:11PM #recipies
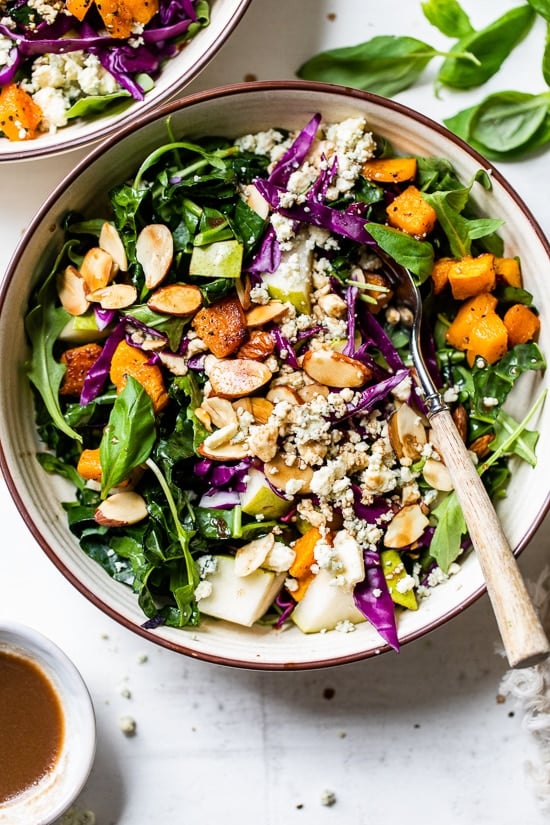
Kale and Butternut Squash Salad with Pears and Almonds
https://ift.tt/2yfW74J Immune-boosting kale, squash, purple cabbage, arugula, almonds, basil and pears are all tossed in a tangy-sweet dressing. To add more protein, you could add grilled shrimp or salmon.
This healthy vegetarian main dish salad is inspired by Sweetgreen’s Winter Squash Salad loaded with lots of nourishing, colorful fruits and veggies. Yesterday I shared this Warm Curry Roasted Butternut Squash and Veggie Salad. Today’s salad is enjoyed cold with hearty vegetables that last a while in the refrigerator. The post Kale and Butternut Squash Salad with Pears and Almonds appeared first on Skinnytaste. Recipes via Skinnytaste https://ift.tt/2ix3Luq March 30, 2020 at 02:24PM #recipies
What Are Some Good Make-Ahead Meals for Two?
https://ift.tt/39suhiS  READER QUESTION: Any advice on making healthy meals for two elderly people who are not able to cook for themselves? If I understand the question correctly, it looks as though you need healthy recipe ideas that can be made ahead of time, portioned out, frozen or cooled and easily reheated. The good news is we have loads of recipes that will work. The tricky part is what you consider healthy. Here at Simply Recipes we believe a healthy diet is full of fruits and vegetables, whole grains, legumes, a variety of animal and vegetarian protein, diary and healthy fats. Basically, if you make it from (mostly) scratch and eat the sweets and fried foods in moderation it’s healthy to us. If you want to dig around for your own version of healthy check out Recipes for Healthy Eating page. You will find everything from Potato Leek Soup to Salmon Foil Packets. If I were caring for someone and wanted to stock their fridge and freezer with food these are my top recommendations: SOUPS AND STEWSSoup is always good makes a big, batch and is easy to portion out into individual servings. It keeps for up to a week in the refrigerator and 3 months or better in the freezer. Here are some personal favorites: SMOOTHIESSmoothies are great for breakfast, a light meal when you’re not feeling well or a mid-day snack. You can easily make ingredient smoothie packets ahead of time so they are ready to go. Or you can blend the whole smoothie up, then freeze individual portions flat in ziptop bags. Just take a bag out in the morning and set it on your countertop while you get ready for the day. Smoosh it together and pour it in a cup. If you’re going to make smoothies, it’s helpful to have a high-speed blender. Check out our Guide to High Speed Blenders to see if your blender fits the bill. I’ve listed a few favorites below, but you can find more smoothie recipes here. CASSEROLESWe have a whole page dedicated to casseroles. Some are easier to portion and freeze than others. If you want to see the complete list check out our Casserole page. If not, here’s a few favorites to get you started. CASUAL FOODIf you’re looking for something really simple quesadillas are a wonderful option. I do this for my children. You can stuff quesadillas with anything. Cook them, then let them cool. Cut them into quarters, layer the quesadillas between pieces of parchment paper and freeze in a zip top bag. When you need one, take it out of the bag, pop in in the microwave for a minute and lunch is ready. If you want the tortilla to crisp up you do need to put it in a toaster oven or skillet on the stove top. I hope that’s enough to get you started. Thanks for writing in! Take care, Summer, Senior Editor and lover of cooking for others P.S. Have a question? Email us: [email protected] Products We LoveThis post may contain links to Amazon or other partners; your purchases via these links can benefit Simply Recipes. Read more about our affiliate linking policy. Recipes via Simply Recipes https://ift.tt/2F9fkDA March 30, 2020 at 09:30AM #recipies
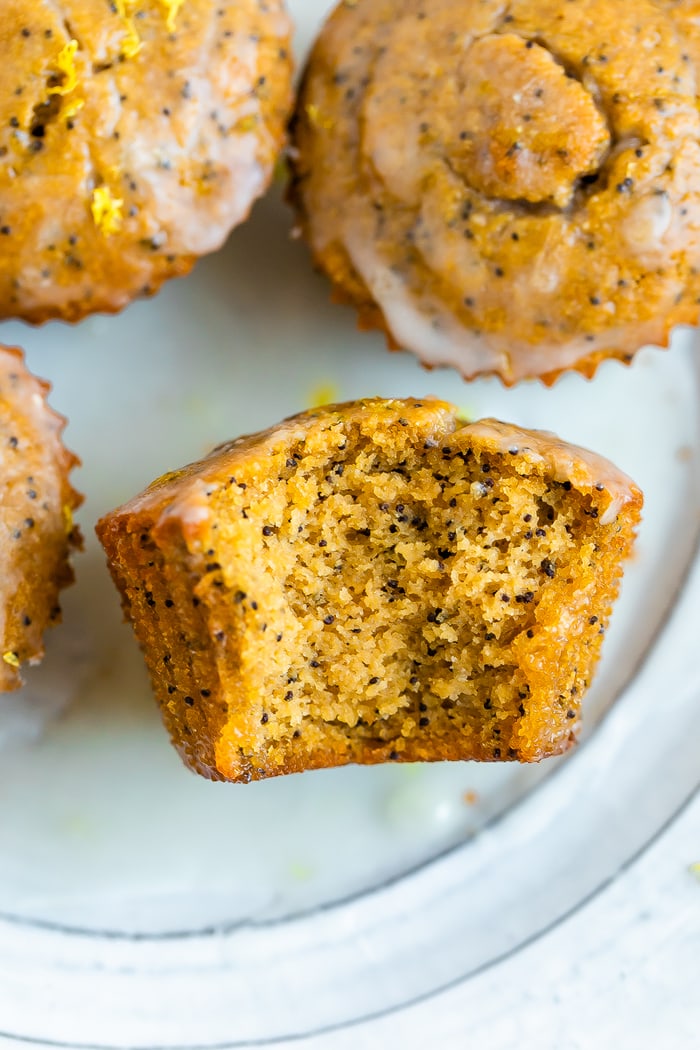
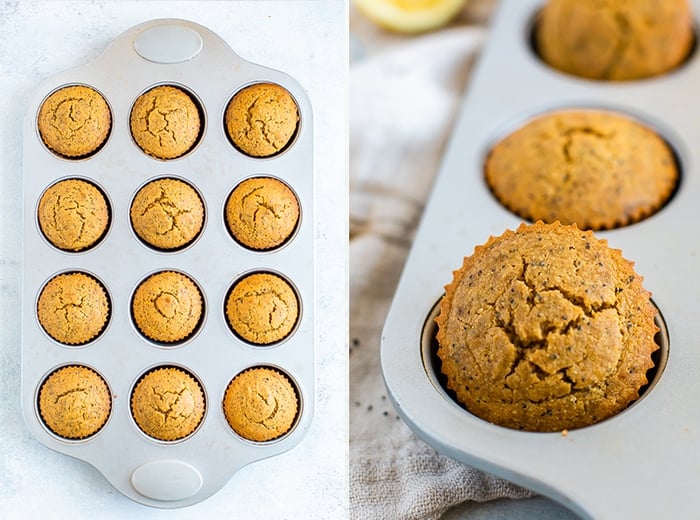
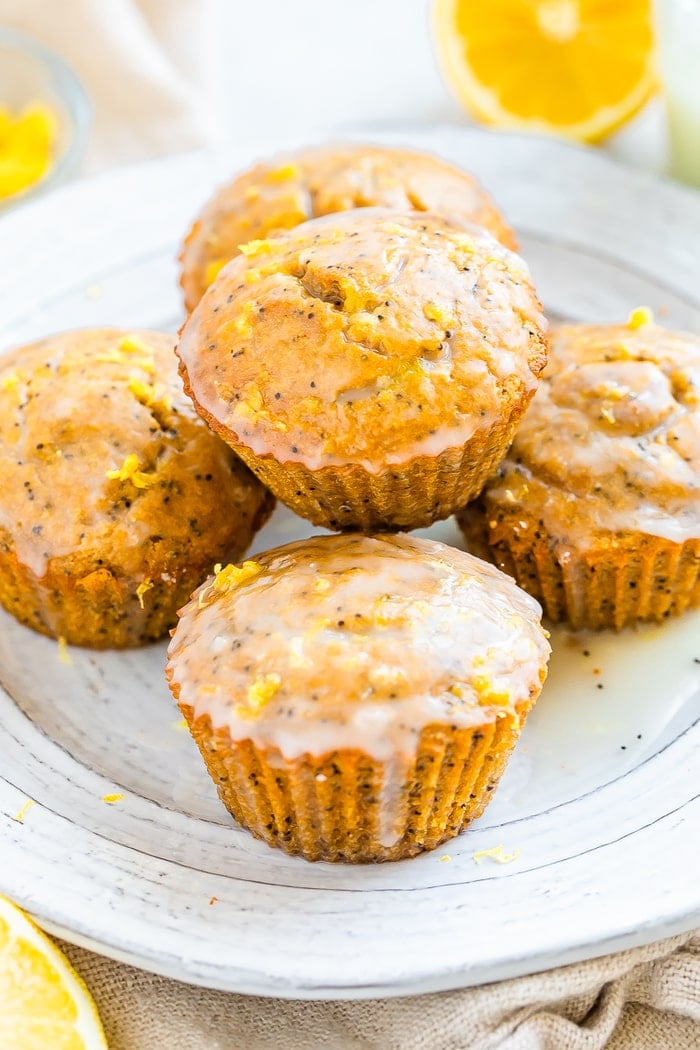
Gluten-Free Lemon Poppyseed Muffins
https://ift.tt/3auEe0u
I’ve always been a fan of lemon treats. They’re decadent, yet light and refreshing and perfect for spring. The crazy thing is that I didn’t have any sweet lemon recipes here on EBF… until now! So these lemon poppyseed muffins are the first and let me tell ya, they were worth the wait. They’re so tasty, come together in no time and can be eaten for breakfast, snack or dessert.
I rarely get confused with the difference between muffins and cupcakes, but these kind of have me stumped! They are light, fluffy and decadent like a cupcake but the healthy ingredients have me leading toward muffin. Since I doubt you’d eat these for breakfast if I called them a cupcake, I decided to go with muffin. Ha! What do you think?!
Here’s What You Need
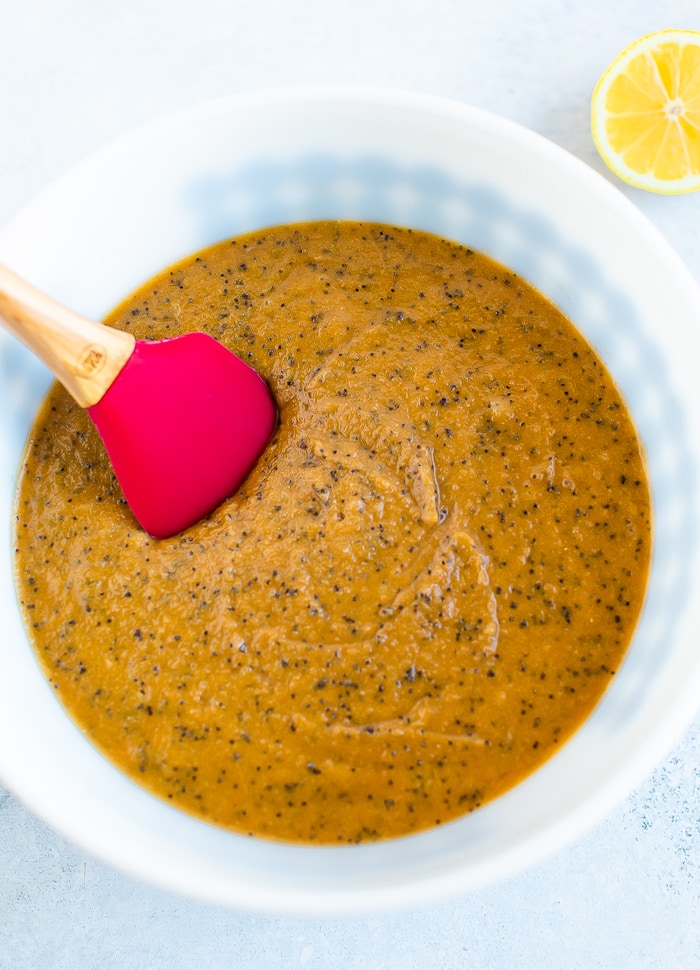
Why Room Temperature?As you may have noticed, I specifically noted that a few ingredients for this muffin recipe need to be room temperature! If your eggs and lemon juice are cold, the coconut oil will solidify and create clumps and it’s hard to mix. If this happens, you can set the bowl in a larger bowl of hot water until the coconut oil melts or put it on the stove-top as your oven preheats. Be careful that the mixture doesn’t get too hot or the eggs will cook. Ah baking… a balancing act. ? This is how your batter should look. All mixed together without little clumps of coconut oil.
Baking with Gluten-Free FlourI actually shared an entire blog all about using different types of flours. The truth is, there isn’t one gluten-free flour that works best for all recipes and you can’t just swap in the same amount of an alternative flour for all-purpose flour. If you have the patience to experiment, go for it! Otherwise lean on already developed and tested recipes like this one that are sure to turn out correctly!
Storage TipsWhile these muffins would be perfect for Easter or Mother’s Day brunch, they don’t have to be for a fancy occasion! I may or may not have already made this recipe a few times this spring, just to have as a treat. If you’re making these ahead of time and plan to enjoy all week long, I have a few tips for you!
If you make these lemon poppyseed muffins, be sure to leave a comment and star rating letting me know how they turned out! Your feedback is so helpful for the EBF team and other EBF readers. Print Lemon Poppyseed Muffins
DescriptionThese gluten-free lemon poppyseed muffins are made with almond and coconut flour and have a bright, lemony flavor. You can top the muffins with the lemon glaze for a real treat or leave it off. Ingredients
Lemon Glaze
Instructions
Notes
Nutrition
Keywords: lemon poppyseed muffins The post Gluten-Free Lemon Poppyseed Muffins appeared first on Eating Bird Food. Recipes via Eating Bird Food https://ift.tt/1L45wsH March 30, 2020 at 07:06AM #recipies
Skillet Chicken Thighs with Potatoes, Carrots, and Greens
https://ift.tt/3bDKval Crispy skillet chicken is cooked in a flavorful lemon broth and served on a bed of Swiss chard, potatoes, and carrots. This bistro-style oven braised chicken with vegetables has everything you love about cozy comfort food. Photography Credit: Sally Vargas While strictly speaking this is not a French dish, it has all the characteristics of a warm and cozy meal you could imagine having at a local corner café in France. If you can’t travel, you might as well eat like you are! This bistro-style crispy chicken is braised with carrots, potatoes, and, for good measure, greens in a mustard and lemon seasoned chicken broth. It all comes together easily in a skillet and adds up to a satisfying, flavorful meal. THE BONUS TO BRAISING CHICKENBraising is one way to cook meat with moist heat. It cooks food gently, keeps it from drying out, and requires only a small amount of liquid in the pan. Stewing, on the other hand, contains a lot more liquid, enough to submerge the meat. The real bonus here, though, is that the small amount of braising liquid on the bottom of the skillet allows the chicken skin to become crisp in the oven, while the vegetables cook in the juices. The liquid in the skillet creates a kind of flavor exchange—the vegetables give the broth extra richness, and the chicken permeates the vegetables. WINNER, WINNER SKILLET DINNERAfter you brown the chicken on one side, set it aside on a plate and give the potatoes and carrots a head start. Return the chicken to the pan with the stock and pop it in the oven for half an hour or so. The chicken takes another turn on a clean plate while you cook the chard leaves in the pan on top of the stove. Finally, set the chicken atop the vegetables and serve with a squeeze of lemon. WAYS TO ADAPT THIS RECIPEWhen it comes to cooking, you can always find ways to tweak recipes.
HOW TO PREPARE THIS DISH AHEAD OF TIMEI recommend cooking this dish all the way through, cooling it, then freezing it to reheat at a later date. This is a perfect make and reheat meal if you’re caring for someone or bringing a dish to friend who may not need to eat it now but could reheat it later. Although you could safely freeze this for up to four months, two months is optimal for preserving good flavor and texture.
MORE CHICKEN SKILLET DINNERSSkillet Chicken Thighs with Potatoes, Carrots, and Greens RecipeIngredients
Special equipment:Method1 Preheat the oven: Preheat the oven to 400˚F. 2 Trim and season the chicken thighs: With scissors or a sharp knife, cut off excess flaps of skin and fat from the thighs. Sprinkle with salt and pepper on both sides. 3 Prep the chard stalks and leaves: Tear or cut the stalks from the leaves. Cut the stalks into 1-inch pieces. Slice the leaves into 2-inch-wide strips. Keep the stalks and leaves separate.
4 Brown the chicken and par-cook the potatoes and carrots: In a large (12- to 13-inch) ovenproof skillet set over medium-high heat, add the oil. Once the oil shimmers, add the chicken with the skin side down. Cook on the skin side only for about 5 minutes without disturbing it, or until the skin lightly browns. Transfer to a plate. (If the chicken doesn’t fit in one skillet, cook in batches or use two smaller skillets and divide the ingredients between them.) Add the potatoes and carrots to the skillet and cook for 5 minutes, or until they brown lightly.
5 Prep the braising liquid: In a bowl or measuring cup, whisk the chicken stock, mustard, and lemon zest to combine. 6 Braise the chicken: Add the chard stalks, smashed garlic and braising liquid to the skillet with the vegetables. Set the chicken pieces on top and sprinkle with the thyme.
7 Transfer to the oven: Transfer the pan to the oven. Roast, uncovered, for 30 minutes, or until the chicken is cooked through and the vegetables are tender. Remove the pan from the oven. 8 Add the chard leaves: Transfer the chicken thighs to a plate. Taste the broth and add more salt, if you like. Set the skillet over high heat and bring the liquid to a boil. Stir the chard leaves into the skillet and cook for 2 to 3 minutes, or just until wilted. Remove the garlic cloves.
9 Serve: Set the chicken on top of the vegetables. Squeeze the lemon over the chicken and sprinkle with the parsley. Serve from the skillet, or transfer to a large serving platter. Serve as is, or with a salad.
Hello! All photos and content are copyright protected. Please do not use our photos without prior written permission. Thank you! Products We LoveThis post may contain links to Amazon or other partners; your purchases via these links can benefit Simply Recipes. Read more about our affiliate linking policy. Recipes via Simply Recipes https://ift.tt/2F9fkDA March 29, 2020 at 06:09PM #recipies |
|


 Pin Recipe


 RSS Feed
