Feel Healthy Today
  • Home
  • Recipes
  • Health News
  • Fitness News
  • Weight Loss
  • Contact
  • Subscribe

Recipes

Black Bean Burgers with Spicy Mayonnaise

7/31/2018

0 Comments

 
Black Bean Burgers with Spicy Mayonnaise
https://ift.tt/2voURqO

Once upon a time, I ran a vegetarian restaurant in a college town, and one of its signature dishes was the “Big Veg.” The Big Veg was a scratch-made soy veggie burger.

As such, it was pretty good for its time, but it needed some serious updating. These days, I want something better than “pretty good.”

Making the Best Black Bean Burger

I get tired of beef burgers and sometimes want to incorporate more plant-based meals into my diet. For these reasons, I love the idea of a vegetarian alternative to the standard beef burgers of summer.

I turned to black beans as the base. I was tempted to veer toward Southwestern/Mexican spices since they’re such a good pairing with black beans, but ultimately decided against that obvious flavor profile so that the condiments could shine.

No, this is not like a beef burger, but yes, this is a winner in the vegetarian category: it’s full of vegetable flavor, it is filling, and it is not painstakingly time-consuming to make.

Easy Black Bean Burgers Recipe process the black beans

Your food processor is your secret weapon

Compared to hamburgers, which you can buy already formed into patties, these veggie burgers take a little more time. But by the time you pull all the ingredients together, you are only looking at about 15 minutes of total prep with the aid of a food processor.

First, pulse the vegetables to break them down a bit then throw them in a skillet to cook. While they are cooking, make soft breadcrumbs (no need to bother with cleaning the processor).

Finally, chop the beans in the processor, and stir them, the veggies, and the breadcrumbs all together with a beaten egg. Cover the mixture and refrigerate for at least an hour, then form into patties and cook!

Cook the Veggies For Best Texture and Flavor

Do you have an extra five minutes? They will be well spent if you cook the vegetables and dry the beans with a paper towel. This step ensures the burgers won’t be mushy because some of the water will be released from the veggies, plus the flavors of vegetables mellow from cooking.

Poblano peppers add some earthy spice to these burgers, and soften pleasingly when cooked first. In general, they are mild, but every once in a while a rogue hot one pops up, so be sure to taste the pepper before you add it, and cut back if it is too spicy for your taste. If you can’t find them, substitute Anaheim peppers or just plain old green bell peppers.

Onions and garlic lose their raw and sometimes jarring flavor and become sweetened by cooking. In addition, zucchini adds a creamy texture, but it can make your burgers soggy if it’s not cooked before adding it to the burger mix.

Easy Black Bean Burgers Recipe cook the burgers

Make-Ahead Tips for Veggie Burgers When You Want Them

This recipe makes four large, filling burgers, suitable for hungry folks. One of these with all the add-ons and a bun makes a substantial meal all by itself. If you want smaller burgers, say for lunch, you will end up with four to six burgers, depending on the size you want.

Once shaped, the patties will keep in the fridge for a day or two—stack them between layers of parchment and wrap them in plastic.

You could also freeze them: Spread them on a parchment-lined baking sheet and freeze, then stack them with parchment squares in between and enclose in a plastic freezer bag. Let them sit out at room temperature to partially (25 to 30 minutes) defrost before cooking.

Finally, the cooked patties do well reheated—brown them in a skillet, refrigerate them, and reheat them later in the oven with the cheese on top. It’s a handy way to make them ahead if you are having friends over.

Easy Black Bean Burgers Recipe

Low and slow cooking

I prefer to make these in a skillet, but they could be grilled if handled carefully — they are more fragile than a meat burger. I’d recommend chilling the burgers in the fridge for about an hour before grilling.

In either case you need plenty of oil (in the pan or on the grill grates) and medium heat. The burgers need time to heat all the way through and if the heat is too hot, they will brown on the outside but stay cool in the middle.

Top with Spicy Mayo!

The spicy mayonnaise I’ve created for these burgers is mildly hot with a sharp punch of lime. If you like more spice, add more chili powder, or substitute finely chopped chipotle chilies in adobo to taste.

With flavorful beany burgers, and onions, tomato and avocado as toppings, you already have a feast—but the spiced mayonnaise makes them sing.

MORE SUMMERTIME MEATLESS MAINS TO TRY!


Recipes

via Simply Recipes https://ift.tt/2F9fkDA

July 31, 2018 at 09:01AM
0 Comments

Sweet Corn & Arugula Panzanella

7/30/2018

0 Comments

 
Sweet Corn & Arugula Panzanella
https://ift.tt/2OpgvEl

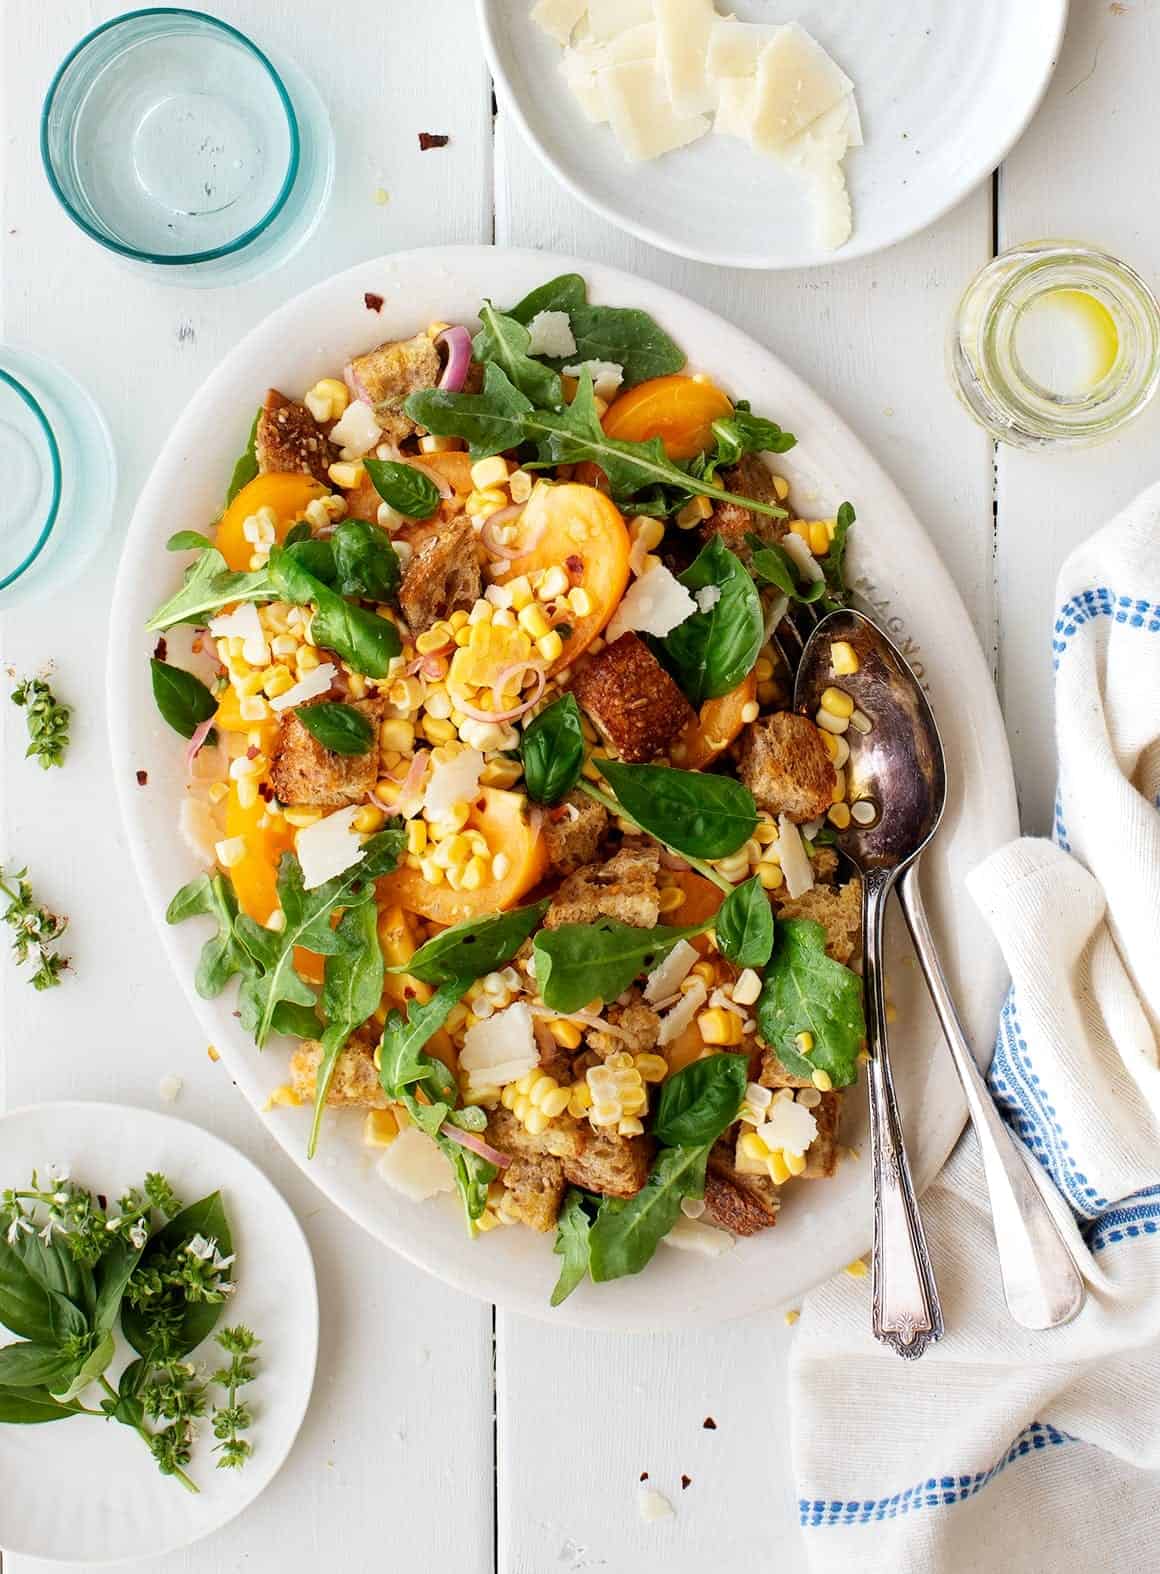
Sweet Corn & Arugula Panzanella

Tell me, what’s your favorite summer salad?

If you said panzanella, you’re at the right place. If you didn’t say panzanella, that’s ok too, because I think you’ll be converted after you try this one! ? It’s the ultimate summer salad to make with a bounty of fresh tomatoes. Or in this case, if you have a few tomatoes and a bounty of fresh sweet corn.

Sweet Corn & Arugula Panzanella

Panzanella may be an Italian bread salad, but the special part about this panzanella is that it’s not entirely about the bread. I think bread salads can often get a bit too bread-y, which is where the corn comes in. It’s fresh, crisp, and it soaks up the tangy vinaigrette and tomato juices so well. Plus, corn is my favorite summer vegetable and it’s just now coming into season, so I’ll be eating it pretty much every day from now until the end of September.

Sweet Corn & Arugula Panzanella

I would usually choose a lighter bread like ciabatta bread for panzanella, but I like this particular salad with cubes of hearty & seedy whole grain bread like this one:

Sweet Corn & Arugula Panzanella

Did I mention that this salad comes together in just one bowl? It’s great to make ahead and it’s the perfect side dish to go with whatever you’re grilling. If you have a bit left over, it makes a great lunch the next day by adding some chickpeas and another handful of arugula.

Sweet Corn & Arugula Panzanella

Sweet Corn & Arugula Panzanella


Author: Jeanine Donofrio

Serves: serves 4 to 6 as a side

Ingredients

  • 3 tablespoons extra-virgin olive oil, more for drizzling
  • 3 tablespoons sherry vinegar
  • ½ teaspoon Dijon mustard
  • ¼ teaspoon sea salt
  • 1 small shallot, very thinly sliced
  • 2 garlic cloves, minced
  • 4 cups cubed whole-grain bread
  • 4 ears corn, kernels cut from cob
  • 2 medium tomatoes, sliced into wedges
  • 3 cups arugula
  • pinches of red pepper flakes
  • flaky sea salt, if desired
  • ½ cup fresh basil, torn or sliced
  • shaved pecorino cheese, optional, omit if vegan

Instructions

  1. Preheat the oven to 350°F and line a baking sheet with parchment paper.
  2. In a large bowl, mix together the olive oil, vinegar, mustard, salt, shallot, and garlic. Set aside.
  3. Arrange the bread cubes on the baking sheet, drizzle with olive oil, and toss to coat. Bake until toasted, about 8 minutes.
  4. To the large bowl, add the corn, tomatoes, toasted bread, arugula, a few pinches of red pepper flakes, and toss. Season to taste with flaky sea salt (or regular sea salt). Spread onto a platter and top with the basil and shaved cheese, if using. Serve.

Notes

Make-ahead note: If you’re not serving this right away, mix every ingredient together except the bread, arugula, basil, and cheese. Add the bread and arugula 15 minutes before serving so that the bread does not get too soggy, and the arugula does not wilt. Top with the basil and cheese as you’re ready to serve.

3.4.3177


Recipes

via Love and Lemons https://ift.tt/2h2Uz32

July 30, 2018 at 04:54PM
0 Comments

Grilled Salmon with Peach Salsa

7/30/2018

0 Comments

 
Grilled Salmon with Peach Salsa
https://ift.tt/2vcaxhc

A peach-avocado salsa is a delicious complement to this grilled salmon. A grill pan ensures the salmon stays crispy throughout the cooking process without sticking to the grill. Winner!

Photography Credit: Sabrina Modelle

This spicy and slightly sweet grilled salmon is bound to become a favorite this summer. Smoked paprika, garlic, and onion powders in the rub create a savory, smoky flavor, while a touch of sugar adds a hint of sweetness and helps the skin become unbelievably crispy.

As if that weren’t enough, the salmon is topped off with a peach and avocado salsa, which compliments the richness of the salmon. The peaches and avocado also contribute a velvety quality to the whole dish.

USE A GRILL PAN FOR CRISPY SKIN THAT WON’T STICK

Grilled salmon is one of my favorite foods ever, but for years I shied away from making it because the fish would stick to the grill and fall apart. For me, the best solution to this problem has been using a good nonstick grill pan, which sits right on top of the grates.

Grill pans are perforated on the bottom, so you still get the classic flavor of cooking over open flame, but you also avoid the tragedy of fish getting stuck to the grill.

If you can’t find a nonstick grill pan, use a stainless steel one and rub it liberally with oil before laying on the salmon.

PREHEAT THE GRILL FOR BEST RESULTS

Next to a grill pan, preheating the grill is the most important part of this recipe. Getting your grill really hot means you get golden caramelization on the fish and crispy salmon skin (my favorite).

Don’t skip this step. It is worth every second of the 15 minutes. Turn the heat to high and close the lid!

I like to season and refrigerate my salmon, then get the grill going, and then make my salsa at a leisurely pace while the grill heats up. You may even have time for a cocktail or glass of wine while you wait.

How to cook salmon on the grill toss the salsa

FRUIT SALSA FOR A SWEET-SAVORY BALANCE

Fruit salsa is a very popular pairing with fish, and one that I come back to over and over. Salmon’s bold richness pairs well with the sweetness, heat, and acidity of this peach salsa.

When choosing your peaches, look for a ripe but still firm peach to contrast the texture from the creamy avocado. The peach’s slight tartness balances the rich fish and avocado.

PLAN AHEAD FOR AN EASY DINNER

You can make the dry rub in advance; you may even consider making a large batch so you have it on hand for other meals. It will keep indefinitely at room temperature when stored in an airtight container. This particular mix of spices tastes great on everything from summer squash to steak.

You can make the salsa up to eight hours in advance. Just wait to add the avocado until you’re ready to serve—adding it at the last minute keeps it from turning brown or getting mushy. You may also consider making a larger batch of the salsa, as it goes great with chips.

MORE GREAT SALMON RECIPES!

Grilled Salmon with Peach Salsa Recipe

Print

Paleo friends! Swap in maple sugar for the light brown sugar in this recipe for a paleo-friendly summer dinner.

Ingredients

For the salmon:

  • 1 1/2 teaspoons smoked paprika
  • 1 1/2 teaspoons granulated garlic
  • 1 1/2 teaspoons granulated onion
  • 1 teaspoon light brown sugar
  • 1/2 teaspoon salt
  • 1/2 teaspoon black pepper
  • 1 pinch of cayenne (optional)
  • 1 pound skin-on salmon filets (about 4 pieces)
  • 2 to 3 tablespoons neutral cooking oil, such as grapeseed, avocado, or canola oil

For the salsa:

  • 2 heaping cups diced peaches, unpeeled (about 3 medium peaches)
  • 1 medium ripe avocado, diced
  • 1/4 cup finely diced red onion
  • 1/4 cup chopped cilantro
  • 2 tablespoons finely minced jalapeño (optional)
  • 1 tablespoon fresh lemon juice
  • 1/4 teaspoon salt

To serve:

  • A few slices of jalapeño
  • A few sprigs of cilantro

Special equipment:


Method

1 Season the salmon: Whisk together paprika, garlic, onion, maple sugar, salt, pepper, and cayenne.

Sprinkle spice mixture evenly on all sides of the salmon. Refrigerate uncovered while making the salsa and preheating the grill, about 20 minutes.

2 Make the salsa: In a medium bowl, mix together the peaches, avocado, onion, cilantro, jalapeño, lemon juice, and salt. Season to taste, adding more salt or jalapeño if you like. If your peaches are a bit tart, you can add a pinch of sugar.

How to cook salmon on the grill toss the salsa

3 Prep the grill: Preheat a gas or charcoal grill to 500ºF for at least 15 minutes, or until you can hold your hand above the grates for 2 to 3 seconds.

4 Grill the salmon: Brush all sides of the salmon with oil—about a tablespoon total. Brush a bit of oil onto the grill grates as well, ensuring that any fish touching the grates through the grill pan will easily lift away.

Place the salmon skin side up on the grill pan and transfer the pan to the grill. Close the lid and cook undisturbed for 2 to 3 minutes. Using a fish spatula or tongs, gently lift one corner of the fish. The grilled side should be opaque and show some sear marks. If not, check every minute or so until it is.

Salmon with peaches recipe grill the salmon skin side up

Gently, flip the fish to skin side down, close the lid, and grill for another 3 to 4 minutes. Open the lid and watch carefully until the fish is done, another 1 to 3 minutes. The salmon is perfectly cooked when the top and bottom are opaque and there is a nice translucent streak through the middle. (If you prefer your salmon more well-done, continue cooking to your preferred doneness.)

How to grill salmon turn the salmon skin side down

5 Serve: Remove from the grill and serve immediately. Top with peach salsa and cilantro and chilies for garnish.

Salmon with peaches recipe serve the salmon with salsa

Hello! All photos and content are copyright protected. Please do not use our photos without prior written permission. If you wish to republish this recipe, please rewrite the recipe in your own unique words and link back to Grilled Salmon with Peach Salsa on Simply Recipes. Thank you!

Print

Sabrina Modelle

Sabrina Modelle started The Tomato Tart in 2010. Since then, recipes and photographs have been featured in media outlets, worldwide. The site features handmade, homemade, food that happens to be gluten free. When she’s not working, Sabrina can be found with her nose in a cookbook and a dog in her lap.

More from Sabrina


Recipes

via Simply Recipes https://ift.tt/2F9fkDA

July 30, 2018 at 09:10AM
0 Comments

Avocado Caesar Dressing

7/30/2018

0 Comments

 
Avocado Caesar Dressing
https://ift.tt/2K7O7mV

Looking for a healthy caesar salad dressing? This avocado caesar dressing uses avocado instead of eggs so it’s still super creamy and flavorful, but low in calories and fat. Less than 60 calories per serving! 

I feel like caesar salad is something you either love or you hate. Or maybe everyone loves it… I just know I’ve never been a huge caesar salad person myself, maybe because when I first started eating healthier I learned that caesar salads weren’t exactly “healthy”, so I spent years avoiding them.

Typically, caesar salads are high in calories and fat and don’t have much nutrition because they’re made with just lettuce, cheese and croutons.  But to my own surprise, I recently created this dressing and a totally epic, EBF-friendly caesar salad (recipe coming soon) and can now say I’m hooked! I can totally see why people like the taste of caesar salads.

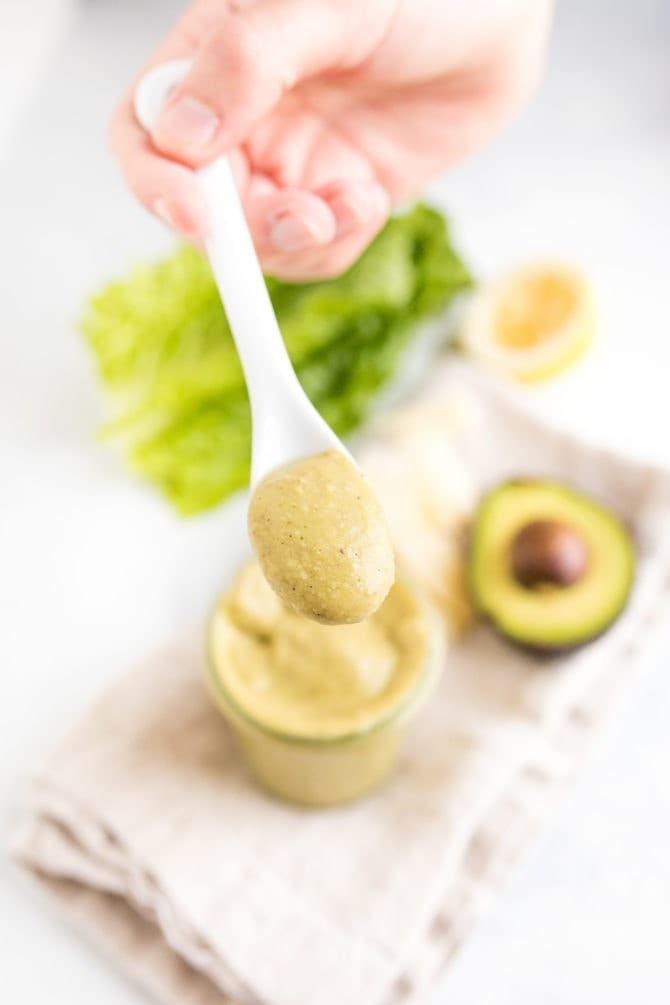
Hand holding a spoon full of avocado caesar dressing above a jar with the dressing on a table with lettuce and an avocado.

SEE HOW EASY THIS AVOCADO CAESAR SALAD DRESSING IS TO MAKE:

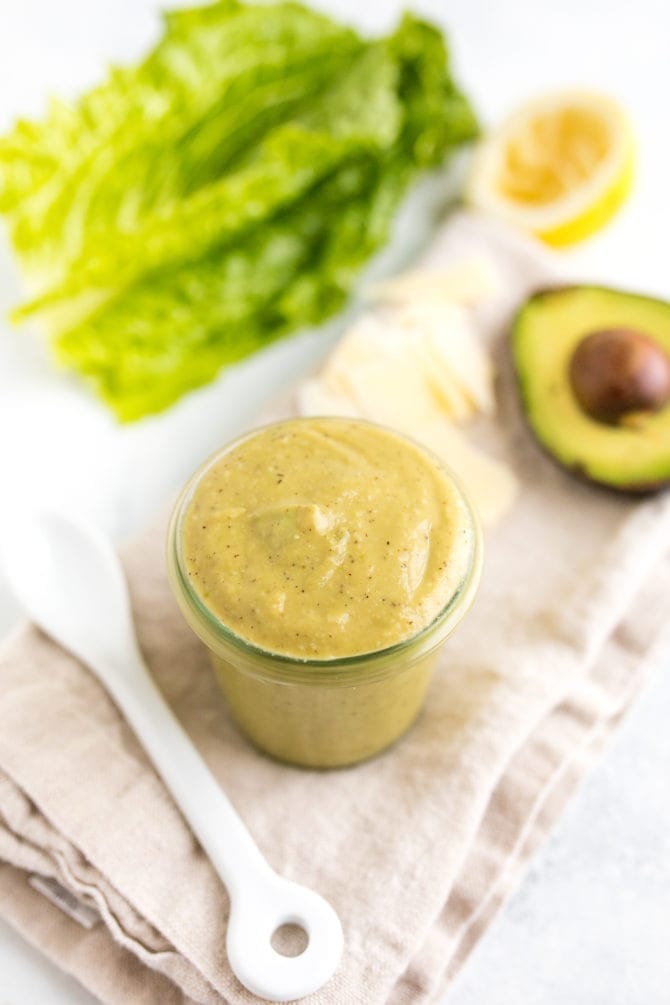
Glass jar filled with avocado caesar dressing on a table with a spoon, napkin, lettuce and avocado.

When it comes to caesar salad dressing , it’s typically made with eggs and loaded with processed oils, but I’ve created a delicious, healthier avocado caesar dressing that’s creamy and light but still packed with all the caesar flavor you love.

Bonus points: this dressing couldn’t be much easier to make – just throw everything into a blender or food processor and blend until smooth! No separating egg yolks, no whisking — bada-bing, bada-boom.

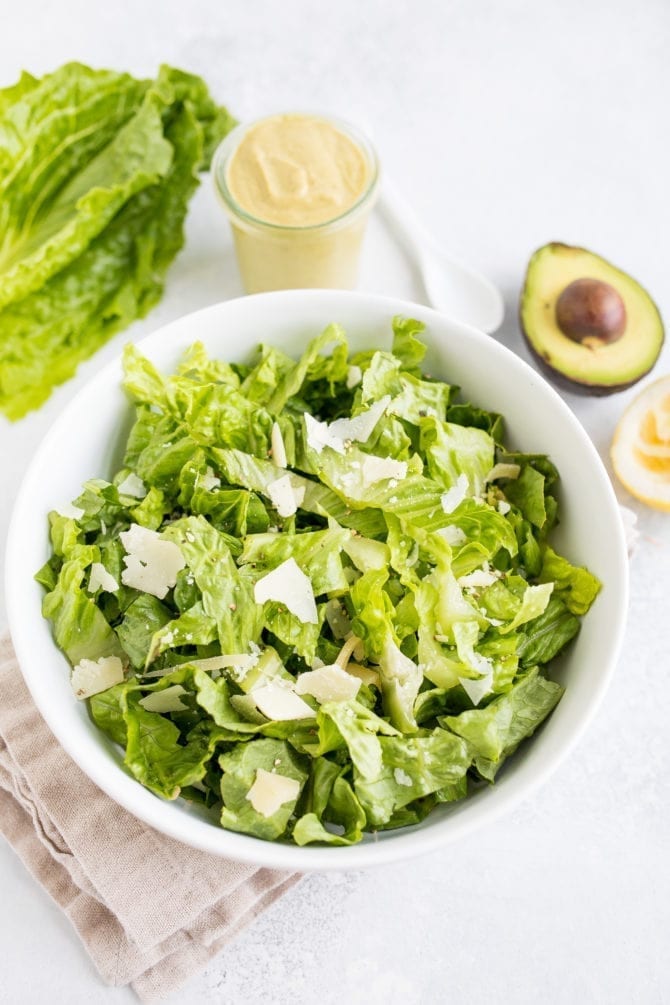
Bowl filled with romaine lettuce. Next to the bowl is a head of lettuce, a jar of avocado caesar dressing, and a half avocado.

Let’s talk about the elephant in the room: anchovies. I know they’re scary and a little weird, but let me tell you – they are nutrition powerhouses and are what gives caesar dressing that unique flavor! They are high in omega-3 fatty acids, which are really important in the standard American diet. They are also high in calcium and vitamin K, which help with bone health (yes please!). Last but not least, they pack a surprising punch in the protein department (1 serving of anchovies has 13 grams of protein)! If you’re freaked out by using anchovy fillets, you can also use anchovy paste (found in your grocery store near the tuna) — whichever is easier for you!

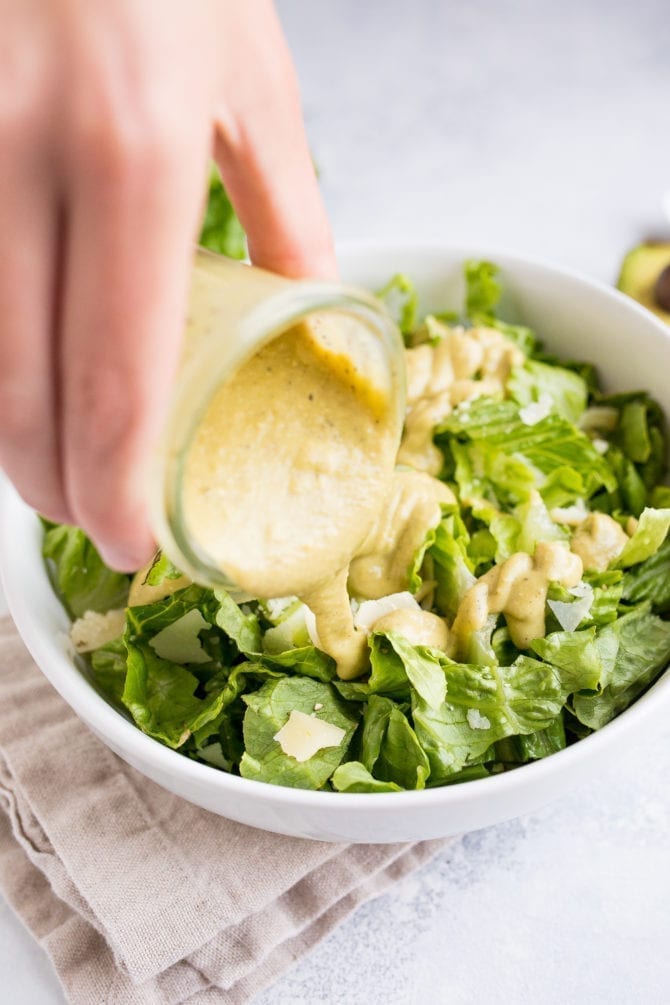
Hand pouring a jar of avocado caesar dressing over a bowl of romaine lettuce with parmesan cheese.

Are you a caesar salad lover? If so, try this dressing and let me know what you think!

Print

Avocado Caesar Dressing

  • Author: Brittany Mullins
  • Prep Time: 10 minutes
  • Total Time: 10 minutes
  • Yield: 3/4 cup
  • Category: Salad
  • Method: Blender
  • Cuisine: American
Print
Pin

Description

Looking for a healthy caesar salad dressing? This avocado caesar dressing uses avocado instead of eggs so it’s still super creamy and flavorful, but low in calories and fat. Less than 60 calories per serving! 


Ingredients

  • 1/3 cup mashed avocado
  • 2 cloves garlic, minced
  • 3 Tablespoons lemon juice
  • 2 anchovy fillets (or 1 teaspoon anchovy paste, if you prefer)
  • 1 Tablespoon olive oil
  • 2 teaspoons Worcestershire sauce
  • 1/2 teaspoon dijon mustard
  • 1/4 cup shredded or shaved parmesan cheese
  • 3/4 teaspoon sea salt
  • 1/4 teaspoon ground pepper
  • 2 Tablespoons water
  • 2 Tablespoons unsweetened almond milk

Instructions

  1. Add all ingredients into a high powered blender or food processor and blend until smooth. Taste and add additional salt and pepper if needed. 

Nutrition

  • Serving Size: 2 Tablespoons
  • Calories: 58
  • Sugar: 2g
  • Sodium: 336mg
  • Fat: 5g
  • Saturated Fat: 1g
  • Carbohydrates: 2g
  • Fiber: 1g
  • Protein: 2g
  • Cholesterol: 4mg

Keywords: avocado caesar dressing, caesar salad dressing, avocado dressing

Did you make this recipe?

Tag @eatingbirdfood on Instagram and hashtag it #eatingbirdfood

If you try this dressing, please leave a comment and star rating below. Your feedback is helpful for us here at EBF and other EBF readers who plan to make the recipe! 

The post Avocado Caesar Dressing appeared first on Eating Bird Food.


Recipes

via Eating Bird Food https://ift.tt/1L45wsH

July 30, 2018 at 05:01AM
0 Comments

Smores Pie

7/29/2018

0 Comments

 
S’mores Pie
https://ift.tt/2mNob6C

Warm weather conjures images of nights spent outdoors, sitting around a campfire surrounded by friends. And with that image usually comes s’mores.

The combination of graham crackers, chocolate, and gooey marshmallows is a classic summertime treat for a reason. With this recipe, we have transformed the dessert into pie form, ideal for serving a crowd of people a summer dinner party or as part of a BBQ dessert spread.

The crunchy graham cracker crust contrasts the cool chocolate pudding filling. But the gooey marshmallows—toasted under the broiler not a campfire, in this case—will have you coming back for more.

HOW TO MAKE A S’MORES PIE

This riff on Simply Recipes’ classic chocolate cream pie starts with the graham cracker crust, which can either be store bought or homemade.

The next step is a modified version of our microwave chocolate pudding. I used standard cocoa powder and semi-sweet (56%) chocolate in this recipe (because that’s what was available at my grocery store), but feel free to go with a higher cocoa percentage for a richer filling.

If you’re feeling a bit skeptical about making pudding in the microwave (I was at first, because in my mind, microwaves are meant for reheating and not cooking!), you’ll love this recipe — it’s very easy and fool proof.

The only part of this entire recipe that you really need to take into consideration is the amount of time it takes for the pudding to set. As such, I’d recommend filling the pie crust the night before you plan to serve it the afternoon of the next day, or first thing in the morning if you plan to serve it that night.

S'mores Pie with Marshmallows add the marshmallows

Top with Marshmallows!

To finish the pie, top the pie with some marshmallows and place it under the broiler until it gets nice and toasty on top. You’ll want to keep a keen eye on this as it can go from beautiful to burned very quickly. Alternatively, you can freehand it with a kitchen torch if you happen to have one in your arsenal.

For extra flourish, I topped the pie with some broken graham crackers and chocolate curls, the latter of which I made by simply running a vegetable peeler along a bar of chocolate.

S'mores Pudding Pie

Messy Pie Means Delicious Pie

Now comes the hard part: slicing. It’s going to be messy. The combination of a crumbly crust, pudding, and marshmallows does not make for picture-perfect slices. However, if you coat your knife with nonstick spray it really helps to cut through the marshmallow layer so that you get less of a mess.

It also helps if you angle your slices so they go between adjacent marshmallows instead of through them.

The crust will soften the longer it sits because the chocolate pudding is so moist, so I’d recommend eating this pie within 12 or so hours after making it for the best results. It still tastes great scooped into a bowl for a couple days after, but it becomes more parfait than pie at that point.

Whether you’re sitting around a campfire under the stars or at your dining room table, this is a crowd-pleasing dessert that’s great for the summer (or any other time of year).

MORE SUMMERY DESSERTS!


Recipes

via Simply Recipes https://ift.tt/2F9fkDA

July 29, 2018 at 09:02AM
0 Comments

Skinnytaste Meal Plan (July 30-Aug 5)

7/28/2018

0 Comments

 
Skinnytaste Meal Plan (July 30-Aug 5)
https://ift.tt/2LFpbYH

Skinnytaste Meal Plan (July 30-Aug 5)

posted July 28, 2018 by Gina

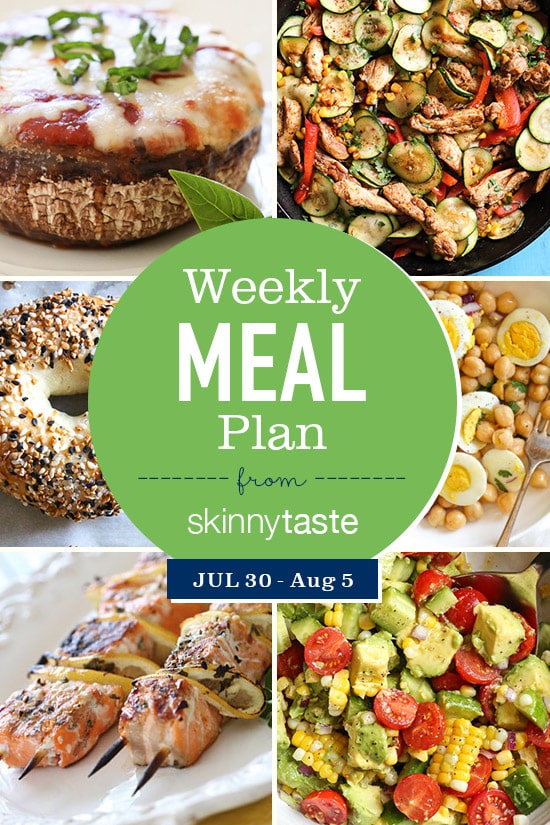
A free 7-day flexible meal plan including breakfast, lunch and dinner and a shopping list. All recipes include calories and Weight Watchers Freestyle™ SmartPoints®.

A free 7-day flexible meal plan including breakfast, lunch and dinner and a shopping list. All recipes include calories and Weight Watchers Freestyle™ SmartPoints®.

Hope everyone is having a great weekend, if you have any suggestions for recipes you want to see next week, let me know! I included the famous Bagel Recipe and Chickpea Egg Salad to make ahead on Sunday so you’ll be ready for the week.

If you’re new to my meal plans, I’ve been sharing these free, 7-day flexible healthy meal plans (you can see my previous meal plans here) that are meant as a guide, with plenty of wiggle room for you to add more food, coffee, beverages, fruits, snacks, dessert, wine, etc or swap recipes out for meals you prefer, you can search for recipes by course in the index. You should aim for around 1500 calories* per day.

There’s also a precise, organized grocery list that will make grocery shopping so much easier and much less stressful. Save you money and time. You’ll dine out less often, waste less food and you’ll have everything you need on hand to help keep you on track.

Lastly, if you’re on Facebook join my Skinnytaste Facebook Community where everyone’s sharing photos of recipes they are making, you can join here. I’m loving all the ideas everyone’s sharing!

THE DETAILS:

Breakfast and lunch Monday-Friday, are designed to serve 1 while dinners and all meals on Saturday and Sunday are designed to serve a family of 4. Some recipes make enough leftovers for two nights or lunch the next day. While we truly believe there is no one size fits all meal plan, we did our best to come up with something that appeals to a wide range of individuals. Everything is Weight Watchers friendly, I included the updated Weight Watcher Freestyle Points for your convenience, feel free to swap out any recipes you wish or just use this for inspiration!

The grocery list is comprehensive and includes everything you need to make all meals on the plan. I’ve even included brand recommendations of products I love and use often. Cross check your cabinets because many condiments you’ll notice I use often, so you may already have a lot of them.

And last, but certainly not least, this meal plan is flexible and realistic. There’s plenty of wiggle room for cocktails, healthy snacks, dessert and dinner out. And if necessary, you can move some things around to make it work with your schedule. Please let me know if you’re using these plans, this will help me decide if I should continue sharing them! 

MONDAY (7/30)
B: Easy Bagel Recipe* (3) with 1 egg (0), 1 ounce avocado (1) and 2 slices tomato (0)
L: Chickpea Egg Salad* (2)
D: Veggie Lasagna Stuffed Portobello Mushrooms (6) with a green salad** (2)
Totals: Freestyle Points 14, Calories 950***

TUESDAY (7/31)
B: Easy Bagel Recipe (3) with 1 egg (0), 1 ounce avocado (1) and 2 slices tomato (0)
L: Chickpea Egg Salad (2)
D: Southwest Chicken Skillet (5)
Totals: Freestyle Points 11, Calories 957***

WEDNESDAY (8/1)
B: Easy Bagel Recipe (3) with 2 tablespoons light cream cheese (3), 2 slices each: tomato (0), red onion (0) and cucumber (0)
L: Chickpea Egg Salad (2)
D: Unstuffed Cabbage Bowls (8)
Totals: Freestyle Points 16, Calories 950***

THURSDAY (8/2)
B: Easy Bagel Recipe (3) with 2 tablespoons light cream cheese (3), 2 slices each: tomato (0), red onion (0) and cucumber (0)
L: Chickpea Egg Salad (2)
D: Bacon Topped Petite Turkey Meatloaf with BBQ Sauce (6) and corn on the cob (0)
Totals: Freestyle Points 14, Calories 969***

FRIDAY (8/3)
B: Skinny Green Monster Smoothie (7)
L: LEFTOVER Bacon Topped Petite Turkey Meatloaf with BBQ Sauce (6) and an apple (0)
D: Grilled Salmon Kebabs (0) with Corn Tomato Avocado Salad (3)
Totals: Freestyle Points 16, Calories 1,002***

SATURDAY (8/4)
B: Roasted Strawberry Banana Bread (3) with 1 cup fruit salad** (0)
L: Greek Nachos (5) (Recipe x 2)
D: DINNER OUT!
Totals: Freestyle Points 8, Calories 353***

SUNDAY (8/5)
B: LEFTOVER Roasted Strawberry Banana Bread (3) with 1 cup fruit salad** (0)
L: Lentil Bowls with Avocado, Eggs and Cholula (2) (Recipe x 2)
D: One Skillet Chicken with Bacon and Green Beans (2) with ¾ cup brown rice (5)
Totals: Freestyle Points 12, Calories 905***

*Make Easy Bagels and Chickpea Egg Salad on Sunday

**Green salad includes 4 cups romaine ½ cup each: tomatoes, cucumber and light vinaigrette. Fruit salad includes 2 peaches, 1 pound sliced strawberries, 2 mangos, 6-ounces blueberries

***This is just a guide, women should aim for around 1500 calories per day. Here’s a helpful calculator to estimate your calorie needs. I’ve left plenty of wiggle room for you to add more food such as coffee, beverages, fruits, snacks, dessert, wine, etc.

Shopping List:

Produce

  • 4 large portobella mushroom caps
  • 6 medium ears of corn
  • 1 medium apple
  • 1 medium head cabbage
  • 2 medium peaches
  • 2 medium mangos
  • ½ pound French green beans
  • 1 small bunch/container cilantro
  • 1 small head Romaine lettuce
  • 1 medium shallot
  • 1 (5-ounce) bag baby spinach
  • 1 medium head garlic
  • 1 small and 3 medium bananas
  • 2 (1-pound) containers strawberries
  • 1 (6-ounce) container blueberries
  • 1 small bunch/container fresh thyme
  • 1 small bunch/container fresh oregano
  • 1 small bunch/container fresh basil
  • 2 small (4-ounce) and 1 medium (5-ounce) Hass avocados
  • 3 small limes
  • 3 medium lemons
  • 3 medium zucchini (2 of which can be yellow squash, if desired)
  • 1 small and 1 medium cucumber
  • 3 Persian (or 1 English) cucumber
  • 1 small and 1 large red bell pepper
  • 1 small red onion
  • 1 medium yellow onion
  • 4 vine-ripened tomatoes
  • 2 dry pints grape or cherry tomatoes

Meat, Poultry and Fish

  • 1 ½ pounds boneless, skinless chicken thighs
  • 1 pound 93% lean ground beef
  • 1 1/3 pound 93% lean ground turkey
  • 1 package center-cut bacon
  • 1 pound boneless, skinless chicken breasts
  • 1 (1 ½ pound) skinless wild salmon filet

Grains

  • 1 small bag white whole wheat flour*
  • 1 small bag all-purpose flour*
  • 1 small container seasoned breadcrumbs*
  • 1 bag 100% whole wheat small pita rounds*
  • 1 bag/box dry brown rice*

Condiments and Spices

  • Extra virgin olive oil
  • Cooking spray
  • Olive oil spray (or get a Misto oil mister)
  • Kosher salt (I like Diamond Crystal)
  • Pepper grinder (or fresh peppercorns)
  • Light vinaigrette (or make your own with ingredients in list)
  • Chili powder
  • Red pepper flakes
  • Cayenne pepper
  • Oregano
  • Smoked Paprika
  • Cumin
  • Garlic powder
  • Onion powder
  • Marjoram
  • Hungarian paprika
  • Honey
  • Red wine vinegar
  • Unsulfured molasses
  • Liquid hickory smoke (I like Colgin)
  • Cinnamon
  • Vanilla
  • Cholula
  • Apple cider vinegar (I like Bragg’s)
  • Optional bagel toppings: everything bagel seasoning, sesame seeds, poppy seeds, dried garlic flakes, dried onion flakes
  • Sesame seeds

Dairy & Misc. Refrigerated Items

  • 2 (6-ounce) containers non-fat plain Greek yogurt
  • 1 small container unsweetened vanilla almond milk
  • 2 dozen large eggs
  • 1 small package cotija cheese (optional for SW Chicken Skillet)
  • 1 wedge/container feta cheese
  • 1 small box butter
  • 1 (8-ounce) container light cream cheese
  • 1 (15-ounce) container part-skim ricotta
  • 1 wedge fresh Parmesan cheese
  • 1 (8-ounce) bag shredded part-skim mozzarella cheese
  • 1 small tub hummus

Canned and Jarred

  • 2 (15-ounce) cans chickpeas (I use Goya)
  • 1 small jar unsweetened apple sauce
  • 1 small jar marinara
  • 1 (8-ounce) and 1 (15-ounce) cans tomato sauce
  • 1 (6-ounce) cans tomato paste
  • 1 jar Better n Peanut Butter
  • 1 (14.5-ounce) can low sodium chicken broth
  • 1 (14.5-ounce) can reduced sodium beef broth

Misc. Dry Goods

  • Baking powder
  • 1 small box/bag raisins (you need 2 tablespoons)
  • Baking soda
  • 1 small box/bag light brown sugar
  • 1 bag/package dry lentils (can sub refrigerated, pre-cooked if you can find it)
  • 1 bottle crisp white wine, such as Sauvignon Blanc

Non-Food Items

*Can sub gluten-free, if desired

posted July 28, 2018 by Gina


Recipes

via Skinnytaste https://ift.tt/2ix3Luq

July 28, 2018 at 01:10PM
0 Comments

Foil Packs with Sausage Corn Zucchini and Potatoes

7/28/2018

0 Comments

 
Foil Packs with Sausage, Corn, Zucchini and Potatoes
https://ift.tt/2LGRVjB

Foil packs on the grill are so easy! Just toss together veggies and some sausage, and close them up in foil before tossing on the grill. It's a mostly hands-off process that brings together the best flavors of summer.

Photography Credit: Sally Vargas

It’s summertime, and the livin’ should be easy! And easy it is with these make-ahead foil packs that you can throw on the grill after a long hike or a day at the beach.

HOW TO MAKE A FOIL PACKET DINNER

The idea is simple: Choose any fully cooked sausage that you like—bratwurst, flavored chicken sausage, kielbasa, Italian smoked sausage. Just check the package label says it is fully cooked. Cut the sausage into pieces along with some vegetables.

Enclose the sausage and veggies in foil packets and grill. The contents of your package are ready to eat right off the grill. No knives needed!

USE HEAVY DUTY FOIL

To make packets like these, I like to use heavy-duty foil because it’s thicker and doesn’t tear as easily. Pick a wide roll, which is easier to form into packets—if you’re stocking up for the summer, this is the size to buy.

HOW TO GRILL FOIL PACKETS

After assembling the packets, I like to flip them over and cook them with the folded side of the packet downward, against the grill grates. This side is thicker (because of the folds), which insulates the food just enough for everything to brown but not burn. Don’t forget to poke a few holes in the top of the packet for steam to escape.

When you are ready to serve the packets, simply cut a large cross in the top of the packet and fold the corners back. Set the packets on paper plates (easiest) or transfer the contents to plates or a large platter.

Remember, it’s summertime and the livin’ should be easy, right?

MORE EASY GRILLED DINNERS!

Foil Packs with Sausage, Corn, Zucchini and Potatoes Recipe

Print

Oven instructions if you don't have a grill or the weather isn't cooperating: Preheat the oven to 450°F and bake the packets directly on the oven rack for 25 to 30 minutes or until the vegetable are tender when pierced with the tip of a paring knife, and the sausages are hot all the way through.

Ingredients

  • 4 fully cooked sausages (12 ounces), any kind, cut into 1-inch thick slices
  • 12 small potatoes (12 ounces), halved or quartered if large
  • 1 large red onion, cut into wedges through the root
  • 2 yellow or red bell peppers, seeded and cut into 1-inch wide strips
  • 1 zucchini, cut into 1/2-inch thick rounds
  • 1 yellow squash, cut into 1/2-inch thick rounds
  • 2 ears corn on the cob, husked and cut in half
  • 3 tablespoons olive oil
  • 1 teaspoon salt
  • 1/4 teaspoon black pepper
  • 1 teaspoon dried oregano
  • 4 thyme sprigs
  • 4 rosemary sprigs

Special equipment:

  • 18-inch wide roll of heavy-duty foil

Method

1 Preheat the grill: Build a charcoal fire or set a gas grill on medium high heat.

2 Prepare the foil: Cut 4 pieces of heavy-duty foil into rectangles that are approximately 18x24 inches. Spray the centers with vegetable oil spray or brush with oil.

3 Make the foil packets: In a large bowl, toss the sausages, potatoes, onion, peppers, zucchini, and corn with the oil. Add the salt, pepper, and dried oregano and toss again.

Grill Foil Packet Dinner combine the veggies

Divide the mixture between the four sheets of foil. Place a sprig of thyme and a sprig of rosemary on top of each pile. Fold the right side over the vegetables to cover them. Fold the opposite side over the first side so they're overlapping.

Grill Foil Packets Meal add the veggies

Fold the top and bottom ends in toward the center. Repeat the procedure with the remaining packets. (At this point, the packets can be refrigerated until ready to grill, up to 24 hours.)

Turn the packets so the folded side is on the bottom. With the tip of a paring knife, poke 4 or 5 steam vents in the foil.

Sausage Foil Packet Meal make the foil pack

4 Grill the packets: Set the packets on the grill with the folded side down. Close the cover, and cook for 18 to 20 minutes, moving them once or twice during cooking to ensure they cook evenly. To test for doneness, remove a packet from the grill, turn it over, open the bottom and peek inside; be careful of steam.

5 Serve the packets: Turn the packets so the vent sides are up. With a sharp knife, cut a large cross in the foil. Carefully peel back the foil to open the packets (hot steam releases immediately, so mind your fingers). Serve immediately.

Sausage Foil Packet Meal serve the packets

Hello! All photos and content are copyright protected. Please do not use our photos without prior written permission. If you wish to republish this recipe, please rewrite the recipe in your own unique words and link back to Foil Packs with Sausage, Corn, Zucchini and Potatoes on Simply Recipes. Thank you!

Print


Recipes

via Simply Recipes https://ift.tt/2F9fkDA

July 28, 2018 at 09:10AM
0 Comments

Meal Plan for July Week 5

7/28/2018

0 Comments

 
Meal Plan for July Week 5
https://ift.tt/2LsKxZT

This month, Summer Miller is back, sharing her meal plans for July. Summer is a mom, a full-time food writer, and also helps test the fabulous recipes we bring you every week at Simply Recipes.

And just like that we are finishing off the month of July! The official end of summer is still a couple of months way, but the back to school sales are everywhere reminding us the end is near. Soon fall sports and homework will replace swimsuits and sprinklers.

With that in mind I want to make the most of these final carefree days. My garden is packed with tomatoes, basil and cucumbers at this point in the season, and this week’s meal plan puts them all to good use.

Continue reading "Meal Plan for July Week 5" »


Recipes

via Simply Recipes https://ift.tt/2F9fkDA

July 28, 2018 at 09:10AM
0 Comments

Award-Winning Pecan-Crusted Nashville Hot Chicken

7/27/2018

0 Comments

 
Award-Winning Pecan-Crusted Nashville Hot Chicken
https://ift.tt/2v6ebcg

1 Marinate the chicken: In a medium glass baking dish, whisk together the buttermilk, dill pickle brine, hot sauce, smoked paprika, salt and pepper. Add chicken and turn to coat. Cover and refrigerate for at least 4 hours or overnight, turning occasionally.

2 Meanwhile, make the pesto: Bring a medium pot of salted water to a boil. Add the collard greens and cook for 8 to 10 minutes, or until tender. Drain well in a colander and let cool for 10 minutes. Add the collard greens and remaining pesto ingredients to a food processor, and pulse until it forms a course puree. Refrigerate until you are ready to bake the chicken.

Pecan-Crusted Nashville Hot Chicken Pecan-Crusted Nashville Hot Chicken

3 Prepare the chicken coating: Preheat the oven to 400°F. Line a rimmed baking sheet with foil and lightly coat with cooking spray. In a food processor, pulse pecans until they resemble the texture of coarse cornmeal and pour into a shallow dish. In separate shallow dish, whisk together the flour, salt and pepper. In another separate shallow bowl, place egg whites.

4 Coat the chicken: Drain and discard chicken marinade. Pat chicken dry with paper towels. Lightly dredge chicken in the flour, then into the egg whites and finally into the pecans, coating thoroughly.

Place chicken on the foil-lined baking sheet and spray tops lightly with cooking spray. Bake for 18 to 22 minutes or until chicken is cooked through.

Pecan-Crusted Nashville Hot Chicken

5 Meanwhile, make the cornbread grits: Crumble the cornbread into coarse crumbs and transfer to a bowl along with the milk and broth. Stir gently to moisten. For super creamy grits, blend in a blender until no lumps remain.

Transfer this mixture to a medium saucepan. Cook over medium heat until thickened like grits, stirring often. Remove from heat and stir in the cheddar, salt and pepper until smooth. Fold in pimientos.

Pecan-Crusted Nashville Hot Chicken Pecan-Crusted Nashville Hot Chicken

6 Make the hot pecan oil: In a small bowl, whisk together all ingredients for the hot oil except honey until combined. Pour 1 tablespoon of the oil mixture into a small bowl with the honey, whisk briefly to combine, and set aside.

Pour remaining oil into a small skillet and heat over medium for 2 to 3 minutes or until heated through, whisking often.

Pecan-Crusted Nashville Hot Chicken

7 Plate and serve: Spread 2 to 3 tablespoons pesto around the outer edges of each of two serving plates. Spoon about 1 cup of grits in the center of each plate. Carefully place chicken in the skillet with the hot oil. Spoon more oil on top. Place one piece of chicken over each plate of grits. Drizzle reserved honey-oil mixture over chicken, allowing any excess to drip over the edges. Garnish chicken with dill pickle slices.

Pecan-Crusted Nashville Hot Chicken Pecan-Crusted Nashville Hot Chicken


Recipes

via Simply Recipes https://ift.tt/2F9fkDA

July 27, 2018 at 09:08AM
0 Comments

Easiest Yummy Peanut Noodles

7/26/2018

0 Comments

 
Easiest Yummy Peanut Noodles
https://ift.tt/2mMJx4f
These Easiest Yummy Peanut Noodles are a quick version of the beloved "peanut noodle." They have just enough complexity to the flavor to keep things interesting, yet they are quite simple with prep and ingredients. Perfect for a lazy summer afternoon or as a busy workday meal. These make great 'make ahead' noodles because they taste delicious both warm or chilled. Next time you are hungry and craving a cozy, steamy bowl of goodness, give these lovable noodles a whirl!... Read more »

This is a summary, images and full post available on HHL website!


Recipes

via Healthy. Happy. Life. https://ift.tt/ygHPsr

July 26, 2018 at 09:03PM
0 Comments
<<Previous

    The Flat Belly Detox Drink Fix


    The Flat Belly Fix

    This is the only 21-day rapid weight loss system that allows you to easily lose an average of 1 lb a day for 21 days without feeling hungry or deprived. The unique and brand new techniques used in this System are proven SAFE. And they do not cause the rebound weight gain common to all the other rapid weight loss systems that are not backed by the latest science. The Flat Belly Fix System takes advantage of a recent scientific discovery that proves the effective weight loss power of an ancient spice. Combined with other cutting-edge ingredients in the patent-pending Flat Belly Fix Tea™ — that you can make right in your own kitchen in minutes — this System is the quickest, easiest and most enjoyable way to quickly get the body you desire and deserve. Click Here

    Categories

    All
    Gluten Free
    Pancakes
    Protein

    Archives

    November 2020
    October 2020
    September 2020
    August 2020
    July 2020
    June 2020
    May 2020
    April 2020
    March 2020
    February 2020
    January 2020
    December 2019
    November 2019
    October 2019
    September 2019
    August 2019
    July 2019
    June 2019
    May 2019
    April 2019
    March 2019
    February 2019
    January 2019
    December 2018
    November 2018
    October 2018
    September 2018
    August 2018
    July 2018
    June 2018
    May 2018
    April 2018
    March 2018
    February 2018
    January 2018
    December 2017
    November 2017

    RSS Feed

Powered by Create your own unique website with customizable templates.
  • Home
  • Recipes
  • Health News
  • Fitness News
  • Weight Loss
  • Contact
  • Subscribe