Feel Healthy Today
  • Home
  • Recipes
  • Health News
  • Fitness News
  • Weight Loss
  • Contact
  • Subscribe

Recipes

Fudgy Pumpkin Collagen Bites

10/31/2018

0 Comments

 
Fudgy Pumpkin Collagen Bites
https://ift.tt/2CT69Jj

Get in your daily collagen with these two layer, fudgy pumpkin collagen bites. These collagen bites are no bake and high in protein — a double win in my book.

I shared these easy fudgy collagen bites over on Instagram… and the crowd went wild! But for real, this was a fan favorite so I knew I needed to add it the recipe to my blog. if you’re like me, your bookmarked Instagram posts get a littttle overwhelming and disorganized so it helpful to have a blog post version of the recipe as well.

I’ve been taking collagen peptides daily and to be honest, it’s one of the only supplements that I’ve been able to stay pretty consistent with… mainly because it’s tasteless and I can add it to just about anything. I typically add it to my morning cup of coffee and I’m happy to report that I’ve seen a TON of great benefits, the most noticeable being my skin looking extra healthy and my hair and nails grow super fast. I was inspired to make a new recipe using collagen peptides because I wanted something a little more versatile than my 2-ingredient protein coffee and I know some of you don’t drink coffee.

Are you curious about collagen? I already wrote a blog post about what collagen is, which brands I recommend and some of the most common questions I see around collagen so definteily check that out if you’re new to collagen.

Now let me introduce you to my new favorite way to get my daily dose of collagen in. There are two layers: pumpkin and chocolate. I mean, does it get any better than that?! These are soooo simple to make and require zero baking. I know pumpkin is more of a fall flavor but I can already see myself enjoying these year round.

Print

Fudgy Pumpkin Collagen Bites

  • Author: Brittany Mullins
  • Yield: 8
Print
Pin

Description

Two layer, fudgy pumpkin collegen bites that you better believe I’ll be making year round. These bites are no bake and high in protein — a double win in my book.


Ingredients

Pumpkin layer:

  • 1/4 cup nut butter (I used crunchy peanut butter)
  • 1 Tablespoon canned pumpkin
  • 1 Tablespoon maple syrup
  • 1/2 Tablespoon  melted coconut oil
  • 3 scoops collagen peptides
  • 3 Tablespoons coconut flour
  • 1/2 teaspoon pumpkin pie spice
  • pinch of cinnamon
  • 1 Tablespoon mini chocolate chips

Chocolate layer:

  • 2 Tablespoons melted coconut oil
  • 1 1/2 Tablespoons nut butter
  • 1/2 Tablespoon cocoa/cacao powder
  • 1-2 teaspoon maple syrup

Instructions

  1. Grab two bowls, mix the pumpkin mixture in one and the chocolate mixture in another. Scoop pumpkin mixture into the cavities of a silicon ice cube tray, filling each about halfway and press mixture down.
  2. Pour a thin layer of chocolate on top of each until all are covered, then go back and add more chocolate to each until you run out.
  3. Place tray in the fridge to harden for 20-30 minutes and enjoy. Store leftovers in the fridge and eat 1-2 bites a day. Makes 6-8 bites.

Keywords: pumpkin collagen bites

Did you make this recipe?

Tag @eatingbirdfood on Instagram and hashtag it #eatingbirdfood

The post Fudgy Pumpkin Collagen Bites appeared first on Eating Bird Food.


Recipes

via Eating Bird Food https://ift.tt/1L45wsH

October 31, 2018 at 09:53AM
0 Comments

Make-Ahead Turkey Gravy

10/31/2018

0 Comments

 
Make-Ahead Turkey Gravy
https://ift.tt/2RtZf1r

1 Roast the turkey wings and vegetables: Preheat the oven to 450ºF. In a roasting pan, combine the turkey, onions, carrots, celery, and garlic. Sprinkle with the oil, and toss with your hands to coat with the oil.

Roast the turkey and vegetables, stirring occasionally, for 1 1/2 hours, or until the meat and vegetables are well browned.

Make Ahead Turkey GravyMake Ahead Turkey Gravy

2 Make the stock: Transfer the turkey, onions, carrots, celery and garlic to a large pot.

Pour 2 cups of the bone broth into the bottom of the roasting pan and set the pan over medium heat. Bring to a boil and stir with a flat wooden spoon to scrape up and release the brown bits.

Make Ahead Turkey Gravy

Pour the broth, including any accumulated fat from the pan or vegetables that stuck to the bottom, into the pot with the turkey and vegetables. Add the remaining bone broth, water, parsley, thyme and bay leaf.

Bring the stock to a boil over medium heat. Adjust the heat so the stock maintains a gentle simmer. Simmer for 2 hours.

3 Strain the stock: With tongs, remove the turkey wings and discard the skin and bones. (If the meat is not too dry, you can refrigerate it and use it in soup later.)

Set a large strainer over a large container, and strain the stock into it. When the stock settles, skim off the fat with a ladle, transfer it to a bowl, and reserve it for making the gravy.

Alternatively, if time permits, refrigerate the stock overnight. The fat solidifies and is easier to remove. Also, don’t be surprised if your stock turns into jelly overnight in the fridge. That’s a good thing!

Make Ahead Turkey Gravy

4 Make the gravy: Reheat the stock if you have refrigerated it overnight.

Spoon 1/2 cup of the reserved turkey fat into a large saucepan and set the pan over medium heat. Slowly whisk in the flour, and cook, stirring, for about 2 minutes to cook the flour.

Make Ahead Turkey Gravy

Slowly add 4 cups of stock while whisking the roux. Simmer, whisking often, until thickened, another 2 to 5 minutes. Thin with additional stock if desired.

Add additional stock, if you like, to bring the gravy to the consistency you prefer. Add the salt and pepper and taste. Add more salt, if you like.

Make Ahead Turkey Gravy

5 Freeze or refrigerate the gravy: Let the gravy cool for about 30 minutes and transfer it to a storage container.

Refrigerate for up to 4 days or freeze for up to 4 months. Reheat in a saucepan when ready to use. Frozen gravy made without milk or cream like this gravy should not separate upon reheating.


Recipes

via Simply Recipes https://ift.tt/2F9fkDA

October 31, 2018 at 09:33AM
0 Comments

Cheesy Baked Hot Dogs

10/31/2018

0 Comments

 
Cheesy Baked Hot Dogs
https://ift.tt/2EUdniT

Welcome to Eat Your Food!, our biweekly column of real meals made for real kids by Nick Evans.

Eat Your Food Banner

Oh, the humble hot dog! It’s maybe the most iconic American children’s food, and with good reason.

Hot dogs are easy to cook—actually almost all of them are precooked so you can safely eat them cold out of the package, if that’s your thing. They are easy for kids to eat either with hands or chopped up into pieces. They are also pretty darn delicious.

WHAT HOT DOGS TO BUY?

My kids will eat pretty much any hot dog, but if I’m making these for my dinner as well, I want a good quality hot dog. I prefer to buy all-beef hot dogs with a natural casing on them so they have some snap to them.

Hebrew National is my go-to brand if it’s available, and Nathan’s is a close second.

Hot Dog Recipe with Cheese serve the dogs

WHY BAKE YOUR HOT DOGS?

To make sure the hot dogs have a little snap to them, I recommend searing them in a skillet before baking them. Sure, it takes a few minutes, but it does add some nice texture to the dog.

Then baking the hot dogs allows the cheese to melt and the bun to get crispy on top. It’s a beautiful, and simple, combo!

Topped with cheddar cheese and diced onions, the hot dogs bake up beautifully (I recommend a top-cut bun for easier positioning in the baking dish). Top with any and all toppings you wish and serve them with a steamed veggie. I used cheddar cheese and chopped white onions, and after a few minutes in a 350°F. oven, dinner is done!

What to serve with your hot dogs?

To round out the plate, I recommend serving these with a steamed vegetable of some sort. I went with peas, as it’s an easy win for my kids (they actually eat them frozen), but steamed broccoli would be great also! Just something green!

Baked Hot Dogs with Cheese

Eat Your Food - Dad AddTHE DAD ADD: PICKLE RELISH

I can eat a cheesy hot dog as-is with nothing else and be pretty content. But I have nothing to do while the hot dogs bake anyway, so I like to chop up a quick cheater giardiniera (a.k.a. fancy Italian relish) with common store-bought pickled veggies.

I use a mix of dill pickles, spicy pickled cauliflower, and banana peppers, which adds a zesty crunch and cuts through some of the richness of the hot dogs. I chop the mix pretty finely since it’s going on the dogs.

I recommend making a double batch and keeping it in the fridge. Giardiniera is pretty solid on any deli sandwich, also.

Eat Your Food - Kid Report v2THE REPORT CARD

These hot dogs were a science class for my kids. The first thing they wanted to do to these beautiful hot dogs was completely deconstruct them. They both scraped the toppings off, pulled the hot dog out, and ate everything separately.

The key? They ate everything. A bite of hot dog there, a bite of bun here, and smiles all around, although they didn’t try the Dad Add. I tend to worry about my littlest one choking because she tends to try to shove WAY too much food in her mouth at once, so I took the extra step of slicing her dog up into thin slices.

Hot dogs are a pretty easy win for most kids so maybe explore different toppings with your kids such as spicy mustard, the Dad Add, or just keep it simple and count this as a surefire dinner win.

MORE KID-FRIENDLY RECIPES:


Recipes

via Simply Recipes https://ift.tt/2F9fkDA

October 31, 2018 at 09:01AM
0 Comments

Our All-Time Best Thanksgiving Pies from Simply Recipes

10/30/2018

0 Comments

 
Our All-Time Best Thanksgiving Pies from Simply Recipes
https://ift.tt/2JuGqsc

Let’s be real. We might make a big deal about the amazing golden hue of this year’s roast turkey and go back for seconds of Grandma Dola’s famous green bean casserole, but most of us are really just waiting a polite and acceptable period of time until we can hit the dessert table.

We’re just here for the pie, thanks.

There’s a lot riding on these Thanksgiving pies. Do you stick to tradition, or branch out into something new? Will your brother be upset if you don’t make “his” pumpkin pie this year? How many pies do you really need? (Trick question: you need all of them.)

Here’s my advice — give yourself a break when it comes to Thanksgiving dessert. Make one or two traditional pies, but then make some room for something new on the table. Who knows — your picky brother might just discover a new favorite!

Jump to Your Favorite Pie!


Recipes

via Simply Recipes https://ift.tt/2F9fkDA

October 30, 2018 at 10:33AM
0 Comments

Herbed Chicken Tenders with Tomato Sauce

10/30/2018

0 Comments

 
Herbed Chicken Tenders with Tomato Sauce
https://ift.tt/2RoKFbf

Chicken tenders, baked with an herbed breadcrumb coating, served with simple Italian tomato dipping sauce.

Photography Credit: Elise Bauer

What is a Chicken Tender?

I wonder who came up with the name “chicken tenders”? Hmm, perhaps it sounds more appealing than “the piece of meat we strip off the breast when we make cutlets.”

In any case, chicken tenders can be useful to have around, especially stored in the freezer for when you want a quick meal.

As the name implies, they are tender, having been cut from chicken breasts, and a little soaking in buttermilk helps tenderize them even further.

Making Chicken Tenders From Scratch

Where to buy chicken tenders

Chicken tenders are sold packaged as such, or you can make your own by saving and freezing them when you prepare chicken cutlets. Just find that little strip on the side of the chicken breast half and cut it or pull it off.

Making Baked Chicken Tenders From Scratch

There are so many ways one could play with this recipe. What we present here are simple, basic, breaded and baked chicken tenders, with a classic Italian tomato sauce for dipping. (These little guys make great finger food.)

I make my breadcrumbs from scratch, because we often have leftover hard ends of French or Italian loaf bread hanging around, which are so easy to chop up and pulse in the blender.

Herbed Chicken Tenders with Tomato Sauce

How to Make the Tomato Dipping Sauce

Sure, you could use store-bought marinara sauce for dipping, but it’s so easy and quick to make your own — and it tastes better! Just sauté some chopped onions and garlic, and add tomato paste and canned tomato sauce or crushed tomatoes. Blend it all up in a blender, and it’s ready to serve.

The sauce can also be made ahead and kept in the fridge for up to a week. If you have any leftover, it’s great for serving with pasta or layering into a casserole.

WAYS TO ADAPT THIS RECIPE

I’m using Italian seasoning with the breadcrumbs, you could just as well pick one herb, like thyme, and go with that. Or add some grated Parmesan.

For a lemony flavor you could soak the chicken in a little lemon juice instead of buttermilk.

More Easy Chicken Dinners

Updated October 30, 2018 : We spiffed up this post a little to make it sparkle! No changes to the recipe.

Herbed Chicken Tenders with Tomato Sauce Recipe

Print

You can make a substitute for buttermilk by adding a tablespoon and a half of lemon juice or vinegar to 1 1/2 cups of milk and letting the mixture stand for 10 minutes.

A mixture of dried herbs often used in Italian cooking such as marjoram, thyme, rosemary, savory, sage, oregano, and basil

Ingredients

For the chicken tenders:

  • 2 pounds chicken tenders (about 12 pieces)
  • 1 1/2 cups buttermilk (See Recipe Note)
  • 1 cup bread crumbs
  • 2 tablespoons Italian seasoning herbs (See Recipe Note)
  • 1/2 teaspoon salt
  • Vegetable oil
  • 2 tablespoons butter, melted

For the tomato dipping sauce:

  • 2 tablespoons olive oil
  • 1/4 cup minced onion
  • 1 chopped garlic clove
  • 1 tablespoons tomato paste
  • 1 15-ounce can tomato sauce or crushed tomatoes
  • 1 teaspoon salt
  • 1 teaspoon sugar

Method

1 Soak tenders in buttermilk for 15 to 30 minutes. While the tenders are soaking, make the tomato dipping sauce.

2 Make the tomato dipping sauce: Heat the olive oil in a pot over medium-high heat. Sauté the onions, stirring often, until translucent, about 3 minutes. Add the garlic and cook another minute.

Add the tomato paste, mix well and cook for 1 to 2 minutes more. The tomato paste should darken to a brick-red color.

Add the tomato sauce or crushed tomatoes, salt and sugar and bring to a boil. Cook this for 5 minutes if using tomato sauce, 10 minutes if using crushed tomatoes.

3 Blend the dipping sauce: Put the sauce into a blender and purée until smooth. Hold your hand over the blender lid to keep it from popping off, and start the blender at a low setting and work up to the highest.

The sauce will keep in the fridge for up to a week.

4 Heat oven to 500°F and line a roasting pan with foil. Brush the top of the foil with vegetable oil to help prevent sticking, or use a Silpat sheet.

5 Coat the tenders with breadcrumbs: Mix together the breadcrumbs, Italian seasoning, and salt in a shallow bowl. One by one, remove the chicken tenders from the buttermilk and place in the bowl with breadcrumbs, coating them on all sides with the breadcrumbs. Place on the roasting pan, spaced slightly apart.

6 Bake the tenders: Drizzle a little melted butter over each chicken tender. Place the pan in the oven and bake for about 12 minutes, until the chicken is cooked through and the pieces are lightly browned.

7 Serve with a bowl of the sauce for dipping.

Hello! All photos and content are copyright protected. Please do not use our photos without prior written permission. If you wish to republish this recipe, please rewrite the recipe in your own unique words and link back to Herbed Chicken Tenders with Tomato Sauce on Simply Recipes. Thank you!

Print

Elise Bauer

Elise Bauer is the founder of Simply Recipes. Elise launched Simply Recipes in 2003 as a way to keep track of her family's recipes, and along the way grew it into one of the most popular cooking websites in the world. Elise is dedicated to helping home cooks be successful in the kitchen. Elise is a graduate of Stanford University, and lives in Sacramento, California.

More from Elise


Recipes

via Simply Recipes https://ift.tt/2F9fkDA

October 30, 2018 at 08:06AM
0 Comments

Loaded Vegetarian Baked Sweet Potato

10/29/2018

0 Comments

 
Loaded Vegetarian Baked Sweet Potato
https://ift.tt/2O7PX9f

Loaded Vegetarian Baked Sweet Potato

8 Freestyle Points 307 Calories

Loaded Vegetarian Baked Sweet Potato are Mexican-inspired, loaded with zesty black beans, melted cheese, salsa with a dollop of cream. What can be better than a 20 minute meal!

Loaded Vegetarian Baked Sweet Potato are Mexican-inspired, loaded with zesty black beans, melted cheese, salsa with a dollop of cream. What can be better than a 20 minute meal!Loaded Vegetarian Baked Sweet Potato

Loaded baked sweet potatoes are so quick and easy to make. A few of my other favorites are Italian-Style Stuffed Sweet Potatoes, Sloppy Joe Baked Sweet Potatoes, and Cheesy Baked Sweet Potato Skins.

This recipe is a guest post from The Picky Eater. I met Anjali in San Francisco a few years ago; she’s a sweet blogger who I instantly connected with, she is also a vegetarian and shared this delicious (yes, I tested this myself and now make it all the time) recipe with us, perfect for meatless Monday!

Loaded Vegetarian Baked Sweet Potato are Mexican-inspired, loaded with zesty black beans, melted cheese, salsa with a dollop of cream. What can be better than a 20 minute meal!

Hi Everyone! My name is Anjali Shah and I blog over at The Picky Eater, where I write about healthy recipes and easy-to-make family meals. I test all of my recipes on my “fast food loving husband,” who, prior to meeting me, ate a diet of frozen pizzas and Taco Bell, so any recipe that makes it on to my blog is “husband approved”!

One of my favorite things to do in the kitchen is to makeover comfort foods into healthy versions that taste amazing, are full of flavor and feel just like the original.

Today I’d like to share one of my favorite recipes – my Loaded Baked Potato Makeover. My healthy swaps include: sweet potatoes instead of russet, “loaded” toppings like black beans and veggies sautéed with spices, and a dollop of cream (which is my favorite swap – 0% Greek Yogurt for sour cream!) The husband usually can’t tell the difference, especially when I spice up the yogurt with some taco seasoning.

How To Make Loaded Baked Sweet Potatoes

VIDEO

Loaded Vegetarian Baked Sweet Potato are Mexican-inspired, loaded with zesty black beans, melted cheese, salsa with a dollop of cream. What can be better than a 20 minute meal!

This meal is delicious and takes only 20 minutes to make, which is why I love making it after a long day at work – I know I’ll have something yummy in my stomach in the same amount of time it would take to pick up takeout. The husband loved it too, and it has since become a staple weeknight meal in our house. I hope you enjoy it as much as we do!

More Sweet Potato Recipes:

Loaded Baked Sweet Potato “Healthified” 

Baked Mexican style vegetarian loaded sweet potato loaded with zesty black beans, melted cheese, salsa with a dollop of cream. What can be better than a 20 minute meal!

Ingredients:

  • 4 medium sized sweet potatoes
  • 1/2 cup fat free Greek yogurt (or light sour cream)
  • 1 tsp taco seasoning
  • 1 tsp olive or canola oil
  • 1 red bell pepper, diced
  • 1/2 red onion, diced
  • 1 tsp chili powder
  • 1/2 tsp paprika or smoked paprika
  • 1/2 tsp cumin
  • a pinch of salt
  • 1-1/3 cups canned black beans, rinsed and drained
  • 1/2 cup mild or spicy salsa
  • 1/2 cup reduced fat Mexican cheese blend
  • 1/4 cup chopped scallions or cilantro

Directions:

  1. Poke holes in the potato with a fork, cook on your microwave’s potato setting until potatoes are soft and cooked through (about 8-10 minutes on high for 4 potatoes). If you don’t have a microwave, bake about 45 minutes at 400°F.
  2. Combine yogurt and taco seasoning in a small bowl, mix well.
  3. Heat oil in a medium pot over medium heat.
  4. Add peppers, onions, chili powder, paprika, cumin and salt; cook until the onions have caramelized slightly, about 5 minutes.
  5. Add black beans, stir to combine and heat through (about another 5 minutes).
  6. Slice the potato lengthwise down the middle or as I did in the photo, use a fork to pierce the top in an oval shape, then remove the top of each potato.
  7. Top with 2 tbsp shredded cheese, 1/3 cup of black bean mixture, 2 tbsp Greek yogurt mixture and 2 tbsp salsa of salsa.
  8. Enjoy!

Nutrition Information

Yield: 4 servings, Serving Size: 1 potato

  • Amount Per Serving:
  • Freestyle Points: 8
  • Points +: 8
  • Calories: 307 calories
  • Total Fat: 5g
  • Saturated Fat: 0.5g
  • Cholesterol: 7.5mg
  • Sodium: 312mg
  • Carbohydrates: 53g
  • Fiber: 10.5g
  • Sugar: 1g
  • Protein: 15g

All images and text ©Gina Homolka for Skinnytaste

posted October 29, 2018 by Gina


Recipes

via Skinnytaste https://ift.tt/2ix3Luq

October 29, 2018 at 11:12AM
0 Comments

This Flavorful Buddha Bowl Is Exactly What Your Post-Workout Routine Needs

10/29/2018

0 Comments

 
This Flavorful Buddha Bowl Is Exactly What Your Post-Workout Routine Needs

https://ift.tt/2FxD8Sg

Buddha bowls seem to be the new hype all over Instagram. They are supercolorful, full of macronutrients and micronutrients, and they're delicious. If you haven't heard of a Buddha bowl before, it's basically a bowl piled so high with all your favorite foods that it looks like a belly. They also tend to be plant-based, vegan or vegetarian. But don't be fooled, they can still be high in protein. The Buddha bowl has six components. You have your leafy greens, raw or cooked veggies, healthy grains or complex carbs, protein, fats, and a sauce to top it all off.

Combining my favorite meal and the cuisine I hold closest to my heart, here is a recipe for a North African inspired Buddha Bowl. In Libya, we make couscous using ingredients like chickpeas, pumpkin, green pepper, potato, and zucchini. It's also very common to use spices like cumin, ginger, cinnamon, paprika, and coriander. In fact, Morocco is famous for their spice mix called Ras El Hanout, which just means the head of the shop. Also harissa, or a hot red chili paste, is a huge staple in Libyan cuisine.

Although North African food is heavily centered on proteins like lamb, beef, and seafood, it can be tweaked a little to fit the so-called definition of a Buddha bowl. For our protein, we have roasted chickpeas, pumpkin for carbs, lemon tahini dressing for healthy fats and more protein, baby kale as our greens, avocado because why not, Hab al Barakat (blessed seeds or black seeds), and chopped cilantro for garnish.

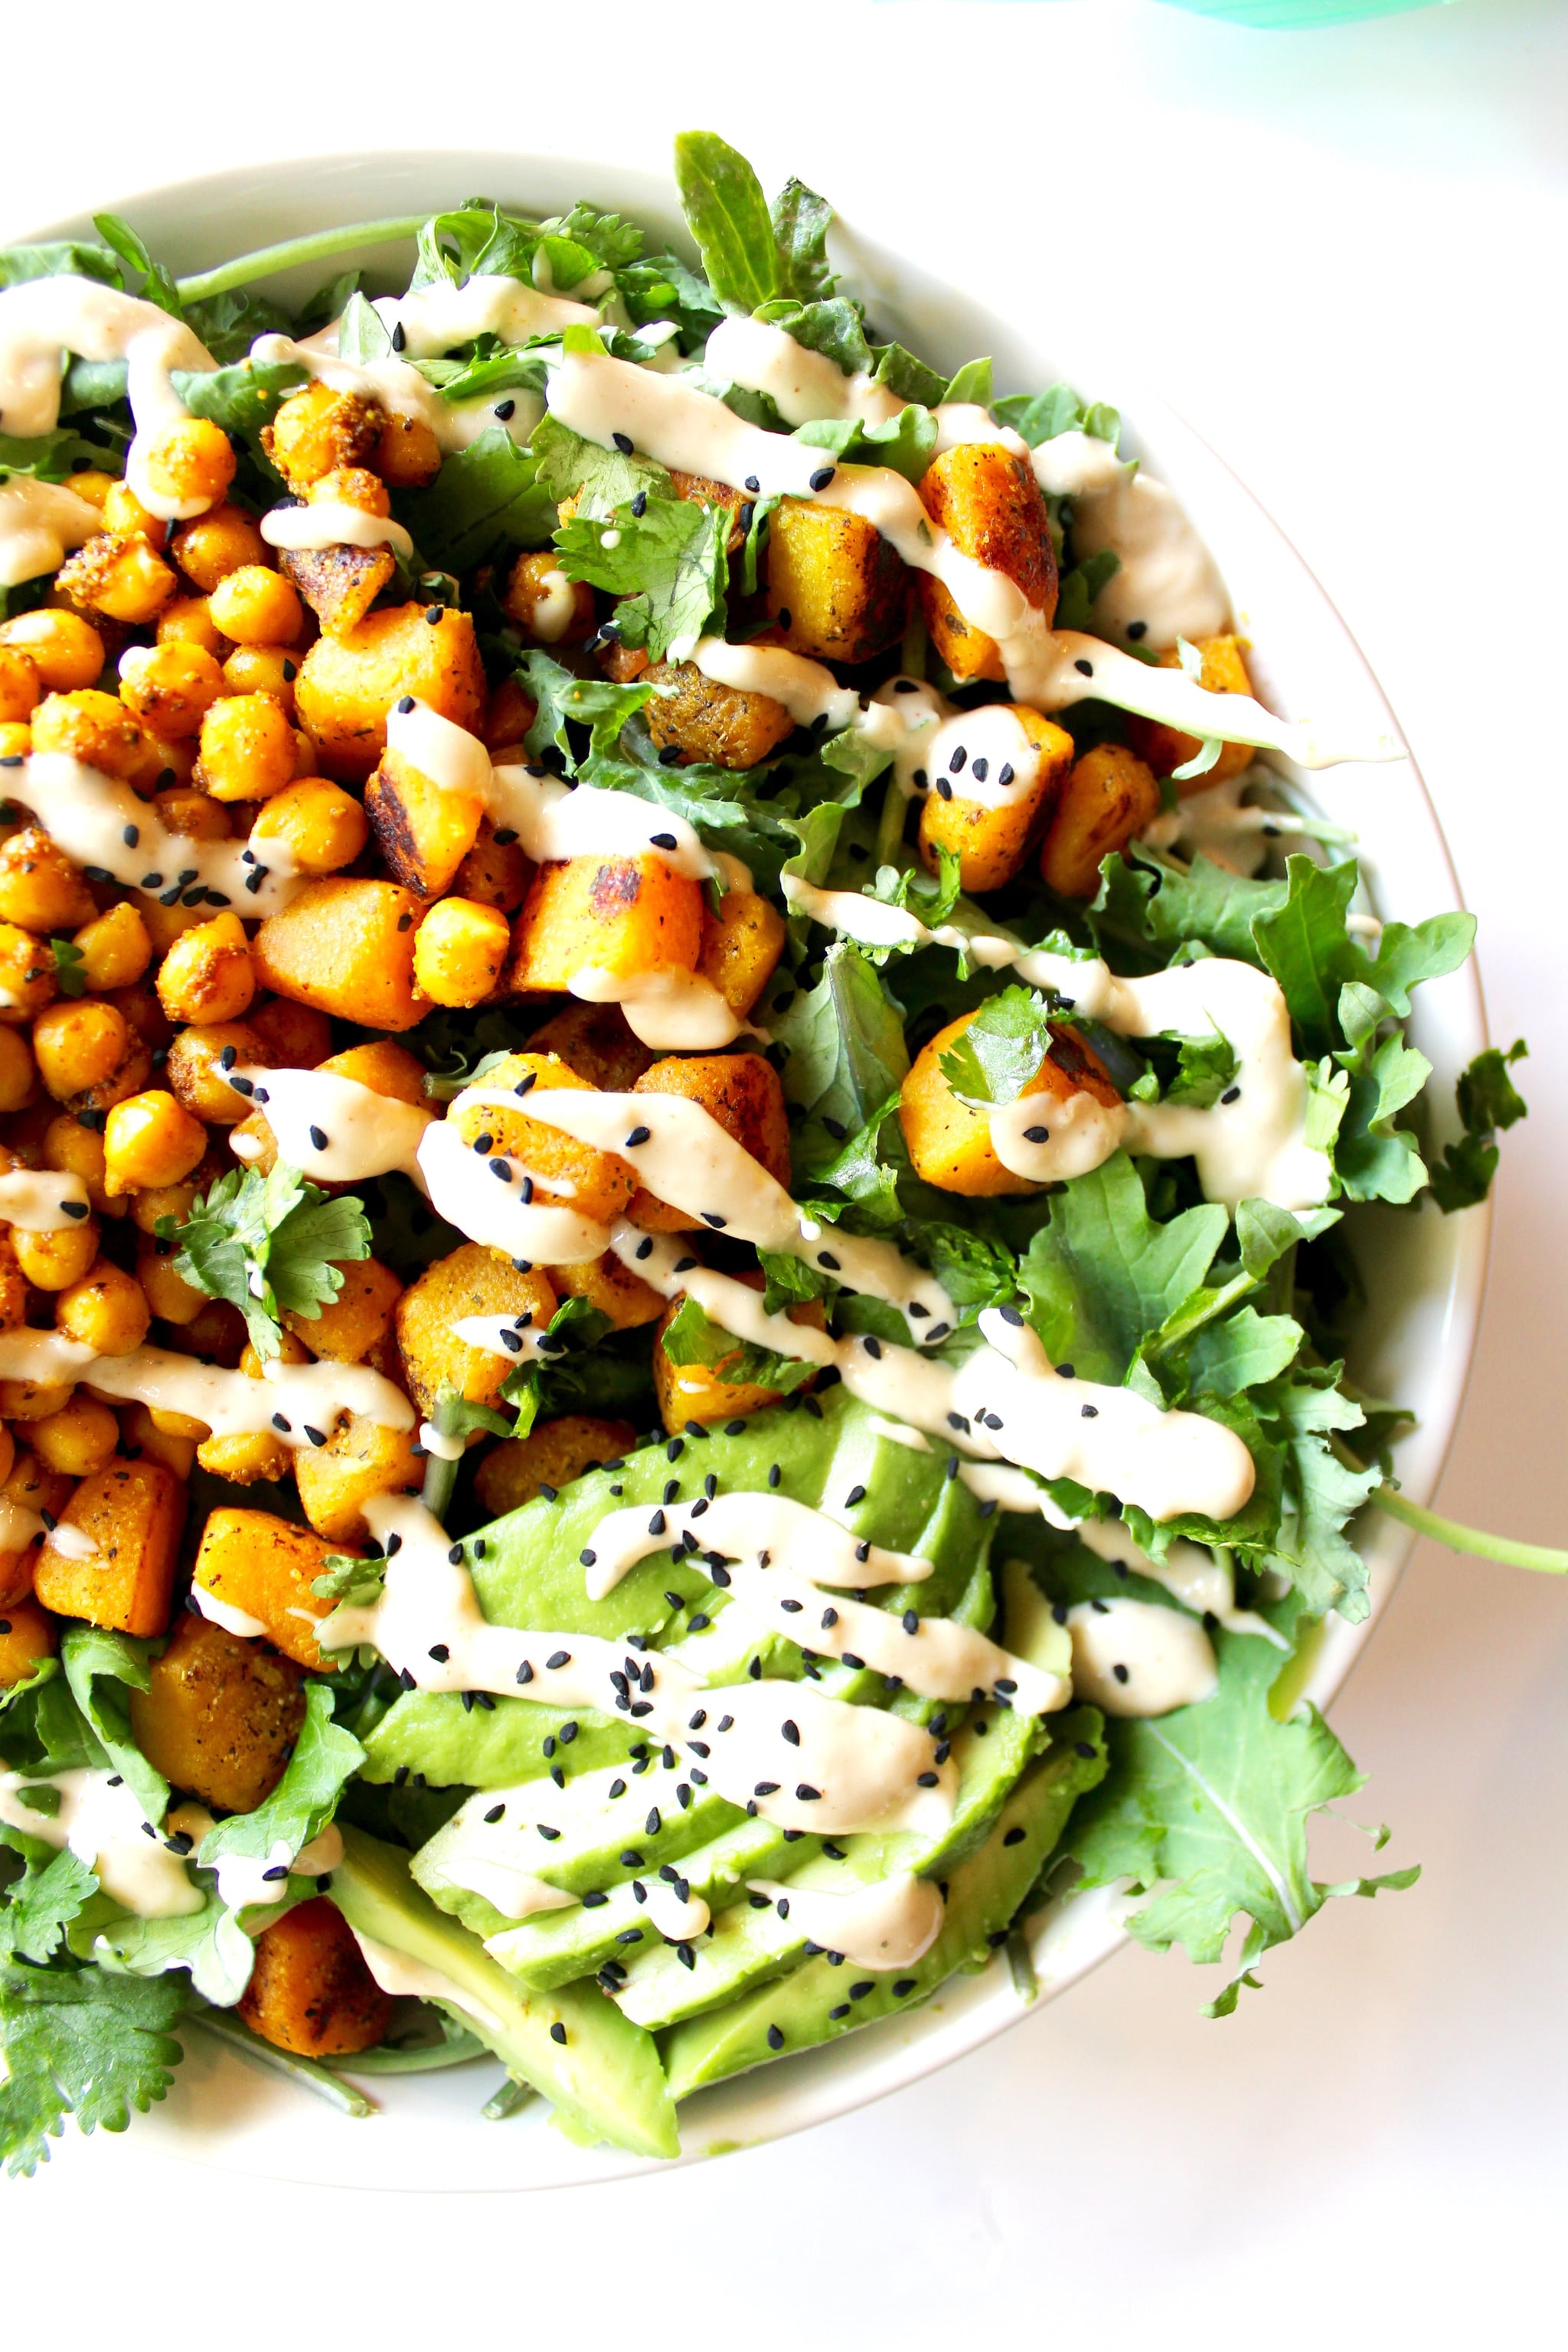
North African-Inspired Buddha Bowl

Original Recipe

Post-Workout Buddha Bowl Recipe

Ingredients

  1. Roasted Chickpeas
  1. 1 cup chickpeas, drained
  2. 1/2 tablespoon olive oil
  3. 1/2 teaspoon paprika
  4. 1/2 teaspoon turmeric
  5. 1/4 teaspoon cinnamon
  6. 1/4 teaspoon cumin
  7. 1/4 teaspoon salt
  1. Roasted Pumpkin
  1. 1/2 cup pumpkin, cubed
  2. 1/2 tablespoon ghee
  3. 1/4 teaspoon salt
  4. 1/4 teaspoon garlic
  5. 1/2 teaspoon ginger
  6. 1/2 tablespoon harissa
  1. Tahini Dressing
  1. 1/2 cup tahini
  2. 1/4 cup water
  3. 1/2 lemon, juiced
  4. 1 tablespoon vinegar
  5. 1/2 teaspoon paprika
  6. 1/2 teaspoon garlic
  7. 1/4 teaspoon salt
  1. Additionals
  1. 4 cups baby kale
  2. 1 Haas avocado
  3. Hab al Barakat (black seeds)
  4. Fresh coriander

Directions

  1. Add olive oil to a frying pan over medium-high heat and add chickpeas. Season with paprika, turmeric, cinnamon, cumin, and salt, and sauté until slightly browned — about 5 minutes. Set chickpeas aside.
  2. In the same pan, cook your ghee over medium-high heat and add the pumpkin. Season and sauté just like before. The pumpkin takes a bit longer to soften and caramelize — about 10 to 12 minutes. Once it's done, set it aside as well.
  3. In a small bowl, add the tahini, water, lemon juice, vinegar, paprika, garlic, and salt, and mix well until you have a dressing.
  4. In a large bowl, add the kale or any leafy greens of choice. Top with the chickpeas, pumpkin, avocado, cilantro/coriander, black seeds, and dressing.
  5. Massage it all together with your hands to really break down the kale and get it seasoned evenly. Serve and enjoy!

Information

Category
Salads, Main Dishes
Cuisine
African
Yield
2 servings
Total Time
30 minutes

Nutrition

Calories per serving
450
Print recipe

Print recipe

Image Source: Hajar Larbah


Recipes


via POPSUGAR Fitness

October 29, 2018 at 10:15AM
0 Comments

Vegan Pumpkin French Toast

10/29/2018

0 Comments

 
Vegan Pumpkin French Toast
https://ift.tt/2RlTqmx

Vegan Pumpkin French Toast

It’s Halloween week! That means that it’s the official(?) final week for everything pumpkin to appear on the blogosphere. I know, it’s sad, but not to worry – I have some majorly delicious Thanksgiving recipes in the works. But before we get there, here’s my last pumpkin hurrah for the year, and it’s a good one!

I think you will love this french toast whether you’re vegan or whether you just happened to have run out of eggs. The pumpkin puree acts as the custardy base so perfectly. I love this version even more than my original vegan french toast, which continues to be one of the most popular recipes on our site.

Vegan Pumpkin French Toast

This is made with just a handful of ingredients, see above. The most important one is the bread. Your french toast will only be as good as your bread, so grab a nice sourdough or ciabatta loaf and slice it into thick slabs. Day-old bread is preferred, just stay clear of thinly sliced sandwich bread.

Once you’ve mixed the batter together, pour it over your slabs of bread. Then use your hands to slather it all over (that step is not pictured because it was not so photogenic).

Vegan Pumpkin French Toast

Cook it up in a skillet, then serve your french toast with lots of maple syrup and whatever toppings you like!

Vegan Pumpkin French Toast

With your extra pumpkin puree, you can make Vegan Pumpkin Snack Cake, Pumpkin Pancakes, Pumpkin Oatmeal Chocolate Chip Cookies, Pumpkin Bread, or Pumpkin Waffles.


Vegan Pumpkin French Toast


Author: Jeanine Donofrio

Serves: 4

Ingredients

  • 8 slices day-old ciabatta or sourdough bread, sliced ¾-inch thick
  • ¾ cup almond milk
  • ½ cup pumpkin puree
  • 1 tablespoon maple syrup, plus more for serving
  • 1 teaspoon cinnamon
  • ¼ teaspoon nutmeg
  • ⅛ teaspoon sea salt
  • coconut oil, for brushing
  • Optional toppings: toasted almonds, pecans, diced apple, powdered sugar

Instructions

  1. In a medium bowl, whisk together the almond milk, pumpkin puree, maple syrup, cinnamon, nutmeg, and salt.
  2. Place the bread slices on a large platter or tray and drizzle with the pumpkin mixture. Use your hands to spread the mixture, coating all sides of the bread.
  3. Heat a non-stick skillet to medium heat and brush with coconut oil. Add the bread slices and cook until golden brown, about 2 minutes per side. Reduce the heat to low as needed to cook thoroughly without burning. Serve with maple syrup and desired toppings.

3.4.3177


Recipes

via Love and Lemons https://ift.tt/2h2Uz32

October 29, 2018 at 09:59AM
0 Comments

Pasta with Butternut Squash Bacon and Brown Butter

10/29/2018

0 Comments

 
Pasta with Butternut Squash, Bacon, and Brown Butter
https://ift.tt/2qimbFg

1 Roast the squash: Preheat the oven to 425°F. On a rimmed baking sheet, combine the squash with olive oil, salt, and pepper on a rimmed baking sheet, and toss to coat.

Roast for 20 minutes, tossing half way through to evenly brown. When it’s ready, the squash will be soft and some of the edges will have browned.

Butternut Squash Browned Butter Pasta roast the squash

2 Cook the pasta: Meanwhile, bring a large pot of salted water to boil and cook the pasta to al dente, or according to package directions. Drain well and set aside.

Butternut Squash Pasta - Cook the pasta

3 Fry the bacon: In a large, deep skillet (I used cast iron), put the bacon in a cold pan and cook over medium heat until crispy. Remove from the skillet and drain on paper towels.

Roasted Butternut Squash Pasta fry the bacon

4 Cook the shallots: Place the skillet back on the stove, but with the heat turned off. Drain all but about 2 tablespoons of the bacon grease.

Add the shallots and cook in the residual heat from the skillet; this helps prevent the shallots from burning. If they don’t seem to be cooking fast enough, turn the heat to medium-low and cook for just a couple of minutes until they start to soften and become aromatic. Transfer the cooked shallots to a large bowl.

Butternut Squash Bacon Pasta slice the shallots

Butternut Squash Pasta - cook the shallots

5 Combine the bacon, shallots, squash and pasta: After the bacon cools, cut it into small pieces using kitchen scissors (or using a chef's knife), and combine with the shallots in a large bowl—or you can use the stockpot you cooked the pasta in (I like to do this if it's just me and the boys).

Add the pasta and toss to combine. When the squash comes out of the oven, add the squash to this bowl and toss gently together.

Butternut Squash Browned Butter Pasta cut up the baconRoasted Butternut Squash Pasta add the squash and bacon to the pasta

6 Brown the butter: In a small saucepan, melt the butter over medium heat. Stir it constantly and keep an eye on it so it does not burn. (See here for full instructions on how to brown butter.) It will start to crackle, foam, and smell nutty. The color will deepen to a caramel/amber hue.

Around when the butter stops foaming—or at least it starts to subside—and the butter turns slightly brown, add the sage leaves.

Remove the saucepan from the heat as soon as the sage leaves start to curl. Pour the butter and the sage leaves into the bowl with the rest of the ingredients.

Butternut Squash Bacon Pasta brown the butter and add the sage

Butternut Squash Bacon Pasta add the browned butter and sage to the pasta

8 Combine all ingredients and serve: Toss everything gently together with a wooden spoon. Taste and add salt and/or pepper if needed. Serve immediately with freshly grated cheese over the top.

If you are feeling extra decadent, add a chunk of unsalted butter or a splash of extra virgin olive oil on top when you toss, or some of the reserved bacon grease.

Leftovers keep for about 2 to 3 days and reheat fairly well. I like to add a bit of olive oil or water to the pot when I reheat it over low heat. (I try to avoid microwaving leftover pasta because it just makes it gummy.)


Recipes

via Simply Recipes https://ift.tt/2F9fkDA

October 29, 2018 at 09:01AM
0 Comments

Cheeseburger Salad with Special Sauce

10/29/2018

0 Comments

 
“Cheeseburger” Salad with Special Sauce
https://ift.tt/2OXdXB1

OMG! This “Cheeseburger” Salad with Special Sauce is reminiscent of a Big Mac, but so much better. It’s totally plant-based and made with lentil walnut burger meat and a cashew cream sauce. 

Few things are better than seeing your friends succeed. My friend Megan of Detoxinista recently released her THIRD cookbook to the world (The Fresh & Healthy Instant Pot Cookbook) and I’m so excited to share a recipe from it today! 

I know a lot of people are making the recipes from my blog every day, but I still love cookbooks (and have a whole collection of them to prove it) so creating my own cookbook is still a goal – and I’m always so impressed by other bloggers who have made this happen.

Vegan cheeseburger salad-- romaine lettuce topped with lentil walnut "meat", vegan cheese, tomatoes, pickles, onions, and a cashew cream special sauce. A folk is on the side of the plate.

You may remember when I shared this turkey cauliflower baked ziti from Megan’s second cookbook. It has been super popular so if you haven’t tried it yet, go check it out.

Megan and I have really similar food philosophies so I was extra excited to see another cookbook come out. Plus it’s all Instant Pot recipes, which has been so fun to experiment with!

While I don’t have a name-brand Instant Pot, I have the Pressure Cooker XL and it has the same functionality. We received this bad boy as a gift a few years ago and although I have shared one recipe (butternut squash and turkey chili), I haven’t fully explored pressure-cooker life yet.

Honestly, many of the Instant Pot recipes you find online aren’t super healthy, which is why Megan created this cookbook. Every recipe has nutrition info, a photo, a gluten-free/vegan option and all are made without refined sugar. The purpose of her cookbook is to help you eat better and spend less time in your kitchen. Love that!

Vegan cheeseburger salad-- romaine lettuce topped with lentil walnut "meat", vegan cheese, tomatoes, pickles, onions, and a cashew cream special sauce. A folk is on the side of the plate.

Now about this cheeseburger salad . . . 

The Fresh & Healthy Instant Pot Cookbook actually has seven salad recipes in it! Who knew you could make salads with an Instant Pot? Not me.

I was instantly drawn to this “Cheeseburger” Salad with Special Sauce because it reminded me of a Big Mac, aka my go-to order at McDonald’s when I was younger. I know it’s crazy to imagine me ordering and eating a Big Mac with a supersized Dr. Pepper and fries that I dipped in honey, but it’s true. From Big Macs to Bird Food I guess. ? 

Vegan cheeseburger salad-- romaine lettuce topped with lentil walnut "meat", vegan cheese, tomatoes, pickles, onions, and a cashew cream special sauce drizzled on top. A folk is on the side of the plate.

Megan’s “cheeseburger” salad actually doesn’t have beef in it at all… she created burger “meat” made from lentils, which I’m willing to bet will be a crowd favorite. If Meatless Monday isn’t going over too well in your home, you might just need to introduce this cheeseburger salad into your meal rotation. ?

Vegan cheeseburger salad-- romaine lettuce topped with lentil walnut "meat", vegan cheese, tomatoes, pickles, onions, and a cashew cream special sauce drizzled on top. A folk is on the side of the plate.

Thankfully, Megan broke down each step into really digestible instructions. If you have never used an Instant Pot before, this cookbook will definitely help you feel comfortable with it, and this recipe is a great one to start out with. You’ll practice both sautéing and pressure cooking in the Instant Pot, which are the two key features. Just a few simple steps results in six servings – so a simple family meal or easy meal prep/leftovers for your week! 

Do you own an Instant Pot? If so, please share your favorite healthy Instant Pot recipe below! If you own an Instant Pot and it’s been collecting dust, I highly recommend grabbing a copy of Megan’s cookbook. There are so many awesome recipes included — everything from easy breakfasts to sweet treats. 

Print

“Cheeseburger” Salad with Special Sauce

  • Author: Brittany Mullins
  • Prep Time: 15 minutes, plus soaking
  • Cook Time: 10 minutes
  • Total Time: 25 minutes
  • Yield: 6
  • Category: Salad
  • Method: Pressure Cooking
  • Cuisine: American
Print
Pin

Description

OMG! This “Cheeseburger” Salad with Special Sauce is reminiscent of a Big Mac, but so much better. It’s totally plant-based and made with lentil walnut burger meat and a cashew cream sauce. 


Ingredients

Burger “Meat”

  • 1 Tablespoons extra-virgin olive oil
  • 1 yellow onion, chopped
  • 1 teaspoon garlic powder
  • 1 teaspoon paprika
  • 1/8 teaspoon cayenne pepper
  • 1/2 teaspoon ground cumin
  • 1/4 teaspoon freshly ground black pepper
  • 1 cup green lentils
  • 1 1/4 cups water
  • 1 teaspoon fine sea salt
  • 1/2 cup finely chopped walnuts

Special Sauce

  • 1/2 cup cashews, soaked for 1 hour
  • 1/2 cup water
  • 1 Tablespoons raw apple cider vinegar
  • 2 Tablespoons pure maple syrup
  • 2 Tablespoons tomato paste
  • 2 Tablespoons yellow mustard
  • 1/2 teaspoon onion powder
  • 3/4 teaspoon fine sea salt
  • chopped lettuce, tomatoes and green onions; pickle slices; and shredded cheddar cheese, for serving

Instructions

  1. To make the burger “meat,” press Sauté and add the olive oil to the Instant Pot. Once the oil is hot but not smoking, add the onion and sauté until softened, about 5 minutes. Press Cancel to stop the cooking cycle.
  2. Stir in the garlic powder, paprika, cayenne, cumin, an black pepper while the pot is still hot. Add the green lentils and water, and stir to make sure the lentils are covered in the liquid for even cooking. Secure the lid and moves the steam release valve to Sealing. Select Manual/Pressure Cook to cook on high pressure for 5 minutes.
  3. While the lentils are cooking make the special sauce. Drain and rinse the cashews, then add them to a blender with the water, vinegar, maple syrup, tomato paste, mustard, onion, powder, and salt. Blend until very smooth and set aside.
  4. White the cooking cycle on the burger “meat” is complete, let the pressure naturally release for 10 minutes, them move the steam release valve to Venting to release any remaining pressure. When the floating device valve drops, remove the lid and stir in the salt and chopped walnuts.
  5. Fill a bowl with chopped lettuce, the burger “meat,” tomatoes, green onions, pickles, and cheese. Drizzle plenty of the special sauce over the top before serving. Store leftovers in three separate airtight containers- – for the dressing, the burger “meat,” and the vegetables — in the fridge for 1 week.

Notes

Make it vegan: omit the cheddar cheese or use a dairy-free sub.


Nutrition

  • Serving Size: 1 salad with 2 tablespoons special sauce
  • Calories: 334
  • Fat: 15g
  • Carbohydrates: 37g
  • Fiber: 17g
  • Protein: 16g

Keywords: cheeseburger salad

Did you make this recipe?

Tag @eatingbirdfood on Instagram and hashtag it #eatingbirdfood

The post “Cheeseburger” Salad with Special Sauce appeared first on Eating Bird Food.


Recipes

via Eating Bird Food https://ift.tt/1L45wsH

October 29, 2018 at 06:01AM
0 Comments
<<Previous

    The Flat Belly Detox Drink Fix


    The Flat Belly Fix

    This is the only 21-day rapid weight loss system that allows you to easily lose an average of 1 lb a day for 21 days without feeling hungry or deprived. The unique and brand new techniques used in this System are proven SAFE. And they do not cause the rebound weight gain common to all the other rapid weight loss systems that are not backed by the latest science. The Flat Belly Fix System takes advantage of a recent scientific discovery that proves the effective weight loss power of an ancient spice. Combined with other cutting-edge ingredients in the patent-pending Flat Belly Fix Tea™ — that you can make right in your own kitchen in minutes — this System is the quickest, easiest and most enjoyable way to quickly get the body you desire and deserve. Click Here

    Categories

    All
    Gluten Free
    Pancakes
    Protein

    Archives

    January 2020
    December 2019
    November 2019
    October 2019
    September 2019
    August 2019
    July 2019
    June 2019
    May 2019
    April 2019
    March 2019
    February 2019
    January 2019
    December 2018
    November 2018
    October 2018
    September 2018
    August 2018
    July 2018
    June 2018
    May 2018
    April 2018
    March 2018
    February 2018
    January 2018
    December 2017
    November 2017

    RSS Feed

(C) FeallHealthy2day.com 2017 - 2018
Some photos and content used under Creative Commons
  • Home
  • Recipes
  • Health News
  • Fitness News
  • Weight Loss
  • Contact
  • Subscribe