
|
No Mayo Coleslaw
https://ift.tt/2ZXjR6f No mayo in this coleslaw! Cool and crunchy, this southwest coleslaw has thinly sliced cabbage with carrots, radishes and cilantro. Great as a summer side dish or piled high on tacos. Photography Credit: Elise Bauer I make a great pie crust. My father, a killer meatloaf. My mother? She’s the queen of salads. When the three of us cook together, mom almost always gets salad duty, because she just does it so darn well. She has perfected the balance of sweet and acidity, salt, and bitter. No Mayo ColeslawThis particular coleslaw of my mother’s is one of my favorites and has a southwestern touch. The coleslaw is made with cabbage, carrots, green onions, and cilantro, and seasoned with rice vinegar. No mayo! It’s light, cool, and crunchy, just what you want a coleslaw to be. 
Make-Ahead TipsThe ingredients for this salad can be prepped a day or two ahead of time. Store them in an airtight container in the fridge and toss with the dressing ingredients when ready to serve. Leftovers will keep for a few days in the fridge, but the coleslaw will become more wilted and watery over time. What to Serve with this ColeslawServe the coleslaw alongside Mexican or TexMex dishes or chili beans. No mayo coleslaw is also a perfect side to fish or piled high in a taco. Try These Other Coleslaw Recipes:Updated June 30, 2019 : We spiffed up this post to make it sparkle! No changes to the original recipe. No Mayo Coleslaw RecipePrintA mandoline If the seasoned rice vinegar adds too much sweetness for your taste, add a sprinkle of lemon juice. If you are using unsweetened rice vinegar, to get the right balance of acidity and sweet, sprinkle a little sugar over the salad and toss. Ingredients
Method1 Assemble the salad: Place the thinly sliced cabbage, grated carrot, radish slices, sliced green onions, and cilantro in a large serving bowl. 2 Toss with dressing and serve: Right before serving, sprinkle with olive oil, rice vinegar, salt and pepper, and toss to coat. Serve immediately. Hello! All photos and content are copyright protected. Please do not use our photos without prior written permission. If you wish to republish this recipe, please rewrite the recipe in your own unique words and link back to No Mayo Coleslaw on Simply Recipes. Thank you! PrintProducts We LoveThis post may contain links to Amazon or other partners; your purchases via these links can benefit Simply Recipes. Read more about our affiliate linking policy. Recipes via Simply Recipes https://ift.tt/2F9fkDA June 30, 2019 at 04:10PM
0 Comments
Watermelon Salad with Feta and Mint
https://ift.tt/303NSl9
Once summer rolls around, I can’t get enough of salads made with a mix of peak season fruits and veggies. I love a good sweet & savory combination, and this watermelon salad with feta, mint, avocado, and a tangy dressing is exactly that. Every year, as soon as I spot a good watermelon, I rush home to make this recipe. It takes minutes to throw together, and it’s incredibly refreshing. Try it once, and you’ll have it on repeat for the rest of watermelon season.
Watermelon Salad Recipe IngredientsIf you’ve never tried watermelon in a savory setting, you have to make this recipe ASAP. Juicy & fresh, the melon goes SO well with the other creamy, crisp, tangy, and spicy components in this salad. Here’s what makes it so delicious:
Watermelon Feta Salad Recipe VariationsThis watermelon feta salad is a great one to play with. Here are some of my favorite ways to change it up:
Let me know what variations you try! |
 will make slicing cabbage much much easier than using a knife.


 Spicy Watermelon Tomato Salad |
 Best Guacamole |
 Mango & Black Bean Quesadillas |
 Thai Coconut Cucumber Salad |
 Zucchini & Grilled Corn Salad |
 Watermelon Poke Bowl |
The post Watermelon Salad with Feta and Mint appeared first on Love and Lemons.
Recipes
via Love and Lemons https://ift.tt/2h2Uz32
June 30, 2019 at 11:01AM
Guacamole with Charred Sweet Corn, Bacon and Tomato
https://ift.tt/2LvBGW7
Recipes
via Simply Recipes https://ift.tt/2F9fkDA
June 30, 2019 at 09:01AM
https://ift.tt/2LvBGW7
1 Preheat the oven and grill: Set your oven to 400°F for cooking the bacon. Preheat your grill to medium-high (about 400°F) as well.
2 Soak the corn: Place the ears of corn in a large bowl and add enough cold water to the bowl to submerge them. Let the ears soak for 15 minutes.

3 Bake the bacon while the corn soaks: Line a sheet pan with aluminum foil, and set a baking rack on top of it. Arrange the slices of bacon on the baking rack.
Bake the bacon for 10 minutes. After 10 minutes, flip the bacon over and cook for another 5 to 6 minutes, or until the bacon is slightly crisp. The bacon should have a little chew left to it, but shouldn’t be floppy once cooled.
Transfer the bacon to a plate lined with paper towels to drain and cool. Once the bacon is cool enough to handle, crumble it into small 1/2-inch sized pieces.


4 Steam, then char, the corn: After soaking the corn, steam them on the grill, still in their husks, for 15 minutes. Peel back the husks and char the ears of corn on the grill for another 5 to 6 minutes, or until the corn begins to pop and take on a dark brown color.
After the corn has charred, remove the ears from the grill and set them aside until cool enough to handle.


5 Remove the kernels from the cob: First, set a small inverted bowl inside a larger mixing bowl. To prevent the smaller bowl from moving while I’m cutting the kernels off the cob, I set it on top of a couple of the steamed husks.
Rest the tip of the corn cob on the inverted bowl and use your knife to cut away the kernels. Allow the kernels to cool completely while you prep the rest of the ingredients.


6 Prepare the tomatoes: Slice the tomatoes in half. Press into the tomato halves with your thumb to remove some of the seeds and juice. This prevents the guacamole from becoming watery. I like to juice the tomatoes over a smaller, separate bowl.
Place the cut tomatoes and the crumbled bacon into the mixing bowl with the cooled corn kernels.
7 Prepare the avocados: In a separate bowl, mash the avocado slightly with a fork or potato masher. Stir in the lime juice, then add the mashed avocado to the bowl with the corn, bacon, and tomatoes.


8 Finish the guacamole: Fold the guacamole ingredients together until well-blended. Season with the salt, then cover the guacamole with plastic wrap pressed directly onto its surface. Refrigerate the guacamole for 15 minutes to give the flavors a chance to blend before serving.

9 Adjust the seasoning: Just before serving, taste the guacamole and add more salt, if needed. Garnish the dip with the crumbled cotija cheese and serve with warm tortilla chips.
Keep leftover guacamole covered with plastic wrap and/or a lid in the refrigerator. Leftovers are good for up to three days.
Recipes
via Simply Recipes https://ift.tt/2F9fkDA
June 30, 2019 at 09:01AM
Skinnytaste Meal Plan (July 1- July 7)
https://ift.tt/2RHYBi5
Recipes
via Skinnytaste https://ift.tt/2ix3Luq
June 29, 2019 at 09:13AM
https://ift.tt/2RHYBi5
A free 7-day flexible weight loss meal plan including breakfast, lunch and dinner and a shopping list. All recipes include calories and Weight Watchers SmartPoints®.
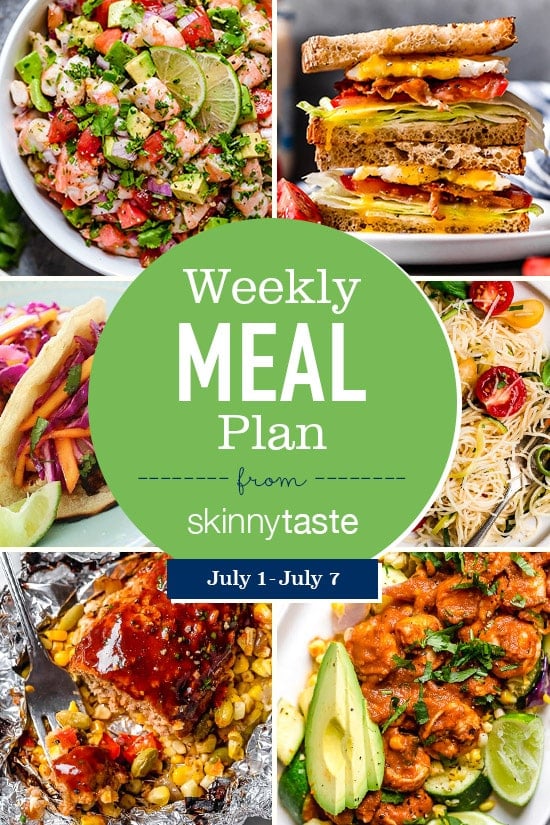
Have a great 4th of July weekend!
If you’re new to my meal plans, I’ve been sharing these free, 7-day flexible healthy meal plans (you can see my previous meal plans here) that are meant as a guide, with plenty of wiggle room for you to add more food, coffee, beverages, fruits, snacks, dessert, wine, etc or swap recipes out for meals you prefer, you can search for recipes by course in the index. You should aim for around 1500 calories* per day.
There’s also a precise, organized grocery list that will make grocery shopping so much easier and much less stressful. Save you money and time. You’ll dine out less often, waste less food and you’ll have everything you need on hand to help keep you on track.
Lastly, if you’re on Facebook join my Skinnytaste Facebook Community where everyone’s sharing photos of recipes they are making, you can join here. I’m loving all the ideas everyone’s sharing! If you wish to get on the email list, you can subscribe here so you never miss a meal plan!
Also, if you don’t have the Skinnytaste Meal Planner, now would be a great time to get one to get organized for 2019! There was a print error last year, but it’s perfect now! You can order it here!
THE DETAILS:
Breakfast and lunch Monday-Friday, are designed to serve 1 while dinners and all meals on Saturday and Sunday are designed to serve a family of 4. Some recipes make enough leftovers for two nights or lunch the next day. While we truly believe there is no one size fits all meal plan, we did our best to come up with something that appeals to a wide range of individuals. Everything is Weight Watchers friendly, I included the updated Weight Watcher Freestyle Points for your convenience, feel free to swap out any recipes you wish or just use this for inspiration!
The grocery list is comprehensive and includes everything you need to make all meals on the plan. I’ve even included brand recommendations of products I love and use often. Cross check your cabinets because many condiments you’ll notice I use often, so you may already have a lot of them.
And last, but certainly not least, this meal plan is flexible and realistic. There’s plenty of wiggle room for cocktails, healthy snacks, dessert and dinner out. And if necessary, you can move some things around to make it work with your schedule. Please let me know if you’re using these plans, this will help me decide if I should continue sharing them!
MONDAY (7/1)
B: PB + J Smoothie (4)
L: Honey Sriracha Chicken and Broccoli Meal Prep Bowls* (7)
D: Angel Hair Pasta with Zucchini and Tomatoes (7) and a green salad* (2)
Totals: Freestyle™ SP 20, Calories 1,023**
TUESDAY (7/2)
B: Avocado Toast with Sunny Side Egg (4)
L: Honey Sriracha Chicken and Broccoli Meal Prep Bowls (7)
D: Blackened Fish Tacos with Cabbage Mango Slaw (4) with Cilantro Lime Cauliflower “Rice” (1)
Totals: Freestyle™ SP 16, Calories 996**
WEDNESDAY (7/3)
B: 2 hard-boiled eggs (0) with 1 cup mixed berries (0)
L: Honey Sriracha Chicken and Broccoli Meal Prep Bowls (7)
D: Skillet Chicken Cordon Bleu (5) with Roasted Broccoli with Smashed Garlic (2)
Totals: Freestyle™ SP 14, Calories 1,040**
THURSDAY (7/4)
B: Avocado Toast with Sunny Side Egg (4)
L: Grilled Salmon Kebabs (0) with Chickpea Salad with Cucumbers and Tomatoes (1)
D: Easy Inside Out Turkey Cheeseburgers (8) with Low Carb Potato Salad (4)
Totals: Freestyle™ SP 17, Calories 1,209**
FRIDAY (7/5)
B: PB + J Smoothie (4)
L: Asparagus Egg and Bacon Salad with Dijon Vinaigrette (3)
D: Mexican Shrimp Diablo (3) with ¾ cup brown rice (5)
Totals: Freestyle™ SP 15, Calories 886**
SATURDAY (7/6)
B: Breakfast BLT (6) (Recipe x 4)
L: Chicken Chimichangas (6)
D: DINNER OUT!
Totals: Freestyle™ SP 12, Calories 679**
SUNDAY (7/7)
B: Crustless Ham and Cheese Quiche (5) with a peach (0)
L: Zesty Lime Shrimp and Avocado Salad (2) with 12 tortilla chips (4)
D: Campfire Dinner Meatloaf Foil Packets (8)
Totals: Freestyle™ SP 21, Calories 1,006**
*Prep bowls Sunday night, if desired. Green salad includes 4 cups romaine, 2 scallions, ½ cup each: tomatoes,
cucumber, chickpeas and 2 tablespoons light Italian dressing.
**This is just a guide, women should aim for around 1500 calories per day. Here’s a helpful calculator to estimate
your calorie needs. I’ve left plenty of wiggle room for you to add more food such as coffee, beverages, fruits,
snacks, dessert, wine, etc.
The post Skinnytaste Meal Plan (July 1- July 7) appeared first on Skinnytaste.
Recipes
via Skinnytaste https://ift.tt/2ix3Luq
June 29, 2019 at 09:13AM
Brownie Ice Cream Cake with Fudge Sauce
https://ift.tt/2XyagWb

Recipes
via Simply Recipes https://ift.tt/2F9fkDA
June 29, 2019 at 09:09AM
https://ift.tt/2XyagWb
Ice cream cake has always been the epitome of summertime and birthdays to me. It has all the things that a birthday party needs: cake (or in this case, brownies!), ice cream, something crunchy, and lots of gooey fudge.
WHAT’S THE BEST WAY TO ASSEMBLE THIS CAKE?
While ice cream cake might seem like an ambitious project, it’s really just an assembly job. I baked a from-scratch brownie for this, but a boxed brownie will do the job just as well.
Assembly starts with the brownie base that’s been baked and cooled. Then comes the ice cream! We add one layer of ice cream, followed by a layer of chunky crushed cookies, and top that with another layer of ice cream. Finally, the cake gets a glossy covering of fudge sauce.
The fudge sauce is so easy, thick, and rich. It’s slightly more spreadable than other versions, but I wanted to be able to spread it cold, so it wouldn’t melt the cake.
WHAT IS THE BEST PAN TO USE?
A springform pan is the easiest pan to use for this cake. It’s a cinch to remove the cake from the pan, no flipping! Plus, you can both bake the brownie layer and build the cake in one pan.
If you don’t have a springform pan, feel free to use a round cake pan or a 9×13. Just make sure you place parchment paper in the bottom of the pan with enough hanging over the sides so you can lift the cake out of the pan. Or keep it all in the pan; pour the fudge sauce over the top; slice, and serve!

WHAT IS THE BEST ICE CREAM TO USE?
I went vanilla here, because it’s classic, and that visual contrast cannot be beaten. Plus, Oreos and ice cream are forever a match made in heaven, and they provide the perfect crunchy texture.
But that said, the ice cream can literally be any flavor you want. I am always into a coffee and chocolate combo, but strawberry ice cream with crushed peanut butter cookies would be interesting and fun. Let your food brain run wild!
MAKE THIS AHEAD OF TIME
This cake is great to make ahead of time. You can bake the brownie layer up to a month in advance and freeze it. Wrap the entire pan well in two layers of plastic or foil.
You can also assemble the cake in advance, but I wouldn’t do it more than a week ahead, because I wouldn’t want the cake to get freezer burn (or absorb any weird freezer smells).
You can freeze the cake with the fudge topping if you want. Either way, freeze the assembled cake in the pan, covered well with a layer of plastic and foil.
THE BEST WAY TO SLICE AN ICE CREAM CAKE
Since this cake is frozen, use a hot knife to slice it. This will help the knife move through the frozen ice cream layers easily and give you clean slices.
To do this, I boil a kettle of water, pour into a tall vessel wide enough to fit the blade of my knife all the way to the hilt, then dip the knife in for about 15 seconds; dry it with a towel; then slice. It works like a charm and is actually very satisfying. Repeat the steps each time for super sharp, perfect slices.
LOVE ICE CREAM AND CAKE? TRY THESE RECIPES!
Recipes
via Simply Recipes https://ift.tt/2F9fkDA
June 29, 2019 at 09:09AM
Simply Recipes 2019 Meal Plan: July Week 1
https://ift.tt/2Lqj4Xz

Recipes
via Simply Recipes https://ift.tt/2F9fkDA
June 29, 2019 at 09:01AM
https://ift.tt/2Lqj4Xz
Simply Recipes 2019 Meal Plan: July Week 1
We're mixing it up with this week's meal plan! Koren Beef Bulgogi Sous Vide-Style, German Pork Burgers, Spicy Grilled Chicken Tacos, and back to basics with Greens, Eggs and Ham Grilled Cheese!
This month, we welcome back Marta Rivera for more of her meal plans. Marta is a trained chef, mom of twins, and wife to a newly-retired soldier!
The first week of July means my twins turn another year older. I cry, but they rejoice because they know their birthday week means Mom is making whatever they want.
I have no qualms about indulging my babies on their special day and I’m notorious for turning it into a week-long celebration revolving around food.
Many of this week’s recipes are an homage to their lives. Would you be so kind as to help me wish the Wonder Twins a happy 14th birthday?
This post may contain links to Amazon or other partners; your purchases via these links can benefit Simply Recipes. Read more about our affiliate linking policy.
Recipes
via Simply Recipes https://ift.tt/2F9fkDA
June 29, 2019 at 09:01AM
Perfect Oatmeal Cookies
https://ift.tt/2JaiBWU
Click here to browse more recipes!
Click here to browse more recipes!
Recipes
via Love and Lemons https://ift.tt/2h2Uz32
June 28, 2019 at 10:08AM
https://ift.tt/2JaiBWU

Happy Friday! I’m so excited to share these oatmeal cookies with you today because they truly are the best. A few weeks ago, I got an intense craving for a good oatmeal raisin cookie. I ran to the kitchen and hastily threw together ingredients that I happened to have on hand and, without really measuring, I made some ok oat-ball kind of cookies. They halfway hit the spot, but my craving continued. So when I flipped through Sarah Copeland’s beautiful new book Every Day is Saturday, her oatmeal cookie recipe grabbed my attention.
Sarah writes, “there are three kinds of oatmeal cookie: over-sugared and raisin-laden; too wholesome (a hippie cookie in disguise); and then these little nuggets of joy you can’t stop eating – that just right kind of cookie. These live in the third camp: sugar under control, but present, and no skimping on the butter (although I used coconut oil and they were still perfect). Cinnamon and vanilla give these big flavor. And for the sweet-toothed, a sprinkling of raisins, and buttery pecans (I used walnuts) do the trick.”
My personal verdict? These cookies totally hit the spot! They were exactly what I was craving, the only problem is that they disappeared too quickly!
Sarah is the author of some of my favorite cookbooks including the Newlywed Cookbook and Feast. Her newest book, Every Day is Saturday, is a gorgeous book full of recipes that are easy and doable for weekdays but that will infuse a dreamy weekend vibe into your everyday. Also – if you’re in Chicago, I’m doing an event with Sarah TOMORROW at Read it & Eat in Lincoln park at 2pm. We’ll be chatting about cookbooks and I’ll be signing copies of my book too. I hope to see you there!

Oatmeal Cookie Recipe Ingredients
The ingredients to this recipe are simple – you likely already have them in your pantry!
- All-purpose flour and whole rolled oats are the base of the dough.
- Baking powder and baking soda make them nice & puffy.
- Brown sugar adds the perfect caramelized sweetness.
- Sea salt offsets the sweet sugar and raisins.
- Cinnamon and vanilla extract give them that delicious warm, spiced oatmeal cookie flavor.
- Coconut oil or melted butter adds moisture and richness. I used coconut oil, and these tasted wonderfully buttery just the same!
- 1 large egg + an extra egg yolk give them a rich, thick dough and a moist, light final texture.
- Raisins dot them with chewy pops of sweetness.
- And walnuts add nuttiness and crunch.

How to Make Oatmeal Raisin Cookies
Making this oatmeal raisin cookie recipe couldn’t be easier. Here’s what you need to do:
- In separate bowls, whisk together the dry and wet ingredients.
- Pour the wet ingredients into the bowl with the dry ingredients and mix until just combined.
- Fold in the oats, raisins, and walnuts. The mixture will be thick!
- Let the dough rest for 20 minutes. Then, roll it into balls.
- Bake the balls at 350 degrees for 10-11 minutes, until nicely golden brown.
- When you take the cookies out of the oven, they should look slightly under-baked. Don’t worry, though – leave them on the hot baking sheets for 5 minutes out of the oven, and they’ll be delectably soft and chewy.
- After 5 minutes, transfer the cookies to a wire rack to cool completely, and enjoy!


Oatmeal Cookie Recipe Tips
Sarah has a few excellent pointers in her book. These are her tips for making the best oatmeal raisin cookies:
- Use brown sugar. Instead of using a mix of brown sugar and granulated sugar, Sarah opts for all brown sugar. It gives these oatmeal raisin cookies a delicious caramelized sweetness.
- Go for melted, not creamed, butter. According to Sarah, creamed butter cookies are unpredictable: they can easily spread too much or be too firm. With melted butter, though, you’ll get moist, chewy cookies every time.
- Let the dough rest 20 minutes before baking. Those 20 minutes will make your dough easier to roll into balls, so the cookies will keep their shape and develop a yummy chewy texture in the oven.
- Allow the cookies to cool completely for the best texture and flavor. It may be agony, but letting these oatmeal raisin cookies cool completely only makes them better. They’ll be chewier and fully infused with brown sugar flavor. Sarah likes these best a few hours to 1 day after baking. (Though I can attest that they’re still good if you can’t wait that long.)

Make-Ahead Oatmeal Cookies
If you’re someone who likes to keep cookie dough on hand in the fridge or freezer, this oatmeal cookie recipe is for you. You can mix up the dough and keep it in the fridge for 7-10 days or freeze it for up to a month.
To store the dough, roll it into balls and freeze them briefly. Then, transfer them to airtight plastic containers or Ziploc bags and refrigerate or freeze. You can also roll the dough into a log, using an 8×12-inch piece of parchment paper as a guide. Wrap the log tightly in parchment to refrigerate or freeze, and slice the cookies into rounds before baking.
Bake your cookie dough straight from the fridge. If it’s frozen, allow it to rest for 15 minutes at room temperature before putting it in the oven.

My Favorite Variations for Oatmeal Cookies
If you follow this recipe as written, you absolutely will not be disappointed: these oatmeal cookies are buttery, nutty, and perfectly spiced. If you want to step outside the traditional oatmeal raisin cookie box, though, here are a few suggestions to change them up:
- Substitute chocolate chips for the raisins to make oatmeal chocolate chip cookies, or use a mix of both.
- Try using pecans instead of walnuts.
- Swap the raisins for dried cherries or cranberries.
- Add a dash of cardamom or ginger to the dough.
- Skip the raisins and use butterscotch chips or a mix of chocolate and butterscotch chips for extra-buttery flavor.
What’s your favorite way to make oatmeal cookies? Let me know in the comments!


If you love this oatmeal raisin cookie recipe…
Try these apple cookies, these pumpkin cookies, these sugar cookies, or these breakfast cookies next!

And be sure to check out Every Day is Saturday! I know you’ll love it!
Other posts you may enjoy...
 Coconut Loaf |
 Gluten-free Chocolate Chip Cookies |
 Chocolate Almond Breeze Smoothie |
 Raspberry Crumble Bars |
 Almond Butter Brown Rice Crispy Treats |
 Jessica's Pistachio Oat Squares |
The post Perfect Oatmeal Cookies appeared first on Love and Lemons.
Recipes
via Love and Lemons https://ift.tt/2h2Uz32
June 28, 2019 at 10:08AM
The Friday Buzz: All the S’mores, Coolest Drinks Around, and Good Reads
https://ift.tt/2FF4K9Z

Recipes
via Simply Recipes https://ift.tt/2F9fkDA
June 28, 2019 at 09:00AM
https://ift.tt/2FF4K9Z
Here's our weekly round-up of all good things, good advice, good feelings. Up this week: All the S'mores, Coolest Drinks Around, and Good Reads
PrintWelcome to The Friday Buzz, our roundup of all good things, good advice, good feelings. It’s the happy hour of blog posts! Up this week: All the s’mores, coolest drinks around, good reads, and more!
Greetings from the desert! I have left the plush land of Oregon and have traveled to Utah where I’ll be spending the next week with extended family. Traveling 14 hours in a car with little ones always proves to be a challenge, but we made it in one piece AND with everyone smiling. Whoa.
In the eight years I’ve been making this road trip, this was one of the smoothest rides…. what does this translate to? I’m basically walking on sunshine right now!
The Simply Recipes Team also has some favorites they’d like to share with you all that have had them walking on sunshine… let’s take a look at what they are, shall we?
OUR FAVORITES FROM THE WEEK
- First you take the graham… I had my first s’more of the season and simply couldn’t eat it without reciting this classic scene from “The Sandlot.” Please tell me I’m not the only one who loves that scene!
- Coolest drinks around: Summer makes switchel and agua fresca every year for the 4th. They will cool you off in a jiffy, AND vodka can easily be added making them perfect for both drinkers and non-drinkers!
- More drinks, comin’ up! This drink from our friend The Self-Proclaimed Foodie has Emma’s name written allllll over it.
- I dream of tahini: Ever made brownies with tahini? That’s exactly what Megan plans on making for her festivities on the 4th.
- Life is BREWTIFUL: Andy is going to try his hand at brewing a Watermelon Saison inspired by this book written from our very own Emma!
- Shout it loud! Special shout out to our sister company Serious Eats and Ed Levine on his new book!
THIS WEEK ON INSTAGRAM
Heavy debate going on what you call these bars. Are they 7-Layer Bars, Magic Bars, or Hello Dollies? Or in the words of Irvin, “Just call them GONE, because that’s what happens every time I make them!” I’d love to hear what you call them! Tell me here.
READER COMMENT OF THE WEEK
We always manage to receive the best reviews on our Banana Bread, but this one from Raynette gave me the giggles:
This is the easiest recipe ever, my husband couldn’t wait for it to finish as the smell had him counting the time. The aftermath: my family almost ate their fingers.
WOW. They must have really loved that banana bread!
Cheers to celebrating the 4th of July! Wherever you are, have a sparkling one.
This post may contain links to Amazon or other partners; your purchases via these links can benefit Simply Recipes. Read more about our affiliate linking policy.
Recipes
via Simply Recipes https://ift.tt/2F9fkDA
June 28, 2019 at 09:00AM
Strawberry-Basil Moscow Mule
https://ift.tt/2YlpIBY


Recipes
via Simply Recipes https://ift.tt/2F9fkDA
June 28, 2019 at 09:00AM
https://ift.tt/2YlpIBY
This Strawberry-Basil Moscow Mule is a fruity twist on the classic! Mixed with vodka and spicy ginger beer, it's a perfect cocktail for a hot summer afternoon.
Photography Credit: Nancy Mitchell
You know that drink you sometimes see when you’re out at a bar, the one served in a copper mug? That’s a Moscow Mule.
A classic Moscow Mule has just three ingredients--vodka, lime juice, and ginger beer—and while that’s delicious (yes) and easy to put together (yes again), I wanted a fruity twist on this classic.
It may involve a little extra preparation, but I think it’s worth it!
OUR SUMMER TWIST ON THE MOSCOW MULE
Our summertime version of the Moscow Mule adds strawberry and basil to the mix—a flavor combination just as classic as vodka and ginger!
In this drink, the sweetness of the strawberry and the herbal tug of the basil are especially good mixed with vodka and ginger beer, the traditional ingredients, which add lightness and a bit of spice.
WHICH VODKA TO USE
I like Tito’s. It’s not too expensive, and it’s made in Texas, which pleases this Texan. That said, any moderately-priced vodka will do. Since you’re pairing it with strawberry and ginger beer, this is not the time to showcase a pricey brand.
WHICH GINGER BEER TO USE
My preference here is for a spicier ginger beer, especially because you’re getting a little extra sweetness from the strawberry. Fentimans makes a ginger beer with a nice spicy kick, as does Fever Tree. Gosling’s is a bit easier to find and still makes a very nice drink.
Resist the temptation to substitute ginger ale for the ginger beer—you lose out on a lot of the flavor, and the drink will be very sweet.
A NOTE ON THOSE COPPER MUGS
The ones pictured here are from Moscow Muled, but you can find copper mugs in many places. I like how the mugs develop a nice frost after sitting out for a bit.
It’s debatable whether or not they actually make your drink colder, but they sure look good!
MORE FRESH AND FRUITY COCKTAILS YOU’LL LOVE
Strawberry-Basil Moscow Mule Recipe
PrintThe proportions for this drink are designed for a Moscow Mule mug, which is typically 16 ounces. If you don't have a copper mug, you can make it in a regular glass—just make sure it's around 16 ounces for the best results!
This drink is also very good with tequila, should you feel so inclined.
Ingredients
- 2 ounces vodka
- 4 or 5 strawberries (5 for medium-to-large strawberries, 4 for truly enormous ones)
- 5 basil leaves
- 3/4 ounce fresh-squeezed lime juice
- Crushed ice
- 2 to 3 ounces ginger beer, or to top
Special equipment:
Method
1 Muddle the strawberries and basil: Add strawberries and basil to the bottom of a shaker. Pour the lime juice on top, then muddle them with a muddler or the back of a spoon. Do this enough to gently smoosh the strawberries, but not completely pulverize them.
2 Add the vodka and shake: Add the vodka to the shaker, then the ice. (I find that 4 or 5 large cubes per drink works well.) Cover and shake for about 30 seconds.
3 Strain: Strain directly into a copper mug full of crushed ice or double strain by pouring the drink through a tea strainer, which will catch the finer particles. A single strain is also fine.
4 Add ginger beer: Fill the cup with ginger beer. Drink on a patio in the sunshine!
Hello! All photos and content are copyright protected. Please do not use our photos without prior written permission. If you wish to republish this recipe, please rewrite the recipe in your own unique words and link back to Strawberry-Basil Moscow Mule on Simply Recipes. Thank you!
PrintProducts We Love
This post may contain links to Amazon or other partners; your purchases via these links can benefit Simply Recipes. Read more about our affiliate linking policy.
Recipes
via Simply Recipes https://ift.tt/2F9fkDA
June 28, 2019 at 09:00AM
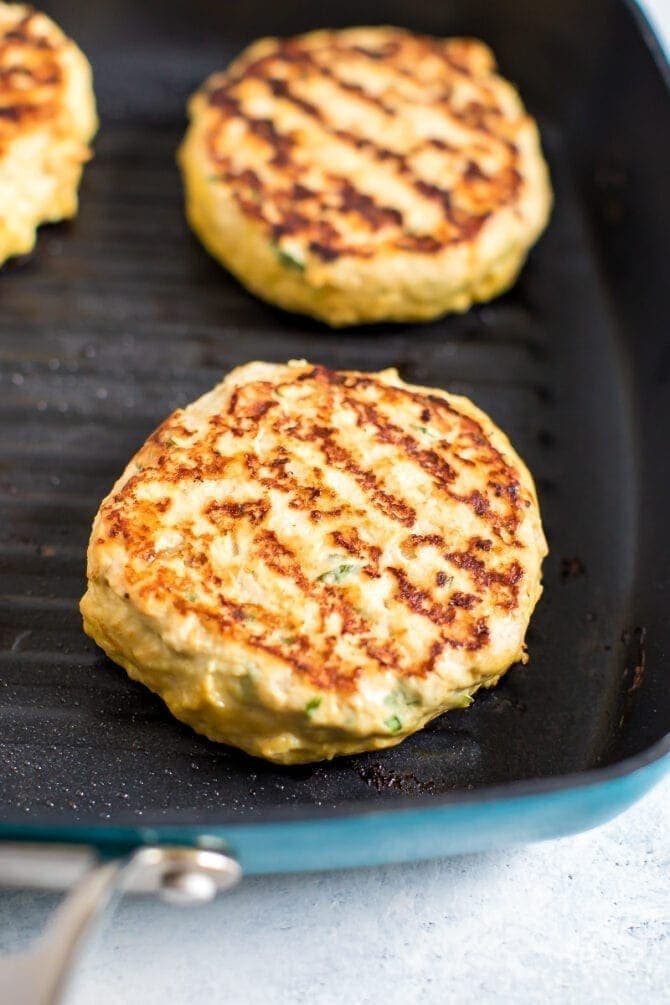
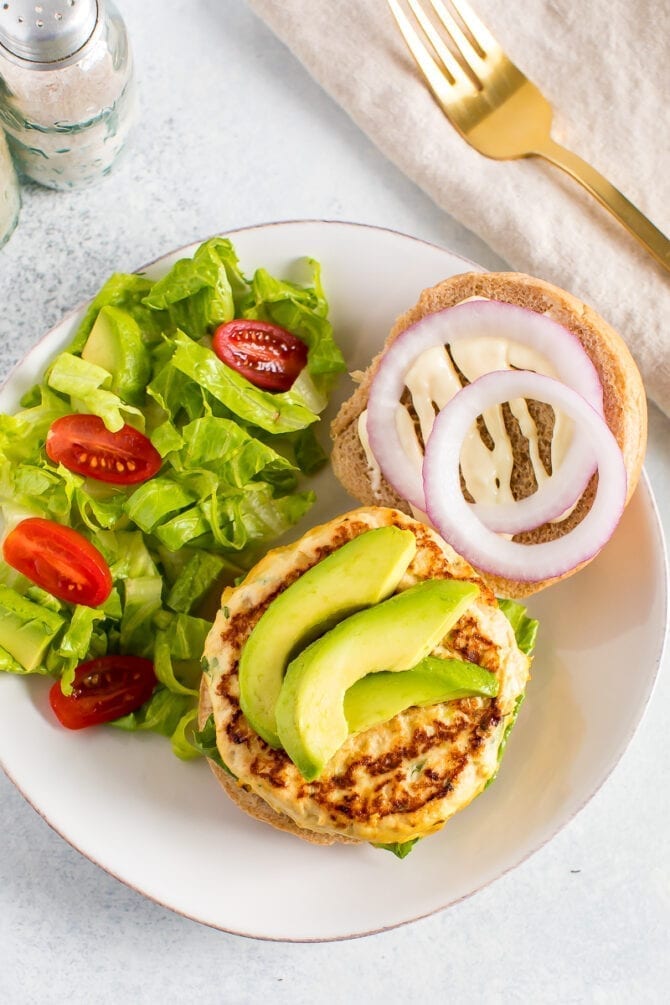
Cilantro Lime Chicken Burgers
https://ift.tt/2YrHS5n

Recipes
via Eating Bird Food https://ift.tt/1L45wsH
June 28, 2019 at 07:16AM
https://ift.tt/2YrHS5n
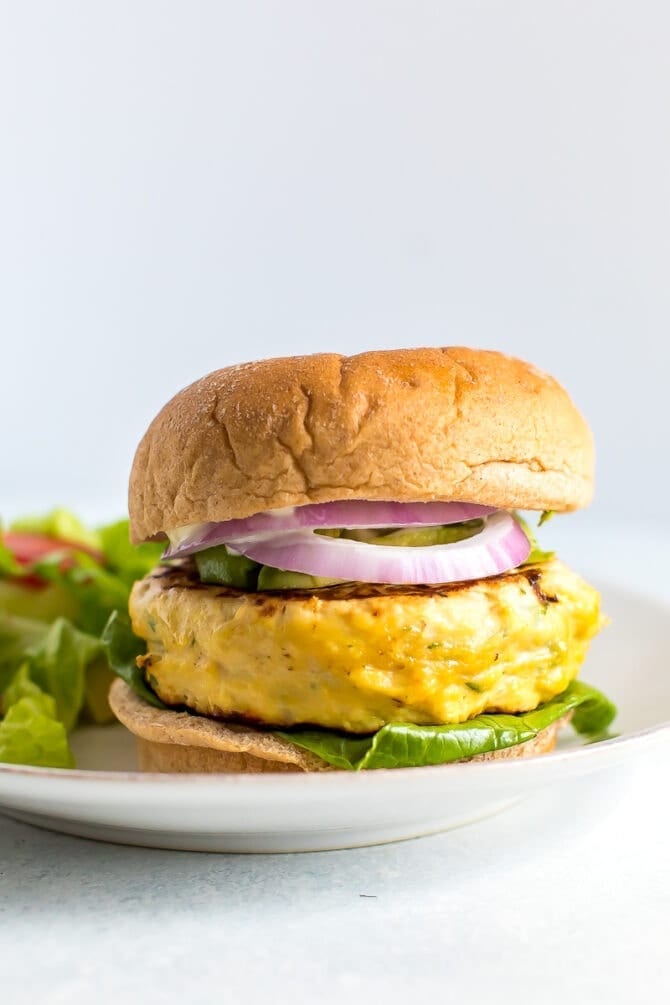
Cilantro lime chicken burgers that are packed with refreshing flavor! The perfect summer main dish. Gluten-free and paleo-friendly.
As I was planning out recipes for summer, I realized I only have two burger recipes on my blog! Time to change that! Although my brain typically goes to eating a burger on a hamburger bun, you can also serve these in a lettuce “bun” or over a salad. This burger is delicious every way!
Why Ground Chicken?
I decided to use ground chicken for this recipe because I thought it would go best with the cilantro and lime flavors. It feels stickier than ground beef but the burgers hold together well once they’re cooked without using an egg or bread crumbs.
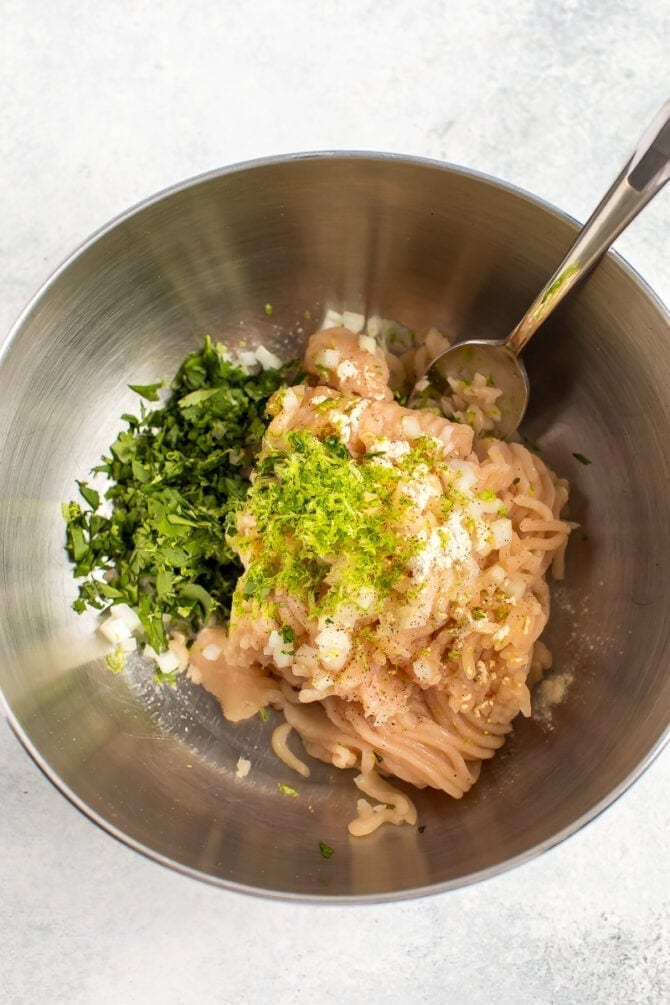
Ingredients in Cilantro Lime Chicken Burgers
- ground chicken
- lime juice + zest
- onion
- cilantro
- garlic powder
- sea salt
- ground pepper
How to Make Chicken Burgers
There is a little bit of chopping involved but this recipe is super simple! Mix all of the ingredients together in a large bowl and shape into burgers. I like to get my hands a little damp before forming the burgers so the chicken sticks to itself and not my hands. 
You can cook these chicken burgers in a skillet, on a grill pan or on the grill. When they reach an internal temperature of 165º, they’re ready to eat! My favorite way to enjoy these burgers is with sliced avocado, sliced jalapeños, onion, mayo and ketchup but feel free to create your own masterpiece.
If you make these cilantro lime chicken burgers, please be sure to leave a comment and star rating below letting me know how they turn out. Your feedback is so helpful for the EBF team and other EBF readers.
PrintCilantro Lime Chicken Burgers
- Author: Brittany Mullins
 Prep Time: 6 minutes
- Cook Time: 14 minutes
- Total Time: 20 minutes
 Yield: 4
Ingredients
- 1 lb. ground chicken
- 1 Tablespoon lime juice + 1 teaspoon lime zest
- 1/4 cup minced onion
- 1/4 cup chopped cilantro
- 1 teaspoon garlic powder
- 1/2 teaspoon sea salt
- pinch of ground pepper
- whole wheat or gluten-free hamburger buns or lettuce bun
- toppings of choice: avocado, ketchup, red onion, jalapeño slices, avocado oil mayo
Instructions
- Combine all ingredients in a bowl and mix until just combined. Shape the mixture into equal sized burgers.
- Spray a little cooking spray on a non-stick skillet or grill pan over medium heat. Add burgers to skillet and cook 6-7 minutes per side, or until cooked through and 165°F internally. Serve immediately with toppings and bun of choice.
 Category: Lunch/Dinner
 Method: Stovetop
 Cuisine: American
Nutrition
- Serving Size: 1 burger (no bun or toppings)
- Calories: 190
- Sugar: 1g
- Fat: 11g
- Carbohydrates: 2g
- Fiber: 0g
- Protein: 21g
Keywords: cilantro lime chicken burgers
The perfect sides for these chicken burgers:
- Avocado Corn Salad
- Side Salad with Tomatillo Avocado Dressing
- Mexican Layer Dip
- Guacamole Salad
The post Cilantro Lime Chicken Burgers appeared first on Eating Bird Food.
Recipes
via Eating Bird Food https://ift.tt/1L45wsH
June 28, 2019 at 07:16AM

The Flat Belly Fix
This is the only 21-day rapid weight loss system that allows you to easily lose an average of 1 lb a day for 21 days without feeling hungry or deprived. The unique and brand new techniques used in this System are proven SAFE. And they do not cause the rebound weight gain common to all the other rapid weight loss systems that are not backed by the latest science. The Flat Belly Fix System takes advantage of a recent scientific discovery that proves the effective weight loss power of an ancient spice. Combined with other cutting-edge ingredients in the patent-pending Flat Belly Fix Tea™ — that you can make right in your own kitchen in minutes — this System is the quickest, easiest and most enjoyable way to quickly get the body you desire and deserve. Click Here
Categories
All
Gluten Free
Pancakes
Protein
Archives
November 2020
October 2020
September 2020
August 2020
July 2020
June 2020
May 2020
April 2020
March 2020
February 2020
January 2020
December 2019
November 2019
October 2019
September 2019
August 2019
July 2019
June 2019
May 2019
April 2019
March 2019
February 2019
January 2019
December 2018
November 2018
October 2018
September 2018
August 2018
July 2018
June 2018
May 2018
April 2018
March 2018
February 2018
January 2018
December 2017
November 2017
 RSS Feed
