Feel Healthy Today
  • Home
  • Recipes
  • Health News
  • Fitness News
  • Weight Loss
  • Contact
  • Subscribe

Recipes

Sweet Potato White Bean Dip

9/30/2018

0 Comments

 
Sweet Potato White Bean Dip
https://ift.tt/2NeL9yx

Sweet potatoes are so versatile—they work beautifully in a dip! This sweet-smoky dip with white beans and chipotle peppers is great with chips, pita, veggies, and crackers.

Photography Credit: Erin Alderson

Fall always feels like a bit of a slippery slope in terms of food. Once the kids are back in school, it’s football season, which leads right into the holidays. I always feel like time goes quicker during these months and by the time I’m ready to enjoy fall, it’s Thanksgiving. And so, I always like to plan ahead with ideas for parties and holidays, usually starting in September!

It feels like once a week I’m whipping together some kind of party food, and among my friends, I’ve become the person notorious for showing up with something that is heavy on the vegetable side, but still delicious.

VEGAN BEAN DIP

This sweet potato dip is sneaky. Its base is simple: roasted sweet potatoes and white beans.

The flavor sweet potatoes take on from the roasting process is a concentrated flavor mixed with sweet and earthy. I love to pair that with the smoky spiciness of chipotle peppers.

I keep a small bag of chipotle peppers in adobo sauce stashed in my freezer especially for making dips like this. I pull it out, add it to the dish. I also like using chipotle peppers in homemade chilis, enchilada sauces, and mixed as a marinade for roasted sweet potatoes.

A DIP FIT FOR A PARTY!

This dip is one of my go-to party dips. I like to pair it with crackers, fresh vegetables, or toasted bread for an easy-to-transport appetizer. I also love how bright the color is; the dip’s a great conversation starter as people are usually curious what’s in it.

WAYS TO USE LEFTOVER DIP

Best of all, leftover dip can be then used in enchiladas or quesadillas. The dip makes an excellent filling for enchiladas: simply top with enchilada sauce and cheese (or avocado to keep vegan). Or spread the dip with a bit of cheese between two tortillas for an easy lunch or snack.

MORE GREAT PARTY DIPS!

Bean Dip Recipe with Sweet Potatoes

Sweet Potato White Bean Dip Recipe

Print

Ingredients

  • 1 pound sweet potatoes
  • 2 shallots (about 1/4 pound), cut into 4 pieces each
  • 4 tablespoons olive oil, divided
  • 1 teaspoon sea salt
  • 1 1/2 cup white beans, drained and rinsed if using canned (reserve the liquid)
  • 1 to 2 chipotles in adobo sauce
  • 2 tablespoons lime juice
  • 1/4 cup cilantro, plus more for serving

For serving:

Special equipment:

Method

1 Roast the sweet potatoes: Preheat your oven to 450˚F. Peel the sweet potatoes and cut into 1 1/2-inch cubes.

Place both the sweet potatoes and shallots on a rimmed baking sheet and toss with 2 tablespoons of olive oil and sea salt. Roast until the sweet potatoes are tender, about 25 to 30 minutes.

2 Make the dip: Place the roasted sweet potatoes and shallots in a food processor or blender along with the white beans, 2 tablespoons olive oil, chipotles, lime juice, and cilantro. Puree, adding reserved bean liquid as needed, until the dip is smooth and thick, like a hummus would be.

3 Serve the dip: Sprinkle the top of the tip with cilantro, and serve with your favorite tortilla chips or an assortment of fresh vegetables.

Hello! All photos and content are copyright protected. Please do not use our photos without prior written permission. If you wish to republish this recipe, please rewrite the recipe in your own unique words and link back to Sweet Potato White Bean Dip on Simply Recipes. Thank you!

Print

Erin Alderson

Erin Alderson is a photographer/videographer living in Sacramento, CA. She currently runs Grove Haus Studio, focusing on capturing the stories behind food/farms through visual media and recipes. Erin can also be found sharing fresh, vegetarian recipes on her site, Naturally Ella.

More from Erin


Recipes

via Simply Recipes https://ift.tt/2F9fkDA

September 30, 2018 at 12:19PM
0 Comments

Maple Pecan Banana Muffins

9/30/2018

0 Comments

 
Maple Pecan Banana Muffins
https://ift.tt/2OmQJDr

Maple Pecan Banana Muffins

4 Freestyle Points 142 Calories

Moist and delicious banana muffins sweetened with pure maple syrup and topped with crushed pecans – so good you won’t believe they are light!

This week has been a crazy week, for those of you who missed it I was on QVC Wednesday selling The Skinnytaste Cookbook!

Here’s a link to the video if you want to see it. (I never realized I talked so much with my hands until playing this back!) I was a little nervous, but honestly David is such a great host, he made it so easy. After that I flew to Pittsburgh to visit the Delallo family (I will share more about that later this week) but it feels so good to be back home in the kitchen cooking and sharing recipes.

Madison, my youngest LOVES banana muffins, so whenever I have ripe bananas on my counter I always like to bake a batch for her. Whatever we don’t eat that day is usually her breakfast the next day. In my house, these go pretty quick, but if you live alone, you can individually wrap them in plastic wrap and freeze them for a later day, then pop them in the microwave – they taste just like you first baked them.

These muffins are slightly adapted from my low fat banana nut bread recipe. Here I wanted to use pecans, pure maple syrup and some maple sugar I purchased, but if you don’t have maple sugar any sugar would work. What I love about making these banana muffins is that they come out so moist, and I only use 2 tablespoons of butter in the whole batch!
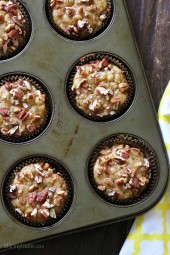
Maple Pecan Banana Muffins

Moist and delicious banana muffins sweetened with pure maple syrup and topped with crushed pecans – so good you won’t believe they are light!

Ingredients:

  • 3 medium very ripe bananas
  • 1 1/4 cups white whole wheat flour
  • 3/4 teaspoon baking soda
  • 1/4 teaspoon salt
  • 2 tablespoon unsalted butter, softened
  • 1/4 cup maple sugar (or brown sugar)
  • 2 large egg whites
  • 1/4 cup pure maple syrup
  • 2 tbsp unsweetened apple sauce
  • 1/2 teaspoon vanilla extract
  • 1/3 cup crushed pecans

Directions:

  1. Preheat oven to 325°F. Line a cupcake tin with liners.
  2. Mash bananas in a bowl, set aside.
  3. In a medium bowl, combine flour, baking soda and salt with a wire whisk. Set aside.
  4. In a large bowl cream butter and 1/4 cup maple sugar with an electric mixer.
  5. Add egg whites, mashed bananas, maple syrup, apple sauce and vanilla; beat at medium speed until mixed well, scraping down sides of the bowl.
  6. Add flour mixture, then blend at a low speed until just combined.
  7. Pour the batter into the prepared muffin tin. Spread the pecans evenly over the muffins.
  8. Bake the muffins on the center rack for 30 to 35 minutes, or until a toothpick inserted in the center comes out clean.

Nutrition Information

Yield: 12 servings, Serving Size: 1 muffin

  • Amount Per Serving:
  • Freestyle Points: 4
  • Points +: 4
  • Calories: 142 calories
  • Total Fat: 5g
  • Saturated Fat: g
  • Cholesterol: 5mg
  • Sodium: 113mg
  • Carbohydrates: 23g
  • Fiber: 2g
  • Sugar: 12g
  • Protein: 3g

All images and text ©Gina Homolka for Skinnytaste


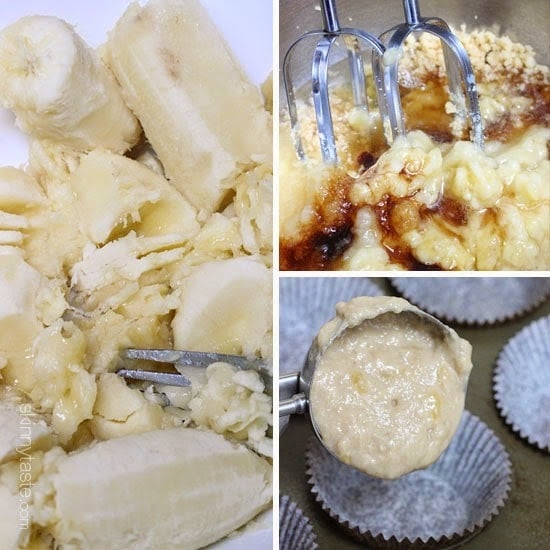
posted September 21, 2014 by Gina


Recipes

via Skinnytaste https://ift.tt/2ix3Luq

September 30, 2018 at 09:43AM
0 Comments

Enter for a Chance to Win a Years Worth of Coffee in our Coffee Lovers Sweepstakes!

9/29/2018

0 Comments

 
Enter for a Chance to Win a Year’s Worth of Coffee in our Coffee Lovers Sweepstakes!
https://ift.tt/2QluefB

Love coffee as much as we do? Tell us about it in our new Sweepstakes with Westrock Coffee!

Print
Westrock Coffee

Coffee lovers unite! In celebration of National Coffee Day, for the next two weeks (Sept 29 – Oct 12, 2018), we’re hosting a Coffee Lovers Sweepstakes on Instagram and entering couldn’t be easier. Simply follow @westrockcoffee on Instagram and comment on THIS POST, telling us your favorite morning coffee drink!

We’ll select the winner at random on October 15th. Ten lucky winners will win coffee for one month, and one grand prize winner will win a year’s worth of coffee beans from Westrock Coffee!

About Westrock Coffee

Westrock Coffee believes in ethical and sustainable coffee from crop to cup. They are changing lives with every delicious sip, working closely with farmers from around the world to ensure honest and fair trade practices.

By having a hand in every step of the coffee-making process, Westrock is able to create long-term relationships with farmers while ensuring high-quality coffee for their customers. All things we can get behind!”

A Few Favorite Coffee Recipes:

How to Make Cold Brew Coffee
Brown Sugar Irish Coffee
Coffee Bourbon Chocolate Chip Ice Cream


Recipes

via Simply Recipes https://www.simplyrecipes.com

September 29, 2018 at 11:36AM
0 Comments

Simply Recipes Meal Plan: October 2018 Week 1

9/29/2018

0 Comments

 
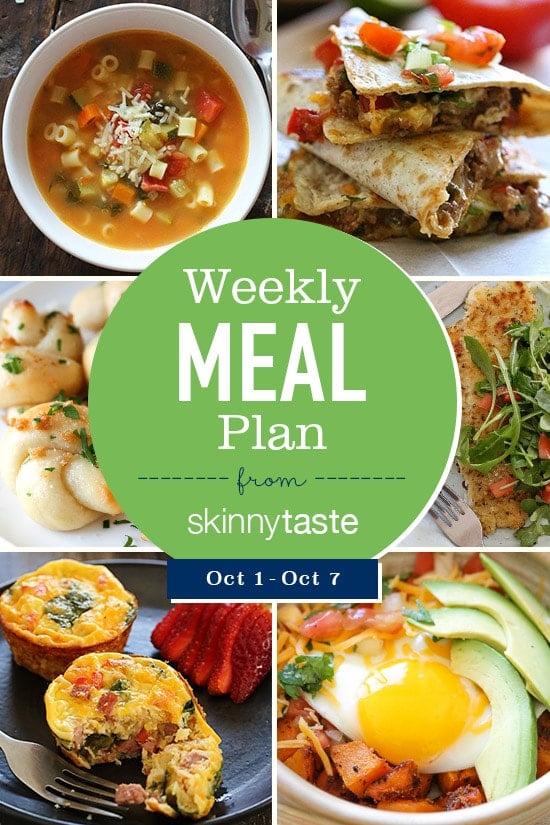
Simply Recipes Meal Plan: October 2018, Week 1
https://ift.tt/2y8xsM3

This month, we welcome back Marta Rivera for more of her meal plans. Marta is a trained chef, mom of twins, and Army wife – and she is also one of our Simply Recipes contributors and recipe testers!

How is it already October?!?! I’m still trying to get into the fall groove with our school and work schedules. These days, I just want to enjoy the chilly temps, daydreaming about pumpkin spiced something-or-other, and Oktoberfest (which I celebrate all season long!).

Great produce is still coming into season in October. Keep an eye out in your food markets for corn, broccoli, cabbage, and kale this month!


Recipes

via Simply Recipes https://ift.tt/2F9fkDA

September 29, 2018 at 09:05AM
0 Comments

How to Freeze and Reheat Rice

9/29/2018

0 Comments

 
How to Freeze and Reheat Rice
https://ift.tt/2Ip6lAV

In the last few years, I’ve started seeing boxes of pre-cooked rice in the freezer aisle at my local grocery stores. They’re super convenient, but way pricier than just cooking up some rice at home. I wondered if it’d be possible to make my own version at home.

After some trial and error, I found that, yep, it works great! And it’s much more economical, too—as you would expect.

It’s also easy to incorporate this prep step into your routine—if you find yourself making rice for a meal, just make twice as much, so you’ll have some to freeze for next time. Of course, you can also have a dedicated prep day where you freeze some rice for future meals.

I often make a big batch of rice in my Instant Pot and freeze half of it.

HOW TO FREEZE RICE

This method works with any kind of rice, brown or white. I find that the rice still has great texture when reheated, but it does have a tendency to dry out quickly after reheating. Make sure to serve it straight away to avoid this issue. Cook your rice as you would normally, on the stove or in a pressure cooker, then freeze it by following the instructions here.

1. Spread your just-cooked rice on a cookie sheet, fluffing it a bit as you spread it out in an even layer.

2. Once the rice is cool (this takes about 20 minutes), scoop it into freezer-safe plastic bags. Label the bags with the type of rice, the date, and the amount of rice in the bag. It’s really important to label the bags, since different kinds of rice pair well with different meals, and it’s pretty hard to tell varieties apart when frozen!

Reheat Rice scoop into plastic bagsEasy Rice to Freeze and Reheat label the bag

3. Pop the bags in the freezer, stacked nice and flat. They’ll keep well this way for up to 2 months. After that, it gets dry and the texture suffers.

Reheat Rice freeze the bag

HOW TO REHEAT FROZEN RICE IN THE MICROWAVE

When it’s time to reheat the rice, just follow a few easy steps:

1. The rice will have frozen into a solid block. Break this into chunks (you can do this while it’s still in the bag for less mess), and place it in a bowl.

Freeze Rice frozen block of rice break into chunks

2. Cover the bowl tightly with plastic wrap, or with a reusable, microwave-safe lid or bowl.

Place the covered bowl in the microwave and cook the rice on high heat for 2 to 3 minutes. The timing will depend on the wattage of your microwave, so you want to check on it after a couple minutes. Mine is pretty powerful, so I find that 2 minutes is plenty.

Reheat Rice cover with plastic wrap

3. Carefully remove the lid from the bowl (it will be very hot and steam quite a bit!), then fluff the rice with a fork and serve it right away.

Easy Rice to Freeze and Reheat

HOW TO ADD FROZEN RICE DIRECTLY TO DISHES

Alternatively, you can use the rice straight from the freezer, in its still-frozen state.

This method works best when you’re adding it to a soup or a chili, since it will defrost evenly when fully submerged in liquid. I often break up frozen rice into chunks, then add it to a pot of simmering chicken soup. Once it comes back up to a simmer, it’s ready to go.

And that’s it, really! I hope this helps you save some bucks and speed up your weeknight dinner routine, too.


Recipes

via Simply Recipes https://ift.tt/2F9fkDA

September 29, 2018 at 08:55AM
0 Comments

How to Make Rice in the Pressure Cooker

9/29/2018

0 Comments

 
How to Make Rice in the Pressure Cooker
https://ift.tt/2xZlyUp

Ever since I got my Instant Pot a few years ago, I’ve stopped making rice any other way! It’s such a simple, basic method, and you never have to worry about it getting gummy or a pot boiling over on the stove.

Every time I make rice, I achieve the same results: separate grains, with a pleasing, chewy texture. Pressure cooking does give rice a slightly different texture than stovetop cooking, and I have actually grown to prefer it prepared this way. Give it a try and see what you think!

HOW MUCH WATER FOR PRESSURE COOKING RICE?

You can cook any kind of rice in your pressure cooker, long or short grain, brown or white. (It even makes a killer risotto, but that’s a recipe for another day.) No matter what kind of rice I’m cooking, I use the same ratio of rice to water or broth, 1:1.

This is probably less water than you’re used to using for cooking stovetop rice, and that’s because there’s very little evaporation when you’re using the pressure cooker. This ratio produces fairly firm, separate grains—you can add a little more water, maybe about 1/4 cup extra, if you like softer rice.

How to Make Rice in the Instant Pot fluff the rice

HOW LONG TO PRESSURE COOK RICE?

The amount of water (or other liquid—you can also use stock) will remain the same. Different kinds of rice, however, take different amounts of time to cook under pressure. Wild rice and brown rice will require more time than white rice, for instance. Any variety can be cooked at either high or low pressure; it comes out a little fluffier at low pressure, and a little chewier at high pressure.

Although you can cook any variety of rice on the automatic “rice” setting, brown rice works better on either a manual setting, or a setting that’s specifically designed for whole grains, such as the “Multigrain” setting on the Instant Pot.

Here are my preferred cooking times for cooking rice in the pressure cooker:

  • Brown rice: 20 minutes on high pressure for firm rice, or 22 minutes for softer grains
  • White rice: 15 minutes on low pressure for firm rice, or 17 minutes for softer grains

RINSE WELL FOR FLUFFY RICE

I don’t always remember to do this step, but it helps when I do: Rinse the rice in a wire mesh colander under cold water for 30 seconds or so, or until the water runs clear.

Rinsing makes the rice fluffy, and seems to make more of a difference with white rice varieties verses brown; the latter is protected by its hull and doesn’t tend to have a lot of extra starch clinging to the outside of the grains.

JUST ADD WATER—OR BROTH. OR GARLIC. OR BUTTER.

Just like on the stove, you can cook rice in the pressure cooker with broth or water, use as much salt as you like, and add extra seasonings, a pat of butter, or a little olive oil for extra flavor.

I sometimes sauté a little garlic in olive oil before adding my rice and broth, which turns a basic pot of grains into a flavorful side dish! You can also use seasonings such as turmeric and coriander for some Indian-inspired basmati rice, or chili powder for rice to tuck into burritos.

USE A NATURAL PRESSURE RELEASE

No matter what kind of rice you’re cooking, it’s a good idea to let the pressure release naturally for 10 minutes before opening the pot. This allows the moisture to distribute evenly throughout the grains, and helps it unstick from the bottom of the pot, too.

You *can* open the pot with a quick pressure release if you like, but it really does benefit from a little resting time!

MINIMUM (AND MAXIMUM) AMOUNTS OF RICE

One last rule of thumb to keep in mind is that you’ll need to cook at least 1 1/2 cups of rice in a 6-quart pressure cooker to get nice, even results. This is because the bottom of the pot isn’t perfectly flat, but slightly concave. If you use less rice, the grains in the middle of the pot will not cook as evenly, since they won’t be submerged in the water as much as the rice on the sides of the pot.

On the flip side, don’t overfill your pressure cooker with too much rice, either! It should be half full or less when you’re cooking any grains, beans, pastas, or other foods that can tend to foam up. I find that I get the best results when I cook between 1 1/2 and 3 cups of rice at a time.

By the way, you can always make extra rice and freeze the extra. Here’s how to do that!

Those are my best tips for cooking rice! Of course, you can also just follow the basic recipe below. Either way, enjoy!

MORE PANTRY STAPLES TO MAKE IN THE PRESSURE COOKER


Recipes

via Simply Recipes https://ift.tt/2F9fkDA

September 29, 2018 at 08:55AM
0 Comments

Skinnytaste Meal Plan (October 1-October 7)

9/29/2018

0 Comments

 
Skinnytaste Meal Plan (October 1-October 7)
https://ift.tt/2R6UUBQ

A free 7-day flexible meal plan including breakfast, lunch and dinner and a shopping list. All recipes include calories and Weight Watchers Freestyle™ SmartPoints®.

A free 7-day flexible meal plan including breakfast, lunch and dinner and a shopping list. All recipes include calories and Weight Watchers Freestyle™ SmartPoints®.

Happy October! My favorite month and also my birthday week!! And just a few days and Skinnytaste One and Done Cookbook will be arriving to everyone’s door if you pre-ordered! And for those asking, all the WW points for all three books are listed in the cookbook index.

If you’re new to my meal plans, I’ve been sharing these free, 7-day flexible healthy meal plans (you can see my previous meal plans here) that are meant as a guide, with plenty of wiggle room for you to add more food, coffee, beverages, fruits, snacks, dessert, wine, etc or swap recipes out for meals you prefer, you can search for recipes by course in the index. You should aim for around 1500 calories* per day.

There’s also a precise, organized grocery list that will make grocery shopping so much easier and much less stressful. Save you money and time. You’ll dine out less often, waste less food and you’ll have everything you need on hand to help keep you on track.

Lastly, if you’re on Facebook join my Skinnytaste Facebook Community where everyone’s sharing photos of recipes they are making, you can join here. I’m loving all the ideas everyone’s sharing!

THE DETAILS:

Breakfast and lunch Monday-Friday, are designed to serve 1 while dinners and all meals on Saturday and Sunday are designed to serve a family of 4. Some recipes make enough leftovers for two nights or lunch the next day. While we truly believe there is no one size fits all meal plan, we did our best to come up with something that appeals to a wide range of individuals. Everything is Weight Watchers friendly, I included the updated Weight Watcher Freestyle Points for your convenience, feel free to swap out any recipes you wish or just use this for inspiration!

The grocery list is comprehensive and includes everything you need to make all meals on the plan. I’ve even included brand recommendations of products I love and use often. Cross check your cabinets because many condiments you’ll notice I use often, so you may already have a lot of them.

And last, but certainly not least, this meal plan is flexible and realistic. There’s plenty of wiggle room for cocktails, healthy snacks, dessert and dinner out. And if necessary, you can move some things around to make it work with your schedule. Please let me know if you’re using these plans, this will help me decide if I should continue sharing them! 

MONDAY (10/1)
B: Petite Crustless Quiche* (5) and a banana (0)
L: 2 servings Heirloom Tomato Sandwich (8)
D: Minestrone Soup (2) with Easy Garlic Knots (2)
Totals: Freestyle™ SP 17, Calories 924**

TUESDAY (10/2)
B: Petite Crustless Quiche (5) with a pear (0)
L: LEFTOVER Minestrone Soup (2) with Easy Garlic Knots (2)
D: Skillet Cauliflower “Arroz” con Pollo (8)
Totals: Freestyle™ SP 17, Calories 1,060**

WEDNESDAY (10/3)
B: Petite Crustless Quiche (5) with a pear (0)
L: LEFTOVER Minestrone Soup (2) with Easy Garlic Knots (2)
D: Cuban Picadillo***(3) over ¾ cup brown rice (5) and Quick Cabbage Slaw (2)
Totals: Freestyle™ SP 19, Calories 1,049**

THURSDAY (10/4)
B: Petite Crustless Quiche* (5) and a banana (0)
L: Picadillo Quesadillas (6) with 2 ounces avocado (3)
D: Chicken Marsala Meatballs (5) with Roasted Spaghetti Squash (0)
Totals: Freestyle™ SP 19, Calories 913**

FRIDAY (10/5)
B: Greek Yogurt with Berries, Nuts and Honey (5)
L: LEFTOVER Picadillo Quesadillas (6) with 2 ounces avocado (3)
D: Flounder Milanese with Arugula and Tomatoes (3) and Creamy Cauliflower Puree (1)
Totals: Freestyle™ SP 18, Calories 833**

SATURDAY (10/6)
B: Breakfast Burrito Bowl with Spiced Butternut Squash (3)
L: Chicken and Lentil Soup (1)
D: DINNER OUT!
Totals: Freestyle™ SP 4, Calories 490**

SUNDAY (10/7)
B: Applesauce Nut Bread# (5) with 1 cup mixed berries (0)
L: LEFTOVER Chicken and Lentil Soup (1)
D: Pork Chops and Applesauce (4) with  Skinny Buttermilk Mashed Potatoes with Chives (5) and Easy Garlic Broccolini (1)
Totals: Freestyle™ SP 16, Calories 842**

*Freeze any leftover you/your family won’t eat.

**This is just a guide, women should aim for around 1500 calories per day. Here’s a helpful calculator to estimate your calorie needs. I’ve left plenty of wiggle room for you to add more food such as coffee, beverages, fruits, snacks, dessert, wine, etc.

***Make a quesadilla Wed night with leftover Picadillo for lunch Thurs and Fri.

#Make applesauce Saturday.

(more…)


Recipes

via Skinnytaste https://ift.tt/2ix3Luq

September 29, 2018 at 07:13AM
0 Comments

Tofu Croutons

9/28/2018

0 Comments

 
Tofu Croutons
https://ift.tt/2OmmBIq
These simple and tasty Tofu Croutons are perfect for adding a punch of protein to your salad or soup. They have a mild cheezy, peppery flavor and golden edges all around. Infuse some serious flavor into your tofu, and fall in love with it all over again! If you love croutons on your salad, or are looking for flavorful ways to add more protein, give these a try!...Read more »

This is a summary, images and full post available on HHL website!


Recipes

via Healthy. Happy. Life. https://ift.tt/ygHPsr

September 28, 2018 at 05:06PM
0 Comments

Vegan Broccoli White Pizza

9/28/2018

0 Comments

 
Vegan Broccoli White Pizza
https://ift.tt/2xNbuP2

Vegan Broccoli White Pizza

It’s Friday – let’s make pizza!

I’m so crazy about this pizza because it’s packed with a TON of vegetables, but not in a boring “I”m trying to eat my vegetables” way. It tastes amazing because each one provides an interesting texture or flavor. The broccoli gets all roast-y toasty, the corn pops with sweetness, the sun dried tomatoes bring that tangy umami-flavor, and the jalapeño brings some spice to this Friday pizza party. The whole thing gets doused in a creamy/savory layer of cashew cream in lieu of any cheese or dairy. It’s pizza you can feel good about! ?

While this looks like a lot of ingredients, it actually all comes together pretty quickly.

Vegan Broccoli White Pizza

Once you chop everything (even the stems of the broccoli!), toss everything together in bowl with olive oil, salt, and pepper until everything is well seasoned and well coated. While you do this, your partner could be stretching the pizza dough.

To make things easy, I like to use Whole Foods’ Multigrain fresh pizza dough – it can be found in the refrigerated area near the pizza section of the store. If you don’t see it, ask the people at the pizza counter. I’ve also heard that Trader Joe’s fresh dough is delicious.

And just a side note: I’ve been really enjoying this hole-ey pizza pan lately – it gets the bottom edges of the crust nice and crisp.

Vegan Broccoli White Pizza Vegan Broccoli White Pizza

Look how many vegetables! I love it ?

Spread just a thin layer of cashew cream onto the stretched dough. You want just enough so that the vegetables have something to stick to, but you don’t want the middle to become too gooey.

Vegan Broccoli White Pizza Vegan Broccoli White Pizza

The oozy cashew cream layer goes on at the very end. You don’t want to bake cashew cream in the oven – it loses a lot of its creaminess if you do.

So once the pizza comes out of the oven, drizzle the cashew cream very generously over the top. Finish with fresh basil and a sprinkle of red pepper flakes, if you like.

Slice and devour!

Vegan Broccoli White Pizza

Vegan Broccoli White Pizza


Author: Jeanine Donofrio

Serves: 6 to 8 slices

Ingredients

  • 1 small head broccoli, florets chopped into small pieces, top of stalk diced (½ cup)
  • ⅓ cup halved cherry tomatoes
  • kernels from 1 ear fresh corn
  • ¼ cup coarsely chopped red onion
  • ½ jalapeño, thinly sliced
  • 4 oil-packed sun-dried tomatoes, diced
  • extra-virgin olive oil, for drizzling and brushing
  • 1 (16-ounce) ball of pre-made fresh pizza dough
  • ½ cup fresh basil leaves
  • 2 tablespoons fresh thyme leaves
  • pinches of red pepper flakes
  • sea salt and freshly ground black pepper

Cashew Cream (makes extra)

  • 1 cup cashews
  • ½ cup water, more as needed
  • 2 tablespoons extra-virgin olive oil
  • 2 tablespoons fresh lemon juice
  • 1 garlic clove
  • ½ teaspoon sea salt

Instructions

  1. Preheat the oven to 450°F.
  2. In a medium bowl, combine the broccoli, tomatoes, corn, onion, jalapeño, and sun-dried tomatoes and drizzle with olive oil and pinches of salt and pepper. Toss to coat and taste. The vegetables should be well-seasoned and well-coated with the olive oil so that the vegetables are flavorful throughout the pizza.
  3. Meanwhile, make the cashew cream. Place the cashews, water, olive oil, lemon juice, garlic, and salt in a high-speed blender and blend until creamy. Add more water, if necessary, to blend into a smooth consistency.
  4. Stretch the pizza dough onto a 14-inch pizza pan. Brush the dough lightly with olive oil and spoon a few scoops of cashew cream onto dough, just enough to spread it into a thin layer. Distribute the vegetables onto the dough. Bake 15 minutes, or until the crust is golden, cooked through, and the broccoli is tender and roasted. Remove from the oven and drizzle generously with the cashew cream. Top with the fresh basil, fresh thyme, and pinches of red pepper flakes.

3.4.3177


Recipes

via Love and Lemons https://ift.tt/2h2Uz32

September 28, 2018 at 10:20AM
0 Comments

Curried Squash and Pear Soup

9/28/2018

0 Comments

 
Curried Squash and Pear Soup
https://ift.tt/2N8dyWA

EASY Butternut Squash Soup with Pears, seasoned with curry and ginger

Photography Credit: Elise Bauer

Tis the season for squash and pear! These two pals of fall work beautifully together in this creamy, lightly spicy, gingery soup.

When I first posted this recipe years ago, I suggested roasting a halved butternut squash first, to get make purée as the base for the soup. That works, but you are left with an excess of squash purée, and sometimes it’s just easier to start with pre-cut butternut squash.

So, in this revised version, I’m browning pre-cut cubed squash in olive oil and butter, then cooking onions with spices, and then adding chopped pears, before adding back the squash and stock to make the soup. 

Pears and ginger love each other, so I’m adding a little ground ginger for some zing, as well as a splash of nutmeg.

The soup is similar to a spicy pumpkin soup also here on Simply Recipes, but with a distinctive pear flavor. You can add a thin slice of Bartlett pear to each serving, or cut up a pear in small pieces and mix them into the soup for added sweetness.

Updated September 28, 2018 : Photos and recipe updated, first published 2005

Curried Squash and Pear Soup Recipe

Print

Ingredients

  • 6 cups cubed butternut squash (about 1 1/2 pounds)
  • 3 Tbsp olive oil
  • 1 teaspoon butter
  • 1 medium onion, chopped (about 1 1/2 cups)
  • 2 1/2 teaspoons yellow curry powder
  • 1/2 teaspoon ground ginger
  • Pinch of nutmeg
  • 2 cups peeled, chopped Bartlett pear (about 1 pound, 3 pears)
  • 1 1/2  cups water
  • 1 cup pear nectar
  • 4 cups chicken or vegetable stock (use veg stock for vegetarian option)
  • 1/2 teaspoon salt
  • 1/8 teaspoon black pepper
  • 1/4 cup heavy whipping cream
  • 1 small Bartlett pear, cored and thinly sliced

Method

1 Sauté the butternut squash: Heat 2 Tbsp olive oil and 1 teaspoon butter in a large, thick-bottomed pot on high heat. Add half of the cubed butternut squash. Toss to coat with the oil. Let cook until lightly browned on several sides.

Remove with a slotted spoon to a bowl. Repeat with the remaining butternut squash. Remove to a bowl.

2 Cook the onions and spices: Add 1 tablespoon of olive oil to the pot. Add the chopped onion. Lower the heat to medium and cook for a few minutes to soften.

Then add the curry powder, ground ginger, and nutmeg. Cook for a few minutes more.

3 Add the chopped pear, and toss to coat. Cook for a minute more.

4 Add water, stock, pear nectar, salt, pepper, then simmer: Add the browned butternut squash to the onion pear mixture. Add the water, stock, pear nectar, salt, and pepper. Bring to a boil on high heat; partially cover, reduce heat, and simmer 30 minutes.

5 Purée: Purée using a stick blender or if using a standing blender, purée a third of the soup at a time.

If the soup is too thick for you, add a little water to thin it. If it is too thin for you, bring it to a boil and let it boil down a bit.

6 Add cream: Turn off heat. Stir in 1/4 cup of cream.

Ladle soup into bowls, and garnish with pear slices.

Hello! All photos and content are copyright protected. Please do not use our photos without prior written permission. If you wish to republish this recipe, please rewrite the recipe in your own unique words and link back to Curried Squash and Pear Soup on Simply Recipes. Thank you!

Print

Elise Bauer

Elise Bauer is the founder of Simply Recipes. Elise launched Simply Recipes in 2003 as a way to keep track of her family's recipes, and along the way grew it into one of the most popular cooking websites in the world. Elise is dedicated to helping home cooks be successful in the kitchen. Elise is a graduate of Stanford University, and lives in Sacramento, California.

More from Elise


Recipes

via Simply Recipes https://ift.tt/2F9fkDA

September 28, 2018 at 07:10AM
0 Comments
<<Previous

    The Flat Belly Detox Drink Fix


    The Flat Belly Fix

    This is the only 21-day rapid weight loss system that allows you to easily lose an average of 1 lb a day for 21 days without feeling hungry or deprived. The unique and brand new techniques used in this System are proven SAFE. And they do not cause the rebound weight gain common to all the other rapid weight loss systems that are not backed by the latest science. The Flat Belly Fix System takes advantage of a recent scientific discovery that proves the effective weight loss power of an ancient spice. Combined with other cutting-edge ingredients in the patent-pending Flat Belly Fix Tea™ — that you can make right in your own kitchen in minutes — this System is the quickest, easiest and most enjoyable way to quickly get the body you desire and deserve. Click Here

    Categories

    All
    Gluten Free
    Pancakes
    Protein

    Archives

    November 2020
    October 2020
    September 2020
    August 2020
    July 2020
    June 2020
    May 2020
    April 2020
    March 2020
    February 2020
    January 2020
    December 2019
    November 2019
    October 2019
    September 2019
    August 2019
    July 2019
    June 2019
    May 2019
    April 2019
    March 2019
    February 2019
    January 2019
    December 2018
    November 2018
    October 2018
    September 2018
    August 2018
    July 2018
    June 2018
    May 2018
    April 2018
    March 2018
    February 2018
    January 2018
    December 2017
    November 2017

    RSS Feed

Powered by Create your own unique website with customizable templates.
  • Home
  • Recipes
  • Health News
  • Fitness News
  • Weight Loss
  • Contact
  • Subscribe