


 Buy Now →
|
Apple Cider Glazed Donut Holes
https://ift.tt/2oCQOYr Apple Cider Glazed Donut Holes tickle the taste buds with the flavors of fall. A touch of sweetness and the warm spices of apple cider make these donut holes the perfect morning treat to eat with a cup of steaming coffee. Photography Credit: Cindy Rahe Apple Cider Glazed Donut Holes are my cheat for getting some of those orchard vibes into my own home. These donut holes are a hybrid between a classic cider donut and my favorite sour cream old-fashioned donuts. The result is a crispy donut with a fluffy interior, fragrant with apple and cinnamon. Just like an old-fashioned donut, the exterior of these are cracked and craggled, making them perfect for catching the sweet, cider-spiked glaze. WHAT’S THE BEST CIDER FOR APPLE CIDER DONUT HOLES?I like to use fresh, unfiltered apple cider for this recipe—preferably the kind from an orchard, but any cloudy cider or juice works. It has the most apple flavor—the donuts themselves use cider, as well as the glaze, so the apple flavor really comes through. HOW TO FRY THE PERFECT DONUT HOLEThese donut holes are deep-fried to ensure perfectly browned outsides and a soft, fluffy inside. To make sure the interior of the donut holes are cooked though, I like to check the temperature of the oil with a thermometer. Use a thermometer that can either clip to the side of the pan or one that will instantly read the temperature. It’s important to maintain the oil frying temperature at 350˚F. Each time you add a batch of donut holes to the oil, it will drop the temperature. You will want to wait until the oil temp increases to 350°F again before adding your next batch. If you don’t have a thermometer, gently drop a small amount of batter into the hot oil. If it sizzles aggressively, the oil is hot enough. HOW TO STORE DONUT HOLESI think most fried things are best eaten still warm from the fryer, and these donuts are no exception. The glaze sets after a few minutes, and the still-warm donuts are fluffy on the inside and crunchy on the outside. That said, these keep surprisingly well, covered at room temperature, for a day or two. The glaze keeps them from drying out too quickly, but after a few days, they do become kind of dense and dry. I don’t recommend freezing these at any stage, as the end results aren’t really worth the effort. More Ways to Enjoy Apples This Fall!Apple Cider Glazed Donut Holes RecipeIngredientsFor the donut holes:
For the apple cider glaze:
Method1 Prepare your drying station: Set a wire cooling rack over a baking sheet. You will let the donut holes dry here after you’ve dipped them in the glaze. 2 Make the batter: In a large mixing bowl whisk together the flour, baking powder, salt, and sugar. In medium bowl, whisk together the egg, sour cream, and apple cider. Add the wet mixture to the dry mixture, followed by the melted butter, and fold to combine until you get a very thick batter.
3 Prepare to fry the donut holes: Heat the oil in a 3-quart saucepan until the temperature reads 350°F. Use a medium cookie scoop (about 1 1/2 tablespoons), to scoop up the batter. Fry the donut holes in batches, cooking each side for about 2 minutes, until the donut holes float to the surface and turn golden brown. Drain on paper towels. Repeat until all the batter is used up.
4 Make the glaze: In a medium bowl whisk the powdered sugar with 2 tablespoons of apple cider and pinch of salt, adding more cider a few teaspoons at a time, until you get a thick, heavy glaze. You may not need all 4 tablespoons of cider. Remember that the glaze will thin as it hits the hot warm donuts.
5 Dip the donut holes: Pour the glaze into a deep bowl or mug, this will help with glazing the donuts. Dip the warm (or even hot) donuts into the glaze, using a spoon to coat the donut hole completely. Lift the donut hole from the glaze using a fork. Let the glaze set and drain by placing the dipped donut holes on the wire rack set over a baking sheet. Enjoy immediately!
Hello! All photos and content are copyright protected. Please do not use our photos without prior written permission. Thank you! Products We LoveThis post may contain links to Amazon or other partners; your purchases via these links can benefit Simply Recipes. Read more about our affiliate linking policy. Recipes via Simply Recipes https://ift.tt/2F9fkDA September 30, 2019 at 09:04AM
0 Comments
Baked Peanut Tofu
https://ift.tt/2oAoZ30
If you’ve been an Eating Bird Food reader for awhile, you know I’ve been on a food journey over the last few years. I used to be pescatarian and now I’ve expanded to a balanced, whole foods approach. I eat meat (organic and sourced sustainability) but I still love my plant based meals! This is a great recipe whether you’re a tofu lover or are just thinking about incorporating Meatless Monday into your week.
I’m always looking for new ways to make tofu and given my love for peanuts, this baked peanut tofu was bound to happen! We’re basically just coating tofu in a delicious peanut sauce and baking it until it’s golden brown and crisp. Ingredients in the Peanut Sauce
This peanut sauce is so versatile. I’ve used it on a variety of proteins and veggies and it’s been delicious every time!
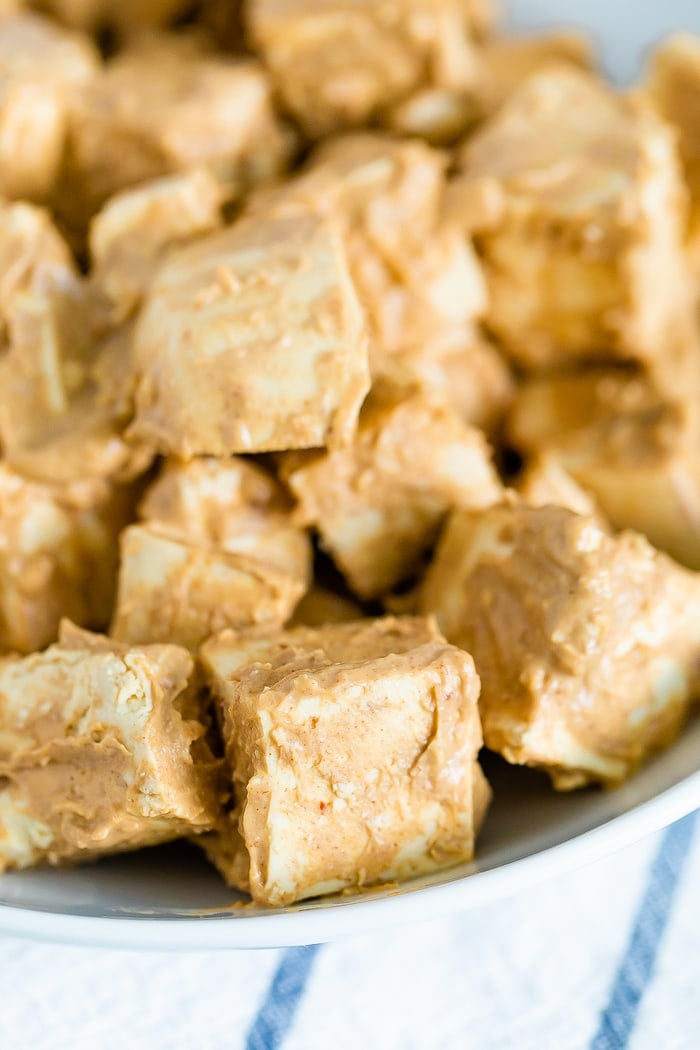
How to Make Baked Peanut TofuYou’ll want to leave a little time to prep this meal so the flavors can marinate into the tofu! Mix it up in the morning and have a delicious dinner waiting for you at the end of the day. ? Start by pressing your tofu. Drain out all of the liquid from the extra-firm tofu package and then use a tofu press OR wrap the tofu “bricks” in paper towels or a clean kitchen towel. Place on a flat surface and top with some heavy items to press the excess water out! I like to use a cast iron skillet, canned goods or heavy cookbooks. While your tofu is being pressed, mix the sauce together until well blended. Cube your tofu, pour the sauce over and stir to cover all of the pieces. Cover your container of tofu and sauce and let the mixture marinate in the fridge for at least an hour. I like to marinate mine for about 5-6 hours or even overnight.
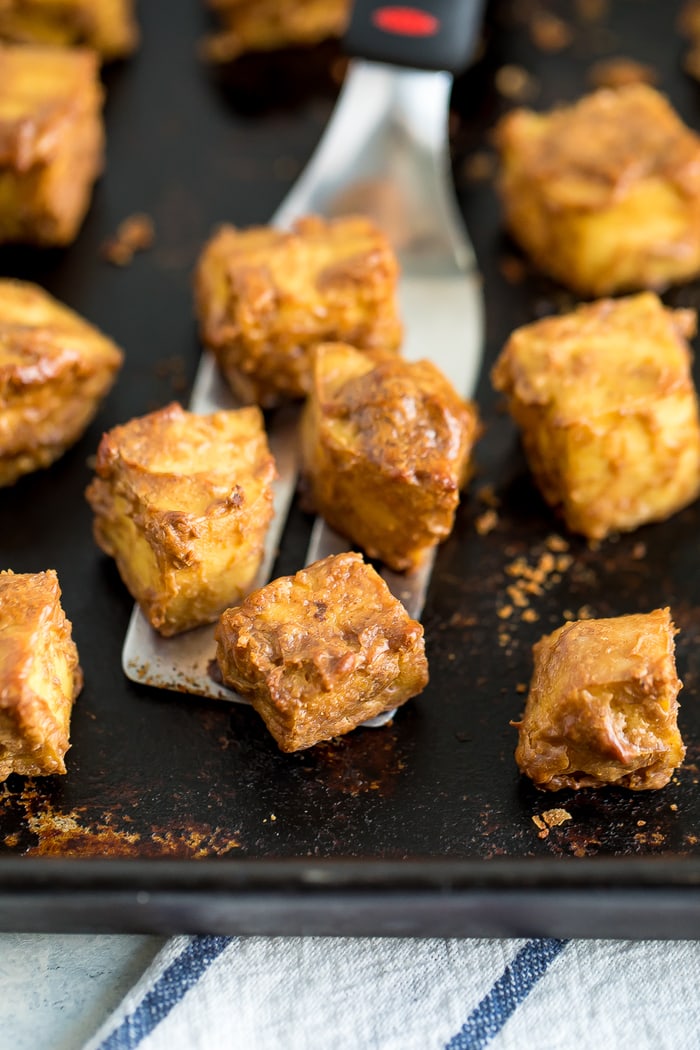
When you’re ready to bake, pre-heat the oven to 350ºF and bake the tofu on a non-stick pan for 30-40 minutes or until tofu is nice and crispy and golden brown.
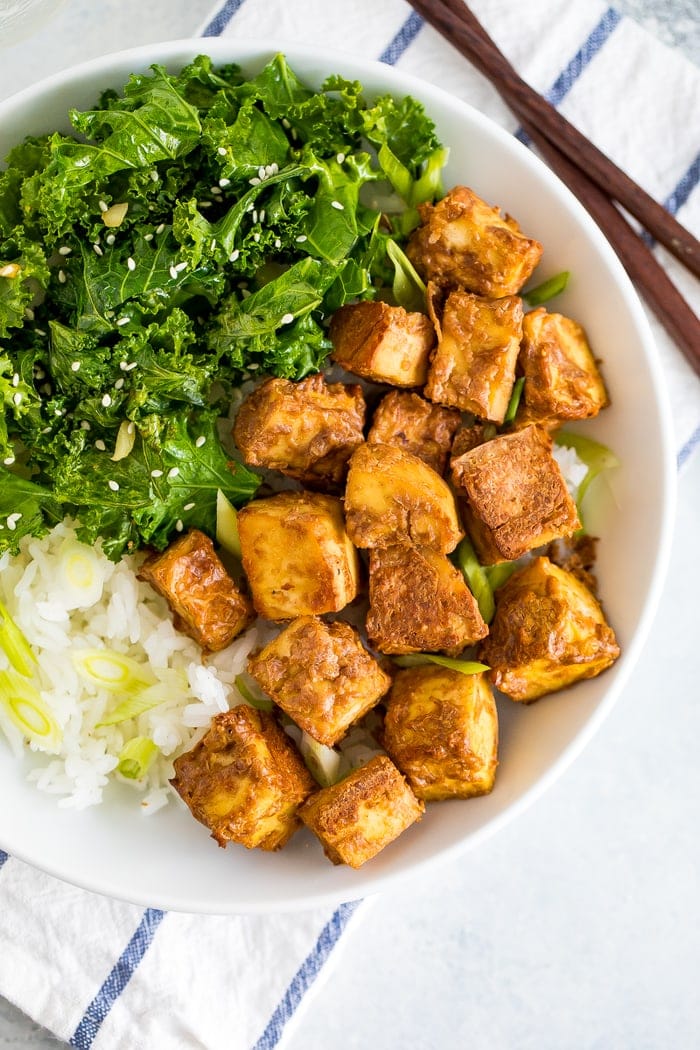
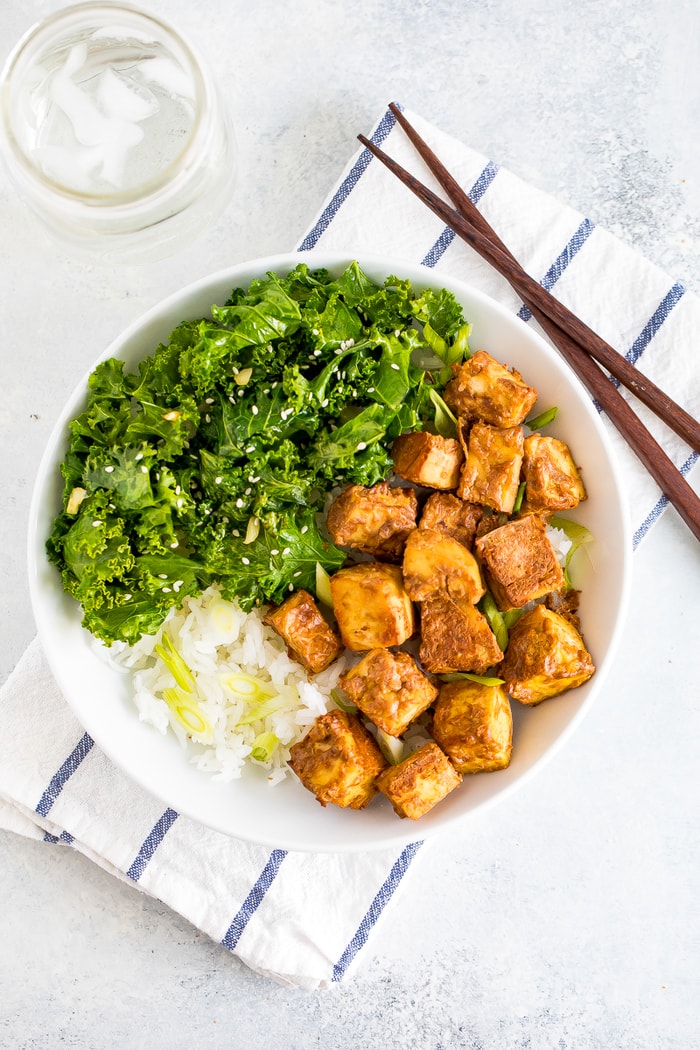
The tofu comes out of the oven looking like chicken nuggets from Chick-Fil-A (one of my favorite foods growing up) and has an amazing texture and peanuty taste. This might be my new go-to tofu recipe! It’s delicious served over brown rice, white rice or rice noodles with a veggie on the side. I like it with kale (this garlicky kale would be perfect) or roasted broccoli.
Like this recipe? Here are other tofu recipes you might enjoy!If you make this baked peanut tofu recipe, please be sure to leave a comment and star rating below. Your feedback is super helpful for the EBF team and other readers who are thinking about making the recipe. Print Baked Peanut Tofu
DescriptionThis baked peanut tofu is marinated in a delicious peanut sauce that gives the tofu an amazing flavor and crispy coating. Just pair with rice and a veggie side for a full meal! Ingredients
Peanut Sauce
Instructions
Nutrition
Keywords: peanut tofu The post Baked Peanut Tofu appeared first on Eating Bird Food. Recipes via Eating Bird Food https://ift.tt/1L45wsH September 30, 2019 at 07:19AM
Pot Roast
https://ift.tt/2nE2NVg Pot roast was a standard growing up, and still continues to be in my parents’ household. It requires slow cooking over low heat to ensure tender, flavorful meat. What Makes the Best Pot Roast?Pot roasts typically use the tougher cuts of beef—a chuck roast or shoulder roast—which have the most flavor. Slow cooking at low heat is what melts the tough connective tissue between the muscle fibers, leaving you with tender meat that pulls apart with your fork. For pot roasts, and other slow cooked tough meats, fat is your friend! Not only does fat deliver flavor, it helps keep the meat from drying out in the long slow cooking. So look for cuts that are well marbled with fat. Another tip? Let the roast sit (wrapped) for one to two hours outside of the refrigerator so that it comes closer to room temperature (between 65 and 70°F) before cooking. Otherwise, it will take a lot longer to cook at the low heat called for in this recipe. How Much Liquid Do You Need?This is my mother’s tried and true recipe for pot roast and she only adds a half cup of liquid to the pot! Why does this work? Beef is about 60 to 70% water (the rest is protein and fat). So if you keep the heat very low and the pot tightly covered, the beef will release water as it cooks, and it will cook in its own juices. The result? A deeper beef flavor for your pot roast. The key is keeping the temperature low and making sure the lid is tight fitting. Otherwise, too much vapor will escape from the pot and you’ll have a dry pot roast. This recipe calls for 1/2 cup of red wine for the liquid. Use whatever red wine you like to drink. The wine will add a richer flavor to the roast, but if you don’t have wine on hand or would prefer to cook without it, you can substitute the wine with water or broth. After cooking 3 1/2 hours. Note how much liquid has been released by the meat! Can I Make This Pot Roast Other Ways?My mother cooks her pot roast on the stovetop, but you can make it in the oven, a slow cooker, or a pressure cooker.
Note! If you have a gas range, you may find difficulty getting the flame low enough. A tip I read in Cook’s Illustrated suggests tightly rolling up some aluminum foil, shaping it into a donut, and putting that on top of the burner to create a little more distance between the range and the pan. If you use a high-BTU range, even this may not be enough, in which case I recommend starting the roast on the stovetop and moving it to the oven to cook. Can I Add Potatoes to this Pot Roast?The issue with the potatoes is that they may fall apart with the long, slow cooking of the pot roast. If I wanted to add potatoes, I would use firmer new potatoes instead of Russets (they’ll hold their shape better). Cut them in half over 1 1/2 inches in diameter, and into quarters if larger. I would heat the potatoes first (so they don’t lower the temperature inside the pot when you add them) in the microwave or in the oven on a roasting sheet, and then add them to the pot roast the last hour of cooking. WHO DOESN’T LOVE A GOOD POT ROAST?Products We LoveThis post may contain links to Amazon or other partners; your purchases via these links can benefit Simply Recipes. Read more about our affiliate linking policy. Recipes via Simply Recipes https://ift.tt/2F9fkDA September 29, 2019 at 04:13PM
Easy Crispy Falafel
https://ift.tt/2omMgoX
Falafel was the food that first convinced me that a vegetarian diet could be filled with bold, exciting flavors. It’s crispy, rich, and satisfying, packed with fresh herbs and aromatic spices. Stuffed into pita bread with veggies, tahini sauce, and a pop of pickled onions, it’s insanely flavorful, making it one of my all-time favorite foods. I included a recipe for red lentil falafel in Love and Lemons Every Day (one of my favorites in the book!), but never before have I shared a classic chickpea-based falafel recipe. Without a doubt, it was worth the wait. I’m picky about my falafel, but these little guys check all the boxes: they’re crunchy on the outside, soft in the middle, and loaded with herbs and spices.
What is Falafel?If you’re thinking, “Wait. What is falafel?”, you’re in for a treat. A traditional Middle Eastern dish, falafel are fried balls of ground chickpeas, which often include parsley, cilantro, and spices such as cumin and coriander. It’s a popular street food throughout the Middle East and Europe (if you’re ever in Paris, make a stop at L’As du Fallafel), where you can find it stuffed into pitas brimming with fresh veggies, herbs, sauces, and pickles. I’m not a fan of working with a big vat of hot oil at home, so instead of deep frying my falafel, I bake it. It comes out deliciously crisp just the same, and it’s a little lighter than the traditional version. This one is my favorite falafel recipe to date, and I hope you fall for it too!
My Falafel Recipe IngredientsTo make my baked falafel recipe, you need these key ingredients:
How to Make FalafelOnce you’ve soaked your chickpeas, this recipe is easy to make! Here’s what you need to do:
Best Baked Falafel Tips
Falafel Serving SuggestionsI love stuffing my falafel into a pita sandwich loaded with chopped tomatoes and cucumbers, fresh herbs, hummus, pickled onions, and generous drizzles of tahini sauce. To customize your pita sandwich, you could easily swap another Middle Eastern sauce like tzatziki or baba ganoush for the hummus, or drizzle it with cilantro lime dressing instead of (or in addition to) the tahini. If you’re not in the mood for pita, top your falafel onto a big salad along with some crispy roasted chickpeas, or serve it over a bed of quinoa, cilantro lime rice, or cauliflower rice with lots of fresh veggies. And if you’re in the market for a side dish, any of these recipes would be excellent with this baked falafel:
If you love this falafel recipe…Try my Mediterranean chickpea salad, shawarma wraps, or stuffed zucchini next! Other posts you may enjoy...
The post Easy Crispy Falafel appeared first on Love and Lemons. Recipes via Love and Lemons https://ift.tt/2h2Uz32 September 29, 2019 at 11:01AM
Grilled Cheese Sandwich with Mozzarella, Red Peppers, and Arugula
https://ift.tt/2nGM1ow If you’ve never had this riff on a traditional grilled cheese, you’re in for a treat! Sweet and creamy with a snappy bite from the arugula, it’s a wonderfully light grilled cheese in which to indulge this fall. WHY MOZZARELLA, ARUGULA, AND ROASTED RED PEPPERS?Back when I was writing my cookbook, Melt: The Art of Macaroni and Cheese, I had a lot of extra cheese in my house. Like, a lot of extra cheese – usually no less than 10 pounds, all scraps. For my husband, who possesses the enviable metabolism of a high school student despite being well into his forties, this was a boon. His favorite food growing up and still to this day is a grilled cheese sandwich, and I had provided him with an inexhaustible supply of ingredients. To him the variety is inconsequential. If it’s got bread and melted cheese, well, it’s his favorite. Brie and jam? Done. Manchego and ham? He’s on it. Taleggio and leftover bratwurst? Stinky but satisfying. He even bought a panini press so he could better, more efficiently feed his habit. But one particular rendition stands out to us all these years later: mozzarella, roasted red peppers, and arugula. A little bit sweet, a little bit peppery, it hits all the right notes for fall. ROASTED RED PEPPERS: BUY A JAR OR MAKE THEM!Preserved, roasted red peppers can generally be purchased quite affordably at any grocery store. They’re packed in water or oil, and either type will do. Just be sure to pat off the excess liquid before making your grilled cheese. Trader Joe’s has a lovely version packed in water, while Mezzetta makes one packed in oil that can be found in many stores or purchased online. If you’re an avid gardener with a glut of peppers coming in, or have a great source at the farmers’ market, you can also easily make your own! Whatever peppers you use, make sure to salt and pepper them once they’re on the sandwich. All foods, including sandwiches, need seasoning. Flaky salt is best, but kosher salt also works. Avoid iodized salt; its metallic tang mars flavor. WHAT KIND OF MOZZARELLA TO USE?There are essentially two kinds of mozzarella: fresh or low-moisture. Fresh mozzarella is sold in balls packed in salty brine. Low-moisture mozzarella is sold in bricks or pre-shredded and can be found alongside the cheddar, Jack, and Colby cheeses in the dairy section of a store. For this sandwich, you’ll want to use low-moisture (also known as part-skim) mozzarella. It has a saltier flavor and greater meltability. If you only have fresh mozzarella, that will also work. It won’t melt and become as delightful stringy as a low-moisture mozzarella, but it will still taste absolutely fantastic! Really want to take it over the top? If you can get fresh burrata, then, by all means, give that a go. Its creamy taste and texture make it well suited to oozing apart over high heat and soaking itself deep into the bread. EASY SUBSTITUTIONSGrilled cheese sandwiches are all about improvisation. Don’t have red peppers? Use tomato! Consider this more a set of guidelines than anything else. For the bread, I love the tang of sourdough and it grills so well. But if you don’t have that, or you’d like to use a panini press, then focaccia is also great. The only ingredients I wouldn’t skimp on are the arugula, mustard, and seasoning. Arugula delivers a powerfully peppery bite, and the pungency of the Dijon mustard helps cut through the sugars naturally found in the peppers and cheese. MORE GREAT GRILLED CHEESE SANDWICHES:Products We LoveThis post may contain links to Amazon or other partners; your purchases via these links can benefit Simply Recipes. Read more about our affiliate linking policy. Recipes via Simply Recipes https://ift.tt/2F9fkDA September 29, 2019 at 09:04AM
Simply Recipes 2019 Meal Plan: September Week 5
https://ift.tt/2nxKxfV  Simply Recipes 2019 Meal Plan: September Week 5Fall is officially here and this meal plan is all about recipes you can double so you can enjoy quality time with friends and family. Chicken Gumbo, Air Fryer Falafel, Beef Stew, and Turkey Sloppy Joes are sure to please any crowd! This week, please welcome Rachel Knecht and her meal plans! Rachel is a recipe tester here on Simply Recipes and the blogger behind Baking with Rachel.
By the end of the month, routines start to fall into place and life starts to feel normal again. We should all pat ourselves on the back! Let’s enjoy the early autumn colors and celebrate the change of seasons. The meals I remember most are those shared with friends. I often meet new acquaintances this time of year through school activities and kids sporting events. What better way to make new friends than to welcome them to the table? Not only do these meals taste great but you can also double them with little extra effort. This week’s meals offer a variety of flavors that will be a sure hit for friends and family. Enjoy! This post may contain links to Amazon or other partners; your purchases via these links can benefit Simply Recipes. Read more about our affiliate linking policy. Recipes via Simply Recipes https://ift.tt/2F9fkDA September 28, 2019 at 09:09AM
Instant Pot Chicken Wing Ramen
https://ift.tt/2npeVJE Do you like wings? Do you like ramen? If you said yes twice, we should hang out. Barring that, make chicken wing ramen. It’ll be your happy place. This easy Instant Pot recipe will be your go-to for using up leftover wings either from eating out or when you make them at home. Chicken wing ramen is essentially a bonus meal from your initial wing-fest…but psst, I like chicken wing ramen even more than the wings themselves. The bulk of work is making wings in the first place (which is EASY) and picking the meat and skin from the bones. (And if you’re not into that, you’re not into wings in the first place, right?) Throw everything into the Instant Pot and you have an easy weeknight meal from your party leftovers. What Wings Can Be Used for Ramen?This whole idea came from my friend, who regularly goes to the local brewery’s weekly wing night. He intentionally orders more hot wings than he knows he can eat so he can take the leftovers home to make Buffalo Wing ramen. While Buffalo ramen is indeed amazing and remains my favorite manifestation of chicken wing ramen (there’s the gorgeous bright red slick of grease on top of the broth), we realized it’s possible to make ramen out of any leftover cooked chicken wings. I tried it with Miso Chicken Wings, Old Bay Chicken Wings, and Teriyaki Chicken Wings. Sure, the flavor will vary depending on what you use, but it’s still essentially ramen. WAIT! WHAT IS RAMEN, ANYWAY?Ramen has come into its own in American noodle shops in the past 20 years, but most of us still think of it as super-cheap instant noodle soup with super-salty seasoning packets. Real ramen is a Japanese noodle soup in a flavorful broth that’s garnished with sliced pork, soft-cooked eggs, and a very light scattering of vegetables. All the components are artfully arranged and in a wonderful harmony of colors, textures, and flavors. The best shops spend years perfecting their broth and their noodles. You don’t need to, though. A satisfying bowl of steamy noodles and broth on a cold or rainy day is plenty close enough to perfect. Chicken wings have tons of cartilage and give you a silky, rich broth. Your Instant Pot makes quick work of extracting those characteristics because it’s ace for making chicken stock, stat. HOW TO COOK THE EGGSCook your ramen eggs directly in the broth in the pot. A lot of recipes have you do this over a steamer rack before even cooking the broth, but why bother? Cooking eggs in the broth streamlines the process, and the eggs turn out just right. The shells will be a little greasy, but you’re peeling them soon anyway. You want to undercook the egg so the whites are set but the yolk is a tad gooey. Two minutes at high pressure nails it every time! If the idea of cooking the eggs in broth isn’t for you, you can steam them in the Instant Pot using this method, or on the stovetop with this method. WHAT ARE THE BEST NOODLES?The classic noodles for ramen are Chinese-style fresh wheat flour noodles. You might be able to find such noodles easily at a grocery store or Asian market—or, like me, have limited options. I use shelf-stable “fresh” Chinese-style Hokkien stir-fry noodles from the Asian section of my big chain grocery store. If you’re in a pinch, use the noodles from two packets of instant ramen (but pitch the seasoning packets). Classically, you cook the noodles in their own pot of boiling water, and not directly in the broth. This is a streamlined ramen, though, and we’re gonna do it right in the broth like the wing-lovin’ rogues we are. WHAT DO YOU SERVE WITH THIS?Good question! Instead of loading up the ramen with vegetables and detracting from the glorious broth, I suggest a modest scattering of scallions on top and a refreshing cucumber salad on the side. Dude, you just ate the wings of, like, a dozen chickens for dinner, don’t get all uppity about green veggies right now. NEED MORE INSTANT POT RECIPES?Products We LoveThis post may contain links to Amazon or other partners; your purchases via these links can benefit Simply Recipes. Read more about our affiliate linking policy. Recipes via Simply Recipes https://ift.tt/2F9fkDA September 28, 2019 at 09:06AM
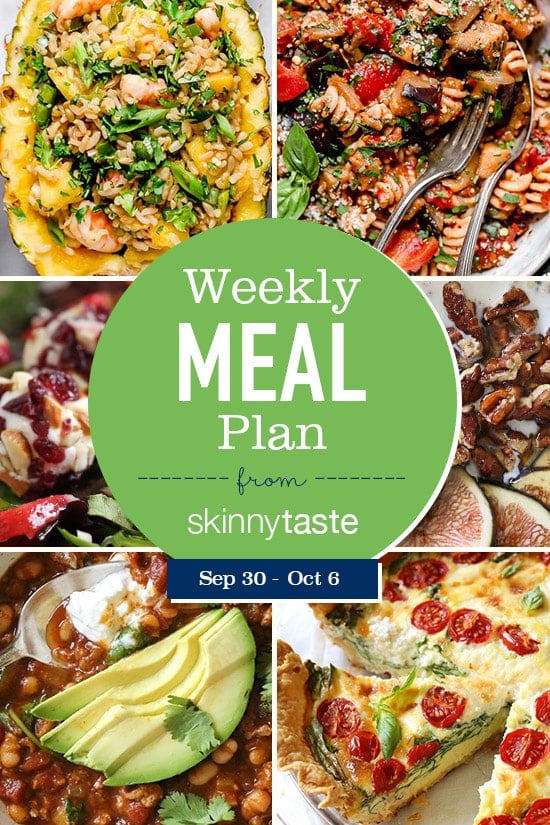
Skinnytaste Meal Plan (September 30-October 6)
https://ift.tt/2lRKr2u A free 7-day flexible weight loss meal plan including breakfast, lunch and dinner and a shopping list. All recipes include calories and Weight Watchers SmartPoints®.
I am so glad it is finally starting to feel a little like fall! I hope it is where you live too! Peak apple picking season for many areas is the next few weeks, for those of you who go, check out my Crock Pot Applesauce and Crock Pot Apple Butter! Nothing beats fresh and homemade! If you’re new to my meal plans, I’ve been sharing these free, 7-day flexible healthy meal plans (you can see my previous meal plans here) that are meant as a guide, with plenty of wiggle room for you to add more food, coffee, beverages, fruits, snacks, dessert, wine, etc or swap recipes out for meals you prefer, you can search for recipes by course in the index. You should aim for around 1500 calories* per day. There’s also a precise, organized grocery list that will make grocery shopping so much easier and much less stressful. Save you money and time. You’ll dine out less often, waste less food and you’ll have everything you need on hand to help keep you on track. Lastly, if you’re on Facebook join my Skinnytaste Facebook Community where everyone’s sharing photos of recipes they are making, you can join here. I’m loving all the ideas everyone’s sharing! If you wish to get on the email list, you can subscribe here so you never miss a meal plan! Also, if you don’t have the Skinnytaste Meal Planner, now would be a great time to get one to get organized for 2019! There was a print error last year, but it’s perfect now! You can order it here! THE DETAILS:Breakfast and lunch Monday-Friday, are designed to serve 1 while dinners and all meals on Saturday and Sunday are designed to serve a family of 4. Some recipes make enough leftovers for two nights or lunch the next day. While we truly believe there is no one size fits all meal plan, we did our best to come up with something that appeals to a wide range of individuals. Everything is Weight Watchers friendly, I included the updated Weight Watcher Freestyle Points for your convenience, feel free to swap out any recipes you wish or just use this for inspiration! The grocery list is comprehensive and includes everything you need to make all meals on the plan. I’ve even included brand recommendations of products I love and use often. Cross check your cabinets because many condiments you’ll notice I use often, so you may already have a lot of them. And last, but certainly not least, this meal plan is flexible and realistic. There’s plenty of wiggle room for cocktails, healthy snacks, dessert and dinner out. And if necessary, you can move some things around to make it work with your schedule. Please let me know if you’re using these plans, this will help me decide if I should continue sharing them! MONDAY (9/30) Totals: Freestyle™ SP 13, Calories 1,001** TUESDAY (10/1) Totals: Freestyle™ SP 14, Calories 1,000** WEDNESDAY (10/2) THURSDAY (10/3) Totals: Freestyle™ SP 20, Calories 985** FRIDAY (10/4) Totals: Freestyle™ SP 14, Calories 1,044** SATURDAY (10/5) Totals: Freestyle™ SP 10, Calories 566** SUNDAY (10/6) *Green salad includes 4 cups romaine, 2 scallions, ½ cup each: tomatoes, cucumber, chickpeas and 2 tablespoons The post Skinnytaste Meal Plan (September 30-October 6) appeared first on Skinnytaste. Recipes via Skinnytaste https://ift.tt/2ix3Luq September 27, 2019 at 11:06PM
Negroni Cocktail
https://ift.tt/2nd7MMf You may love it or hate it, but you’ll never forget your first Negroni! This cocktail can be a bit polarizing, but for those who love it, it inspires an almost fanatical devotion. Earthy, bitter, and sweet all at once, its simple proportions – one part each of gin, Campari, and sweet vermouth – make it one of the easiest cocktails to mix at home! The History of the NegroniLegend has it that the Negroni originated in 1919 at an Italian café when Count Negroni asked for an Americano (Campari, vermouth, and club soda) with gin in place of the club soda. The mix was serendipitous, and a famous cocktail was born. Since then the Negroni has become incredibly popular. It has such an enthusiastic following in the cocktail world that there is a whole event devoted to it! During Negroni Week you can sip Negronis at local bars and a portion of the proceeds will go to charity. What Should I Know About Campari?There is only one brand of Campari, and if you’re going to make this drink you definitely need some. Campari is a bitter, herbal Italian liqueur. It also has notes of orange and a bit of spicy sweetness. If you’ve ever had Aperol – the star of the Aperol spritz – then you get the idea: They both belong to the family of bitter Italian liqueurs called Amaros, but the bitterness of Campari is a bit more pronounced. Campari gives the Negroni its characteristic bitter edge, and also its bright red color. You can find Campari in the liqueurs section at most larger liquor stores. What Gin and Vermouth Should I Use?While you can certainly use a premium gin in a Negroni, it’s not necessary to spend a lot of money. A mid-range gin (I like Boodles or Broker’s) will do fine. However, it is worth shelling out for a nicer sweet vermouth. Carpano Antica is really the dream, but other high-end vermouths will do as well. What Glass Should I Use?I’ve always preferred this drink served up – that is, without ice – in a cocktail glass. But it’s far more common (at bars and on the internet) to see it served in an old fashioned glass, over ice. Try both and see what you like! What Are the Correct Proportions?The incredibly simple proportions of the Negroni (just 1: 1: 1) are surely a part of its enduring appeal, but you can make it other ways. I’ve had Negronis made with two parts gin to one part vermouth and Campari, which results in a delicate (albeit gin-heavy) drink. I’ve also seen recipes that favor Campari over the sweet vermouth for a more bitter, bracing cocktail. As with all cocktails, I encourage you to experiment! Start with the classic recipe, then let your imagination and your inclinations take you from there. More Gin Cocktails to Enjoy!Products We LoveThis post may contain links to Amazon or other partners; your purchases via these links can benefit Simply Recipes. Read more about our affiliate linking policy. Recipes via Simply Recipes https://ift.tt/2F9fkDA September 27, 2019 at 09:08AM
The Friday Buzz: Nutella for Life, Near Beer, and Flannel Fridays
https://ift.tt/2lDucG9  Welcome to The Friday Buzz, our roundup of all good things, good advice, good feelings. It’s the happy hour of blog posts! Up this week: Discussions on Nutella and Cookie Butter, Near Beer, Flannel Fridays, and more! Can we talk about Target for a minute? I’m pretty sure I’m not alone when I say that my obsession for that store runs deep. I go almost weekly just to browse through everything… and, if I’m being really honest with all of you, it’s a great way to keep my twins strapped into their stroller so I can have a moment of sanity. I digress. It really is a fabulous store filled with all sorts of treasures, and the best treasures can be found on their end aisles with that happy yellow sticker that screams CLEARANCE! I’ve been known to exclusively shop their end aisles for amazing deals. A few years back I scored not one, but TWO matching pink quilts for my girls for $7.50 each! #score I won’t go into all the things I’ve found there that make my soul sing, but I will tell you to run to your nearest Target and check out their Bullseye Playground, which is their dollar section. It’s overflowing with cute stuff for Halloween and fall! Anyone out there have a favorite Target find? I’d love to hear about it! Now, let’s see what makes the souls of the Simply Recipes Team sing, shall we? OUR FAVORITES FROM THE WEEK
THIS WEEK ON INSTAGRAMBeef Brisket Pot Roast is coming in hot! I think it means we are all ready for comfort food… What are your thoughts? We asked what all y’all would serve with this pot roast and loved reading everyone’s answers! Potatoes were a clear winner with a ton of variations! They included:
Head on over to weigh in! READER COMMENT OF THE WEEKWe had two comments that really just brightened our day! The first was left on our Chicken and Dumplings from Jon. He said:
Then Gene commented on our Banana Nut Muffins:
Oh yeah, that’s what we like to hear! Keep it up, Gene! Cheers to the weekend, my fine friends! This post may contain links to Amazon or other partners; your purchases via these links can benefit Simply Recipes. Read more about our affiliate linking policy. Recipes via Simply Recipes https://ift.tt/2F9fkDA September 27, 2019 at 09:08AM |
|


 RSS Feed
