
|
Sous Vide and Food Safety: What To Know
https://ift.tt/2Ihi30v Sous vide cooking is amazingly hands-off, easy to sync with your schedule, and capable of delivering consistently mind-blowing results. No wonder this method is increasingly winning over home cooks. With its vacuum bags and gently whirring baths of water, sous vide cooking is radically different from the skillets and burners we’re used to in conventional methods. So it’s only natural to wonder how the rules of food safety apply. If you’re worried about cooking foods in plastic or scratching your head about what seem like unusually low cooking temperatures, take heart—we have the answers!
Is it safe to cook in plastic?In short, yes. It depends on the kind of plastic you use, and what temperature you cook your food to. Okay, then what kind of plastic is safe for cooking sous vide?A lot of us have concerns about bisphenol A (BPA) because it’s been found to disrupt hormone function. But BPAs only appear in rigid plastics, and not the flexible plastics used to make bags and wrap. Because your food only comes into direct contact with flexible plastics when you’re cooking sous vide, you don’t need to worry about BPAs. The plastic packaging recommended by sous vide experts is almost always made of food-grade high-density polyethylene, low-density polyethylene, and polypropylene. The temperatures used in sous vide cooking (always well below boiling) are not nearly as high as those reached in a microwave, so the opportunities for plastics leaching chemicals with sous vide are greatly minimized.
What Kind of Container Should Be Used for Sous Vide?Most home cooks will use a metal stockpot to hold the water bath when cooking sous vide—you probably own a perfectly fine stockpot already—but some chefs and cooks like to use large, rigid polycarbonate containers that were manufactured for food storage (such as this one). Such containers do contain BPA, but keep in mind that when you’re cooking sous vide, the heated water and the food don’t come into contact—there’s always the plastic bag between them. If you’re still feeling iffy about it, there’s nothing wrong with sticking to your trusty stockpot. |


 Kale & White Bean Soup |
 Many-veggie Vegetable Soup |
 Beet Hummus |
 Super Seedy Crackers |
 Macro Bowls with Turmeric Tahini Sauce |
 Sweet Potato Avocado Tartare |
The post Carrot Coconut Gazpacho with Lemongrass appeared first on Love and Lemons.
Recipes
via Love and Lemons https://ift.tt/2h2Uz32
September 24, 2018 at 09:39AM
Creamy Polenta with White Beans and Roasted Broccoli
https://ift.tt/2IbdfK5
Recipes
via Simply Recipes https://ift.tt/2F9fkDA
September 24, 2018 at 09:03AM
https://ift.tt/2IbdfK5
White beans and nutritional yeast give this polenta a creamy and cheesy taste, without the dairy. Add some roasted broccoli and a drizzle of chili oil, and you've got an easy, filling meat-free dinner!
Photography Credit: Erin Alderson
The cooler months always bring the comfort food out in full force. Pasta and casseroles are usually the big hit in my family. But for me, it’s all about the creamy polenta. During fall and winter, I’ve been known to eat a bowl that consists only of creamy, cheesy polenta.
Occasionally, I add vegetables, but the comfort food really is in the polenta base. In my book, there’s nothing quite as satisfying.
HOW TO MAKE CREAMY VEGAN POLENTA
Of course, if you’re looking to make creamy polenta and you’re vegan, some items have to change. Cheese is out of the question. You could use vegan butter and cheeses, but I rarely have those items on hand since I don’t always cook vegan.
So I turn to one of my favorite vegan combinations: beans and nutritional yeast.

What Is Nutritional Yeast?
Nutritional yeast is amazing primarily for its nutty, cheese-like flavor. It is often used in vegan cooking because of its flavor profile and nutritional benefits.
Nutritional yeast is yeast that has been deactivated (unlike baker’s yeast, which is still active). While it’s not a 1:1 substitute for cheese, the flavor profile is similar enough that it passes. Think of it as similar to grated Parmesan.
Nutritional yeast is great to use as a popcorn topping or in vegan cheese-like recipes, like mac and cheese. You can find it in the health food section or the bulk bins of most gourmet grocery stores, such as Whole Foods, or you can buy it online.
Beans Make Polenta Creamy!
As for the beans, I love the protein boost they give the polenta base. White beans are great because their texture purees into a smooth cream-like texture that blends perfectly into the polenta. All it takes is a solid whiz in a blender with a bit of olive oil.
And of course, if you’re not vegan, you’re welcome to add cheese or butter to your polenta! Here’s the recipe for how to make basic creamy polenta.

WHAT TO SERVE ON TOP OF POLENTA
This polenta is great with most of the veggies in the brassicas family. Roast up broccoli florets, as I’ve done here, or swap in cauliflower or Brussels sprouts. These all make great additions to the polenta bowl.
I also like to add a drizzle of chili oil over the whole bowl. It’s easy to bring together—it’s a simple infusion of olive oil and chili flakes over low heat. This chili oil is also great as a topping for grain bowls, pizza, and morning eggs—really, any place where you might use traditional hot sauce. However, if you don’t want to go through the trouble of making it, just drizzle the oil and sprinkle the chili flakes on top.
MORE WAYS TO ENJOY POLENTA!
Creamy Polenta with White Beans and Roasted Broccoli Recipe
PrintIngredients
For the polenta:
- 2 cups water
- 3/4 teaspoon salt
- 1/2 cup yellow polenta
For the roasted broccoli:
- 4 cups chopped broccoli
- 2 tablespoons olive oil
- 1/2 teaspoon sea salt
For the white beans:
- 1 cup white beans, homemade or canned, drained and rinsed
- 3 tablespoons olive oil
- 1 tablespoon nutritional yeast
- 1 teaspoon garlic powder
- 1/4 teaspoon onion powder
- Pinch of salt
For the chili oil:
- 1/4 cup olive oil
- 2 teaspoons chili flakes
Method
1 Make the polenta: Bring the water and salt for the polenta to a boil over medium heat in a 2-quart saucepan. Once it's boiling, add the polenta and whisk until the polenta is fully incorporated.
Lower the heat (as low as it can go) and cook the polenta for 20 to 25 minutes, stirring every 5 to 10 minutes with a whisk to break up any clumps.
2 Roast the broccoli: Heat your oven to 425˚F. Arrange the chopped broccoli on a rimmed baking sheet and toss with the 2 tablespoons of olive oil and salt. Roast until the broccoli is tender and beginning to char, about 15 to 20 minutes.
3 Make the bean puree: While the polenta and broccoli are cooking, combine the drained beans with the olive oil, nutritional yeast, garlic powder, onion powder, and salt in the bowl of a food processor or in a high speed blender. Puree until smooth, adding a few tablespoons of water as needed to help smooth it out.
When the polenta is done cooking, stir the bean puree into the polenta.
4 Make the chili oil: Heat the oil in a small skillet. Add the chili flakes, remove from the heat, and let it rest until ready to serve. (You can make this ahead of time!)
5 Assemble the bowls: Divide the polenta among four bowls. Top with the broccoli and a drizzle of the chili oil.
Hello! All photos and content are copyright protected. Please do not use our photos without prior written permission. If you wish to republish this recipe, please rewrite the recipe in your own unique words and link back to Creamy Polenta with White Beans and Roasted Broccoli on Simply Recipes. Thank you!
PrintRecipes
via Simply Recipes https://ift.tt/2F9fkDA
September 24, 2018 at 09:03AM
Thin and Crispy Chocolate Chip Cookies
https://ift.tt/2MW1zvs
Recipes
via Simply Recipes https://ift.tt/2F9fkDA
September 23, 2018 at 09:11AM
https://ift.tt/2MW1zvs
These thin and crispy chocolate chip cookies taste just like Tate’s Bakeshop Cookies from the bright green bag! It's all about baking your cookies low and slow.
Photography Credit: Cindy Rahe
Are you familiar with Tate’s Bakeshop Cookies? You know, the unassuming-looking chocolate chip cookies packaged in a green roll-top bag that you can find at the grocery store?
If you have, then you probably know that they are crazy delicious. My son and I can demolish a package of these in no time at all, which is totally dangerous and led to me banning myself from buying them.
It did not stop me from coming up with a homemade version, however.

Why Crispy Chocolate Chip Cookies are the Best
Usually, I prefer the classic chewy-gooey-in-the-middle and crisp-around-the-edges kind of chocolate chip cookie, but these crispy chocolate chip cookies are an exception.
These cookies are thin around the edges and crispy all the way through. They have a deeply burnished taste, almost like buttery toffee.
The semi-sweet chocolate chips don’t become puddles, as is the trend right now in the world of chocolate chip cookies, but are dispersed throughout the batter. Thank goodness, because it gives you some relief from the addictive buttery crunch of the cookie.

How to Make Crispy Chocolate Chip Cookies
A lower oven temperature and patience are keys to the success with these cookies—along with lots of butter (let’s be real).
Instead of aiming for an under-baked center, like we sometimes do with chewier versions, we want these cookies to bake until they’re done through the center and become thin and deeply browned around the edges, but not burnt.
I bake these at a lower oven temperature for a longer time to ensure they spread a little to create that delicate crisp edge and so they can bake all the way through to crunchy perfection. I use a little extra leavening in the form of baking soda to make the cookies rise and fall which helps with spreading and crisping as well.
There’s also a higher ratio of butter and sugar than many chocolate chip cookie recipes. Along with a longer bake in a lower oven, give these cookies the toffee-like flavor that is one of its signature features.

HOW TO STORE CHOCOLATE CHIP COOKIES TO KEEP THEM CRISPY
These cookies can be stored at room temperature in an airtight container for several days. To really ensure maximum crispness, I add a packet of silica gel to the container to absorb any extra moisture. (I usually just reuse the ones from other packaged goods, such as seaweed snacks.)
MORE CHOCOLATE CHIP COOKIE RECIPES
Thin and Crispy Chocolate Chip Cookies Recipe
PrintIngredients
- 1 3/4 cups (218g) all-purpose flour
- 1/4 teaspoon baking powder
- 1/4 teaspoon baking soda
- 1 teaspoon kosher salt
- 1 cup (227g) unsalted butter, melted
- 1 cup (200g) light brown sugar
- 3/4 cup (150g) granulated sugar
- 2 large eggs
- 2 teaspoons vanilla extract
- 1 cup (190g) chocolate chips
Method
1 Preheat the oven to 325°F. Line two baking sheets with parchment paper.
2 Combine the dry ingredients: Whisk the flour, baking powder, baking soda, and salt together in a bowl and set to the side.
3 Combine the butter and sugars: In a mixing bowl or using a stand mixer with a paddle attachment, mix the melted butter and sugars together on medium speed just until combined (don't cream them like you do with other recipes.

4 Beat in the eggs: Beat in the eggs one at a time, followed by the vanilla, until combined and smooth.

5 Add the flour: Beat in the flour on medium-low speed until there are no more streaky bits of flour visible in the dough.
Mix in the chocolate chips on low or using a spatula, by hand. The dough will be very soft, but that’s okay, as it will firm up a bit as it sits at room temperature.


6 Scoop out the cookies: Using a small cookie scoop or a tablespoon measure, scoop the dough onto the prepared baking sheets, leaving several inches of space between the cookies to allow for spreading (I used about 6 per sheet).

7 Bake the cookies: Bake the cookies, one sheet at a time, in the center of the oven for about 18 minutes per batch.
They will be brown around the edges and lightly golden in the center when they are done. They may also be puffed in the centers but will deflate as they cool.
8 Cool the cookies: Cool the cookies on the sheet pans for about 5 minutes before removing to a baking rack to cool. Store the baked and cooled cookies in an airtight container at room temperature for up to 3 days.

Hello! All photos and content are copyright protected. Please do not use our photos without prior written permission. If you wish to republish this recipe, please rewrite the recipe in your own unique words and link back to Thin and Crispy Chocolate Chip Cookies on Simply Recipes. Thank you!
PrintRecipes
via Simply Recipes https://ift.tt/2F9fkDA
September 23, 2018 at 09:11AM
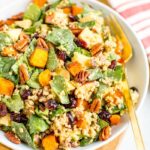
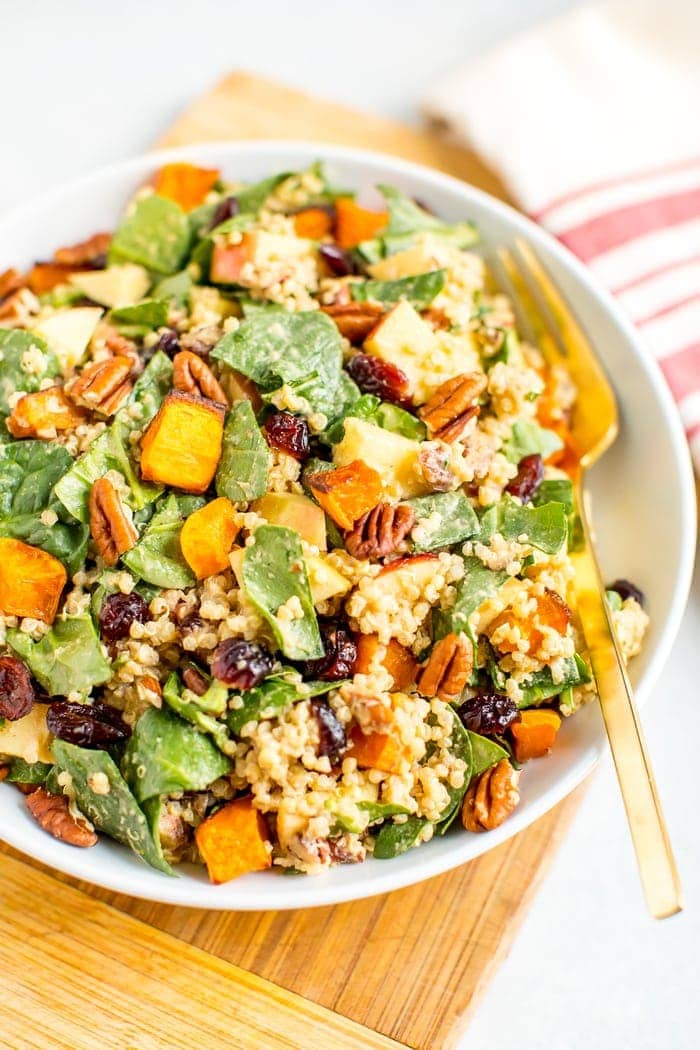
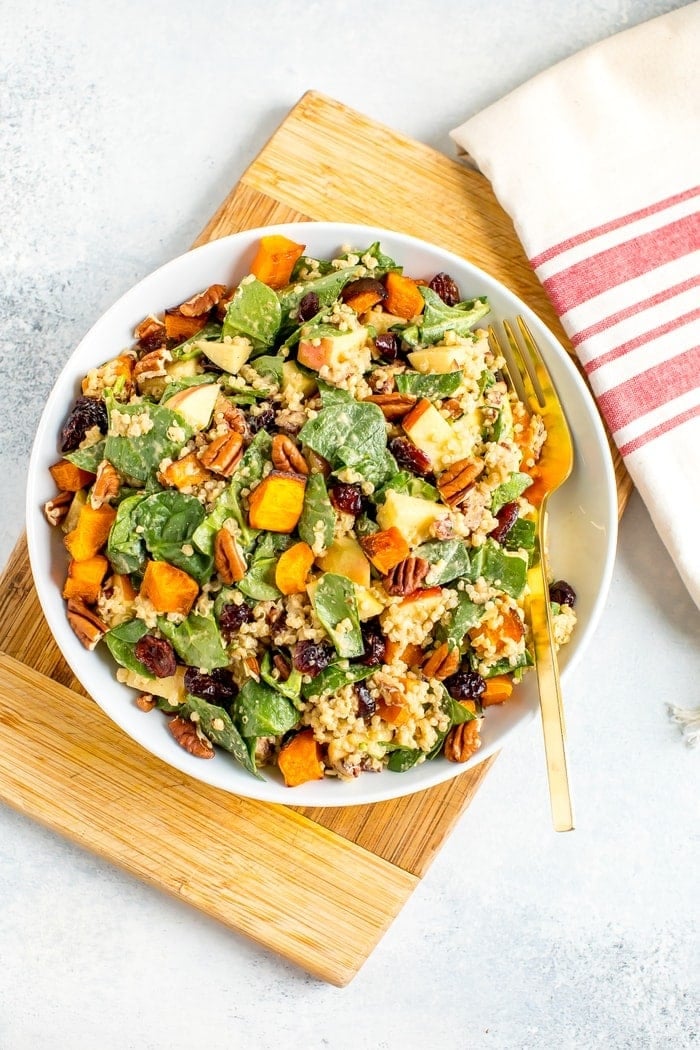
Fall Harvest Spinach Salad
https://ift.tt/2xNbFci
Recipes
via Eating Bird Food https://ift.tt/1L45wsH
September 23, 2018 at 08:52AM
https://ift.tt/2xNbFci
Loaded with fall favorites like butternut squash, chopped apples and quinoa, this fall harvest spinach salad is packed with nutrition and flavor. You’ll love the apple cider vinegar tahini dressing!
Hi friends. How’s your Sunday going? We’ve spent most of the morning gearing up for a hurricane… we went to Whole Foods for a few pantry staples, Lowe’s for a new flashlight and 711 for ice. I’m really hoping the storm creates less damage than what the meteorologists are predicting, but it’s always good to be prepared.
In other news, I’ve been getting super excited about pumpkin recipes lately. I’m truly sorry if you hate pumpkin. Not only are you missing out on a boatload of nutritional benefits, but I just noticed that all the recipes I posted recently have pumpkin in them, even these healthy apple cinnamon muffins. Like I said, I’ve been on a bit of a pumpkin kick… but you’ll be happy to know that today I have a pumpkin-less recipe that features more fall produce favorites — butternut squash, apples and greens. I’ve been eating these things separately or in other dishes, but finally decided to throw them all together for a tasty salad.
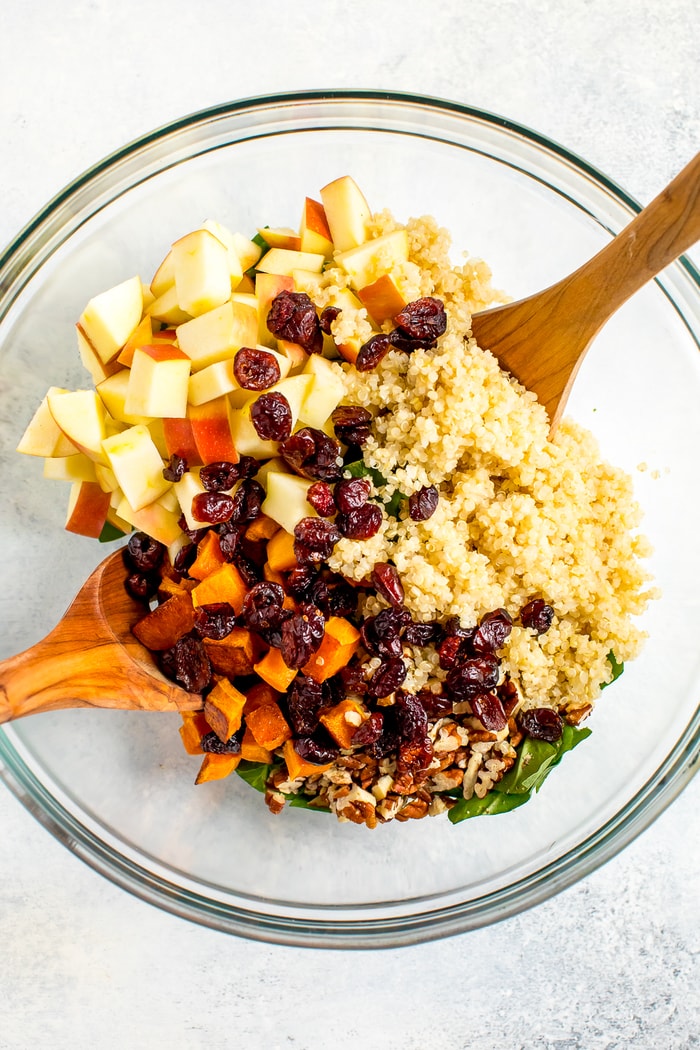
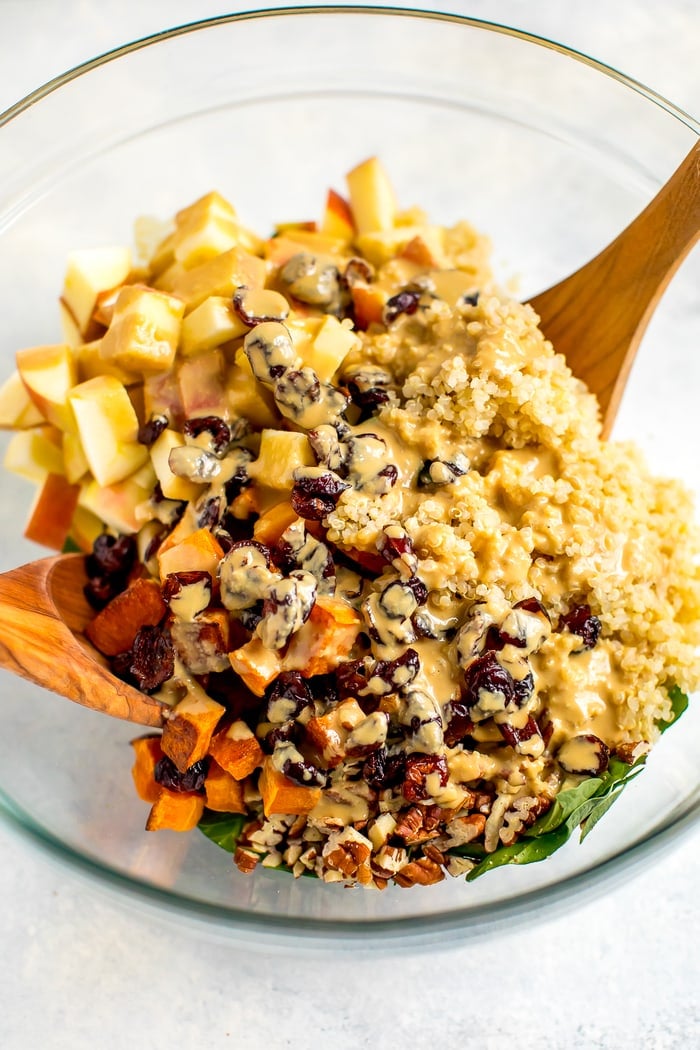
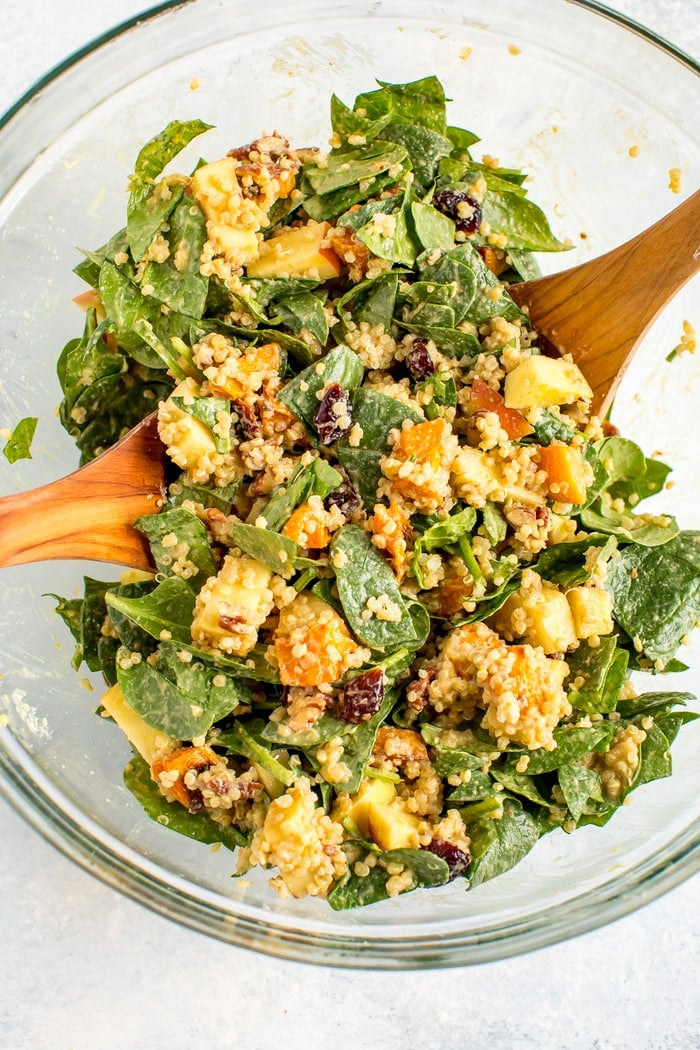
Hearty fall salads are seriously the best! In this salad, the roasted butternut squash makes it sweet and satisfying, while the apple and pepitas add a nice crunch. Quinoa adds some staying power and the spinach nourishes the body in a way that no other food (besides other leafy greens) can. If you like my garlicky kale salad, you’ll love this one because the dressing is almost exactly the same – I just added a little maple syrup to sweeten it up a bit. And if you enjoy this salad, you should also check out my full roundup of quinoa salad recipes.
If you make this fall harvest spinach salad be sure to leave a comment and star rating below. Your feedback is not only helpful for the EBF team, but for other EBF readers as well!
PrintFall Harvest Spinach Salad
- Author: Brittany Mullins
 Prep Time: 15 minutes
- Cook Time: 35 minutes
- Total Time: 50 minutes
 Yield: 2
 Category: Salad
 Method: Bake
 Cuisine: American
Description
Loaded with fall favorites like butternut squash, chopped apples and dried cranberries, this fall harvest spinach salad is packed with nutrition and flavor.
Ingredients
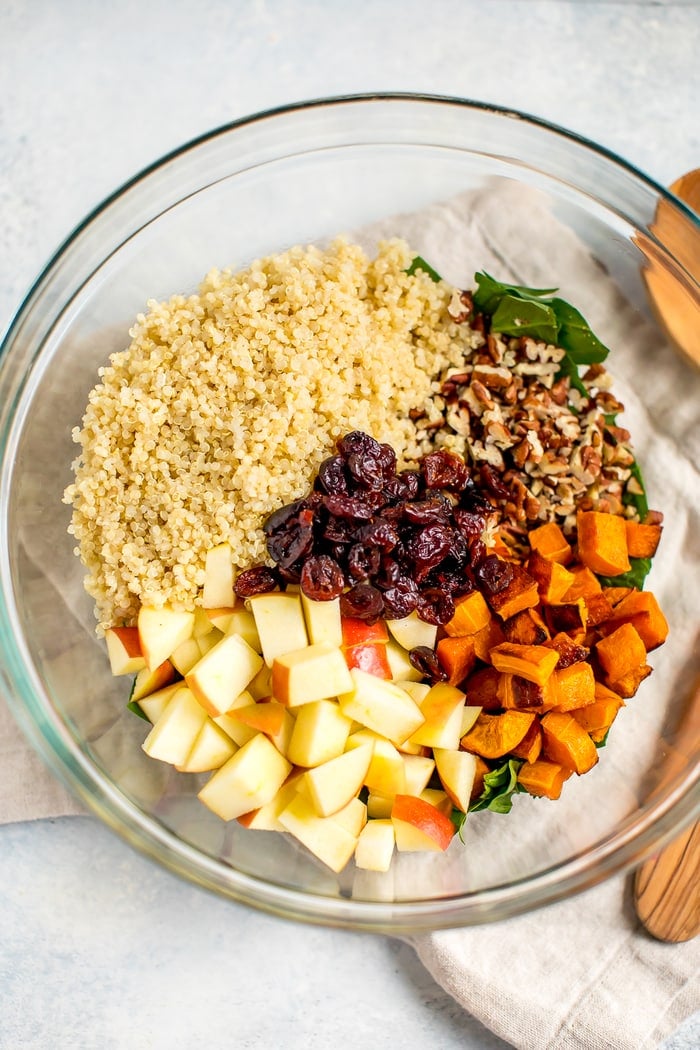
- 4 cups fresh baby spinach, chopped
- 1 1/2 cups cooked quinoa (cooked according to package directions)
- 3/4 cup butternut squash, chopped
- 1 medium apple, peeled and chopped
- 1/3 cup pepitas (pumpkin seeds) or pecans
- 3 Tablespoons dried cranberries
Tahini Apple Cider Vinegar Dressing
- 2 Tablespoons tahini
- 2 Tablespoons apple cider vinegar
- 2 Tablespoons lemon juice
- 2 Tablespoons low sodium tamari or aminos
- 4 Tablespoons nutritional yeast
- 2 teaspoons minced garlic (2 cloves of garlic)
- 2 teaspoons maple syrup
Instructions
- Prepare the squash by peeling it, cutting it in half and scraping out the seeds.
- Cut the squash into bite-size cubes, place on a lightly oiled baking sheet and roast at 400° for 30-40 minutes, turning once or twice, until all the pieces are tender and have a few small brown spots.
- If your pepitas or pecans are raw, you can toast them in the oven with the roasting squash. Spread seeds/nuts on a separate baking sheet and add to the oven with the butternut squash for 5 to 10 minutes or until the seeds/nuts are golden and crunchy, then remove from the pan to cool. Be sure to watch the seeds/nuts carefully because they can burn quickly. The pepitas will take less time to toast than the pecans because they’re smaller.
- While roasting the squash, toss together spinach, cooked quinoa, apple and cranberries in a large salad bowl. Add cooled pepitas (or pecans) once they’ve been toasted.
- Prepare dressing by placing all remaining ingredients (tahini through maple syrup) in a blender and blend until smooth.
- Once the butternut squash is done roasting, allow it to cool and then place into the salad bowl with the other ingredients. Pour the dressing over the salad and toss to coat. Serve immediately.
Nutrition
- Serving Size: 1/2 of recipe
- Calories: 561
- Sodium: 641mg
- Fat: 21g
- Saturated Fat: 3g
- Carbohydrates: 73g
- Fiber: 15g
- Protein: 23g
- Cholesterol: 0 mg
Keywords: fall harvest spinach salad
The post Fall Harvest Spinach Salad appeared first on Eating Bird Food.
Recipes
via Eating Bird Food https://ift.tt/1L45wsH
September 23, 2018 at 08:52AM
Skinnytaste Meal Plan (September 24-September 30)
https://ift.tt/2PZ7DVW
Recipes
via Skinnytaste https://ift.tt/2ix3Luq
September 22, 2018 at 09:26AM
https://ift.tt/2PZ7DVW
Skinnytaste Meal Plan (September 24-September 30)
posted September 22, 2018 by Gina
A free 7-day flexible meal plan including breakfast, lunch and dinner and a shopping list. All recipes include calories and Weight Watchers Freestyle™ SmartPoints®.
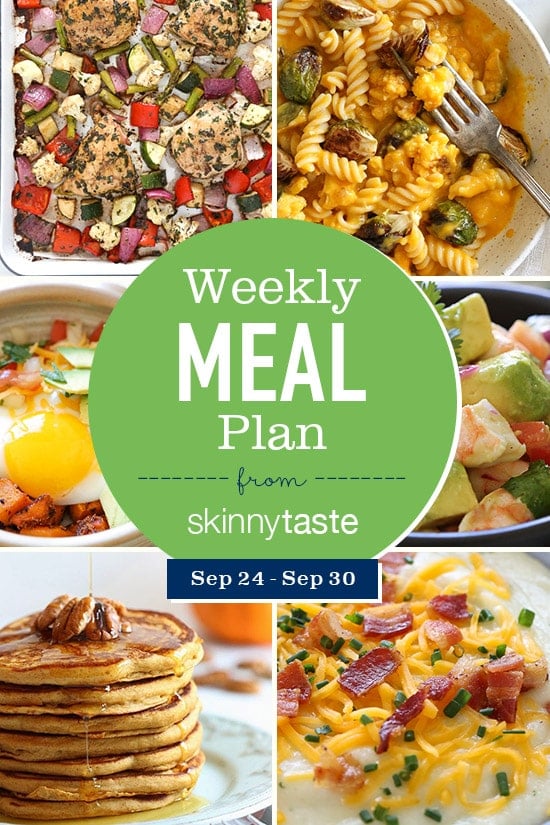
Guys, only a few weeks before my new cookbook, Skinnytaste One and Done comes out!! If you pre-ordered, don’t forget to fill this form out download the 40-page bonus pack today which includes 3 exclusive recipes that will never be posted on my website. One of them, the Air Fryer Parmesan Salmon is included in this weeks meal plan, so you will need the bonus pack to make it!
If you’re new to my meal plans, I’ve been sharing these free, 7-day flexible healthy meal plans (you can see my previous meal plans here) that are meant as a guide, with plenty of wiggle room for you to add more food, coffee, beverages, fruits, snacks, dessert, wine, etc or swap recipes out for meals you prefer, you can search for recipes by course in the index. You should aim for around 1500 calories* per day.
There’s also a precise, organized grocery list that will make grocery shopping so much easier and much less stressful. Save you money and time. You’ll dine out less often, waste less food and you’ll have everything you need on hand to help keep you on track.
Lastly, if you’re on Facebook join my Skinnytaste Facebook Community where everyone’s sharing photos of recipes they are making, you can join here. I’m loving all the ideas everyone’s sharing!
THE DETAILS:
Breakfast and lunch Monday-Friday, are designed to serve 1 while dinners and all meals on Saturday and Sunday are designed to serve a family of 4. Some recipes make enough leftovers for two nights or lunch the next day. While we truly believe there is no one size fits all meal plan, we did our best to come up with something that appeals to a wide range of individuals. Everything is Weight Watchers friendly, I included the updated Weight Watcher Freestyle Points for your convenience, feel free to swap out any recipes you wish or just use this for inspiration!
The grocery list is comprehensive and includes everything you need to make all meals on the plan. I’ve even included brand recommendations of products I love and use often. Cross check your cabinets because many condiments you’ll notice I use often, so you may already have a lot of them.
And last, but certainly not least, this meal plan is flexible and realistic. There’s plenty of wiggle room for cocktails, healthy snacks, dessert and dinner out. And if necessary, you can move some things around to make it work with your schedule. Please let me know if you’re using these plans, this will help me decide if I should continue sharing them!
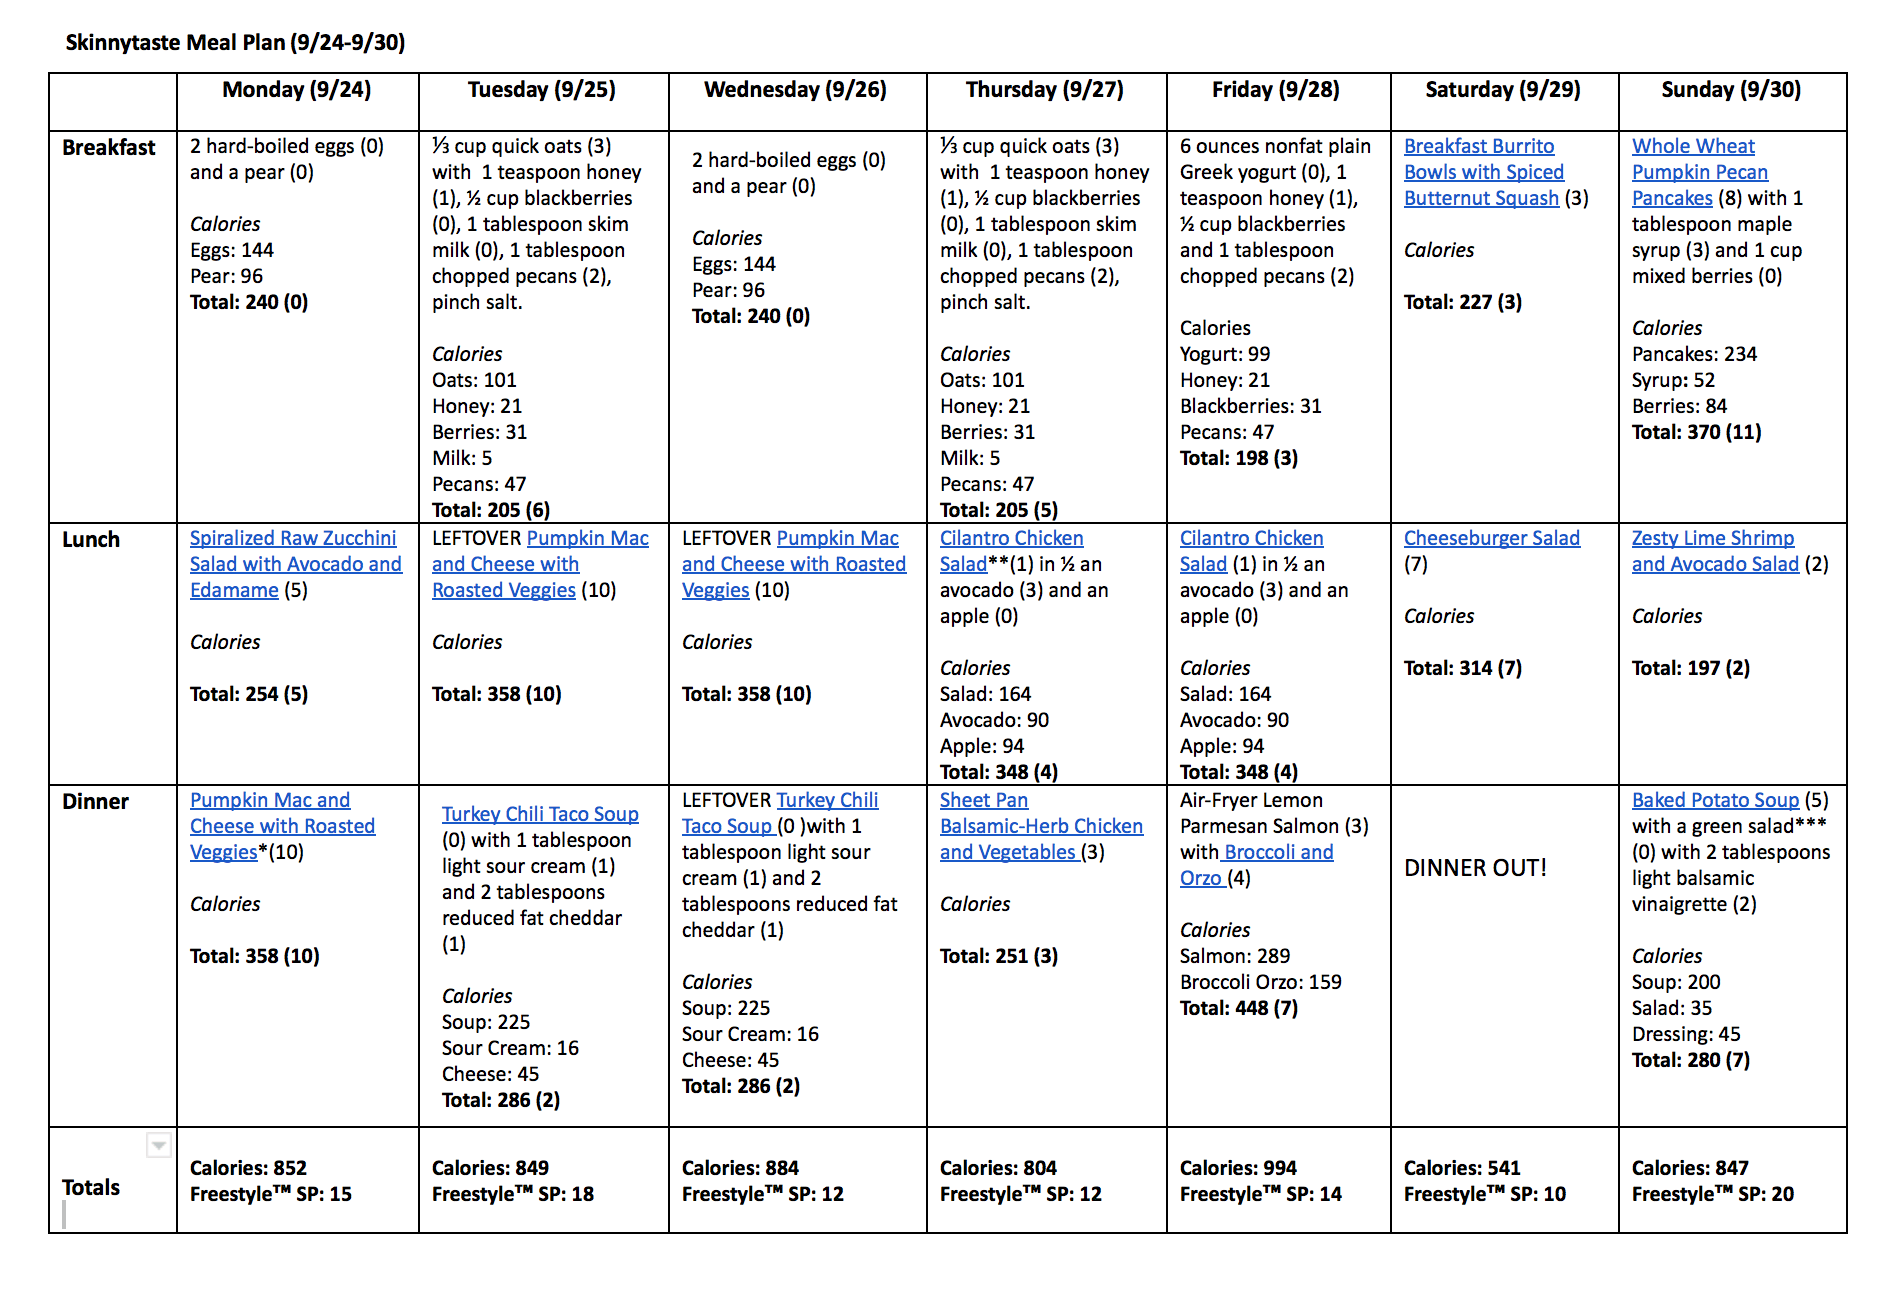
MONDAY (9/24)
B: 2 hard-boiled eggs (0) and a pear (0)
L: Spiralized Raw Zucchini Salad with Avocado and Edamame (5)
D: Pumpkin Mac and Cheese with Roasted Veggies*(10)
Totals: Freestyle™ SP 15, Calories 852**
TUESDAY (9/25)
B: ⅓ cup quick oats (3) with 1 teaspoon honey (1), ½ cup blackberries (0), 1 tablespoon skim milk (0), 1 tablespoon chopped pecans (2), pinch salt.
L: LEFTOVER Pumpkin Mac and Cheese with Roasted Veggies (10)
D: Turkey Chili Taco Soup (0) with 1 tablespoon light sour cream (1) and 2 tablespoons reduced fat cheddar (1)
Totals: Freestyle™ SP 18, Calories 849**
WEDNESDAY (9/26)
B: 2 hard-boiled eggs (0) and a pear (0)
L: LEFTOVER Pumpkin Mac and Cheese with Roasted Veggies (10)
D: LEFTOVER Turkey Chili Taco Soup (0) with 1 tablespoon light sour cream (1) and 2 tablespoons reduced fat cheddar (1)
Totals: Freestyle™ SP 12, Calories 884**
THURSDAY (9/27)
B: ⅓ cup quick oats (3) with 1 teaspoon honey (1), ½ cup blackberries (0), 1 tablespoon skim milk (0), 1 tablespoon chopped pecans (2), pinch salt.
L: Cilantro Chicken Salad(1) in ½ an avocado (3) and an apple (0)
D: Sheet Pan Balsamic-Herb Chicken and Vegetables (3)
Totals: Freestyle™ SP 12, Calories 804**
FRIDAY (9/28)
B: 6 ounces nonfat plain Greek yogurt (0), 1 teaspoon honey (1), ½ cup blackberries and 1 tablespoon chopped pecans (2)
L: Cilantro Chicken Salad (1) in ½ an avocado (3) and an apple (0)
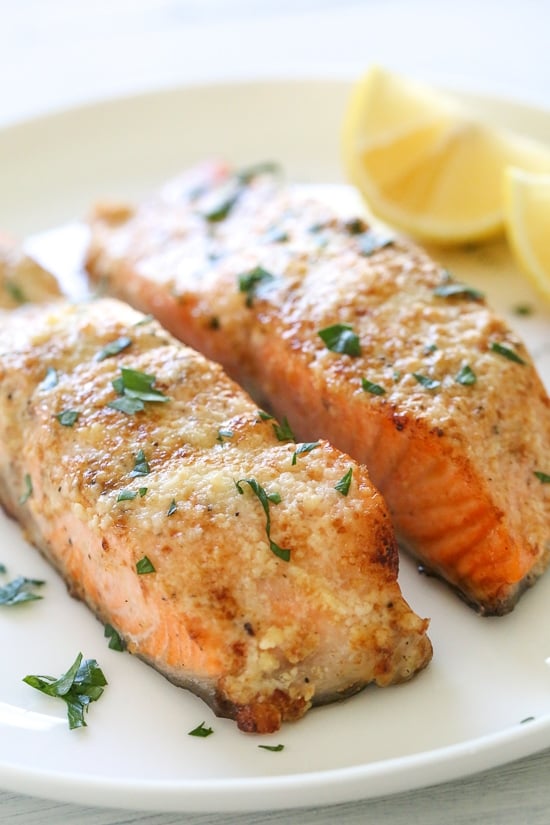
D: Air-Fryer Lemon Parmesan Salmon (3) with Broccoli and Orzo (4)
Totals: Freestyle™ SP 14, Calories 994**
SATURDAY (9/29)
B: Breakfast Burrito Bowls with Spiced Butternut Squash (3)
L: Cheeseburger Salad (7)
D: DINNER OUT!
Totals: Freestyle™ SP 10, Calories 541**
SUNDAY (9/30)
B: Whole Wheat Pumpkin Pecan Pancakes (8) with 1 tablespoon maple syrup (3) and 1 cup mixed berries (0)
L: Zesty Lime Shrimp and Avocado Salad (2)
D: Baked Potato Soup (5) with a green salad*** (0) with 2 tablespoons light balsamic vinaigrette (2)
Totals: Freestyle™ SP 20, Calories 847**
*Freeze any leftover you/your family won’t eat
**This is just a guide, women should aim for around 1500 calories per day. Here’s a helpful calculator to estimate your calorie needs. I’ve left plenty of wiggle room for you to add more food such as coffee, beverages, fruits, snacks, dessert, wine, etc.
***Green salad includes 6 cups romaine, ½ cup each: carrots, tomatoes, cucumber, and 2 scallions.
Shopping List:
Produce
- 2 medium pears (any variety)
- 2 medium Russet potatoes
- 1 small and 1 medium head cauliflower (about 2 ½ pounds)
- 1 pound Brussels sprouts
- 2 medium apples (any variety)
- 1 small and 1 large head Romaine lettuce
- 1 jalapeno
- 1 small head garlic
- 1 (1 ¾ pound) butternut squash (you need 20 ounces cubed)
- 2 medium zucchini
- 4 small (4-ounce) and 1 medium (5-ounce) Hass avocados
- 1 small bunch scallions
- 1 small bunch/container chives (can sub scallion greens in Zucchini Salad and Baked Potato Soup, if desired)
- 1 small bunch fresh Italian parsley
- 1 large red bell pepper
- 1 medium bell pepper (any color)
- 1 (1-pound) clamshell fresh blackberries
- 1 (1-pound) and 1 (6-ounce) clamshell fresh berries (your choice)
- 6 ounces asparagus
- ½ pound broccoli florets
- 1 medium lemon
- 1 medium bunch cilantro
- 1 dry pint cherry or grape tomatoes
- 2 medium vine-ripened tomatoes
- 1 small and 1 medium red onion
- 2 small (or 1 large) carrots
- 1 small bunch fresh basil
- 2 medium and 1 large lime
- 1 small cucumber
- 1 small and 1 medium yellow onion
Meat, Poultry and Fish
- 1 1/3 pounds 99% lean ground turkey
- 1 pound 93% lean ground beef
- 1 pound jumbo cooked, peeled shrimp
- 1 package center-cut bacon
- 20 ounces (4) skin-on salmon filets
- 1 2/3 pounds boneless, skinless chicken breast
Grains
- 1 package rotini pasta (I used Delallo)*
- 1 container quick oats*
- 1 small package orzo pasta*
- 1 bag whole white wheat flour*
Condiments and Spices
- Extra virgin olive oil
- Cooking spray
- Olive oil spray (or get a Misto oil mister)
- Kosher salt (I like Diamond Crystal)
- Pepper grinder (or fresh peppercorns)
- Nutmeg
- Honey
- Low sodium taco seasoning
- Light mayonnaise
- Garlic powder
- Mayonnaise (I like Sir Kensington)
- Cumin
- Chile powder
- Smoked paprika
- Yellow mustard
- Ketchup
- Onion powder
- Paprika
- Cinnamon
- Pumpkin pie spice
- Vanilla extract
- Maple syrup
- Balsamic vinegar
- Light balsamic vinaigrette (or make your own with ingredients in list)
Dairy & Misc. Refrigerated Items
- 1 dozen large eggs
- 1 (8-ounce) container buttermilk
- 2 (8-ounce) bags reduced fat shredded cheddar cheese
- 1 small wedge fresh Parmesan cheese
- 4 ounces gouda cheese
- 1 small box butter
- 1 (6-ounce) container nonfat plain Greek yogurt
- 1 (8-ounce) container light sour cream
- 1 pint 1% milk
- 1 pint skim milk
Frozen
- 1 small bag/box shelled edamame
- 1 (15-ounce) bag corn kernels
- Canned and Jarred
- 1 small jar dill pickle spears
- 1 (10-ounce) can tomatoes with green chilies
- 1 (15-ounce) can no salt added kidney beans
- 2 (15-ounce) cans organic pumpkin puree
- 1 (8-ounce) tomato sauce
- 1 (16-ounce) can fat free refried beans
- 1 (32-ounce) box reduced sodium chicken broth
- 1 (14.5-ounce) can reduced sodium chicken or vegetable broth
Misc. Dry Goods
- 1 small bag chopped pecans
- Baking powder
*Can sub gluten free, if desired
posted September 22, 2018 by Gina
Recipes
via Skinnytaste https://ift.tt/2ix3Luq
September 22, 2018 at 09:26AM
Meal Plan for September Week 4
https://ift.tt/2xuFWO0

Recipes
via Simply Recipes https://ift.tt/2F9fkDA
September 22, 2018 at 09:06AM
https://ift.tt/2xuFWO0
This month, please welcome Aaron Hutcherson and his September meal plans! Aaron is a regular contributor here on Simply Recipes and the blogger behind The Hungry Hutch.
And just like that, the season has changed and we’re fully into autumn. Though life’s seasons and those of the weather don’t always align, I tend to think of fall as prime time for connecting (or reconnecting) with family and friends. I also feel drawn to embrace openness and learning new things—I suppose I’ll always be stuck in that back-to-school mindset no matter how old I get.
As such, this week’s plan is full of a lot of flavors and foods that you know and love, with a few twists thrown in to shake things up a bit. That means everything from pasta with a quick and simple tomato sauce to vegan barbecue tacos (yes, you read that last part correctly).
And for anyone that’s been craving something sweet, there’s a s’mores pie recipe. Nothing screams fall to me more than the combination of graham crackers, chocolate, and marshmallows, and this version is sure to satisfy.
Now, who else is excited to go apple picking?!
New to Meal Planning? Start here!
Looking for Last Week’s Meal Plan? Here you go!
Recipes
via Simply Recipes https://ift.tt/2F9fkDA
September 22, 2018 at 09:06AM

The Flat Belly Fix
This is the only 21-day rapid weight loss system that allows you to easily lose an average of 1 lb a day for 21 days without feeling hungry or deprived. The unique and brand new techniques used in this System are proven SAFE. And they do not cause the rebound weight gain common to all the other rapid weight loss systems that are not backed by the latest science. The Flat Belly Fix System takes advantage of a recent scientific discovery that proves the effective weight loss power of an ancient spice. Combined with other cutting-edge ingredients in the patent-pending Flat Belly Fix Tea™ — that you can make right in your own kitchen in minutes — this System is the quickest, easiest and most enjoyable way to quickly get the body you desire and deserve. Click Here
Categories
All
Gluten Free
Pancakes
Protein
Archives
November 2020
October 2020
September 2020
August 2020
July 2020
June 2020
May 2020
April 2020
March 2020
February 2020
January 2020
December 2019
November 2019
October 2019
September 2019
August 2019
July 2019
June 2019
May 2019
April 2019
March 2019
February 2019
January 2019
December 2018
November 2018
October 2018
September 2018
August 2018
July 2018
June 2018
May 2018
April 2018
March 2018
February 2018
January 2018
December 2017
November 2017
 RSS Feed
