
|
Tres Leches Cake
http://bit.ly/2Vsv1kP 1 Preheat the oven and prep your pans: Preheat your oven to 400°F. Brush the inside of a 9x13x3-inch cake pan with a thin layer of the melted butter. Place 1/2 cup of the granulated sugar into an oven-safe container and let the sugar warm in the oven as it’s heating up. Warm sugar helps give the egg yolks more volume when you whip them.
2 Whip the yolks: Using a hand or stand mixer, whip the egg yolks, the warmed sugar, and the vanilla extract together on medium-high speed until the egg yolks have doubled in volume and are a very pale yellow color. This should take about 5 minutes. Set the bowl aside.
3 Whip the egg whites: In a separate, very clean bowl with clean beaters, whip together the egg whites and the salt on medium-high speed until the whites are foamy. Once the whites look foamy, gradually add the remaining 1/4 cup plus 1 tablespoon of sugar to the egg whites. Continue whipping until the whites are stiff and glossy, about 4 1/2 minutes. The whites should stand up with a peak that folds over just slightly when the beaters are pulled from their surface.
4 Make the batter: Working quickly to prevent the eggs from deflating, sift half of the cake flour into the bowl with the yolks. Use a wide rubber spatula to gently fold the flour into the yolks. Once the flour has been incorporated, fold in half of the egg whites gently so as not to deflate the eggs. Repeat again with the remaining flour and whites.
5 Fill the pans: Fill the prepared cake pan with the cake batter and use an offset spatula to spread the batter evenly into the pan. Gently tap the pan against the countertop a couple of times to release any air bubbles that may be trapped in the batter.
6 Bake the cake for 15 minutes, or until the top is golden brown and springs back quickly when pressed with your fingertip. Allow the cake to cool completely in the pan, or turn it out onto a deep, rimmed serving platter. 7 Make the milk mixture: In a large pitcher or bowl, combine the three milks, the brandy (if using), and the vanilla extract. Whisk together until combined. 8 Soak the cake: Once the cake has cooled, use a toothpick or the tines of a fork to poke small holes all over the cake. Pour the milk mixture over the cake, covering it entirely. Don’t worry if it seems to be a lot; the cake will soak up virtually all of the milk as it sits. Cover the cake with plastic wrap and refrigerate for 3 hours or up to 24 hours.
9 Whip the cream: In a large mixing bowl, whip the heavy cream with an electric hand mixer on medium-high speed. Once the beaters begin to leave ribbons in the cream, stop the mixer and then add the vanilla extract and the powdered sugar. Increase the speed to high, and whip until the cream is thick and holds its shape when the beaters are removed (this should take anywhere from 5 to 7 minutes).
10 Finish the cake: Spread the whipped cream in an even layer over the top of the cake using an offset spatula. Sprinkle with a liberal dusting of ground cinnamon.
11 Serve the cake: Refrigerate the cake up to three hours until ready to serve. Cut into 12 squares. Enjoy up to 3 days after preparation—keep it refrigerated.
Recipes via Simply Recipes http://bit.ly/2F9fkDA April 27, 2019 at 09:08AM
0 Comments
Greek Meatballs
http://bit.ly/2VsB20R These Greek meatballs are great for a party appetizer! They're made with lamb and a handful of seasonings (orange zest! mint! garlic!), and rolled into perfect little bites. Eat with toothpicks and serve some yogurt dipping sauce on the side. Photography Credit: Elise Bauer I found this recipe in the weekend edition of the Wall St. Journal as good “noshing” food for New Year’s and had to give it a try, with a few minor changes. It comes from chef Michael Symon of the Parea Greek restaurant in New York and Lola & Lolita Bistro in Cleveland. Ingredients for Greek MeatballsThese meatballs are made with ground lamb and a little bit of salt pork, though you could substitute bacon if you prefer. The seasonings are garlic, shallots, orange zest, and fresh mint, with a little chopped hot chili pepper for spiciness. If you don’t like spicy foods, you can skip the chili pepper. Conversely, if you love spice, feel free to add another chili pepper to the mix! How to Serve These MeatballsThese meatballs are great served as a warm appetizer with toothpicks, though you could certainly have them for dinner as well. Serve them with a little Greek yogurt for dipping, or even some tzatziki for something extra special. How to Make Ahead and FreezeThese meatballs can be made entirely ahead of time, cooled, and stored in the fridge until ready to serve. Just heat them in the microwave for two minutes on high to warm them up again. You can also freeze either the cooked or uncooked meatballs. If cooked, let the meatballs cool completely before freezing. In either case, just space the meatballs out on a parchment-lined sheet pan and freeze until solid. Transfer them to a freezer container or plastic bag (squeeze out as much air as possible) and freeze for up to three months. Thaw the meatballs overnight in the fridge. Cook uncooked meatballs following the directions in the recipe. Cooked meatballs can be rewarmed in the microwave on high for two minutes. Try These Other Meatball Recipes!Updated April 26, 2019 : We spiffed up this post to make it sparkle! No changes to the original recipe. Greek Meatballs RecipePrintMeatballs can also be cooked ahead, refrigerated and reheated in the microwave on high for 2 minutes. Ingredients
Method1 Soften shallots, chili pepper, garlic: Heat a small pan over medium heat and add oil, minced garlic, chili pepper, and shallot, and cook for 1 minute, then let cool.
2 Make meatball mixture: Meanwhile, crumble lamb into a large bowl. Evenly scatter the salt pork (or bacon), orange zest and mint over lamb, and season with pepper. Sprinkle the cooled garlic mixture over lamb. Gently mix until just combined
3 Form the meatball mixture into 1 1/4-inch balls: Transfer to a plate or sheet pan.
4 Cook the meatballs: Heat a large cast iron pan over medium to medium high heat. Working in batches if necessary to prevent crowding, cook meatballs on all sides until browned and cooked through, 8 to 10 minutes.
5 Serve warm with toothpicks or skewers with Greek yogurt. Hello! All photos and content are copyright protected. Please do not use our photos without prior written permission. If you wish to republish this recipe, please rewrite the recipe in your own unique words and link back to Greek Meatballs on Simply Recipes. Thank you! PrintThis post may contain links to Amazon or other partners; your purchases via these links can benefit Simply Recipes. Read more about our affiliate linking policy. Recipes via Simply Recipes http://bit.ly/2F9fkDA April 26, 2019 at 04:04PM
Mango Salsa
http://bit.ly/2UCmG9P
I make mango salsa all the time, yet it just occurred to me that I had yet to post a classic homemade mango salsa recipe here on the blog. It’s one of those things that’s perhaps too simple – once you memorize the recipe, you can leave the measuring cups in the drawer and just eyeball the ingredients. After that, you can change it up in numerous ways because it’s such a flexible, easy recipe. Get your margarita ready – let’s make salsa! Mango Salsa Recipe IngredientsThis sweet & spicy salsa requires just 7 ingredients!
What type of mango is best for mango salsa?Good question! Any ripe mango will work here, but I especially love Ataulfo or Champagne mangos. They’re the smaller, yellow mangos you see all over grocery stores at this time of year. They’re especially juicy, and their texture is softer and less fibrous than that of bigger red mangos. Mango Salsa Recipe VariationsThis salsa recipe is super flexible! Feel free to change it up to match what you have on hand or how you’re serving it. I recommend stirring in some diced avocado, a splash of hot sauce, or chopped tomatoes (see this mango pico recipe). It would also be delicious with roasted jalapeños instead of raw!
Mango Salsa Serving SuggestionsJust like most salsa recipes, mango salsa is darn good with tortilla chips for dipping – you can even top it onto guacamole for a dressed-up appetizer! But if you want to show it off as part of a full meal, it’s especially good used in place of the mango in these recipes: Or spoon it over nachos, stuffed bell or poblano peppers, or your favorite salad! Looking for more homemade salsa recipes?Stick with something fruity and make pineapple salsa, peach salsa, or kiwi avocado salsa verde! Or, for something a little less sweet, try my tomatillo salsa, dried chile salsa, or corn salsa. Other posts you may enjoy...
The post Mango Salsa appeared first on Love and Lemons. Recipes via Love and Lemons http://bit.ly/2h2Uz32 April 26, 2019 at 09:45AM
The Friday Buzz: Inaugural Edition
http://bit.ly/2ITfG6m  Hello! Congratulations on officially making it to Friday, or FRI-YAY, as I like to call it! As we head into the weekend, let’s take a small break from recipes *gasp* and switch things up! We’re starting a new segment here at Simply Recipes called (at least for the moment) The Friday Buzz. Although our love and passion for creating wholesome recipes runs deep, we wanted to share with you little bits of our lives that have caught our attention throughout the week. I sometimes refer to these as Drop of Sunshine… they’re small and simple things that bring a smile to your face, and who doesn’t want to smile more?! Before we jump into it, many of you may not know me, so I’ll take a quick minute to introduce myself. I’m Claudia Cash, the Community Manager here at Simply Recipes. A lot of the work I do here on the site is behind-the-scenes and on social media. We have some fun conversations happening over on Instagram, so I’d love for you to join the partay! Onto our little drops of sunshine!First up is Emma’s love of GOCHUJANG. Have you ever tried it? Have you heard of it? Apparently, Emma has developed a mad crush on this particular brand and wants to slather it onto everything. We’re talking salads, chicken wings, and even… MAC AND CHEESE. Give it a whirl! According to Carrie, vanilla gets all the extract attention. #howrude But have you ever heard of CHOCOLATE EXTRACT? She’s obsessed. I think it’s safe to say we’ve all munched on more than our fair share of Reese’s Pieces Peanut Butter Eggs. CAN’T STOP, WON’T STOP. Grab some up at the post-Easter sales going on this week, or make your own version with this recipe from The Recipe Critic. Let’s get away from food related stuff and talk about NETFLIX. I know you’ve got a binge obsession (doesn’t everyone?) so I’d love to hear what you’re all watching! Summer is currently head-over-heels in love with this show, Carrie can’t get enough of this one, and I can’t peel my eyes off this one. Have you seen any of them?! “I’ll Do It Anyway” by The Lemonheads is on constant repeat in Summer’s kitchen. This jar is what every kitchen needs. Do you have a daily mantra? This is Emma’s. My mom got me this blanket for Christmas, and my whole family fights over who gets it. Seriously so soft and snuggly! It’s been the perfect companion for me this week as I’ve taken more than my fair share of naps because life is CRAZY right now! Also, because you’ve made it to the weekend, we think you deserve a cookie. COOKIES FOR EVERYONE! #nomnomnom *** Last but not least, we are ever so grateful for our dedicated readers and for the love you show us! Here’s a comment from a reader on The Best Dry-Brined Chicken that caught our eye this week and made us grin from ear-to-ear:
What little bits of life have made you smile this week? We’re always looking for new and fun things to talk about. #gossipqueens I’d love for you to share and I may just add it to our next addition of The Friday Buzz. Cheers to the weekend! This post may contain links to Amazon or other partners; your purchases via these links can benefit Simply Recipes. Read more about our affiliate linking policy. Recipes via Simply Recipes http://bit.ly/2F9fkDA April 26, 2019 at 09:01AM
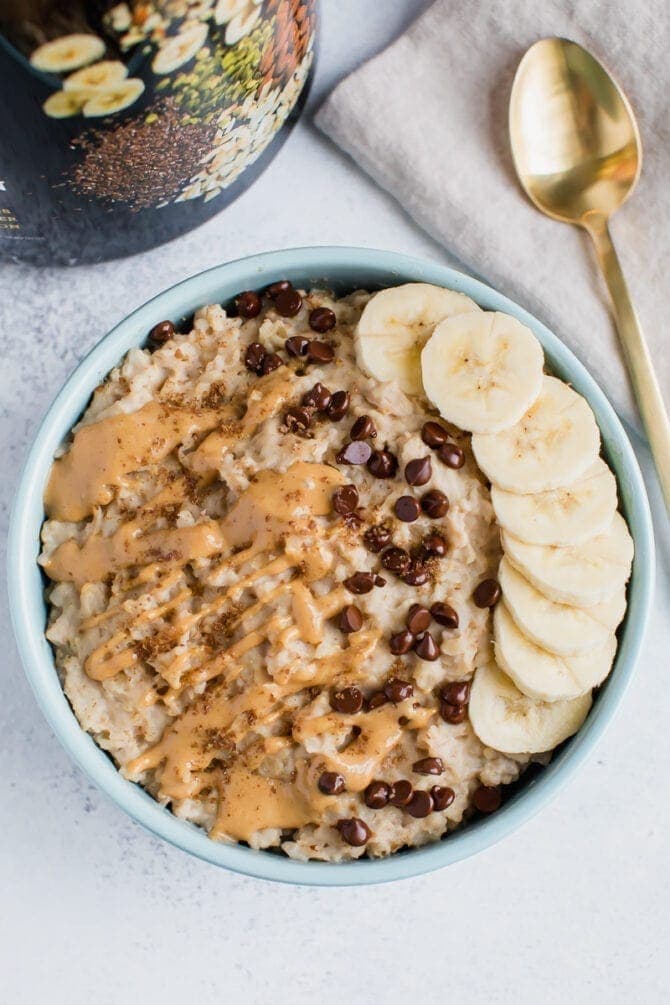
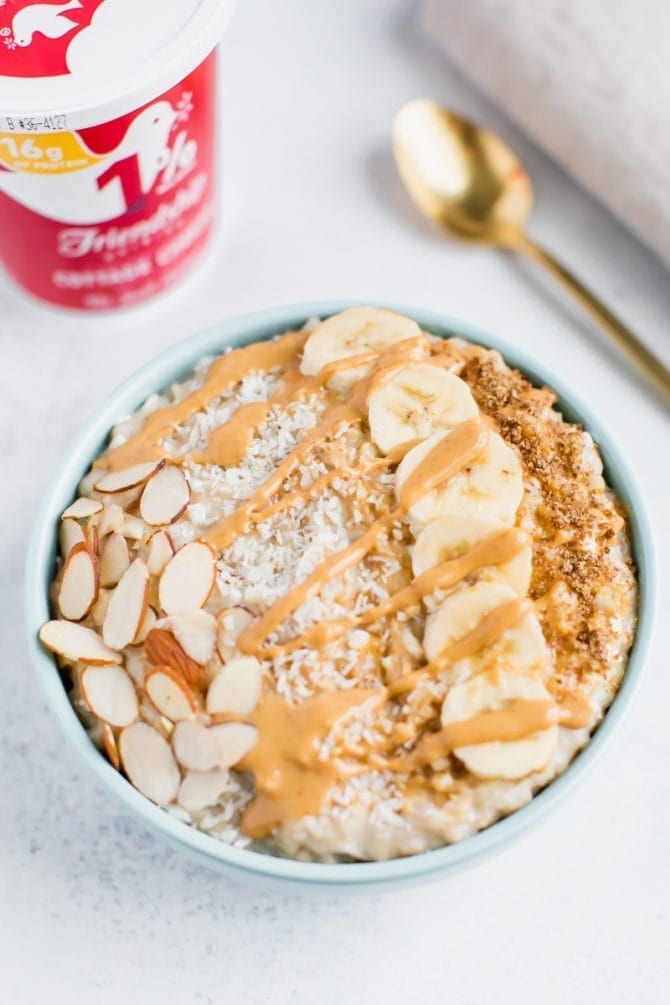
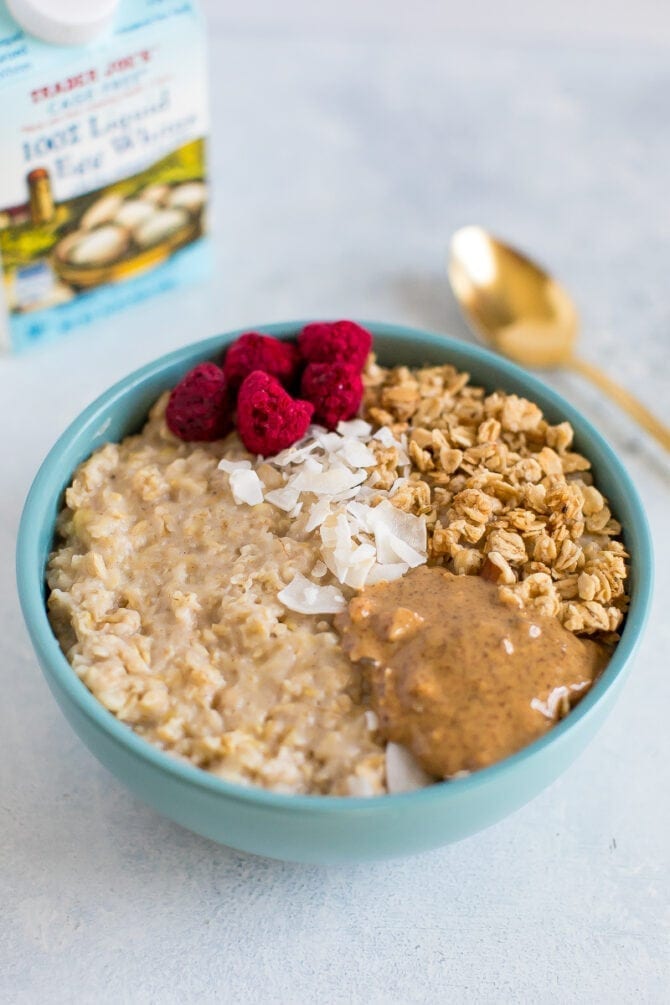
5 Ways to Make Protein Oatmeal
http://bit.ly/2Pu9kf3 Want to make your oatmeal even healthier? I’ve got you covered with 5 delicious and easy ways to boost the protein content of oatmeal so that it will keep you full until lunch. Everyone is crazy about oatmeal recipes! I guess I’m rubbing off on you… Once those are in the mix, you’ll have a healthy, balanced breakfast – AKA a bowl of oats will keep you full and satisfied all morning long!
How to Make High Protein OatmealAs I’m sure you know, oatmeal on its own isn’t very high in protein so I have a few go-to ingredients that I add in to up the protein level. I’ll cover each in more detail below but here’s a quick run-down:
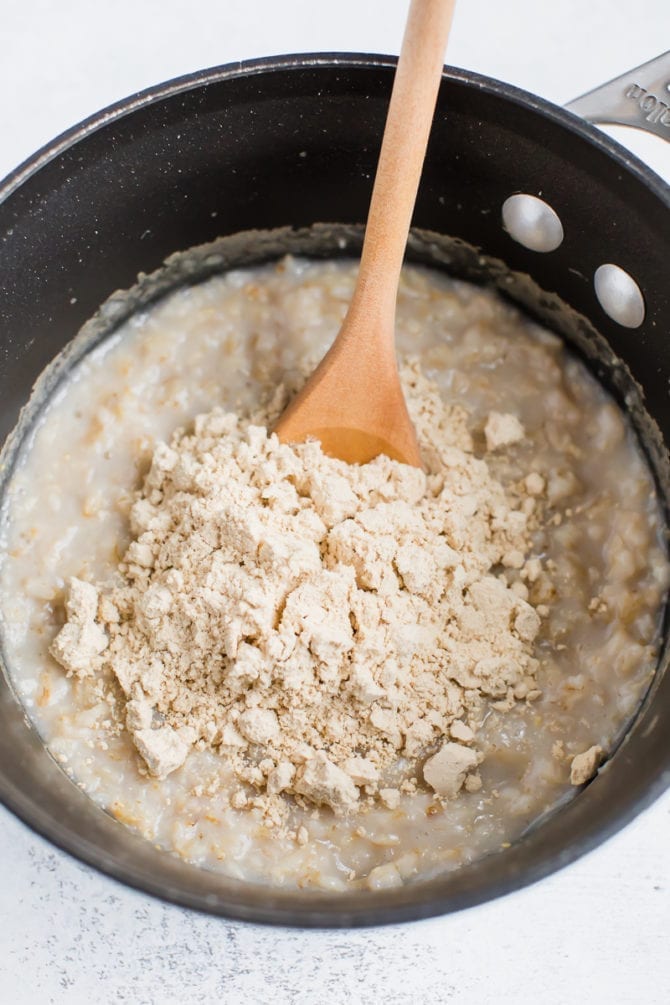
Protein Powder in OatmealFirst off I’ll cover protein powder. I have been adding protein powder to my oatmeal more and more recently. It adds a ton of protein, is super simple to add and can add a fun flavor to the oatmeal. This chocolate peanut butter protein oatmeal gets its chocolate flavor from the protein powder. Double win! Protein powder works great in pretty much any kind of oatmeal – mix it into overnight oats or to stovetop oatmeal. 1 scoop of protein powder has about 15-20 grams of protein. Protein powder is also a great option if you’re vegan or avoid eggs or dairy, considering a lot of the easy protein options include both of those things. Wondering which protein powder to use? Check out this post where I share all my favorite plant-based protein powder brands. Print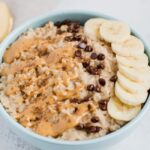 Protein Powder Oatmeal
Ingredients
Instructions
Nutrition
Keywords: protein powder oatmeal
Protein Powder Oatmeal
Ingredients
Instructions
Nutrition
Keywords: protein powder oatmeal There Are so Many Add Protein to Oatmeal
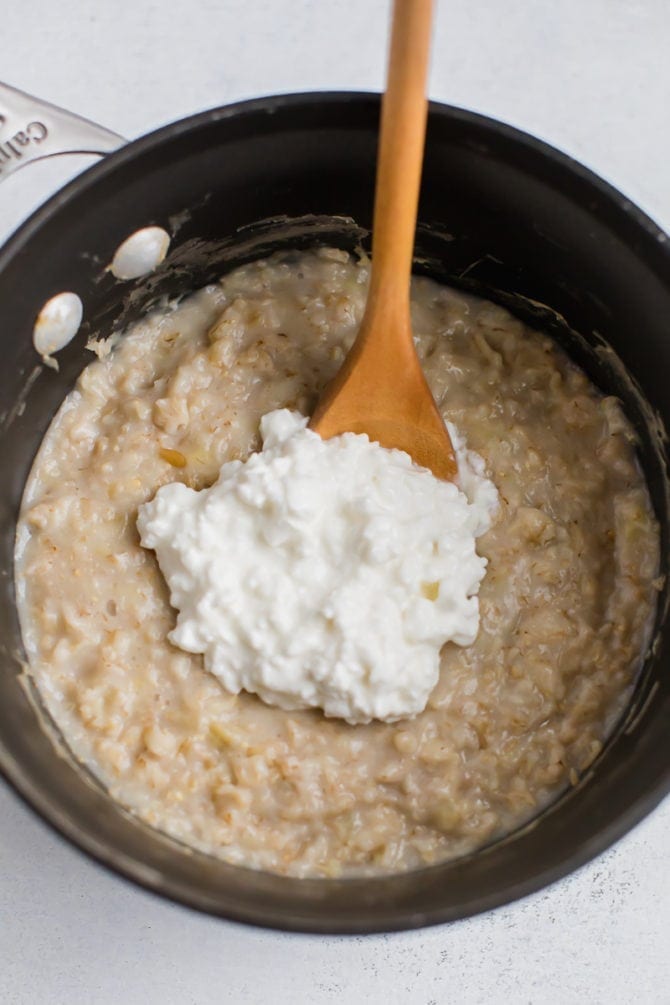
Cottage Cheese OatmealI feel like people are either in the “I love cottage cheese” camp or the “I despise cottage cheese” camp… Before you jump to any conclusions about cottage cheese, hear me out. You won’t taste the cottage cheese in oatmeal! It makes oatmeal so much creamier (win) and ups the protein content (win)! 1 cup of cottage cheese has 25g of protein.
Granted, you probably aren’t going to mix in a whole cup but still! So much protein. Again, you can mix cottage cheese into any kind of oatmeal. I will say that if you’re not a big cottage cheese fan because of the texture, you’ll want to mix it into warm oatmeal so the “chunks” (for lack of better word) break down and mix in. Check out my cottage cheese oatmeal recipe.
Egg White OatmealI love adding egg whites to my oatmeal! I’ve found it works best to add in egg whites to stovetop oatmeal while you’re cooking. The key is to avoid scrambling the egg whites. To do this, you simply have to continuously stir/whisk the egg whites while you’re adding them to the saucepan and as they cook. Trust me on this… one time I got distracted and ended up with a bowl of oatmeal with scrambled egg white chunks. Not so appetizing.
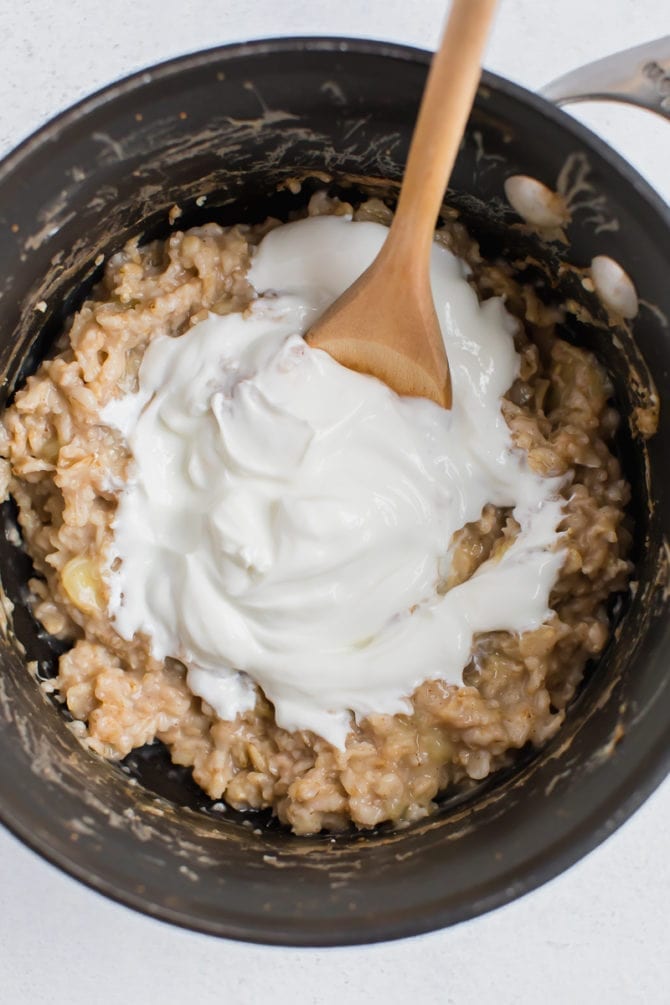
Obviously this method of making high protein oatmeal only works for oats that you’re cooking – please don’t add raw egg whites to overnight oats! 1 cup of egg whites has about 26 g of protein. Again, you won’t be adding in 1 cup of egg whites but they pack a punch! Try this protein pumpkin oatmeal with egg whites whipped in or try my egg and oat combo bowl with egg whites scrambled on the side. Check out my egg white oatmeal recipe.Greek Yogurt OatmealSimilar to cottage cheese, you can mix in Greek yogurt to your oatmeal to increase the protein (and probiotics!). I typically reach for full fat and plain just because the flavored kind can have a lot of added sugar. Greek yogurt works great in any kind of oatmeal – cold or hot! 1 personal container of Greek yogurt has 17 grams of protein . . . that’s as much as a scoop of protein powder! I love using Greek yogurt in overnight oats like this banana bread overnight oats.
Check out my Greek yogurt oatmeal recipe.
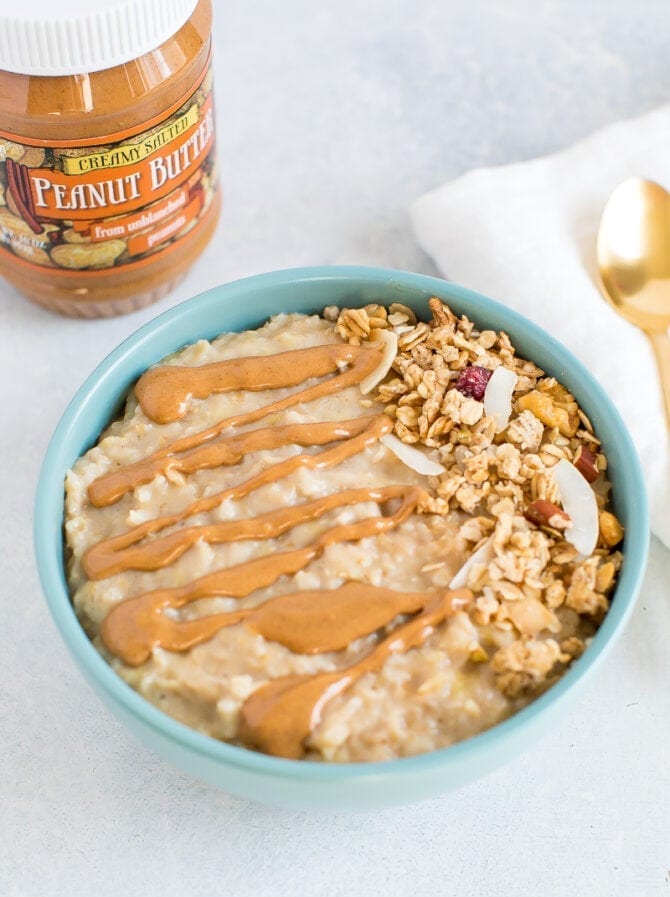
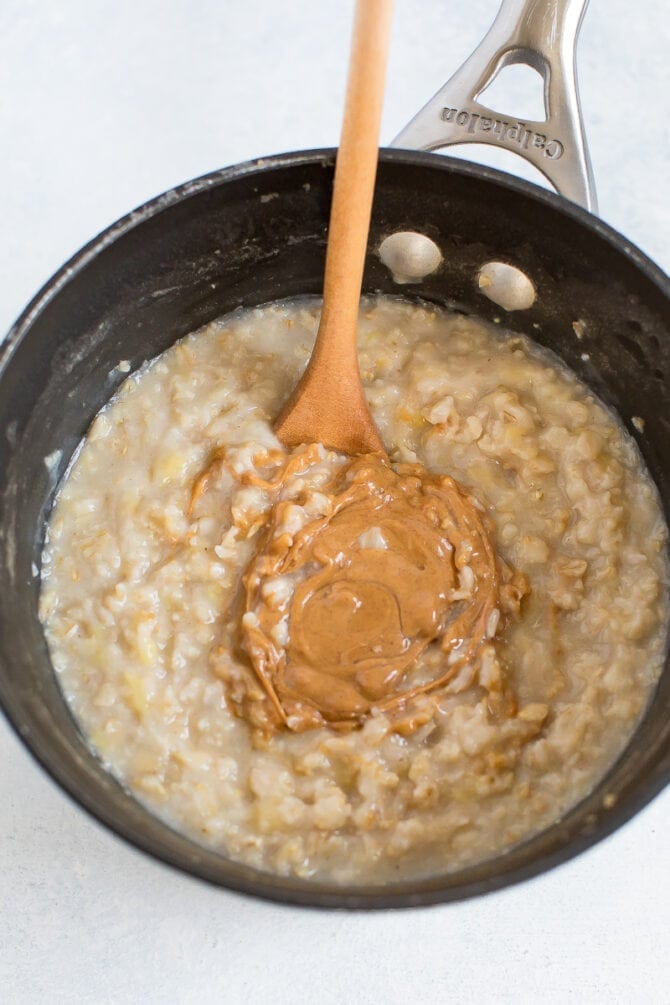
Nuts or Nut/Seed Butter OatmealAdding nut and seed butter is another great way to increase the protein in oatmeal. You can mix it right into the oats or drizzle on top for added flavor. 2 tablespoons of peanut butter has 8g of protein, 2 tablespoons of almond butter has about 7 g of protein and 2 tablespoons of sunbutter (sunflower seed butter) has about 6g of protein. Try my 3-minute peanut butter protein oatmeal or my peanut butter cup overnight oats.
Other Ways to add Protein to Oatmeal
The post 5 Ways to Make Protein Oatmeal appeared first on Eating Bird Food. Recipes via Eating Bird Food http://bit.ly/1L45wsH April 26, 2019 at 07:09AM
Ranch Chicken Salad
http://bit.ly/2UTT4K9 This light and easy chicken salad recipe made with leftover rotisserie chicken breast meat and my homemade ranch dressing. Great for lunch and meal prep!
|


 I wanted to dedicate a full post to protein oatmeal because if oatmeal has one fault, it’s that it typically isn’t very high in protein! For those of you that think oatmeal isn’t very filling or you’re hungry 1 hour after eating it, all you need to do is add some protein and healthy fat.
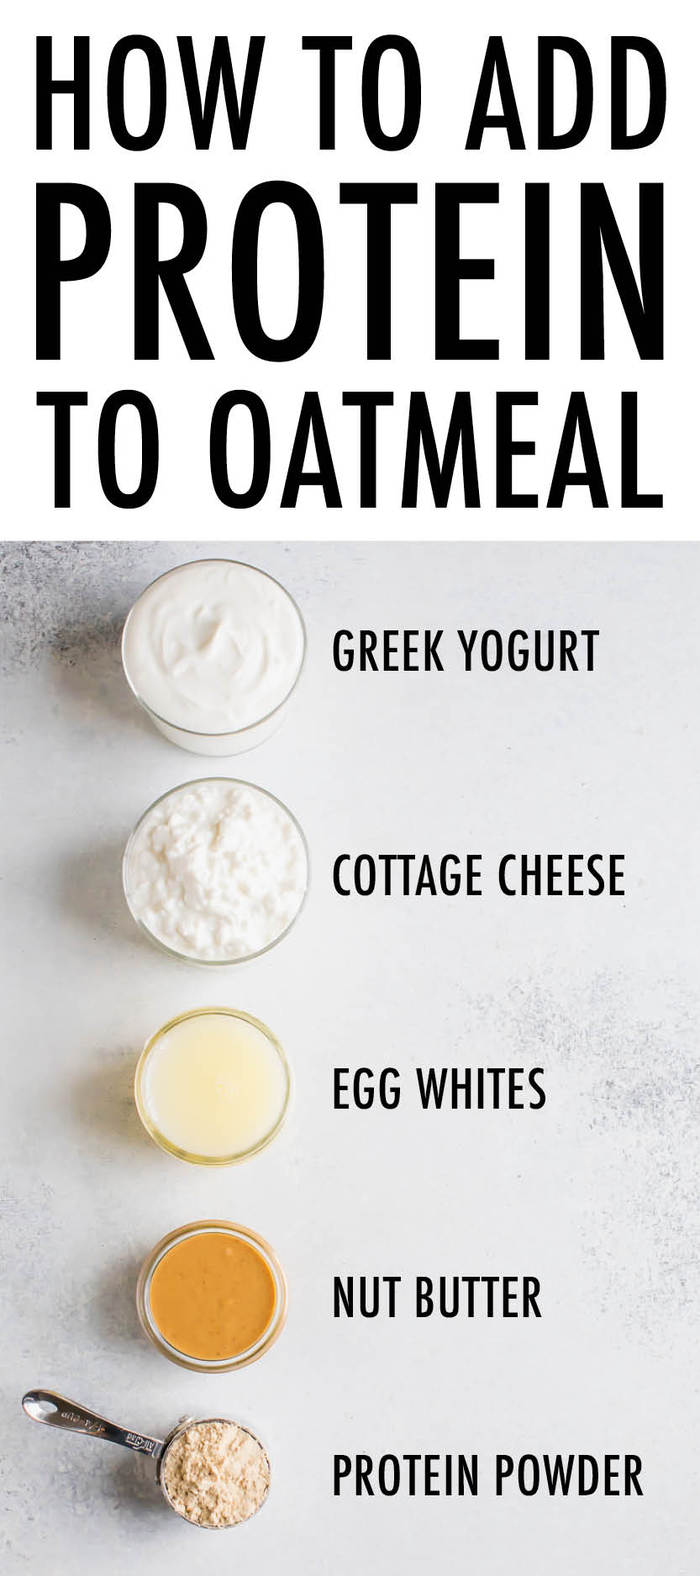


 To make the eggy rice bowl:


 Mango Black Bean Ginger Rice Bowl |
 Loaded Sweet Potato Avocado Toast |
 Broccoli Pesto Quinoa Salad |
 Heidi's Spicy Green Soup |
 Healthy Green Breakfast Tacos |
 Mango Cucumber Nori Wraps |
The post Avocado & Egg Brown Rice Bowl appeared first on Love and Lemons.
Recipes
via Love and Lemons http://bit.ly/2h2Uz32
April 24, 2019 at 12:16PM
Crispy Pakora with Mint Sauce and Rhubarb Chutney
http://bit.ly/2J0vGUj
Pakora is a crispy Indian street snack made with vegetables that are dipped in a chickpea flour batter and then fried and served with chutney or other dip sauces. We use white cabbage, carrot, zucchini and spinach in our pakora and share the recipe both for a crispy pan-fried version and one that is baked.
Recipes
via Green Kitchen Stories http://bit.ly/2G0wQfb
April 24, 2019 at 09:18AM
Stovetop Double-Stack Cheeseburgers
http://bit.ly/2L2GLXl


Recipes
via Simply Recipes http://bit.ly/2F9fkDA
April 24, 2019 at 09:05AM
http://bit.ly/2L2GLXl
In the summertime, I like nothing more than grilling some burgers outside with friends and family, but you shouldn’t have to wait for warmer weather to get your burger fix in.
These stovetop burgers can be made any time of the year, and I love them so much that I crave them even when the grill is an option!
THE BEST STOVETOP BURGERS
These burgers are very different from my standard grilled burger. When I grill a burger, I keep the patties thicker and really let the grill do its thing. These stovetop burgers are closer to what many Americans think of as a fast food burger, except the absolute best version of that!
The signature quality of these burgers is a thinner patty that cooks in a ripping hot skillet in just a few minutes. You can do either a double burger or a single (I make the singles slightly thicker), and obviously you need cheese.
The resulting burger is pretty close to many popular fast casual burger joints (think In-N-Out or Smashburger), but you can make it at home!
HOW TO MAKE EVEN-SIZED PATTIES
To make sure you get evenly-sized patties, I recommend actually weighing the ground beef. Ultimately, it’s up to you what size you make the patties, but here are my rough guidelines:
- If I’m making a single burger, the smallest I’ll go on my patty is four ounces (think quarter pounder). Usually, I’ll add a bit to that just to make the burger a bit thicker, so I shoot for a five- to six-ounce patty if I’m making a single.
- If I’m making a double cheeseburger, I’ll go the opposite direction. I shoot for two very thin three-ounce patties. When sandwiched together with cheese, it isn’t much more beef than a single patty, but has a much different texture. Because of the thin patties and double cheese layer, it feels much more substantial when taking a bite.
HOW TO COOK STOVETOP BURGERS
The trick to making these burgers is that you actually don’t shape the patties until the beef is cooking. That keeps the beef mixture light and not too compressed. It also makes for easier prep.
Once you have your beef portions weighed out (you can eyeball them if you want—but I’m a stickler for weighing them), set a large cast iron pan over medium-high heat and let it get hot. Add a drizzle of oil and then add the beef portions one at a time.
As soon as the beef hits the pan and starts to sizzle, cover it with a piece of foil and press it down with a second smaller pan or skillet to flatten it out. Once your burger is pressed, you can remove the foil and move on to the next one! You want an even, thin patty that ideally is larger than your bun, because the patty will shrink a good amount as it cooks.
Repeat with all your patties. You can probably fit four patties in one skillet at a time. Once all your patties are pressed, season them liberally with salt and pepper, and a bit of garlic powder, if you like.
Smaller double-sized patties will need to cook for two minutes, while larger, single-sized patties need to cook for three to four minutes. Then flip them and cheese them, and they will be ready for the table in another two to three minutes of cooking.
THE SECRET SAUCE
I love a good burger sauce, and this one is about as good as it gets. You don’t need to overcomplicate this. It’s mayo, ketchup, and relish. Stir it up, and slather it.
Most people, in my experience, don’t use enough sauce. It should be messy!
STOVETOP BURGER VARIATIONS
I think this burger is pretty great in its classic form, but if you wanted to experiment, there is nothing wrong with that.
You could add bacon, mushrooms, or caramelized onions, or experiment with other cheeses. For my money, American cheese is as good as it gets on a burger like this, though!
MORE GREAT BURGERS TO TRY!
Products We Love
This post may contain links to Amazon or other partners; your purchases via these links can benefit Simply Recipes. Read more about our affiliate linking policy.
Recipes
via Simply Recipes http://bit.ly/2F9fkDA
April 24, 2019 at 09:05AM
Mexican Tostada
http://bit.ly/2IEh0e8


Recipes
via Simply Recipes http://bit.ly/2F9fkDA
April 24, 2019 at 08:00AM
http://bit.ly/2IEh0e8
Tostadas are meant to be messy! Pile them with your favorite toppings and dig in. These are made with a crispy fried corn tortilla topped with refried beans, grated cheese, chopped avocado and tomato, sliced lettuce, and salsa.
Photography Credit: Elise Bauer
If there’s anything that comes close to a Mexican version of an open-faced sandwich, the tostada is it. Just when you thought nothing could get messier than taco night, along comes the tostada, which I dare you to eat daintily.
It can’t be done.
Strike that. Actually, you must attempt to eat a tostada with finesse, otherwise all hope is lost, and the thing will crumble in your hands with the mounds of filling succumbing to gravity only to ricochet off your plate to the surrounding table, lap, floor, etc.
What is a tostada?
A tostada has a pretty simple construction: it’s like a taco, but flat. It’s usually made with a fried corn tortilla, topped with refried beans, shredded cheese, salsa, and other toppings. Anything that could go in a taco could also go on a tostada, so you can have fish tostadas, shredded chicken tostadas, or beef tostadas.
How To Make Tostadas
We almost always make tostadas with refried beans and plenty of toppings. When we make them we put all of the toppings in separate bowls in the center of the table, distribute the freshly cooked tortillas, and then we each add our topping of choice, starting with the beans.
Mashed refried beans are usually used as the first layer because they spread over the tortilla well, and the other toppings have a better chance of sticking to the beans than they would the straight tortilla.
An Easy Recipe to Adapt
The decision that confronts you when you decide to make tostadas is, “How easy do I want this process to be?” If you want something truly over-the-top you might make your own tortillas from scratch, let them get a day or two old, then fry them and top them with home-cooked beans that you’ve smashed up with bacon fat.
Or, if you were looking for a quick mid-week meal, you could use canned refried beans (or even canned white beans that you heat and mash with a little chile powder added for flavor) and packaged tostada shells.
We almost always make our own refried beans from scratch, because with a pressure cooker it just doesn’t take that long. And we almost always use packaged tostada shells, because we live in California where you can buy them at almost any supermarket (when you are shopping for them, the thicker the tortilla the better, by the way).
Looking for More Great Mexican Dishes?
Updated April 24, 2019 : We spiffed up this post to make it sparkle! No changes to the original recipe.
Mexican Tostada Recipe
PrintThis recipe details how to fry up corn tortillas to make the tostada shells. If you are using packaged shells, before serving them, spread them out on a baking sheet, or directly on oven racks, and heat them at 350°F for 4 to 5 minutes, or until you can smell the aroma of them cooking. Don't keep them in the oven too long, or they will burn. Just heat them enough to lightly toast them.
Ingredients
For the tostadas:
- Corn oil or canola oil
- 12 corn tortillas
- Salt
For the toppings:
- 3 1/2 cups refried beans, homemade or from 2 15-ounce cans
- 1/2 head iceberg lettuce, sliced thin and seasoned with salt and vinegar (no oil)
- 2 medium tomatoes, chopped
- 1 to 2 avocados, chopped peeled and pitted, or guacamole
- 8 ounces grated Monterrey Jack, Cheddar, or crumbled queso fresco and/or cotija cheese
- 1 cup of salsa, or 1/2 cup sliced pickled jalapeños
- A handful chopped fresh cilantro
Method
1 Warm the refried beans: Warm the refried beans in a frying pan on medium heat, until warm. If you are using regular canned beans, drain them, then add them to the pan with a little water, mash them as you heat them.
For extra flavor for the beans you can stir in a tablespoon of bacon fat to them and/or a big slice of cheddar cheese.
Keep the beans on warm while you prepare the tortillas, adding water to them as necessary to keep a creamy consistency.
2 Dry the tortillas in oven: To help the tortillas fry up better, dry them in the oven by laying them out on an oven rack and cooking them at 250°F for 10 minutes or so.
3 Fry the tortillas: Pour enough oil into a frying pan so that you have a quarter inch layer of oil. Heat the oil on medium high heat until sizzling hot, but not smoking.
One at a time, fry the tortillas in the oil. Bubbles should form in the tortilla immediately as you put the tortilla in the oil, otherwise the oil is not hot enough.
Fry until golden brown on both sides, cooking about 30 seconds to a minute per side. Use metal tongs or a spatula to push the tortilla down in the oil, and to turn and lift the tortilla out of the pan, draining the excess oil as you do so. (The tortilla should be fairly stiff and crisp. If not, the oil is not hot enough.)


Place the tortilla on a paper towel-lined plate, to absorb the excess oil. Sprinkle with a little salt.
Put the cooked tortillas on a rimmed baking sheet and place in a 250°F oven to keep warm.
Add more oil to the pan as needed, taking care that the oil heats sufficiently before adding a tortilla to the pan.
4 Serve with toppings: To serve, place toppings in separate bowls, with a larger serving dish for the beans. Bring out the tostada shells in batches, keeping those unused warm in the oven.
To prepare a tostada, spread a large spoonful of mashed beans over a tostada shell. Sprinkle on cheese and other toppings (sliced lettuce, avocados, salsa, etc.)
Don't load the tostada too much or you'll find it difficult to eat. Eat by picking up the tostada with both hands (like a pizza slice).
Hello! All photos and content are copyright protected. Please do not use our photos without prior written permission. If you wish to republish this recipe, please rewrite the recipe in your own unique words and link back to Mexican Tostada on Simply Recipes. Thank you!
PrintThis post may contain links to Amazon or other partners; your purchases via these links can benefit Simply Recipes. Read more about our affiliate linking policy.
Recipes
via Simply Recipes http://bit.ly/2F9fkDA
April 24, 2019 at 08:00AM

The Flat Belly Fix
This is the only 21-day rapid weight loss system that allows you to easily lose an average of 1 lb a day for 21 days without feeling hungry or deprived. The unique and brand new techniques used in this System are proven SAFE. And they do not cause the rebound weight gain common to all the other rapid weight loss systems that are not backed by the latest science. The Flat Belly Fix System takes advantage of a recent scientific discovery that proves the effective weight loss power of an ancient spice. Combined with other cutting-edge ingredients in the patent-pending Flat Belly Fix Tea™ — that you can make right in your own kitchen in minutes — this System is the quickest, easiest and most enjoyable way to quickly get the body you desire and deserve. Click Here
Categories
All
Gluten Free
Pancakes
Protein
Archives
November 2020
October 2020
September 2020
August 2020
July 2020
June 2020
May 2020
April 2020
March 2020
February 2020
January 2020
December 2019
November 2019
October 2019
September 2019
August 2019
July 2019
June 2019
May 2019
April 2019
March 2019
February 2019
January 2019
December 2018
November 2018
October 2018
September 2018
August 2018
July 2018
June 2018
May 2018
April 2018
March 2018
February 2018
January 2018
December 2017
November 2017
 RSS Feed
