
|
Charred Skillet Broccoli
https://ift.tt/3gmZpVF At any given point, I probably have a head of broccoli in my fridge. You, too? If that’s the case, you can bust out this versatile veggie side dish with minimal work. I get it going as I prep other parts of my dinner. Want a gold star in thrift and food waste prevention? Even (or especially if) your broccoli is looking tired and floppy, it shines in this preparation, and you use the whole head—stem and all. The secret is chopping it into little pieces so it cooks quickly and becomes tender. How to Prep the BroccoliIs knife prep something you loathe? You’re off the hook: Accuracy does not count here! While you’re chopping the broccoli into small bits, it’s totally fine—and even preferable—that some are larger than others. That way, some get nice and soft in the skillet, while others still maintain a slight toothiness. Here’s how to prep the broccoli:
Now you’re ready to cook! USE FRESH BROCCOLI“Oh, I can skip all that work by using packaged frozen chopped broccoli,” you may be thinking. Sorry, but with this recipe, you can’t. It won’t get the nice hint of char that makes it special. MIX IT UP WITH OTHER VEGGIESAny member of the cabbage family (cauliflower, cabbage, Brussels sprouts, kale) is awesome in this. I’ll use whatever I have around, usually two or three of the aforementioned brassicas. Just try to have them chopped up in about the same size. I save cauliflower cores and put them to use here, as well as the stems of kale and collard greens. Sometimes I use the leafy greens in other recipes, but I’ll save the stems for this, as they keep for about a week in the fridge. Unlike the broccoli stems, you don’t need to peel them. Just slice them thinly across the grain. They’re packed with nutrition and fiber and cook up sweet, not bitter. DOUBLING THE RECIPEYes, you can double this. But count on it taking longer to cook, as there will be more volume in the pan. I like to make a large batch and eat leftovers all week. FREEZING SKILLET BROCCOLIYou can freeze this! I like to pack it into quart-size freezer bags, press out the air, seal them, and freeze them flat for easy storage. HOW TO SEASON SKILLET BROCCOLISince I usually serve this with other highly flavored things, I don’t usually season this with much else other than salt or pepper. Mild chili flakes are nice, though. If you like, you can sauté a little minced onion or garlic before adding the broccoli. WHAT TO SERVE WITH SAUTÉED BROCCOLII make this (or variations of it) probably once a week. It’s a great side to things like jerk salmon, but grilled flank steak, pork, or chicken is good, too. Most often I use this as a component of a bowl. I pile it over brown rice or quinoa, and top that with romesco sauce, then the broccoli, then crumbled feta cheese. MORE GREAT SKILLET VEGGIESRecipes via Simply Recipes https://ift.tt/2F9fkDA May 25, 2020 at 09:05AM #recipies
0 Comments
Cauliflower Rice Bowl with Garlic Shrimp
https://ift.tt/2zkAfGB Cauliflower rice bowls are a filling, low-carb, vegetable-and protein-packed weeknight dinner for two. The cauliflower is mild, so it doesn’t compete with the garlicky shrimp in this dish. Photography Credit: Sally Vargas | Art Banner Credit: Elena Resko Our “Cooking for Two” series is all about those of us who love good food but need smaller batches. Maybe you’re single, or coupled but with no kids (no kids, before kids, after kids). Whatever the reason, you don’t necessarily want a lot of leftovers hanging around. We had you in mind when we developed these recipes. When you have two at the table, this cauliflower rice with shrimp steps in to give you dinner in under 30 minutes. You can’t argue with that! A tasty, low-carb meal has got to be on the top of your list for weeknight suppers. The emphasis here is on tasty. Cauliflower rice—finely chopped raw cauliflower that looks like a grain—works as a great backdrop for the other fresh flavors in this recipe. It gets a hefty shot of lemon, both zest and juice, plus a bonus of barely wilted spinach and cherry tomatoes. Topped off with garlicky shrimp, this weeknight dinner has a huge yum factor. WHERE TO GET CAULIFLOWER RICECauliflower rice has become a popular replacement for grains for people who have allergies, or who just want to lower their starchy grain intake. You can either buy it already riced in the frozen foods section or make it yourself.
HOW TO BUY SHRIMPSince ‘fresh’ shrimp is pretty much nonexistent because almost all shrimp are frozen immediately after harvest, I almost always pick up frozen shrimp. That shrimp in the seafood case at the supermarket? It is simply frozen shrimp that has been defrosted. Shrimp is quite perishable, and there’s no way to know how long ago it was thawed. For that reason, I like to buy frozen shrimp and defrost it myself when it’s time to cook. Just plunk it in a bowl of cold water for 15 minutes and it will be ready to cook. For this recipe, I prefer jumbo (21/25 per pound) shrimp to small ones, because I like the statement they make on the plate (and there are fewer to peel, too!). WAYS TO ADAPT CAULIFLOWER SHRIMP BOWLS
MORE GREAT BOWL RECIPESCauliflower Rice Bowl with Garlic Shrimp RecipeThis recipe is easily doubled if you'd like to make more servings. Ingredients
Method1 Cook the onion and cauliflower rice: In a large skillet over medium heat, add 2 tablespoons of the oil. When the oil shimmers, add the chopped onion and cook, stirring, for 1 to 2 minutes, or until the onion softens. Add the cauliflower rice and 1/4 cup water to the skillet. Cook, stirring often, for 5 minutes, or until the cauliflower loses its raw taste. Stir in 2 tablespoons of the lemon juice, salt, pepper, and lemon zest. 3 Add the spinach and cherry tomatoes: Stir the spinach into the cauliflower and cook for 3 minutes, or until the spinach barely wilts. Stir in the tomatoes. Taste and add more salt and pepper, if you like. Remove from the heat and set aside while you cook the shrimp.
4 Cook the shrimp: In a nonstick skillet large enough to accommodate the shrimp in one layer, add the remaining 2 tablespoons of oil and the garlic. Set the skillet over medium heat and cook for about 30 seconds, or just until the garlic sizzles. (Start by heating the garlic and oil at the same time in a cold pan to prevent the garlic from burning.) Add the shrimp in one layer. Cook for 1 to 2 minutes on each side, or until the shrimp is opaque in the center. (Exact cooking time depends on the size of the shrimp.) Remove the pan from the heat and sprinkle with the paprika. Stir in the remaining 2 tablespoons of the lemon juice and the parsley. Turn the shrimp to coat it well in the lemony, garlicky oil.
5 Assemble the bowls: In two shallow bowls, divide the cauliflower rice. Top each with half the shrimp and garnish with slices of avocado. Serve warm or at room temperature. Hello! All photos and content are copyright protected. Please do not use our photos without prior written permission. Thank you! Products We LoveThis post may contain links to Amazon or other partners; your purchases via these links can benefit Simply Recipes. Read more about our affiliate linking policy. Recipes via Simply Recipes https://ift.tt/2F9fkDA May 25, 2020 at 09:05AM #recipies
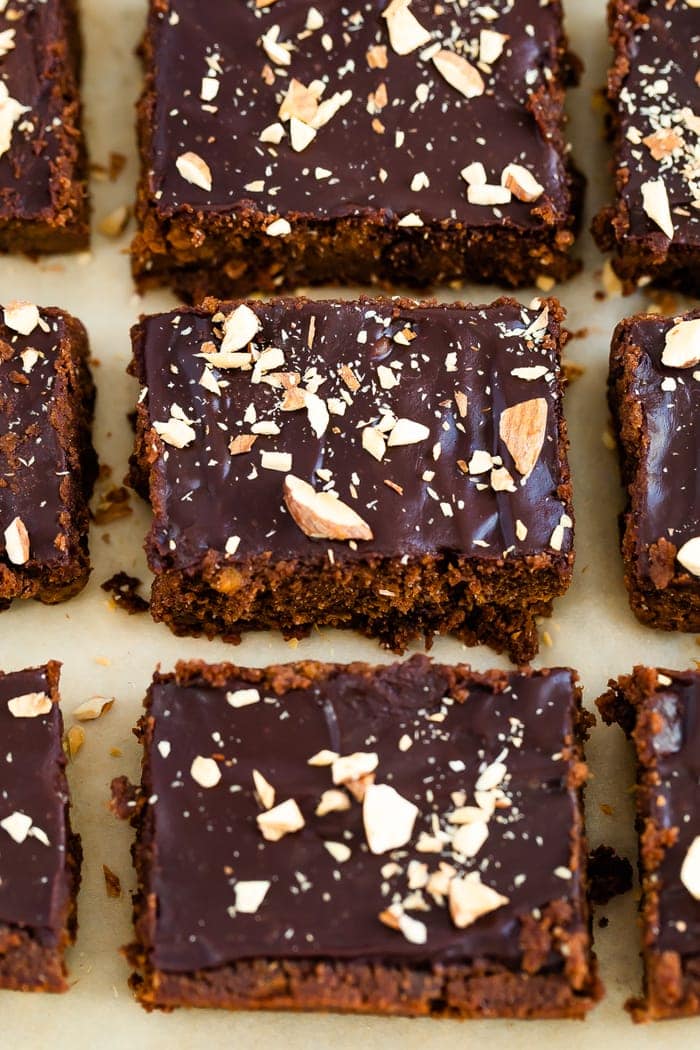
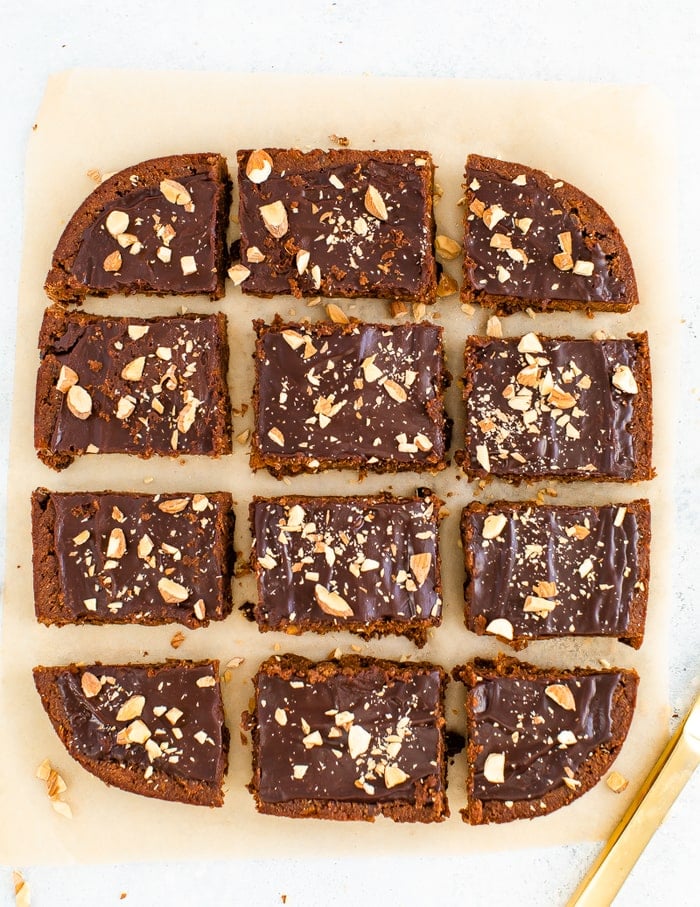
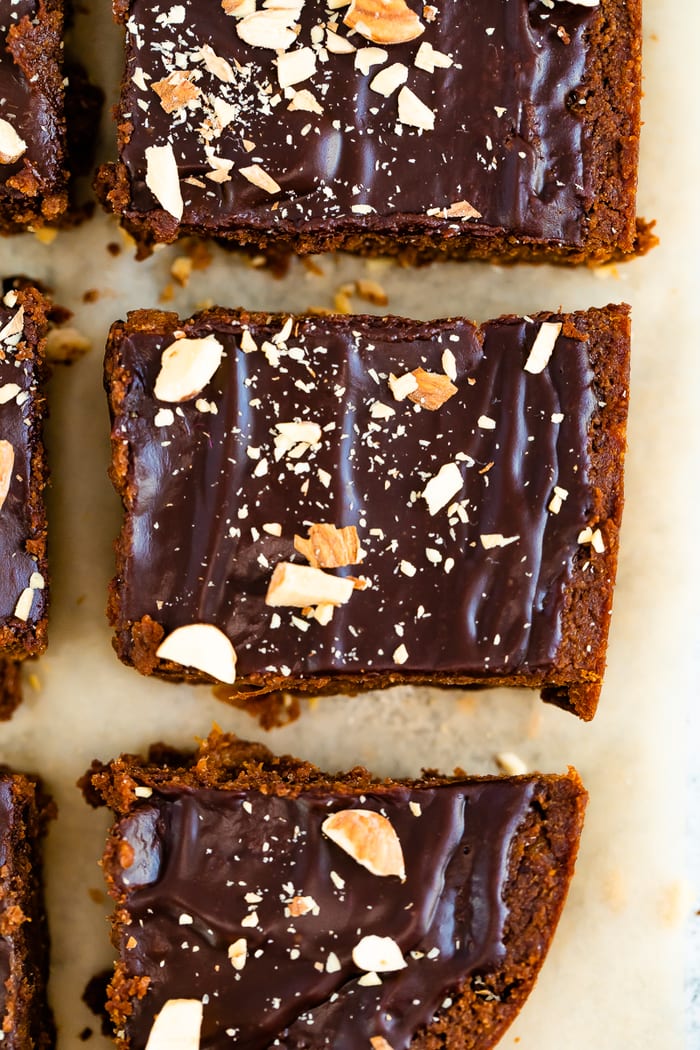
Sweet Potato Brownies
https://ift.tt/36vy6nf
Can you even handle the chocolate ganache on top of these brownies?!? My mouth is watering. I have been working on revamping some of my most popular EBF recipes so today I’m sharing these sweet potato brownies, which are based off my sweet potato brownie bites!
As you may know, I’m a fan of sneaking veggies into my recipes whenever I can. I’ve added zucchini to overnight oats, cauliflower to a smoothie and butternut squash to pancakes. Vegetables do not have to be boring and these recipes have all become fan favorites… picky eaters included! Why Sweet Potatoes?If you’re wondering why the heck I’m putting vegetables in my dessert, I’ve got plenty of reasons why! So I don’t scare you off, I’ll start by saying that sweet potatoes add an amazing texture to these brownies – binding them together without a traditional egg. Beyond that, sweet potatoes add a nutritional punch! They’re high in fiber and a variety of important vitamins and minerals like beta-carotene, vitamin C and potassium. (Source)
Ingredients for Vegan Sweet Potato Brownies:
How to Make Sweet Potato Brownies
How to Store These BrowniesThese brownies aren’t lasting long in our house, but my recommendation is to store leftover brownies in the fridge for up to one week. I haven’t tried freezing them, but I’m sure they would be okay to freeze in an airtight container for up to three months. If you’re freezing them, I would recommend putting parchment paper in between layers so the chocolate ganache doesn’t stick!
Love a Good Brownie? Try These Too:
If you try these sweet potato brownies please be sure to leave a comment and star rating below letting me know how they turned out. Your feedback is super helpful for the EBF team and other readers. Print Sweet Potato Brownies
DescriptionYou’ll never know there are vegetables hidden in these sweet potato brownies! Top with chocolate ganache for the ultimate sweet treat. Ingredients
Chocolate Ganache Topping
Instructions
Nutrition
Keywords: sweet potato brownies The post Sweet Potato Brownies appeared first on Eating Bird Food. Recipes via Eating Bird Food https://ift.tt/1L45wsH May 25, 2020 at 07:53AM #recipies
Homemade Hamburger Buns
https://ift.tt/2WWUsef
Three months ago, if someone had told me that Jack and I would start making homemade hamburger buns every week, I would have laughed. To me, hamburger buns seemed like something that only professional bakers could make. But since Jack’s been baking up a storm lately, the idea of homemade hamburger buns started to seem less and less crazy. If we could make bagels and bread, why not hamburger buns too? After testing and re-testing this recipe, I’m happy to report that homemade hamburger buns are surprisingly easy to make! They require under 30 minutes of hands-on work, and they’re absolutely delicious. Light, puffy, and flavorful, they’ll take any burger to a whole new level.
Hamburger Bun Recipe IngredientsYou only need a few basic ingredients to make this hamburger bun recipe:
We also like to finish our homemade hamburger buns with an egg wash and sesame seeds. I love the way the crunchy, nutty seeds contrast with the lightly sweet, soft buns! Find the complete recipe with measurements below.
How to Make Hamburger BunsThis hamburger bun recipe is super simple to make. Here’s what you need to do: First, make the dough. Activate the yeast by mixing it with warm water and a teaspoon of sugar. When the yeast mixture foams, add it to the bowl of a stand mixer fitted with a dough hook attachment, and mix it with the flours, salt, butter, egg, and remaining sugar until the dough is smooth, slightly stiff, and not sticky, about 5 to 7 minutes.
Then, transfer the dough to a clean work surface, and knead to form it into a ball. Place it in a large bowl, cover the bowl with plastic wrap, and set it aside for an hour, until the dough has almost doubled in size.
When the dough has risen, shape the buns! Turn the dough out onto a clean, unfloured work surface and divide it into 8 pieces. Roll each piece on the countertop with a cupped hand to form it into a ball.
Next, transfer the dough balls to a parchment-lined baking sheet. Press each one down slightly to form it into a 3-inch disk. Cover the baking sheet with plastic wrap and let the dough rise for another hour.
When an hour has passed, bake! At this point, the dough balls will look slightly more puffy, but they’ll still be relatively flat. That’s ok! They’ll puff up more in the oven. Transfer them to a 375-degree oven and bake for 13 minutes. Remove the baking sheet from the oven, brush the buns with the egg wash, and sprinkle them with sesame seeds. Return them to the oven and bake for 2-5 more minutes, until the tops are lightly golden brown. That’s it!
Recipe Tips
Hamburger Buns Serving SuggestionsThese hamburger buns are best on the day they’re baked, but they’ll also keep in an airtight container at room temperature for up to 3 days or in the freezer for up to 2 months. I recommend slicing them in half and toasting them before serving. When you’re ready to eat, load them up with your favorite fixings and any type of burger you please! We love these homemade hamburger buns with all of these recipes:
Other posts you may enjoy...
The post Homemade Hamburger Buns appeared first on Love and Lemons. Recipes via Love and Lemons https://ift.tt/2h2Uz32 May 24, 2020 at 09:36AM #recipies
Easy Grilled Steak Fajitas
https://ift.tt/2LXgd7D For casual family dinners, backyard BBQs, or camping trips, these Easy Steak Fajitas are always a hit. Cook the veggies in foil packet while the seasoned steak grills alongside. Everything can be assembled ahead, and dinner is ready in 10 minutes! Photography Credit: Nick Evans | Art Banner Credit: Andy Christensen Tex-Mex is probably the most common recurring cuisine at my house. My wife is a huge Tex-Mex fan, and I find it easy to make. These grilled steak fajitas are a step up from your classic taco night, but they aren’t necessarily harder to make. Just cook the veggies in a foil packet and grill the steak alongside — dinner is ready in 10 minutes! My kids are usually good with steak and tacos, so I figured this would be an easy win at my house. Of course, the trick is to master the serving of the dinner—not the dinner itself! PUTTING THE EASY IN EASY STEAK FAJITASI like to cook the veggies in a foil packet because you can assemble it in advance and just toss them on a hot grill when you’re ready. You can even make individual foil vegetable packets—spicy for the adults and mild for the kids! Together with the grilled steak, this meal is SO easy and you can feed your family or a few friends without too much work. This also transports beautifully and is great for camping trips. With that in mind, you can definitely assemble everything up to a day in advance with no worries. Toss the packet and the steak on a hot grill and you will be in really good shape! To assemble the foil packet two days in advance, follow these steps:
WHAT’S THE BEST STEAK FOR FAJITAS?You can use almost any steak for fajitas. Skirt steak or flank steak are both popular choices. On this day, I actually used a strip steak, which is a little fancier than need be, but of course, it was delicious. I would shy away from any steak that is more than one inch thick though, as thinner is better for fajitas. WHAT ARE THE BEST TOPPINGS FOR FAJITAS?I think peppers and onions are a must and cook well in the foil alongside the steak. Beyond that, it’s kind of dealer’s choice. Here are a few of my favs (all of which you will find at my table when I serve fajitas): WHAT TO SERVE WITH GRILLED STEAK FAJITAS
I think these make a meal on their own, but if you are looking for sides, try: The DAD ADD
REPORT CARD
MORE GREAT FAJITA RECIPESEasy Grilled Steak Fajitas RecipeAfter seasoning the steak and vegetables, you might have some spice mix leftover. You can use it to sprinkle on the fajitas before serving or keep it in the pantry. The spice mix is great on tacos and keeps well for three months in an airtight container. IngredientsFajita Spice Mix:
For the fajitas:
DAD ADD — Lime Cumin Sour Cream:
To serve: Method1 Make the fajita spice mix: In a small bowl combine kosher salt, black pepper, garlic powder, onion powder, cumin, and chili powder. 2 Make the vegetable foil pack: Fold a large piece of foil in half so you have a double layer. Add the sliced peppers and onions. Season the vegetables with 1 tablespoon of olive oil and sprinkle with 1 teaspoon fajita seasoning. Fold the sides of the foil up and crimp it tightly on top to make a packet.
3 Season the steak: Season the steak liberally with the seasoning mix (about 3/4 teaspoon per side).
4 Preheat your grill to 450°F for high heat grilling. 5 Grill the packet and the steak: Once the grill is hot, transfer the veggie packet and the steak to the grill. Grill over steak over high, direct heat. After 4 minutes, flip the steak and grill for 5 to 7 additional minutes. This will finish cooking the steak to about a medium to medium-rare temperature and soften the veggies. Remove both the foil packet and the steak from the grill and let cool for a few minutes. 6 Make the Dad Add Lime Sour Cream (optional): In a small bowl, combine sour cream, zest, juice from 1 lime, cumin, and salt. Serve alongside the fajitas.
7 Slice the steak: Slice the steak thinly against the grain. 8 Serve: You can add the steak to the veggies and serve the fajitas right out of the foil packet alongside a stack of flour tortillas. The foil should be strong enough, but if yours seems unstable, you can also transfer the ingredients to a serving platter. Hello! All photos and content are copyright protected. Please do not use our photos without prior written permission. Thank you! Products We LoveThis post may contain links to Amazon or other partners; your purchases via these links can benefit Simply Recipes. Read more about our affiliate linking policy. Recipes via Simply Recipes https://ift.tt/2F9fkDA May 24, 2020 at 09:08AM #recipies
How to Measure Flour
https://ift.tt/2LXfJyl
Have you ever made a bread or cake recipe that promised to be moist and tender but turned out to be dry and dense? You’re not alone. This is a common problem in baking, and often, the solution is trying a new method for how to measure flour. First, if you don’t already have a kitchen scale, get one, because weighing your flour will give you the most accurate measurement every time. When you weigh the flour for a recipe, you know exactly how much you’re using. By contrast, when you measure by volume, the actual amount of flour you use varies based on a variety of factors – your specific measuring cups, how you scoop the flour, how tightly you pack it, and more. If a recipe calls for a cup of flour, you could end up using as much as 1.25 times more. A difference this large can have a huge impact on how your baked goods turn out. Kitchen scales don’t have to be expensive, and they’re easy to store. Mine is similar to this one, and it’s the perfect size to tuck into a drawer under my potholders. Trust me, if you bake often, you’ll loving having a scale in your kitchen!
How to Measure Flour with Measuring CupsBut what if you don’t have a scale? Can you still bake? Of course! Though weight measurements will always be the most accurate for baking, you can still get good results with the spoon-and-level method for how to measure flour. Here’s what you need to do: First, fluff up the flour in the bag or canister. Flour settles easily, becoming tightly packed inside a bag or jar. In order to make sure you’re not scooping up packed flour, you should fluff it up with a spoon or fork before you measure it.
Second, spoon the flour into the measuring cup. Gently pile it in until it forms a heap above the rim of the measuring cup. Don’t pack the flour down.
Then, scrape a knife across the top of the measuring cup to level the flour. This way, you’ll get rid of excess flour on top of the cup without packing down the flour inside.
Whatever you do, DON’T scoop the flour directly from the canister. This flour is often densely packed, so dipping the measuring cup into the bag or jar will yield too much flour nearly every time.
For reference, 1 cup of spooned and leveled all-purpose flour should weigh between 120 and 125 grams.
Conversely, a scooped and packed cup can weigh up to 155 grams. That’s over 30 grams more! Weighing your flour is always the best way to go, but if you don’t have a scale, spooning the flour into a measuring cup and leveling it with a knife is your next best bet. Favorite Baking RecipesWant to try this method for how to measure flour? Give it a go in any of these recipes:
How to Measure Flour
Learn how to measure flour accurately for baking recipes. By using the spoon and level method, you'll get great results every time!
The post How to Measure Flour appeared first on Love and Lemons. Recipes via Love and Lemons https://ift.tt/2h2Uz32 May 24, 2020 at 08:53AM #recipies
Burnt Aubergine Dip with Aromatic Crunch
https://ift.tt/3db7SJD  The secret to cooking great tasting aubergine / eggplant at home is almost always to roast it longer than you think. That is definitely the case with this charred dip also known as Baba Ganoush. By roasting the aubergine until the skin is black and it has collapsed, you get lovely burnt tones, buttery soft flesh without any bitterness and a bit of umami complexity. If you like hummus and muhammara, you are going to love this. Inspired by a courgette spread in Noor Murad'sinstagram story and a photo of a creme fraiche dip generously covered with furikake by Andy Barghani, we knew that we wanted to add a crunchy topping to our dip. So we made an aromatic oil with spices and seeds in it and used the oil for the spread and the seeds on top. We also stirred in some yogurt to give it a bright contrast. The crunch on top is what gives this traditional recipe a somewhat new twist and now I don't want it any other way. In fact, we should start implementing crunchy elements on all spreads. We used seeds here, but almonds or other nuts would also be great. Now is the season to make spreads like these, not only because the first aubergines are in season, but also because there are many other tender vegetables in season that taste so good eaten raw and dunked in dips and spreads. Radishes, cucumbers and carrots are all classic dipping vegetables, but you should also try raw beetroot and sturdy greens. And of course, this flatbreadwould also be great. Recipes via Green Kitchen Stories https://ift.tt/2LQcbQy May 24, 2020 at 02:08AM #recipies
Weekly Meal Plan: 5 Dinner Ideas to Prep Ahead
https://ift.tt/3bUNgnq  Weekly Meal Plan: 5 Dinner Ideas to Prep AheadSimplify dinner by using a different cooking technique or tool! Dust off that slow cooker, break out that new air fryer, or transform your favorite sandwich into a casserole. This month, we welcome back Marta Rivera for more of her meal plans. Marta is a trained chef, mom of twins, and Army wife – and she is also a Simply Recipes recipe tester and developer! We’ve almost made it to the mid-point of 2020! I have high hopes that this year will redeem itself in the second half. No matter what we have to look forward to, one thing is for certain: We need to eat, drink, and be as merry as circumstances allow! Let’s make the most of this crazy year starting with this week’s dinner. There are many different time-saving or less labor-intensive ways to prepare meals these days. Slow cookers and packet meals take your hands off of the cooking and lighten up dish duty. On days where a busy schedule makes extensive meal prep impossible, try adapting your recipes to utilize a different cooking method: slow or pressure cooking rather than baking, air frying instead of deep-frying, etc. Or you can easily alter your dinner by modifying its composition—the Reuben casserole later this week is one of my favorite examples of how to switch things up. One last thing—we wanted to highlight the ultimate way to save time in your week: having your groceries delivered right to your door. Click on the red “Add to Shopping List” button at the bottom of any recipe (or meal plan) and check it out! We call this feature “Relish” and we’re into it because, really, dinner can be simpler. This post may contain links to Amazon or other partners; your purchases via these links can benefit Simply Recipes. Read more about our affiliate linking policy. Recipes via Simply Recipes https://ift.tt/2F9fkDA May 23, 2020 at 09:26AM #recipies
Pineapple-Mango Mimosa
https://ift.tt/2WRdxyu A mimosa is a combination of juice and sparkling wine. Orange juice and Champagne are the classic mix – dating back to the early 20th century – but any combination of fruit juice, fruit purée, or nectar can be combined with a sparkling alcohol (or even sparkling nonalcoholic beverage) for a mimosa recipe. For today’s sweet-tart, tropical twist, we’re using pineapple and mango with a brut Cava. WHAT IS CAVA?While any sparkling wine would technically be an acceptable choice for a mimosa, I find that certain types of sparkling beverages are better for some juices than others. For the sweet-tart combination of pineapple and mango, I’m sticking with the Spanish sparkling wine called Cava. Cava is often confused with Prosecco, from Italy, since they are both sparkling wines often found intermingled in the wine area of your liquor store. Spanish Cava, however, is made in the same traditional way that Champagne is produced, and also has a smaller bubble due to the way it is fermented. So, if you don’t want big, aggressive bubbles in your drink, Cava is a good pick for you. Cava is slightly acidic with citrus and green apple notes. It comes in several styles:
WHERE TO FIND MANGO JUICEMango juice can often be found in the refrigerated juice section at your local grocery store. If juice is not available, check the international section or health food section for bottles of mango nectar. Keep in mind that nectar will be thicker and sweeter, so you’ll need to taste a little to see how much mango-to-pineapple juice ratio will work for your preference. Pineapple juice is widely available in most supermarket juice aisles, and also large market chain liquor stores. DO YOU NEED CHAMPAGNE FLUTES FOR MIMOSAS?Almost every brunch service with mimosas on the menu serves them up in a flute glass—but you don’t have to! If you’re casually entertaining with friends and family, stemless wine glasses are a good choice or even a regular wine glass. If flutes aren’t in your home bar, don’t sweat it! HOW TO GET THE PERFECT POURAfter one too many times of pouring sparkling wine into juice and having it bubble and overflow my glass, I almost always pour the wine first, and then the juice. You can always taste and adjust the flavor a bit as you go (as long as you’re pouring your own drink!). NEED A MIMOSA MOCKTAIL?No booze? No problem! This mimosa can easily be made nonalcoholic in a few ways. A good quality club soda like Q Club would thin out the juice while giving the drink a pleasant effervescence. For more complexity, nonalcoholic sparkling wines will also give you bubbles as well as more fruity notes in the glass. If you find your nonalcoholic wine is on the sweeter side, add in a splash of club soda into the mix as well. WAYS TO GARNISH A PINEAPPLE MANGO MIMOSAA pineapple leaf is a beautiful contrast to the bright, bold colors of this mimosa, and it doubles as a drink stirrer too! If your glass accommodates it, edible flower garnishes are also a beautiful presentation and add more punches of color in your drink. If you don’t have either of those garnishes around the house, mint sprigs will give you a similar contrast and add a little extra aroma to your glass. MORE REFRESHING DRINK IDEASProducts We LoveThis post may contain links to Amazon or other partners; your purchases via these links can benefit Simply Recipes. Read more about our affiliate linking policy. Recipes via Simply Recipes https://ift.tt/2F9fkDA May 22, 2020 at 09:01AM #recipies
Air Fryer French Fries
https://ift.tt/2TwFV6W
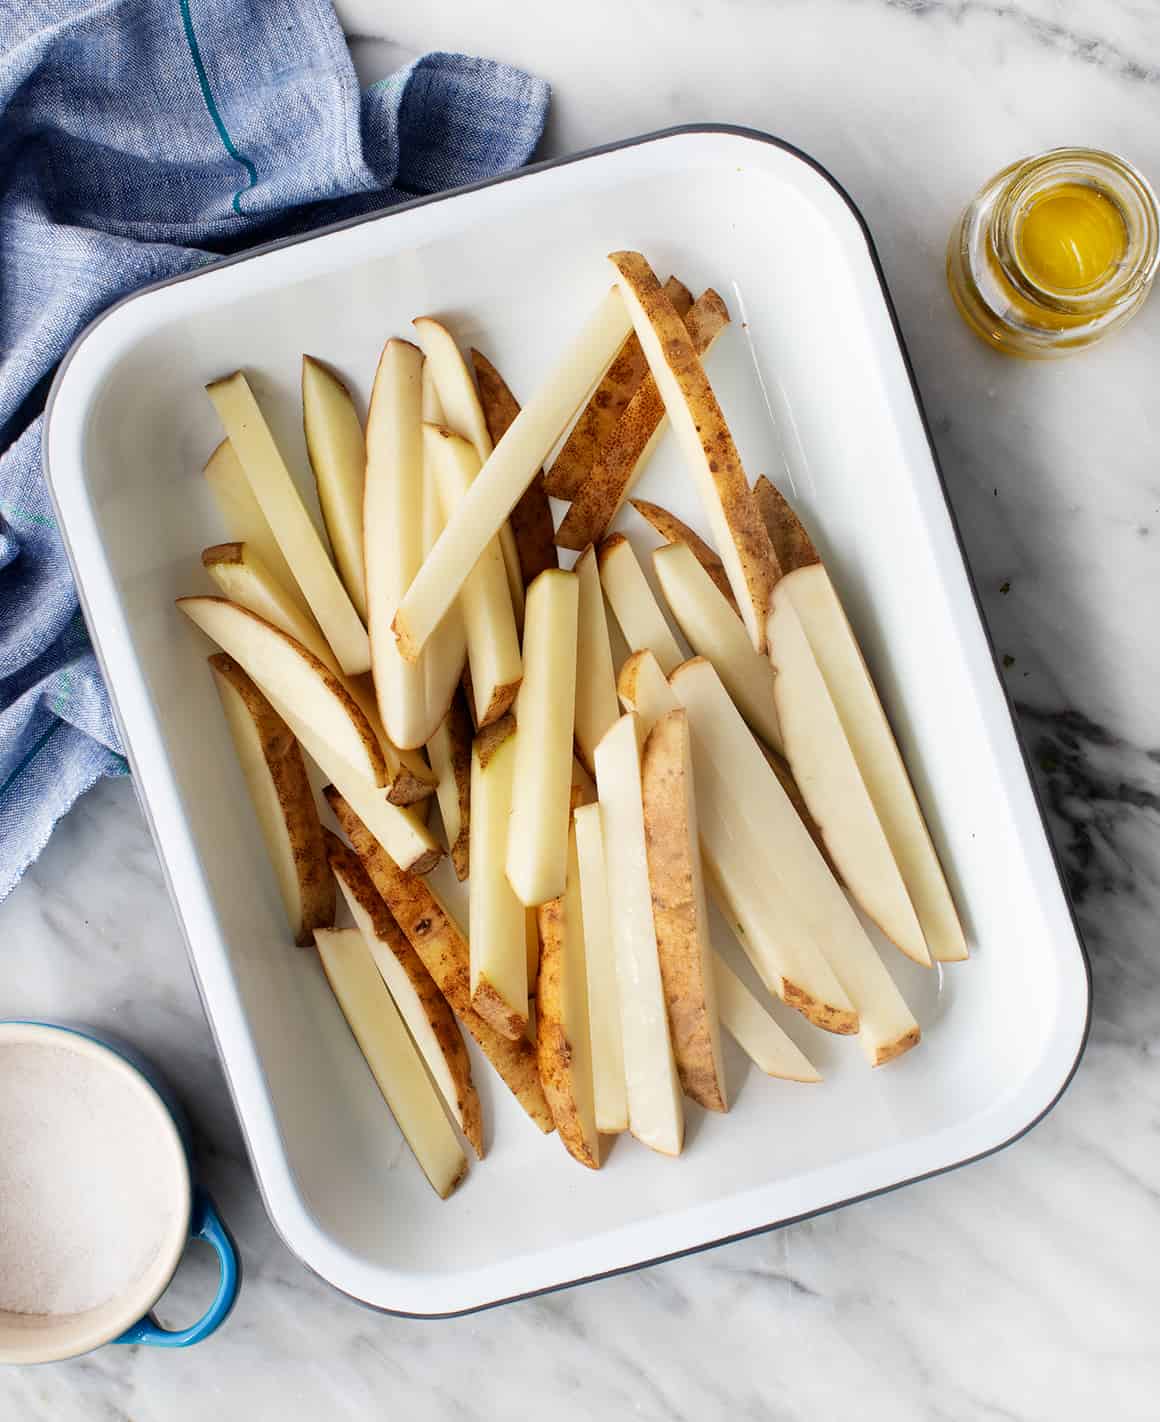
If you’re looking for an easy side to pair with your veggie burgers this weekend, these air fryer French fries are just the thing for you! I know, I know. When it comes to grilling sides, I’m usually all about salads or corn on the cob, but sometimes, I get a craving for a salty, crunchy snack that even the best summer salad can’t satisfy. That’s where these air fryer French fries come in. In a lot of ways, they’re just like regular fries. They’re crispy on the outside, creamy in the middle, and dusted with an irresistible coating of salt. But there is one key difference between deep frying and air frying: you only need a light drizzle of oil to make crispy French fries in the air fryer. As a result, these fries are far healthier than average ones. This is good news for Jack and me, because we’ve been making (and eating) these air fryer fries on repeat lately. They only require 3 basic ingredients, and they cook up in no time. Fresh out of the fryer, they’re hot, crunchy, and completely addictive. Try them once, and you’ll be hooked.
How to Make Air Fryer French FriesIf you don’t have an air fryer yet and are interested in getting one, I highly recommend the SkinnyTaste air fryer. Everything I’ve made in it has become super crispy, super fast. Plus, it’s easy to use, so these air fryer French fries are a breeze to make! When you’re ready to cook, here’s what you need to do: First, chop your potatoes. Aim for them all to be a similar size, about 1/4-inch thick. That way, they’ll all cook at the same rate. I don’t recommend peeling your potatoes – the skin helps them crisp up nicely as they cook. Once you’ve chopped the potatoes into fries, toss them all with olive oil and salt. Next, cook the first batch. Spread the cut potatoes in a single layer in the air fryer basket with a little space between each one. Don’t cram them in! The space allows the hot air to come in contact with all sides of the fries, which is what makes them golden brown and crisp. Air fry them at 380 for 12 to 15 minutes, flipping halfway. Take them out when they’re crisp and brown around the edges.
Repeat with the remaining potatoes, cooking as many batches as necessary to give the fries adequate space in the basket. Finally, toss them all in together! When you finish cooking the last batch, add all the fries back into the air fryer basket (no need to worry about a single layer this time) and cook them for 1 to 2 minutes to warm and crisp up the earlier batches. When all the air fryer French fries are crispy, take them out, and dig in! Find the complete recipe with measurements below.
Best Air Fryer Fries Tips
Air Fryer French Fries Serving SuggestionsOn their own, these air fryer French fries make a super fun snack or appetizer. Serve them simply with salt and pepper, or dress them up with fresh herbs, chili powder, garlic powder, or onion powder. They’re also fantastic with dipping sauces! I love them with ketchup and mustard, but they’re tasty with out-of-the-box choices like chipotle sauce, chimichurri, or vegan cheese too. Of course, these air fryer fries are also a great side dish. Pair them with any of these recipes for a fun, delicious meal:
Enjoy!
More Favorite Snacks and AppetizersIf you love these air fryer French fries, try one of these fun snacks next:
Then, check out this post for 50 more easy appetizer ideas! Other posts you may enjoy...
The post Air Fryer French Fries appeared first on Love and Lemons. Recipes via Love and Lemons https://ift.tt/2h2Uz32 May 22, 2020 at 07:49AM #recipies |
|


 Pin Recipe


 RSS Feed
