
|
Roasted Red Peppers
http://bit.ly/2WSFOq2
Last week, I finished up this fajita recipe, and I still had an abundance of bell peppers in the fridge. I debated what to do with them – Toss them into salad? Sauté them for my breakfast tacos? – but in the end, I settled on making roasted red peppers to have on hand for summer sauces, pizzas, pastas, and more. If you’ve never made roasted red peppers, it’s super easy, and when they’re finished, the peppers have a lightly sweet, charred flavor that’s a delicious addition to all sorts of recipes. They keep for several weeks in the fridge, so make a big batch to blend in to your next dressing, top onto a sandwich, or serve as a simple appetizer with summer herbs, sea salt, freshly ground black pepper, and a drizzle of extra-virgin olive oil. |


 Green Papaya Salad |
 Mini Ceviche Tacos |
 Easy Peanut Noodles {2 ways} |
 Creamy Corn Chowder |
 Kiwi Avocado Salsa Verde |
 Healthier (Vegan) Stuffed Potato Skins |
The post Roasted Red Peppers appeared first on Love and Lemons.
Recipes
via Love and Lemons http://bit.ly/2h2Uz32
June 21, 2019 at 07:51AM
0 Comments
Mexican Shrimp Diablo
http://bit.ly/2IXRVID
Recipes
via Skinnytaste http://bit.ly/2ix3Luq
June 20, 2019 at 10:40AM
http://bit.ly/2IXRVID
This delicious Mexican Shrimp dish is made with saucy Chipotle shrimp served over a bed of corn, zucchini, and red onions, and served with a side of avocado.
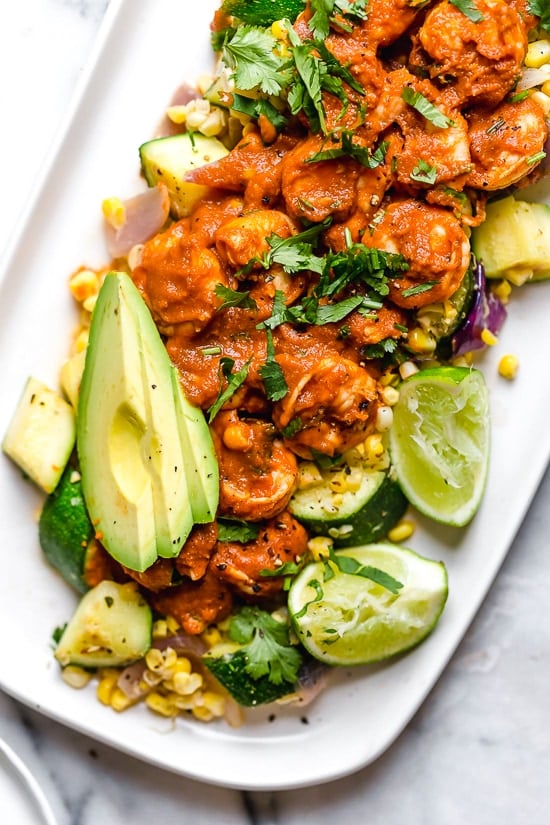
Mexican Shrimp
Also known as Camarones a la Diabla, this whole shrimp dish takes less than 30 minutes made all in one skillet! More Mexican shrimp recipes you may like, Mexican Shrimp Cobb Salad and Shrimp Fajita Bowls.
The post Mexican Shrimp Diablo appeared first on Skinnytaste.
Recipes
via Skinnytaste http://bit.ly/2ix3Luq
June 20, 2019 at 10:40AM
Marmalade Pound Cake // Cookbook Recipe
http://bit.ly/2ZF31ZZ

Recipes
via Simply Recipes http://bit.ly/2F9fkDA
June 20, 2019 at 09:01AM
http://bit.ly/2ZF31ZZ
Let’s talk about your stash. You know which one I mean. All those pickles, tomatoes, jams, and preserves that you so painstakingly “put up” at the end of last summer–or were gifted by well-meaning friends–and that are still lingering in the cupboard at the start of this new canning season.
It’s not that you don’t want to delight in these preserved goods. You do! It’s just that… they’re so precious, right? You want to save them for a special occasion, right? Or maybe, just maybe, there’s only so much toast with heirloom fruit jam that you can eat, right?
Well, my friend Marisa McClellan, a.k.a. the Canning Queen, just came out with a brand new cookbook to help us all with our canned goods dilemma. The Food in Jars Kitchen is allllll about using up those pickles and preserves that we’ve stocked away.

A Cookbook For Cooks and Canners
Whether you’re a newbie canner or have been at the canning game for years, I think this is a book you will find very useful. It moves beyond (way beyond!) simply relegating jam to toast and tomatoes to pasta.
Here, we get jam swirled into cocktails or baked into granola. We get hummus made with preserved lemons and party dips made with chutney and pesto. Wondering what you can do with sauerkraut besides piling it on sausages? Marisa’s got a frittata that you HAVE to try.
The point is, this is a cookbook that will inspire, encourage, and cajole you into using up your canned goods stash. And trust me–after you see these recipes, you will!
Also let me be clear, this cookbook isn’t just for canners. One of the things I love about this book is that you can make any of the recipes using preserves that you’ve been gifted, picked up at the farmers market, or bought at the store.
Let’s Talk Marmalade Cake
I had a very hard time picking just one recipe to share with you all, but this cake took the, ahem…cake. In her headnote for the recipe, Marisa says that she made a six of these cakes to serve at her wedding, and after making it myself, I can see why.
This cake is moist and rich — but not so rich that you couldn’t take it to work as a perfectly respectable afternoon snack. The citrus flavor is just amazing, soft and so very pleasant, like waking up from a good nap and feeling the afternoon sunshine on your face.
I really like the glaze that gets brushed over the top and sides. It turns the outside edges of each slice candy-like and adds the perfect burst of sweetness to each bite.
Store this cake right on the counter and cut yourself a slice whenever the need arises. It keeps well for about a week and gets even better with time. Marisa also says the cake freezes well — the recipe makes two, and I froze my second loaf for another day.

A Q&A with Marisa McClellan!
I thought you all would enjoy getting to know Marisa a little better, so here’s a little Q&A! Her blog, for those of you who don’t know, is Food in Jars, and it’s a treasure trove of canning inspiration.
- How many canned goods do you think you currently have in your kitchen?
If we expand the question to include my entire apartment, the answer is probably something in the neighborhood of 250 full jars. That includes jams, pickles, chutneys, salsas, whole fruit, pie filling, tomato products, and even pressure canned beans and stocks.
- What canned goods do you make sure to re-stock every year?
Roasted corn salsa. Sour cherry jam. Apricot preserves. Tomato jam. Pickled green beans.
- What summer produce are you most excited about coming back in season?
Apricots. They bring me incredible amounts of joy.
- What’s your secret most-favorite recipe from Food in Jars Kitchen?
My most beloved recipe is the Quick Strudel. It comes from my Great-Aunt Doris and I love the feeling of generational connection that making it gives me. Plus, Aunt Doris would have been so incredibly thrilled to have had her recipe in a cookbook. If she was still alive, she’d be selling copies of this book out of the back of her Buick to all the ladies at the synagogue.
- You’ve now written, what, FOUR books about or related to canning — what about canning do you love? What keeps you coming back for more?
I know. It’s a little crazy that I’ve essentially spent the last decade digging into a single topic. But I really do find it endless fascinating. And the thing I most love about canning is that it is a cooking project that endures.
When we make a meal, that experience lasts 20 or 30 minutes, before the pleasure is done and you are start thinking about how you have to do it again. With canning, you get to relive the joy of the picking, gathering, and making over and over again. There is deep satisfaction in that.
Thank you, Marisa! And on that lovely note, I encourage you all to make this recipe for Marmalade Cake. It’s really sure to become a favorite.
Want to Try Canning? Here are some Recipes!
Recipes
via Simply Recipes http://bit.ly/2F9fkDA
June 20, 2019 at 09:01AM
Air Fryer Chinese Egg Rolls
http://bit.ly/31EIvKE


Recipes
via Simply Recipes http://bit.ly/2F9fkDA
June 19, 2019 at 09:04AM
http://bit.ly/31EIvKE
Homemade egg rolls are one of my favorite hearty appetizers to make, but traditionally, you’d need at least a few cups of oil to pan fry the egg rolls.
No more! Thanks to the benefits of technology, I now use an air fryer to make my egg rolls and they turn out almost as crispy and delicious as the deep-fried version!
Why Air Fry Your Egg Rolls?
There are two reasons why you might want to air fry your egg rolls.
- First, there is a health benefit to air frying over deep frying. While I do recommend very lightly brushing the egg rolls with oil before frying (which gives them some extra crispiness), you don’t have to do that. And either way the egg rolls are definitely absorbing less oil than if you deep fry them!
- For me though, the bigger advantage is time. It takes 30 seconds to flip on the air fryer and the clean-up is worlds easier than dealing with vats of hot oil.
Some traditionally fried recipes adapt well to the air fryer, but egg rolls work really well. They come out crispy and browned and if you have access to an air fryer, this is a must try!
How to Make the Filling
I give you my basic egg roll filling recipe for this version, but I’d be lying if I didn’t tell you that I’ll put almost anything in egg rolls (think leftover chicken and rice, steak and onions, etc.). It’s a fridge-cleaner appetizer for me. Any sort of cooked protein can probably be diced and added in. Almost any vegetable can be wilted down and folded in as well.
If I’m starting from scratch, however, I do it the Chinese takeout way: I usually start with a pork filling that has ginger, garlic, scallion, carrot, and cabbage. To make the filling:
- First, cook the ground pork in a large skillet until it’s cooked through.
- Then add the veggies and cook them until they are wilted down, maybe another few minutes.
- Season the filling well with soy sauce and rice wine vinegar.
This should be no surprise, but the filling should taste good before you wrap it up. So taste it and adjust to your liking!
How to Assemble the Egg Rolls
Egg roll wrappers are frequently found in the refrigerated section of your supermarket. They have a few simple ingredients like flour and eggs and are available nationwide these days. If you can’t find them, ask! It’s a good bet your supermarket has them somewhere.
Making egg rolls is like making little mini burritos, except with square tortillas. The key to getting it right is to make sure you turn the square wrapper so a point is facing you (like a diamond). Then place about 1/4 cup of filling in the middle of the wrapper, fold the side points over, and then roll it up!
To make sure the wrapper seals well, I recommend dipping your fingers in water and brushing the outer edges of the wrapper before rolling.
You should get about a dozen egg rolls out of the batch of filling.
How to Air Fry Egg Rolls
When it comes to air frying these, place them in your air fryer basket, but make sure they aren’t stacked or touching. You’ll probably need to do this in two batches.
Brush the egg rolls with a very light coat of oil before air frying. That will help really crisp up the shell. Air fry for about 6 minutes per side. While you’re at it, hit the basket with some nonstick spray just for good measure to avoid sticking.
Just a note: This recipe was developing using a standard air fryer with a single basket. However, there are many different kinds out there! If you have an air fryer that’s also a combination toaster oven, you may need to use the fryer basket on the lower rack to prevent burning.

Alternative Pan Frying Method
If you don’t have an air fryer, have no fear. People were making egg rolls long before air fryers were invented.
If I’m not using an air fryer, I actually prefer to pan fry egg rolls. You only need enough oil to go about 1/2 inch up a skillet and then fry the egg rolls at 350°F for about 4 minutes per side. They will be golden brown and wonderful!
How to prep, store, and freeze the egg rolls
You can certainly make the filling a day or two in advance. Just be sure to keep it in the fridge, covered. If you make the filling right away, be sure to cool it down so it isn’t steaming hot before making egg rolls.
Once your egg rolls are cooked, you can store them in the fridge for 5 days and reheat them either in a 350°F oven or in the air fryer. Just heat them until they are warmed through. The air fryer will take just a minute or two and the oven about 6 to 7 minutes.
You can also wrap the cooked egg rolls tightly in aluminum foil and freeze them for up to three months. If they are frozen, unwrap and reheat them in the oven only until they are thawed and crispy again. If you try to heat the frozen egg rolls in the air fryer, they will burn on the outside before the inside is thawed.
LOVE AIR FRYING? YOU’LL LOVE THESE RECIPES!
This post may contain links to Amazon or other partners; your purchases via these links can benefit Simply Recipes. Read more about our affiliate linking policy.
Recipes
via Simply Recipes http://bit.ly/2F9fkDA
June 19, 2019 at 09:04AM
Rainbow Veggie Fajitas
http://bit.ly/2L0ixv9
Click here to browse more recipes!
Click here to browse more recipes!
Recipes
via Love and Lemons http://bit.ly/2h2Uz32
June 19, 2019 at 08:47AM
http://bit.ly/2L0ixv9

This post is in partnership with ALDI.
Can you believe the 4th of July is right around the corner? It seems like Memorial Day was just last week! If you’re gearing up for the next big summer BBQ holiday, you have to give these delicious rainbow veggie fajitas a try. They’re super easy to make on the grill, and all the ingredients in this veggie fajita recipe can be found at ALDI, meaning that this whole fajita spread is really affordable too.

I’ve been impressed with the quality of fresh produce and pantry staples at ALDI for a while now, but this season, their array of veggies (at super low prices!) really knocked my socks off. To make things even more convenient, we’ve put together a special Instacart link for you that has all of the ingredients ready to make this recipe – click here!
Now that it’s summer, I can’t get enough of colorful fresh veggies like tomatoes and peppers, and I was SO excited to see these rainbow bell peppers at the store. How pretty is that red, yellow, and green? When I saw them, I knew right away that I’d be making these rainbow fajitas. Along with the pretty peppers, I used bold purple onion for extra color and portobello mushrooms for hearty texture.

Veggie Fajitas are Perfect for Parties!
After making these fajitas, I can tell you that they’re my new go-to summer entertaining dish. Not only do can you make them in under 30 minutes, but they’re also ideal for serving a crowd because everyone can customize their final dish to their liking. Jack’s not a fan of avocado (crazy, I know), so he skipped it. I loaded mine up with all the fixings and generous squeezes of lime, and the next day, I enjoyed the leftovers in a burrito bowl with the grilled fajita veggies, rice, beans, arugula, and lots of guac and salsa.
And the best part? The veggies can go straight from the grill to the picnic table at your next backyard celebration.

My Fajita Marinade
You don’t need a fancy fajita seasoning mix to pack these veggie fajitas with flavor. I use a simple 5-ingredient fajita marinade. It’s a lightly spicy mix of avocado oil, garlic, chili powder, cumin, and sea salt. I use Simply Nature Avocado Oil here because I like its neutral taste with the Tex Mex spices. In addition, it’s great for grilling because it has a high smoke point, so you don’t need to worry about putting it on the hot grill.

The mushrooms also get coated with the marinade along with a little balsamic vinegar to make them extra juicy and flavorful. And once everything’s cooked, I brighten up all the veggies with a generous squeeze of lime.

How to Make Fajitas
Once you’ve mixed your marinade together, this recipe couldn’t be simpler to make. Here’s what you need to do:
- Slice your veggies! I like to cut the onions into wedges and the peppers into thin slices. Just stem the mushrooms and leave the caps whole.
- Drizzle on the marinade. Toss the peppers with a scant tablespoon of the marinade, and pour the remaining marinade over the mushrooms and onions. Rub a splash of balsamic vinegar onto the mushrooms too.
- It’s time to grill! Preheat the grill with a cast iron skillet or grill pan on one side. When it’s hot, put the pepper slices in the hot skillet and grill the mushrooms and onions directly on the grill grates.
- Don’t forget to flip halfway… Cook until the veggies soften and char marks form on the onions and mushrooms, flipping halfway through. I use tongs to toss the peppers in the skillet and cook until they get a little char too.
- Enjoy! Slice the mushroom caps and serve the fajita veggies with tortillas and your favorite fixings.

What to Serve with Veggie Fajitas
I like to enjoy this fajita recipe with guacamole, pico de gallo, and tomatillo or pineapple salsa for creamy, zesty, and fresh accents. And don’t forget the tortillas – flour tortillas are traditional for fajitas, but I like to serve corn tortillas as well.
While these fajitas are a filling meal on their own, you can never go wrong by serving them alongside black beans and cilantro lime rice.
And don’t forget the margaritas!

If you love this veggie fajita recipe…
Get all of the ingredients to make these on Instacart in one click! If you’re a first time ALDI Instacart shopper, use the code ALDILemons19 for $10 your first three orders of $35 or more.
Happy fajita making!
Other posts you may enjoy...
 Portobello Mushroom Tacos with Jalapeño Sauce |
 Portobello Burrito Bowl |
 Poblano "Crema" Enchiladas |
 Spicy Sweet Potato Avocado Tostadas |
 Healthy Vegetarian Grilling Recipes |
 Stuffed Poblano Peppers |
The post Rainbow Veggie Fajitas appeared first on Love and Lemons.
Recipes
via Love and Lemons http://bit.ly/2h2Uz32
June 19, 2019 at 08:47AM
Salmon Avocado Salad
http://bit.ly/2ISJCOd
Recipes
via Skinnytaste http://bit.ly/2ix3Luq
June 19, 2019 at 07:47AM
http://bit.ly/2ISJCOd
This Salmon Avocado Salad is made with my two favorite super foods – avocado and wild salmon. I could eat this every day!
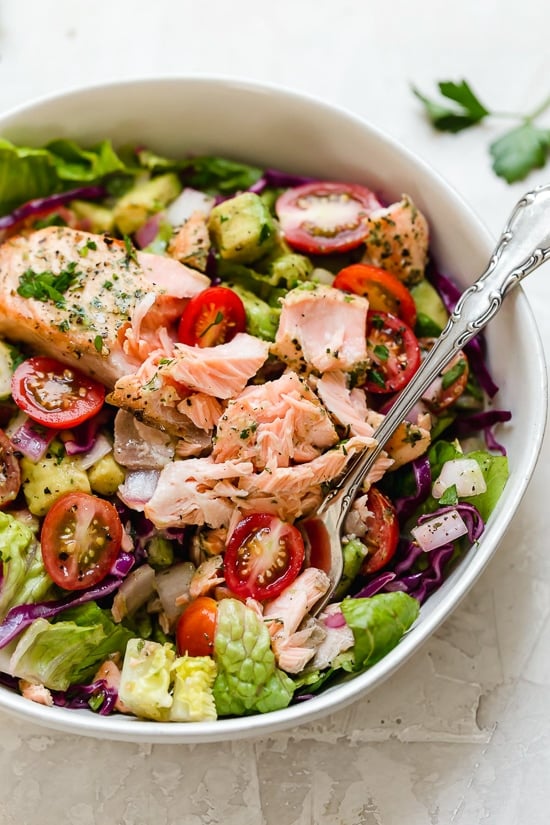
Salmon Avocado Salad
With the warmer weather, all I want to eat is salad these days. A big green salad with salmon, tomatoes and avocado is usually what I crave when I want to eat quick healthy, low carb meal. You can see more salad recipes from the archives.
The post Salmon Avocado Salad appeared first on Skinnytaste.
Recipes
via Skinnytaste http://bit.ly/2ix3Luq
June 19, 2019 at 07:47AM
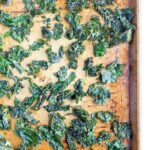
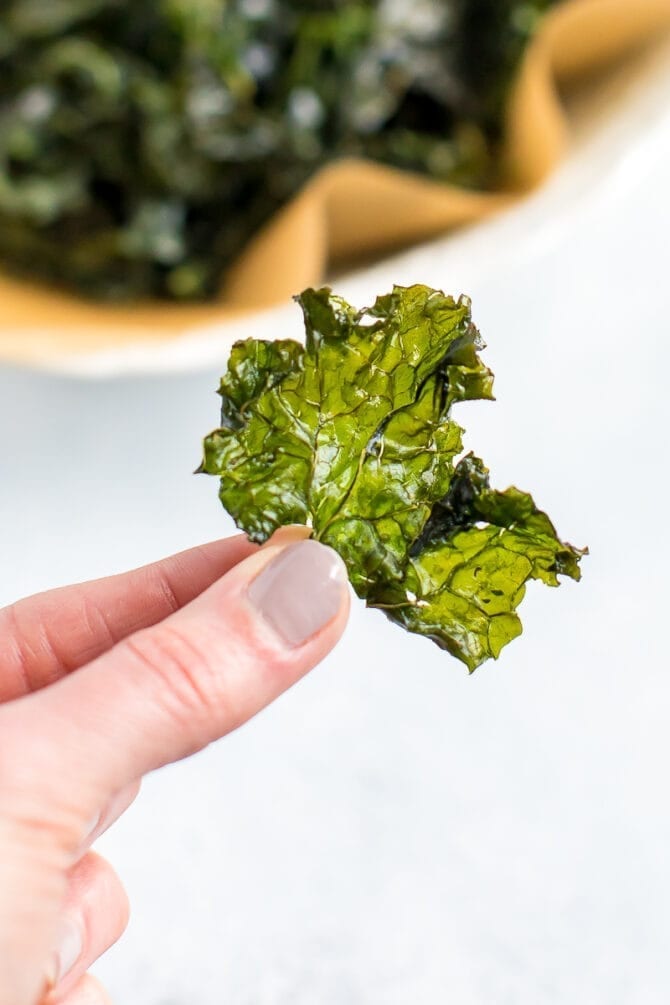
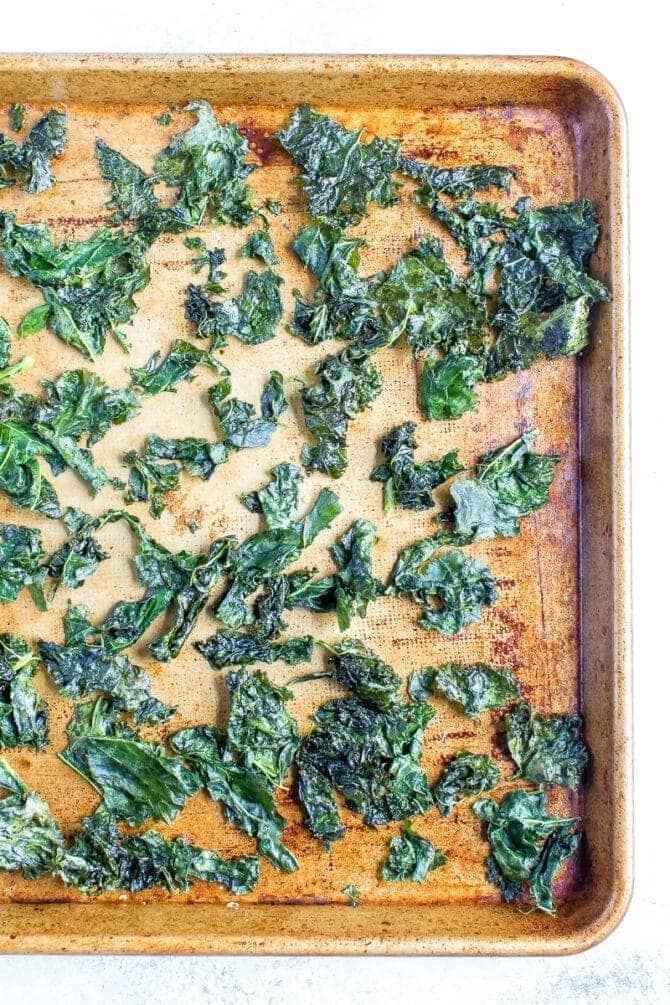
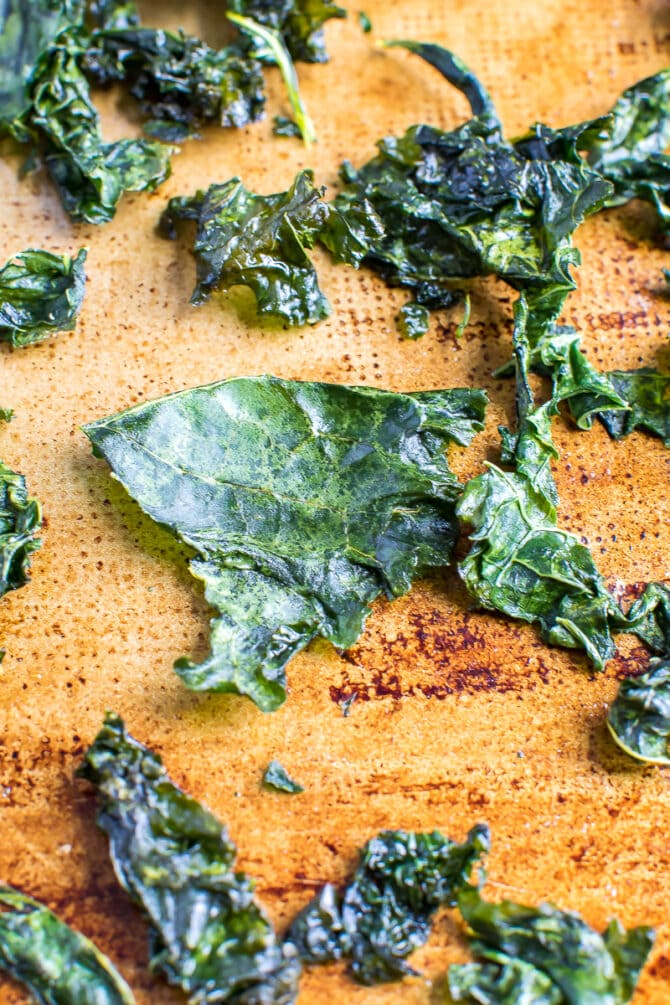
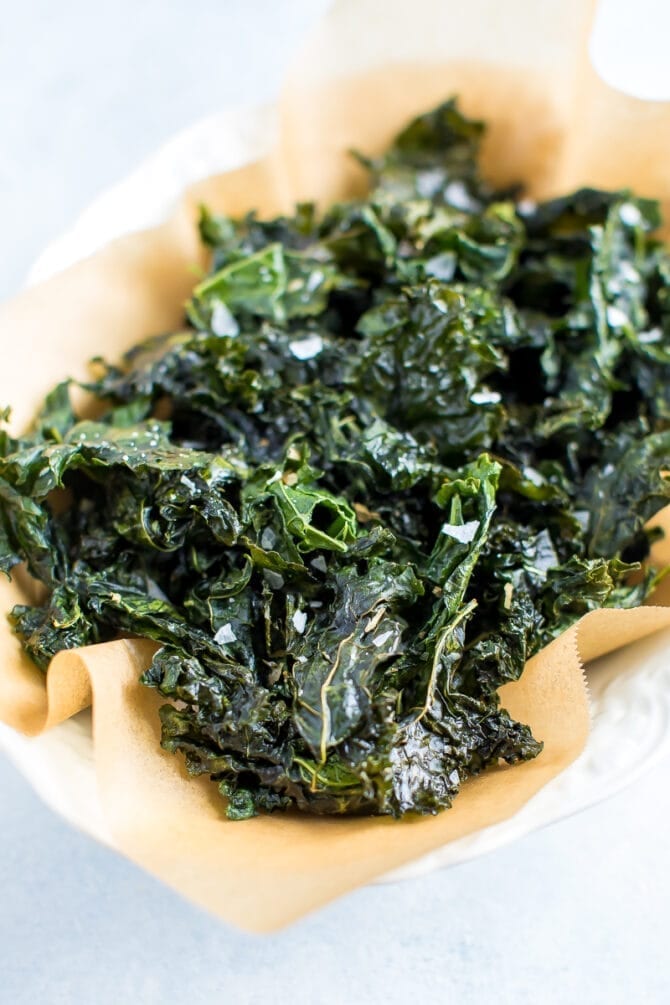
Easy Baked Kale Chips
http://bit.ly/2FkDs8B
Recipes
via Eating Bird Food http://bit.ly/1L45wsH
June 19, 2019 at 07:07AM
http://bit.ly/2FkDs8B
Craving chips? Try these crispy baked kale chips instead! They’re the perfect healthy snack option when you’re craving something salty and crunchy.
I remember when kale chips first became a thing. I think I initially thought they were kind of weird, but once I prepared them the right way… with the perfect amount of crunch and salt, I fell in love. It is SUCH a healthy snack option and a fun way to eat your veggies.
One whole batch of kale chips has about 180 calories while just 7 potato or tortilla chips can have about 150-160 calories. Kale chips all the way!
Health Benefits of Kale
In addition to kale chips being lower in calories, kale is one of the most nutrient dense foods on the planet! This means that there are a ton of nutrients in kale. #winning!
It has a ton of vitamin K, A and C. It is a powerful antioxidant, contains substances that have shown to fight cancer and is high in minerals that a lot of us are deficient in like calcium, magnesium and potassium.
Clearly kale is super healthy for you, but I know not everyone is a fan. That changes today with these kale chips!
Only 3 Ingredients Needed for Kale Chips
- kale
- olive oil
- salt
How to Make Baked Kale Chips
To start, simply wash and dry your kale. You want to make sure your kale is super dry before adding the oil and salt! I use my salad spinner to spin it dry but you can also use a clean kitchen towel. Don’t skimp on this step.
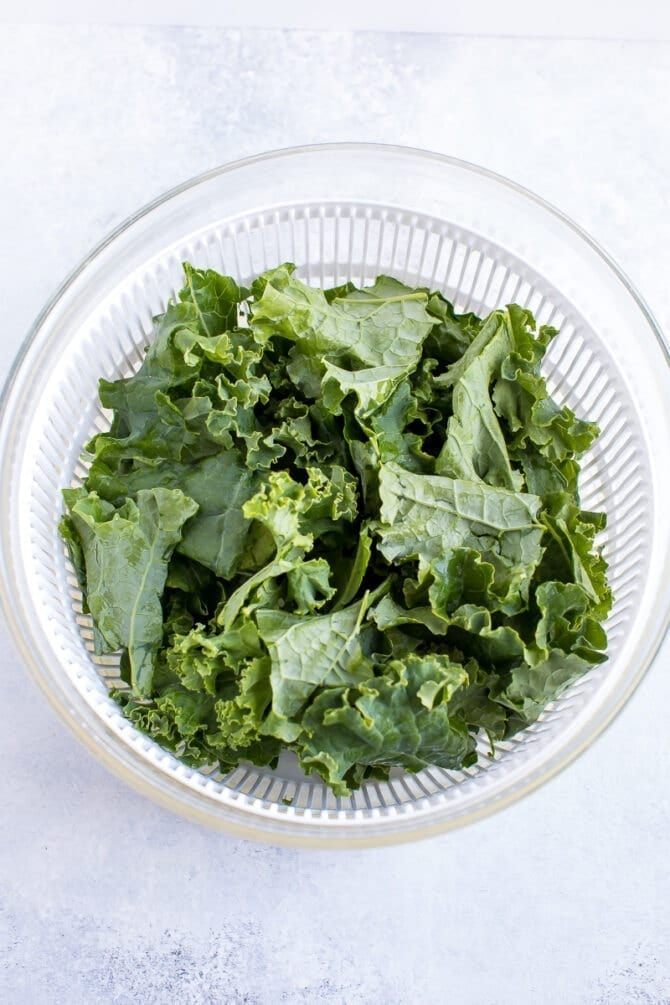
Once dry, de-stem and chop the kale into bite sized pieces.
Add kale to a large bowl and toss with olive oil and salt. Spread the kale on a large baking sheet (make sure no pieces are overlapping) and bake for 15-20 minutes or until the kale is nice and crispy.
I usually munch on the fresh chips right away, but you can store them in a sealed container for 1-2 days if needed. They don’t ever taste as good as they do straight from the oven though!
If you have a friend, partner or child that claims they hate kale, make these chips for them. I’m willing to bet that they’ll love them! A satisfying snack + nutrient packed? What more could you ask for?
If you make these baked kale chips, please be sure to leave a comment and star rating below. Your feedback is super helpful for the EBF team and other EBF readers.
PrintBaked Kale Chips
- Author: Brittany Mullins
 Prep Time: 10 minutesq
- Cook Time: 15 minutes
- Total Time: 4 hours 25 minutes
 Yield: 1
 Category: Snack
 Method: Bake
 Cuisine: American
Ingredients
- 1 bunch curly kale (about 5 cups)
- 1 Tablespoon olive oil
- 1/2 teaspoon sea salt
Instructions
- Preheat oven to 350°F.
- Wash and dry kale, de-stem and roughly chop into bite-size pieces.
- Make sure kale is super dry, add to a large bowl and toss with olive oil and sea salt.
- Spread kale out on a large baking sheet, making sure not to overlap pieces.
- Bake for 15-20 minutes, until kale is crisp.
- Best served immediately, but if needed you can store them in a sealed container for 1-2 days.
Nutrition
- Serving Size: 1 batch
- Calories: 184
- Sugar: 2g
- Fat: 14g
- Carbohydrates: 7g
- Fiber: 3g
- Protein: 3g
Keywords: kale chips
On a Chip Kick? Try These Healthy Chip Recipes!
The post Easy Baked Kale Chips appeared first on Eating Bird Food.
Recipes
via Eating Bird Food http://bit.ly/1L45wsH
June 19, 2019 at 07:07AM
Butterscotch Cookies
http://bit.ly/2IoD3nF

Recipes
via Simply Recipes http://bit.ly/2F9fkDA
June 18, 2019 at 04:02PM
http://bit.ly/2IoD3nF
Love butterscotch? Then put these cookies on your list! These crispy, crunchy butterscotch cookies made with brown sugar and browned butter, perfect for dunking in milk or coffee.
Photography Credit: Elise Bauer
Butterscotch — a Classic dessert flavor
Butterscotch is a classic dessert flavor that doesn’t get the recognition it deserves. The key flavors that make up butterscotch are brown sugar and melted butter, preferably brown as well. When combined these two ingredients create a rich, old-school flavor that most people associate with butterscotch pudding or candy.
Butterscotch Cookies
I learned to make these butterscotch cookies during my internship at the Grange restaurant in Sacramento under the tutelage of pastry chef, Elaine Baker. Buttery, nutty, and rich with a slight caramel flavor, these butterscotch cookies are horribly addictive.
This crispy, crunchy cookie is easy to make (you probably have all the ingredients on hand) and guaranteed to make your usual cookie rotation. Best served to friends and family with tall glasses of cold milk or mugs of hot coffee for dipping.
Tip for How to Make Make Butterscotch Cookies Pop
Before baking these cookies are rolled in brown sugar and then get a little bit of salt sprinkled on top to punctuate the sweetness. It gives them that extra special something.
Love Butterscotch and Caramel? Try These!
Updated June 18, 2019 : We spiffed up this post to make it sparkle! No changes to the original recipe.
Butterscotch Cookies Recipe
PrintDo not use fine grain table salt (aka: iodized salt) as the flavor will be way off and unpleasant.
Ingredients
- 12 tablespoons unsalted butter, cut into tablespoon sized slices
- 1 3/4 cups packed dark brown sugar
- 1/2 teaspoon salt
- 1 large egg
- 1 egg yolk
- 1 tablespoon vanilla extract
- 2 1/2 cups all-purpose flour
- 1/2 teaspoon baking soda
- 1/4 teaspoon baking powder
Sugar dredging mixture:
- 1/4 cup packed dark brown sugar
- 2 tablespoons white granulated sugar
Sprinkling salt:
- Fleur de sel, Maldon, sea salt, or Kosher salt for sprinkling (See Recipe Note)
Method
1 Preheat oven to 375°F and line baking sheets with parchment paper.
2 Whisk the dry ingredients: Vigorously whisk together the flour, baking soda, and baking powder and set aside. Mix together the brown sugar white sugar dredging mixture in another bowl and set aside.
3 Brown the butter: Place 10 tablespoons of butter into a thick-bottomed skillet over medium heat. The butter will foam a bit before subsiding. Once the butter takes on a tan color and begins to smell nutty take it off of the heat. Add the other two tablespoons of butter and mix it in until it melts. (See tutorial on how to brown butter.)
4 Make the cookie dough: Pour the brown butter into a mixing bowl fitted with a paddle attachment. Add the brown sugar and salt and mix. Add the egg, egg yolk, and vanilla extract and mix together, scraping down the sides and bottom of the bowl at least once.
Add the flour mixture in three increments being sure to scrape down the sides and bottom once or twice. Mix just until the flour is incorporated. The dough will be very thick.
5 Shape the cookies: Take 1/2 to full tablespoon-sized pieces of dough (you can make them a bit bigger or smaller to your liking, just make sure the pieces of dough are all the same size) and gently roll them into ball shapes.
Dredge them in the sugar dredging mixture until well-coated.
Place on the baking sheet and sprinkle with a little bit of the sprinkling salt (be reserved with the salt as very little goes a long way).
6 Bake the cookies: Bake at 375°F for 10-12 minutes or until the edges have browned a bit. Be careful not to over-bake.
8 Cool and serve: Allow to cool on the sheet for one minute before transferring to a wire rack to cool completely. Tastes best with a glass of milk for dipping. Cookies will keep in an airtight container for about a week.
Hello! All photos and content are copyright protected. Please do not use our photos without prior written permission. If you wish to republish this recipe, please rewrite the recipe in your own unique words and link back to Butterscotch Cookies on Simply Recipes. Thank you!
PrintProducts We Love
This post may contain links to Amazon or other partners; your purchases via these links can benefit Simply Recipes. Read more about our affiliate linking policy.
Recipes
via Simply Recipes http://bit.ly/2F9fkDA
June 18, 2019 at 04:02PM
Rainbow-Colored Smoothies
http://bit.ly/2ZvEKFw
I was craving some color and fun in the kitchen, so these Rainbow-Colored Smoothies happened! Today I want to show you how to use sweet, antioxidant-packed fruit (and other plant-based ingredients) to create a smoothie in every color of the rainbow..Read more »
This is a summary, images and full post available on HHL website!


Recipes
via Healthy. Happy. Life. http://bit.ly/ygHPsr
June 18, 2019 at 03:37PM
http://bit.ly/2ZvEKFw
I was craving some color and fun in the kitchen, so these Rainbow-Colored Smoothies happened! Today I want to show you how to use sweet, antioxidant-packed fruit (and other plant-based ingredients) to create a smoothie in every color of the rainbow..Read more »
This is a summary, images and full post available on HHL website!
Recipes
via Healthy. Happy. Life. http://bit.ly/ygHPsr
June 18, 2019 at 03:37PM
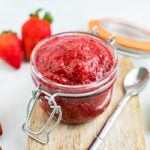
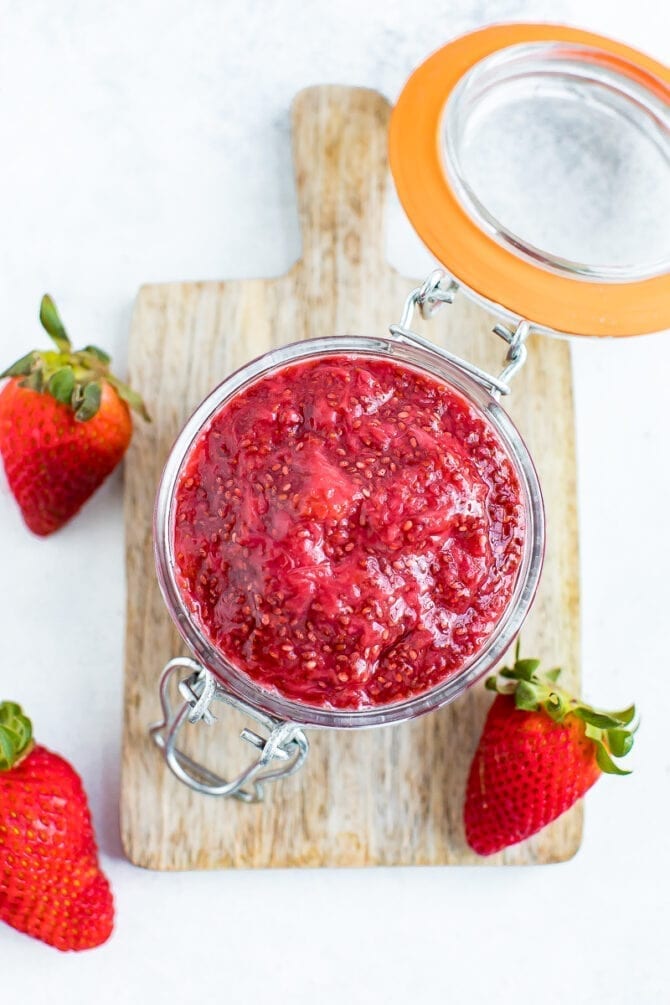
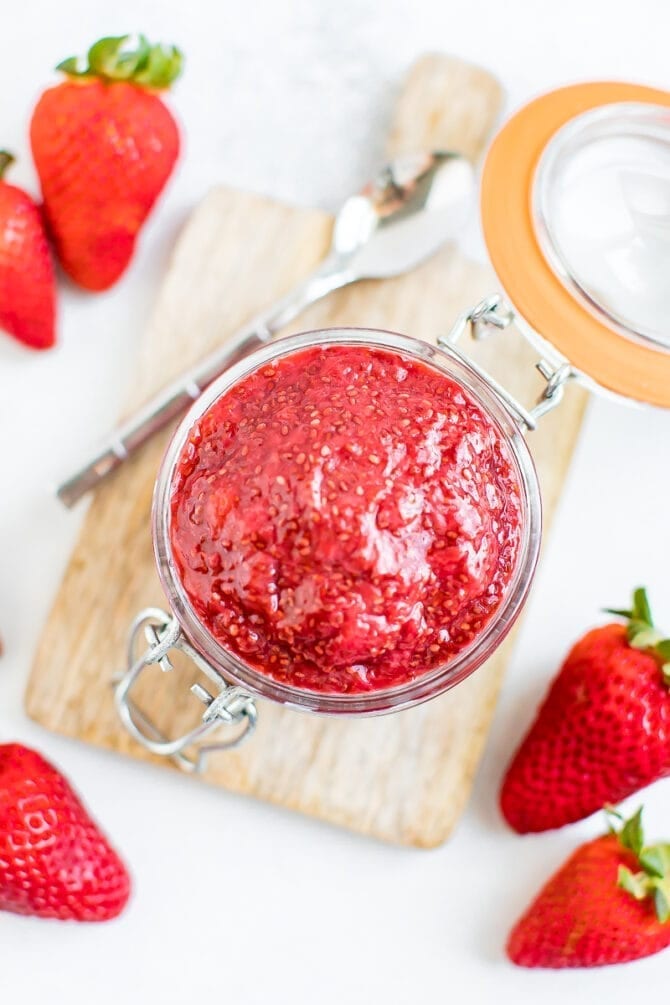
Easy Strawberry Chia Jam
http://bit.ly/2Iol94e
Recipes
via Eating Bird Food http://bit.ly/1L45wsH
June 18, 2019 at 01:34PM
http://bit.ly/2Iol94e
This easy chia jam recipe is made with just strawberries and chia seeds and takes less than 15 minutes to whip up. It’s loaded with fiber and protein, but no added sugar!
As you all know, I’m hooked on chia seeds and try to include them in my breakfast regularly and it’s pretty easy to do (especially when having chia pudding, overnight oats or protein pancakes) but I’m always looking for new ways to incorporate them in my meals. Chia jam is the perfect way to add chia seeds into my breakfast routine because it’s so easy to whip up, keeps in the fridge for about a week and it can be added to just about any breakfast recipe. I personally love stirring it into a bowl of Greek yogurt or adding it to my oatmeal.
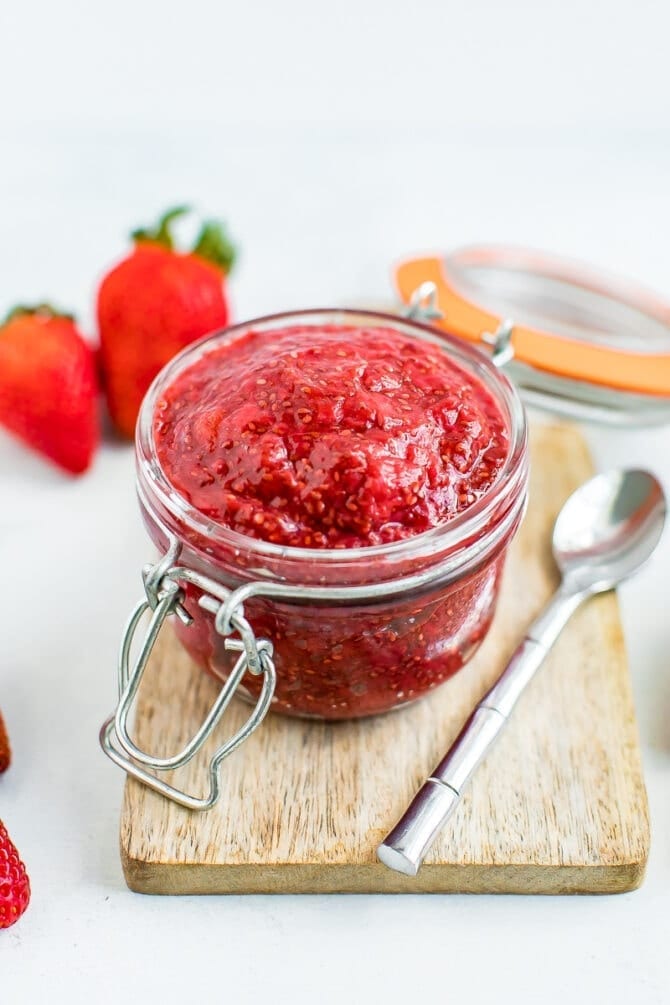
What is Chia Jam?
Chia jam is a fruit-based jam or jelly made by combining puréed fruit with nutrient dense chia seeds. The chia seeds help the jam thicken up, without loads of sugar or thickeners like pectin and it comes together in about 15 minutes. Amazing right?
I’m sharing how to make strawberry chia jam, but you can use any fruit you like, fresh or frozen, to make chia jam And it doesn’t have to be heated (y0u can simply mash fresh or thawed frozen fruit) but I’ve found that heating the fruit helps break it down and gives the jam a sweeter flavor.
Once the fruit has been mashed and is the consistency you like, just add in the chia seeds and lemon juice (just to brighten the flavor) and let the mixture sit for a few minutes to thicken up and cool. And that’s it… your chia jam is ready to be used any way you like.
Chia jam can be used the same way regular jam is used! I love using it for peanut butter and jelly sandwiches, as a mix-in for oatmeal or yogurt or as a fruity spread on toast.
Why is Chia Jam so Healthy?
Beyond the fact that this chia jam is way lower in sugar, there are some amazing health benefits of chia seeds as well! Here’s a little reminder of why chia seeds are so healthy.
- Chia seeds are a good source of omega 3 fatty acids – Omega 3 and Omega 6 fatty acids are essential fatty acids, meaning that you need to get from food sources because your body cannot produce them itself. Omega 3′s reduce inflammation and may help lower risk of chronic diseases such as heart disease, cancer, and arthritis. They’re also said to help with weight loss related to their regulation of blood sugar levels and insulin.
- Chia seeds are a plant-based protein – We all know protein is an essential macronutrient needed for many functions in the body, including muscle building and it’s awesome to have plant-based options.
- Chia seeds are loaded with antioxidants – Antioxidants help rid our body of free radicals, which have been linked to cancer and heart disease.
- Chia seeds are a good source of fiber – The fiber content with weight loss by keeping you feeling full, prevents constipation and enhances regularity.
- Chia seeds also contain magnesium and potassium – Two minerals essential for good health.
I had to make another batch for pictures, which worked out quite well because now I have some to put on my protein pancakes and greek yogurt this week!
If you try this strawberry chia jam recipe please be sure to leave a comment and star rating below to let me know how it turns out! Your feedback is super helpful for the EBF team and other EBF followers.
PrintEasy Strawberry Chia Jam
- Author: Brittany Mullins
- Prep Time: 5 minutes
- Cook Time: 8 minutes
- Total Time: 13 minutes
- Yield: 4
- Category: Sauce
- Method: Stovetop
- Cuisine: American
Description
Homemade sugar-free strawberry jam made with chia seeds, which help it thicken up and add omega-3 fatty acids and fiber.
Ingredients
- 1 cup trimmed strawberries (frozen or fresh)
- 1 Tablespoon chia seeds
- 1/2 Tablespoon lemon juice
- stevia, maple syrup or honey (to taste)
Instructions
- Add strawberries to a saucepan over medium-high heat and cook until the berries start to break down and the mixture is bubbling. You can use the back of a spoon or potato masher to mash the berries and create your desired consistency.
- Stir in the chia seeds and lemon juice. Then taste, and add sweetener if desired. If your berries are sweet you might not need to add any sweetener at all.
- Remove mixture from heat and let cool the mixture cool and thicken, about 5 to 10 minutes.
- You can use right away or let cool completely before transferring to sealed container and placing in chia jam in your refrigerator. The jam will keep for up to 1 week.
Notes
- I like my jam with texture from the fruit, but if you like jam to have a smooth consistency, you can blend the mixture in a high-powered blender or use an immersion blender to blend until smooth.
Nutrition
- Serving Size: 2 Tablespoons
- Calories: 30
- Sugar: 2g
- Fat: 1g
- Carbohydrates: 5g
- Fiber: 2g
- Protein: 1g
Keywords: strawberry chia jam
More Chia Recipes:
The post Easy Strawberry Chia Jam appeared first on Eating Bird Food.
Recipes
via Eating Bird Food http://bit.ly/1L45wsH
June 18, 2019 at 01:34PM

The Flat Belly Fix
This is the only 21-day rapid weight loss system that allows you to easily lose an average of 1 lb a day for 21 days without feeling hungry or deprived. The unique and brand new techniques used in this System are proven SAFE. And they do not cause the rebound weight gain common to all the other rapid weight loss systems that are not backed by the latest science. The Flat Belly Fix System takes advantage of a recent scientific discovery that proves the effective weight loss power of an ancient spice. Combined with other cutting-edge ingredients in the patent-pending Flat Belly Fix Tea™ — that you can make right in your own kitchen in minutes — this System is the quickest, easiest and most enjoyable way to quickly get the body you desire and deserve. Click Here
Categories
All
Gluten Free
Pancakes
Protein
Archives
November 2020
October 2020
September 2020
August 2020
July 2020
June 2020
May 2020
April 2020
March 2020
February 2020
January 2020
December 2019
November 2019
October 2019
September 2019
August 2019
July 2019
June 2019
May 2019
April 2019
March 2019
February 2019
January 2019
December 2018
November 2018
October 2018
September 2018
August 2018
July 2018
June 2018
May 2018
April 2018
March 2018
February 2018
January 2018
December 2017
November 2017
 RSS Feed
