
|
Breakfast BLT
http://bit.ly/2IE4Hx5 Breakfast BLT made with center cut bacon, lettuce, tomato and egg on whole wheat bread.
Add a fried egg or hard boiled egg to a classic BLT sandwich and you have the perfect breakfast sandwich (or have it for lunch). If sandwiches are not your thing, you can browse through all my breakfast recipes here. The post Breakfast BLT appeared first on Skinnytaste. Recipes via Skinnytaste http://bit.ly/2ix3Luq June 24, 2019 at 08:14AM
0 Comments
Napa Cabbage Picnic Salad
http://bit.ly/2WYubZS This Napa Cabbage Salad is perfect for a picnic potluck! It's made with Napa cabbage, radishes, snow peas, toasted almonds, and a creamy sesame mayo dressing. A real crowd pleaser! Photography Credit: Elise Bauer Perfect Picnic SaladAre you looking for the perfect picnic salad to bring to a potluck? Look no more, this is it. This napa cabbage picnic salad has been a favorite of my friends and neighbors for years. It’s one of the most requested potluck salads I’ve ever made. My neighbor Pat first introduced it to me, followed by my friend Chigiy. The original recipe comes from Sunset magazine (July 2004) and serves a crowd. We’ve scaled the recipe back for a regular family and friends meal, but you can easily scale it up for a large picnic.  More Resilient than LettuceNapa cabbage (a kind of Chinese cabbage), while not as sturdy as regular cabbage, is much more resilient than lettuce, so it lends itself well to picnic salads that have to sit around for a while. This salad has Napa cabbage, radishes, snow peas, toasted slivered almonds, and a sweet sesame ginger mayo dressing. Much of it can be made ahead, and then assembled when you are ready to serve. Asian-Inspired Salad DressingThe mayo-based salad dressing has Asian-inspired seasonings whisked in, like rice vinegar, soy sauce, sesame oil, and ginger. The result is a light dressing that flavors every bite of this crunchy salad. Make it a MealThis recipe is meant to be a side salad for a backyard potluck, but it can also work for a stand-alone lunch. Add some grilled chicken or salmon to make it a full meal. More Picnic Side Salads to Try!Updated June 23, 2019 : We spiffed up this post to make it sparkle! No changes to the original recipe. Napa Cabbage Picnic Salad RecipePrintThe dressing recipe makes a little more than you will likely need. So, use about 1/2 of it to start, and add more to taste when you dress the salad. This salad recipes scales easily for a potluck or picnic. Recipe adapted from one in Sunset Magazine, July 2004 Ingredients
Dressing ingredients:
Method1 Toast the almonds: Toast the almond slivers in a dry nonstick or cast-iron skillet on medium high, stirring frequently until browned. Set aside. 2 Assemble the salad ingredients: Combine cabbage, snow peas, radishes, green onions, cilantro in a large bowl. Can make this step a day or two ahead. 3 Make the dressing: In a separate bowl, whisk together the rice vinegar, sugar, soy sauce, garlic, sesame oil, ginger, and cayenne until sugar has dissolved. Whisk in the mayonnaise. 4 Toss the salad with dressing: When ready to serve, gently combine the dressing and almonds with the cabbage mixture. Hello! All photos and content are copyright protected. Please do not use our photos without prior written permission. If you wish to republish this recipe, please rewrite the recipe in your own unique words and link back to Napa Cabbage Picnic Salad on Simply Recipes. Thank you! PrintThis post may contain links to Amazon or other partners; your purchases via these links can benefit Simply Recipes. Read more about our affiliate linking policy. Elise Bauer Elise Bauer is the founder of Simply Recipes. Elise launched Simply Recipes in 2003 as a way to keep track of her family's recipes, and along the way grew it into one of the most popular cooking websites in the world. Elise is dedicated to helping home cooks be successful in the kitchen. Elise is a graduate of Stanford University, and lives in Sacramento, California. Recipes via Simply Recipes http://bit.ly/2F9fkDA June 23, 2019 at 04:02PM
Spicy Fried Chicken
http://bit.ly/2WYsuAx Fried chicken is one of my favorite foods, hands down. I grew up mostly eating quick, skillet-fried chicken, but we would always have a bottle of hot sauce on the table to turn up the flavor. Here, classic buttermilk fried chicken gets a spicy twist, infusing it with spice instead of treating it as an afterthought. Chicken parts get marinated in a spicy buttermilk mixture, dredged in seasoned flour with a kick, and then fried in a skillet until crisp and golden brown on the outside, and juicy on the inside. What are the best cuts of chicken for frying?For starters, you’ll want to use skin-on, bone-in cuts of chicken. In reality, any type of chicken would work, but the skin is my personal favorite part of fried chicken, and the bone helps keep the meat from drying out. In terms of which pieces to use, I’m partial to chicken thighs, but any cut of chicken works well. Keep in mind that white meat (chicken breasts) will tend to have a shorter cooking time than dark meat. 
How can you adjust the spiciness?When it comes to fried chicken, the two main components are the meat itself and the crispy crust. As far as the spice level for the chicken meat, it all comes down to the type of hot sauce used for the marinade.

TIP FOR THE BEST FRIED CHICKEN:
What’s the best pan for frying chicken?When it comes to the type of pan, I like to use cast iron skillets, but stainless steel and anodized aluminum pans also work well. You want a skillet with a thick bottom that can handle the heat. How much and what kind of oil do you use to fry chicken?We’re pan frying here, not deep frying. You only need to fill your skillet with about half an inch of any neutral, high-heat oil, such as vegetable, canola, or peanut. I like to fry chicken at a slightly lower temperature than most—at 325˚F. This gives the chicken enough time to cook all the way through without burning the crust. Without a thermometer, you can tell the oil is the right temperature when a bit of flour dropped in the oil gently sizzles away within a few seconds. 
How to tell when chicken is cooked through?Aside from cutting open each piece to look, the easiest way to tell when the chicken is cooked is with an instant-read thermometer: the thickest part of the meat should register 165°F. Afterwards, transfer each piece to a wire rack set over a baking sheet, or a platter layered with paper towels, to drain the excess oil. What do you serve with fried chicken?The possibilities are endless! I think extra hot sauce for the true heat seekers is always a must. Some of my other favorites include fluffy buttermilk biscuits, creamy, tangy coleslaw, and macaroni and cheese. LOVE CHICKEN? LOVE FRIED FOODS? HERE ARE MORE RECIPES TO TRY!Products We LoveThis post may contain links to Amazon or other partners; your purchases via these links can benefit Simply Recipes. Read more about our affiliate linking policy. Recipes via Simply Recipes http://bit.ly/2F9fkDA June 23, 2019 at 09:07AM
Skinnytaste Meal Plan (June 24-June 30)
http://bit.ly/2xbEiQJ A free 7-day flexible weight loss meal plan including breakfast, lunch and dinner and a shopping list. All recipes include calories and Weight Watchers SmartPoints®.
If you’re new to my meal plans, I’ve been sharing these free, 7-day flexible healthy meal plans (you can see my previous meal plans here) that are meant as a guide, with plenty of wiggle room for you to add more food, coffee, beverages, fruits, snacks, dessert, wine, etc or swap recipes out for meals you prefer, you can search for recipes by course in the index. You should aim for around 1500 calories* per day. There’s also a precise, organized grocery list that will make grocery shopping so much easier and much less stressful. Save you money and time. You’ll dine out less often, waste less food and you’ll have everything you need on hand to help keep you on track. Lastly, if you’re on Facebook join my Skinnytaste Facebook Community where everyone’s sharing photos of recipes they are making, you can join here. I’m loving all the ideas everyone’s sharing! If you wish to get on the email list, you can subscribe here so you never miss a meal plan! Also, if you don’t have the Skinnytaste Meal Planner, now would be a great time to get one to get organized for 2019! There was a print error last year, but it’s perfect now! You can order it here! THE DETAILS:Breakfast and lunch Monday-Friday, are designed to serve 1 while dinners and all meals on Saturday and Sunday are designed to serve a family of 4. Some recipes make enough leftovers for two nights or lunch the next day. While we truly believe there is no one size fits all meal plan, we did our best to come up with something that appeals to a wide range of individuals. Everything is Weight Watchers friendly, I included the updated Weight Watcher Freestyle Points for your convenience, feel free to swap out any recipes you wish or just use this for inspiration! The grocery list is comprehensive and includes everything you need to make all meals on the plan. I’ve even included brand recommendations of products I love and use often. Cross check your cabinets because many condiments you’ll notice I use often, so you may already have a lot of them. And last, but certainly not least, this meal plan is flexible and realistic. There’s plenty of wiggle room for cocktails, healthy snacks, dessert and dinner out. And if necessary, you can move some things around to make it work with your schedule. Please let me know if you’re using these plans, this will help me decide if I should continue sharing them! MONDAY (6/24) Totals: Freestyle™ SP 15, Calories 1,061* TUESDAY (6/25) WEDNESDAY (6/26) Totals: Freestyle™ SP 13, Calories 1,045* THURSDAY (6/27) FRIDAY (6/28) Totals: Freestyle™ SP 13, Calories 881* SATURDAY (6/29) Totals: Freestyle™ SP 9, Calories 466* SUNDAY (6/30) Totals: Freestyle™ SP 18, Calories 916* *This is just a guide, women should aim for around 1500 calories per day. Here’s a helpful calculator to estimate The post Skinnytaste Meal Plan (June 24-June 30) appeared first on Skinnytaste. Recipes via Skinnytaste http://bit.ly/2ix3Luq June 22, 2019 at 09:26AM
Almond Butter Date Balls
http://bit.ly/2WZfniA Have snacks, will travel! These Almond Butter Date Balls are made with just dates, maple syrup, almond butter, and nuts. They come together quickly in the food processor. I dare you to eat just one! Photography Credit: Alison Conklin In mid-afternoon, when the hungry children come running off the bus and throw open the fridge or pantry doors and declare with utmost urgency, “I NEED FOOD!!!!” I need to be armed. Lest I face the wrath of the hangry. I want something that’s going to sustain them, and keep them from saying to me in ten minutes, “I’m still hungry!” Enter these almond butter date balls. A KID-FRIENDLY AFTERNOON SNACKI love throwing a snack together quickly that keeps in the fridge for days. Bonus points if it can be made with ingredients I already have on hand. And double bonus if it’s relatively “healthy,” insofar as it’s not loaded with sugar. (There is a time and a place for things that have sugar and you’ll never see or hear us at Simply Recipes get preachy. But sometimes you want something that’s a little less, ahem, indulgent.) These almond butter date balls meet the criteria—and then some, because they will sustain the kids thanks to the protein in the almond butter and the nuts. And the balls are just sweet enough that they can satisfy the sweet teeth my children have inherited from both sides of the family. Triple bonus? If both of my boys like it, this means they will look for it—which means that they’ll eat it without being reminded that it’s there. And that’s the case with these date balls. 

EASY PROTEIN BALLS IN THE FOOD PROCESSORThis recipe would not be possible without a food processor. It’s just what you need, and there’s no real way to do it without one. But it happens so quickly, and you can have your kids lick the bowl. Reward! A Few Words of AdviceThere is a small margin of error with this recipe. A couple of tips!
HAVE SNACKS, WILL TRAVELBecause these babies are so fast to make, and because they’re sweet and small, they are the perfect snack or after-dinner treat if you don’t want to have something really sugary but want to indulge a little bit. They also travel well—I’ve shared them with my yoga classes many times. Dates and nuts are incredibly good for you (magnesium, fiber, protein, so on and so forth) anyway, but regardless, these just taste good. They also happen to be vegan and gluten-free, if those are two areas of concern. HOW TO STORE THESE DATE BALLSThese date balls keep great in the fridge, covered, for a couple of weeks. I’ve kept them longer than that, mostly when I was recipe testing and forgot they were in there, but honestly most of the time they go pretty quickly. They’re fine at room temperature, and you can store them covered in a container at room temperature for a few days. But if it’s hot or even just a bit warm, be prepared for them to go a little splat and get a bit misshapen. TRY THESE OTHER TASTY SNACKS!Almond Butter Date Balls RecipePrintI sometimes like to add a tablespoon or so of dried cranberries to give this a bit of a tart twist. Ingredients
For topping/rolling the balls:
Method1 Make the date balls: Place the walnuts and dates into the bowl of a food processor fitted with the blade, and pulse several times until well combined. The pieces should look like a rough crumble. Add the cocoa powder, maple syrup, almond butter, vanilla extract, and sea salt and pulse until the mixture is smooth and thick; it will start to peel away from the edge of the bowl. When this happens, stop the food processor; if it keeps whirring away, it may get stuck because these ingredients are, well, sticky! Keep a close eye on this, as it will come together quickly.
2 Add the almonds: Add the almonds and pulse a few times to incorporate them. You want them sort of irregularly sized, so that some pieces are still pretty crunchy and offer a variety of textures.
3 Roll the date balls: Line a rimmed baking sheet with parchment or wax paper. Place the coconut in a small bowl and the cocoa powder in another bowl. Using a cookie scoop measuring about 1 1/2 tablespoons (like this one) and sprayed with cooking spray for easy release, scoop out the mixture, roll it into golf-ball shapes, and roll in the shredded coconut or the cocoa powder. (I usually do some in coconut and some in cocoa powder, and leave some plain.)
4 Chill and store the date balls: Transfer the date balls to the baking sheet and chill them for a few hours or overnight, if needed. Once they've firmed up, transfer to a plastic lidded container and keep in the fridge for several weeks, but I've never, ever, had them last that long. They are usually consumed too quickly.
Hello! All photos and content are copyright protected. Please do not use our photos without prior written permission. If you wish to republish this recipe, please rewrite the recipe in your own unique words and link back to Almond Butter Date Balls on Simply Recipes. Thank you! PrintProducts We LoveThis post may contain links to Amazon or other partners; your purchases via these links can benefit Simply Recipes. Read more about our affiliate linking policy. Recipes via Simply Recipes http://bit.ly/2F9fkDA June 22, 2019 at 09:05AM
Simply Recipes 2019 Meal Plan: June Week 4
http://bit.ly/2J1PQLN  Simply Recipes 2019 Meal Plan: June Week 4This weekly meal plan lets you prepare dinner while creating small bites to serve at your 4th of July festivities! Get ready to savor Lime Chicken, Sheet Pan Salmon, and more! This month, we welcome back Marta Rivera for more of her meal plans. Marta is a trained chef, mom of twins, and wife to a newly-retired soldier! For me, the week leading up to most holidays is filled with bulk cooking, especially if I’m hosting! For Independence Day next week, I’m going to open my home to friends. To maximize my time, I’m going to prep small bites for the party from dinner recipes I’m serving my family this week. I’m a huge fan of freezer-meals and doubling recipes for the future parties, or to just make family dinner plans easier on me! I’ll save half of the Slow Cooker Mexican Pulled Pork for nachos, and top it with extra relish from the Hot Dogs with Pineapple Bacon Relish. Planning ahead helps me enjoy the festivities while feeding our guests amazing dishes. This post may contain links to Amazon or other partners; your purchases via these links can benefit Simply Recipes. Read more about our affiliate linking policy. Recipes via Simply Recipes http://bit.ly/2F9fkDA June 22, 2019 at 09:05AM
Grilled Corn Salad
http://bit.ly/2N1975l 1a If grilling, grill corn, bell pepper, and zucchini: Prepare your grill for high, direct heat. Oil the grill grates. Rub a little olive oil over the bell pepper. Place the red pepper and the corn (in their husks) directly on the grill grates. (See our method for grilling corn-on-the-cob.) Cover the grill. Turn corn occasionally, so that every part of the husk is blackened. Also turn the red bell pepper occasionally until the skin has blistered up all around it. This should take 15 to 20 minutes. When the corn and peppers are about 5 minutes away from being done, rub olive oil over the zucchini pieces and place the zucchini pieces directly on the grill grate, cut side down. Turn them over after a few minutes when they have some nice grill marks on them. Let them cook for just a minute or two on the other side. 1b If cooking on the stovetop, sear corn and zucchini: If you don't have a grill, you can prepare the vegetables on the stove-top: Shuck the corn and use a knife to remove the kernels from the cobs. If you don't have fresh corn, you can easily use frozen. Coat the bottom of a large, sturdy relatively stick-free (can use cast iron) pan with a little olive oil. Heat the pan to high. Spread out the corn kernels on the pan. If frozen, they will defrost almost immediately. Don't stir them that much, just let them cook, stirring occasionally, until they start to toast. When they get a little browned, remove them from the pan to a bowl. Lay the zucchini pieces on the pan and brown on both sides, do not over cook, remove from pan. The bell pepper does not need to be cooked, it can just be seeded and chopped fine. 2 Finish prepping the red pepper: Place charred bell pepper in a bowl and cover with a plate so that it steams in its own heat. Once the bell pepper has cooled a bit, remove the charred peel. Cut open the pepper, remove the seeds and stem. Chop the bell pepper into small pieces. 3 Cut the kernels from the corn cob: Let the corn cool down for a few minutes and pull back the husks. Take a small bowl and turn it upside down in a larger bowl. Stand the corn husks vertically, tip facing down, on top of the upside down small bowl. (You can also use the center of an upturned bundt pan.) Use a sharp knife to make long, downward strokes, removing the kernels from the cob, as you work your way around the cob. 4 Chop zucchini: Slice the grilled zucchini again lengthwise and chop into small pieces. 5 Assemble and serve the salad: Place grilled or toasted corn kernels, chopped bell pepper, chopped zucchini, red onion, cilantro, and serrano (if using) into a large bowl. Add the cumin, olive oil, vinegar or lime juice, and crumbly cheese (if using). Mix gently. Salt and pepper to taste. Serve cold or at room temperature.
Recipes via Simply Recipes http://bit.ly/2F9fkDA June 21, 2019 at 06:05PM
The Friday Buzz: Pan-Baked Granola, Personal Theme Songs, and Vegan Oreos
http://bit.ly/2LeEmYj Here's our weekly round-up of all good things, good advice, good feelings. Up this week: Pan-Baked Granola, Personal Theme Songs, Vegan Oreos, and more! Print Welcome to The Friday Buzz, our roundup of all good things, good advice, good feelings. It’s the happy hour of blog posts! Up this week: Pan-Baked Granolas, Personal Theme Songs, and Vegan Oreos. Happy, happy Friday! Whoa, what a week it’s been! I feel like my to-do list just keeps growing and growing, and I can’t keep up! I’m more than certain that we can all relate to feeling a little overwhelmed at times, so I’m going to reveal my secret as to how we can all not just survive, but conquer the day. Now, this has never been revealed before, and you are gaining top-secret access to the world’s best kept secret. You ready? Here it is: GIRL ON FIRE. Um, what? Excuse me? “Girl On Fire” by Alicia Keys is a song that just pumps me up and has become my personal theme song. Every time I hear it, I muster up the courage to tackle whatever is in front of me and I feel ready to seize the day! I’ve even set my alarm to wake up to it, so it’s the first thing I hear in the morning. Booyah! So, are you ready to conquer the day? Find a personal theme song. A song that speaks to you and just gets you jazzed about life. Sing it loud and proud for when you need a pick-me-up or just because. Either way, you’ve got this! Let’s find out what else has helped The Simply Recipes Team conquer life this week, shall we? OUR FAVORITES FROM THE WEEK
MEANWHILE ON INSTAGRAMEveryone is weighing on in how they plan on enjoying delicious summer tomatoes. There really is nothing better than a juicy tomato fresh from the garden! Now if you’ll excuse me, I’m off to make myself a BLT for lunch now… READER COMMENT OF THE WEEKWe are hot and heavy into grilling season, which means fresh burgers! Troy left us a fantastic comment on our post How to Grill the Best Burgers:
Woot! I also grilled burgers using that recipe, and it’s really the only way to go! Cheers to another fantastic week… now, go find yourself a personal theme song! GIRL. ON. FIRE. This post may contain links to Amazon or other partners; your purchases via these links can benefit Simply Recipes. Read more about our affiliate linking policy. Recipes via Simply Recipes http://bit.ly/2F9fkDA June 21, 2019 at 09:09AM
Blueberry Pomegranate Cosmopolitan
http://bit.ly/2IwFvZp This Pomegranate and Blueberry Cosmopolitan is perfect for warm weather! Made with muddled blueberries and pomegranate juice, this update to the classic Cosmo has a smooth, sweet berry flavor that's just right for summer. Photography Credit: Nancy Mitchell Blame Carrie Bradshaw: the Cosmopolitan is probably the best-known vodka cocktail of the last two decades. While ordering one can feel like a throwback to the late ’90s, it turns out there’s a reason for its popularity—this is a fun, zippy little drink, equal parts tart, sweet, and bracing! A DELICIOUS UPDATE TO THE COSMOA traditional Cosmo is composed of vodka, lime juice, Cointreau, and cranberry juice. This blueberry and pomegranate version is smoother and juicier, but just as enjoyable! Blueberry and pomegranate make a really lovely flavor combination. Both fruits have sweet-tart dimensions that complement each other nicely. Here, that ripe, juicy berry flavor brings a new angle to the classic Cosmo, while honoring the spirit of the original. 
WHICH VODKA TO USEI like Tito’s for this cocktail (it’s my go-to vodka), but any moderately priced vodka will do. MUDDLE YOUR BLUEBERRIES, THEN DOUBLE STRAINTo really make this drink extra fresh and original, muddle your blueberries first using a muddler, then double strain to keep bits of blueberry gunk from ruining the aesthetic of your drink. (If you don’t care about blueberry gunk, feel free to single strain.) A double strain involves straining your drink through both a traditional cocktail strainer (the strainer on your shaker, or a Hawthorne strainer if you’re using a Boston shaker), and also a fine strainer. For the fine strainer, you can use one specifically designed for cocktails, but a tea strainer will also do nicely. Bonus: This technique not only removes pulp from your drink; it also impresses your friends! MORE FRESH AND FRUITY COCKTAILS TO TRYBlueberry Pomegranate Cosmopolitan RecipePrintIngredients
Special equipment:Method1 Muddle the blueberries: Place the blueberries in the bottom of a shaker or mixing glass. Cover with the pomegranate juice, then muddle the blueberries with a muddler or the back of a spoon. Smoosh them enough so that the skins break and a little juice is released, but not so much that the blueberries completely fall apart. 2 Make the cocktail: Add the vodka, lime juice, and Cointreau. Fill with ice, cover, then shake for 30 to 45 seconds. 3 Double strain: If using a mixing glass, place a Hawthorne strainer on top. Then, with your other hand, hold a tea strainer over a cocktail glass. Pour the drink out of the shaker or mixing glass through the tea strainer and into a cocktail glass. Enjoy! Hello! All photos and content are copyright protected. Please do not use our photos without prior written permission. If you wish to republish this recipe, please rewrite the recipe in your own unique words and link back to Blueberry Pomegranate Cosmopolitan on Simply Recipes. Thank you! PrintProducts We LoveThis post may contain links to Amazon or other partners; your purchases via these links can benefit Simply Recipes. Read more about our affiliate linking policy. Recipes via Simply Recipes http://bit.ly/2F9fkDA June 21, 2019 at 09:01AM
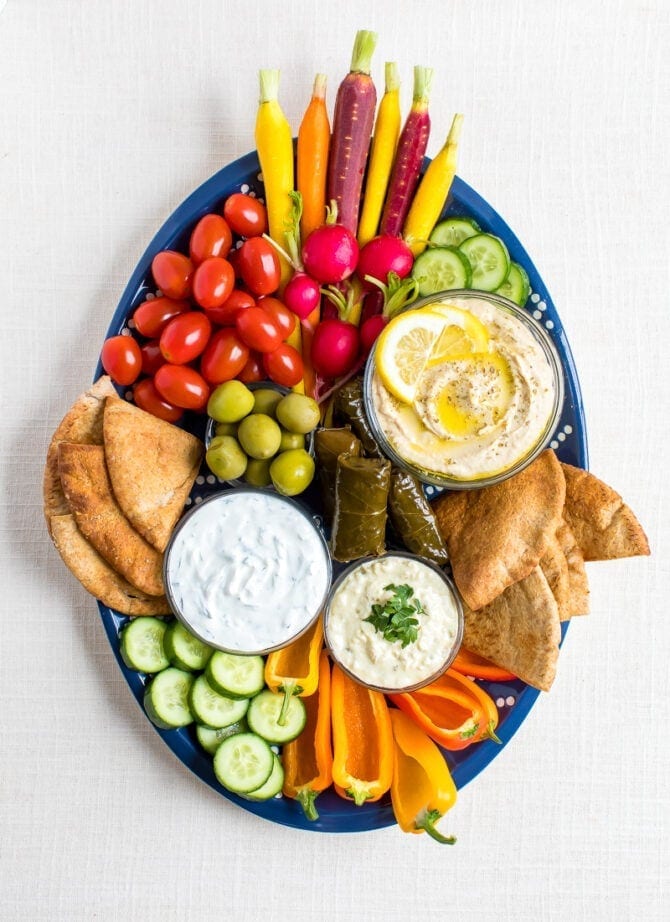
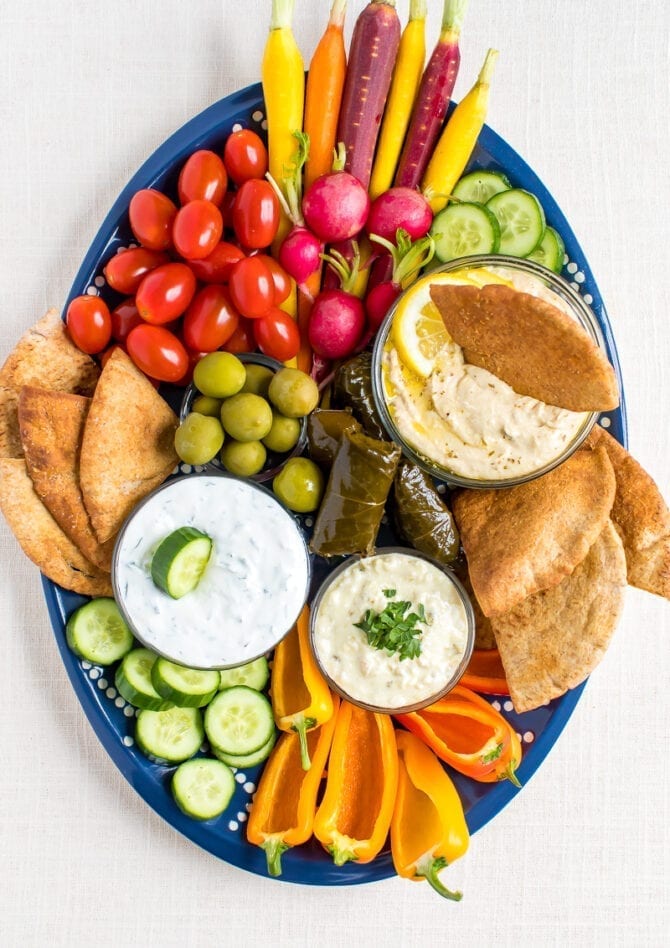
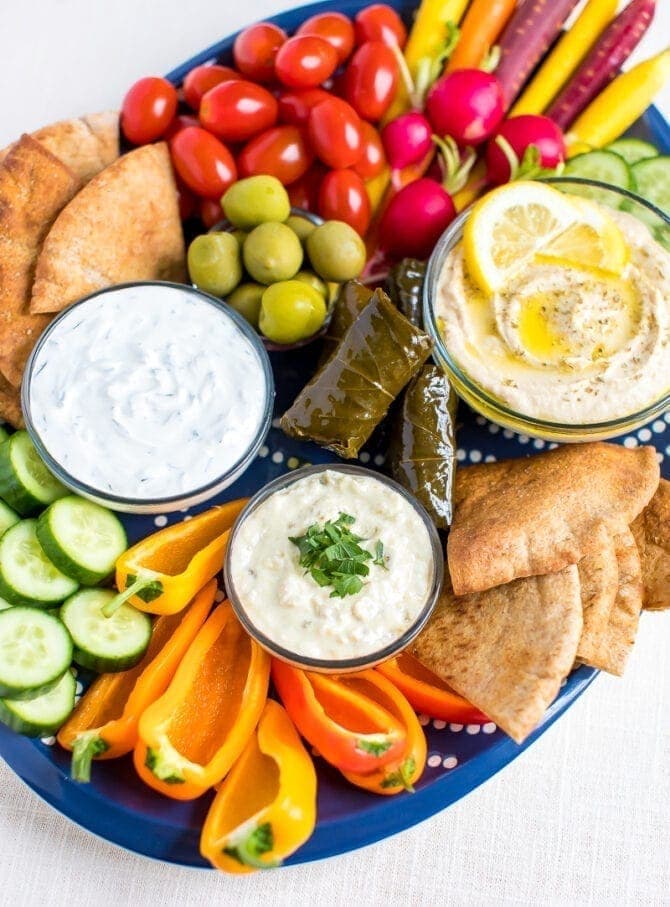
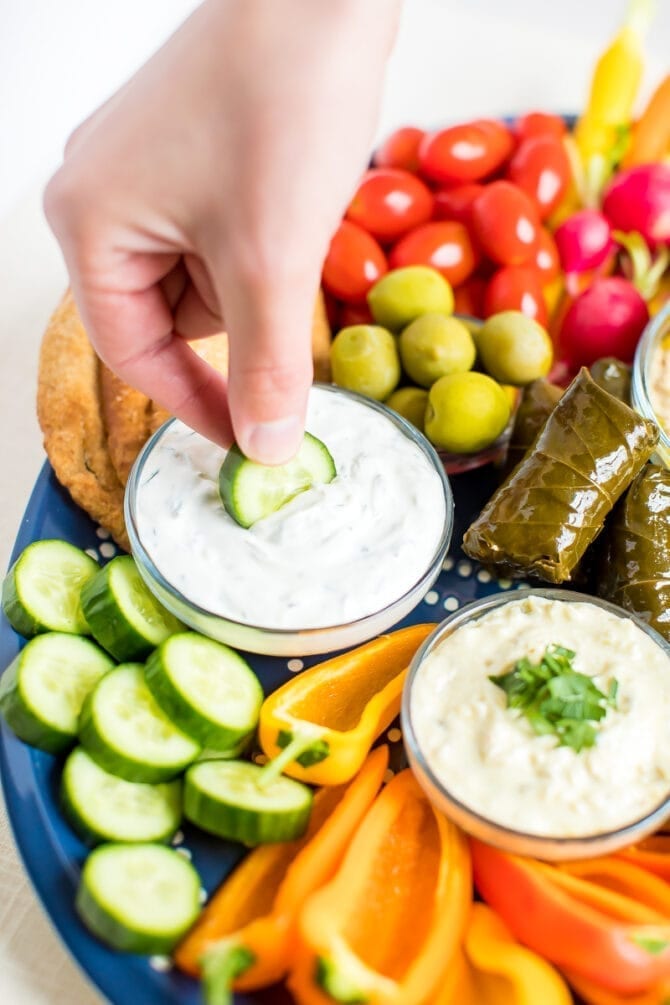
Vegetarian Mezze Platter
http://bit.ly/31MS4XT Learn how to build an epic vegetarian mezze platter with hummus, tzatziki, fresh vegetables, olives, and pita! This Mediterranean snack plate works great as an appetizer for potlucks and dinner parties. I’m all about vegetable trays and love making them for parties, but sometimes they can get a little boring. Combine that with the fact that I’ve been on a Mediterranean kick lately and boom, this mezze platter was born. A mezze platter isn’t anything new (I certainly didn’t come up with the idea), but it’s such a fun spin on a traditional vegetable tray or charcuterie board.
What is a Mezze Platter?Mezze is a compilation of Mediterranean small dishes that all go together. It’s common to serve mezze as part of dinner but let’s be real, this platter makes for an awesome smörgåsbord dinner on its own.
What to Include on a Mezze PlatterThere are so many different things you can use to make an epic mezze platter. The fun part is choosing which items you want to include. Here are some of my favorites:
For this recipe, I’m not giving exact measurements of ingredients or nutritional information, because there are so many different snacks and dips that you can add to your mezze platter. Have fun experimenting!
If you make this mezze platter, please be sure to leave a comment and star rating below. Your feedback is super helpful for the EBF team and other EBF readers. Print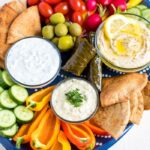 Mezze Platter
DescriptionThis Mediterranean snack plate works great as an appetizer for potlucks and dinner parties. Ingredients
Instructions
Keywords: mezze platter This mezze platter is the perfect appetizer for a Mediterranean feast or just a fun happy hour. Want more Mediterranean eats to pair it with? I’ve got you covered…
The post Vegetarian Mezze Platter appeared first on Eating Bird Food. Recipes via Eating Bird Food http://bit.ly/1L45wsH June 21, 2019 at 07:51AM |
|


 RSS Feed
