
|
Mai Tai Cocktail
https://ift.tt/32STnVZ If you order a Mai Tai at a bar these days, chances are you’ll get a very fruity and heavily sugared drink. But the original Mai Tai wasn’t like that. The classic Mai Tai is rich, creamy, deliciously balanced, and just a little bit nutty. THE TRADITIONAL INGREDIENTS FOR A MAI TAINutty, you say? That’s right. If you’re going to make a proper Mai Tai, the essential ingredient is orgeat (pronounced ohr-zsa, like Zsa Zsa Gabor), a sweet almond syrup made from almonds, sugar, and orange blossom water. The Mai Tai belongs to the family of drinks called sours, which are made with a base spirit, a sweetener, and citrus. A lot of classic drinks are based on the sour, like the vodka sour, the whiskey sour, and the margarita, which is a tequila sour. The traditional Mai Tai is a rum sour (also called a daiquiri) made with two kinds of rum, lime juice, and orgeat and orange liqueur as the sweetener. 
WHY ORGEAT IS SO IMPORTANTIf you want to make a delicious, authentic Mai Tai, the kind of orgeat matters a lot. It’s quite a good drink with just an average orgeat, but becomes exceptional with a very good one. When it comes to orgeat, you can either make your own or you can purchase pre-made orgeat, although the ones available vary greatly in quality. The best orgeat I’ve ever tried is from Austin-based Liber & Co. The Small Hand Foods variety is also nice. Either of those two would be worth getting just for the purposes of making this drink! If you can’t find a good orgeat, or any orgeat at all, simple syrup and almond extract is a workable substitute. (The proportions are 1/2 ounce simple syrup, made with turbinado or demerara, mixed with 1/8 teaspoon almond extract.) THE HISTORY OF RUM IN A MAI TAINow that we know all about orgeat, it’s time to move on to the rum! While many modern tropical drinks mask the taste of their spirits, Trader Vic, who is responsible for the Mai Tai as we know it, actually created the drink as a showcase for a single superior rum. The rum he used – a 17-year-old J. Wray & Nephew – is no longer available, which is why most Mai Tai recipes call for equal parts white and dark rum. ORIGINAL VS MORE COMMONLY USED RUMSAccording to Beachbum Berry, the best way to recreate the original Mai Tai rum is with “an aged Martinique rum mixed with a premium Jamaican rum.” Eager to be as thorough as possible in my role as cocktail historian, I picked up a bottle of Rhum Clément VSOP Martinique rum, and another of the Appleton Estate Reserve Blend Jamaica rum. If you’re a purist and absolutely have to try this drink the way it was originally intended, this is the way to go. For my part, I found this formulation to have too much rum flavor. I prefer the drink with half white rum and half Jamaican rum, which allow the almond notes to come through. (Also, since I just told you to buy fancy orgeat, adding two fancy rums to that seems beyond the pale.) This recipe below mirrors the half-light, half-dark formula commonly found in Mai Tai recipes. For the light half, Bacardi Silver, one of my go-to rums for mixing, works well. For the darker half, an amber rum, preferably a Jamaica rum, is ideal, but a dark rum will also work. Look for Appleton Estate Reserve or Signature, which are both very nice. WANT MORE RUM COCKTAILS? HERE YOU GO!Products We LoveThis post may contain links to Amazon or other partners; your purchases via these links can benefit Simply Recipes. Read more about our affiliate linking policy. Recipes via Simply Recipes https://ift.tt/2F9fkDA July 26, 2019 at 09:00AM
0 Comments
Blackened Salmon
https://ift.tt/2YvVm2W
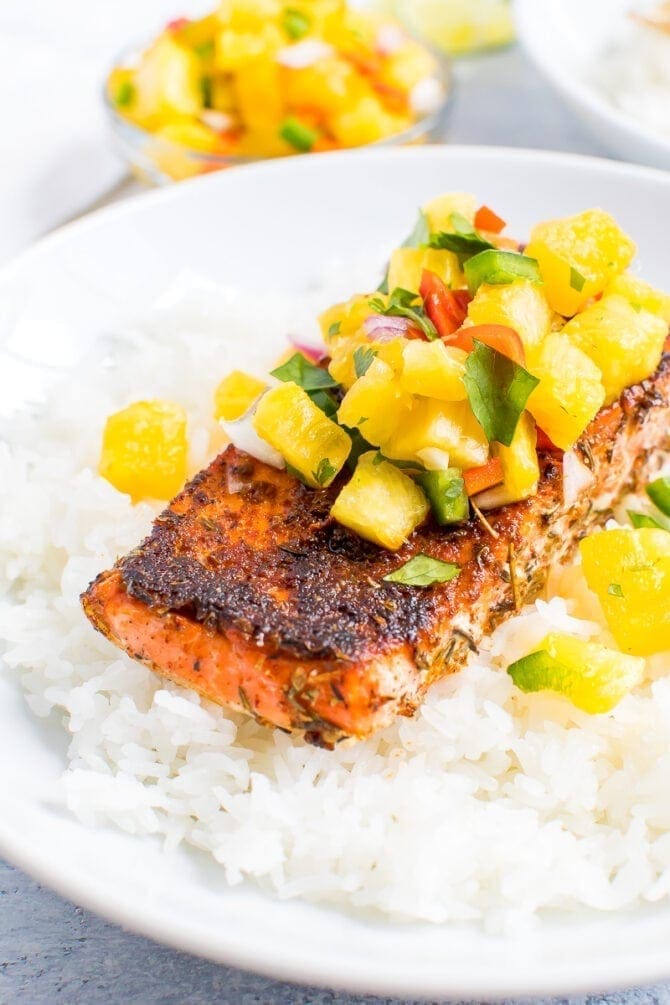
Remember my blackened seasoning recipe and this pineapple salsa? We’re bringing things full circle with this recipe because it uses both the seasoning blend AND the salsa to create a flavorful blackened salmon dish that’s served over rice.
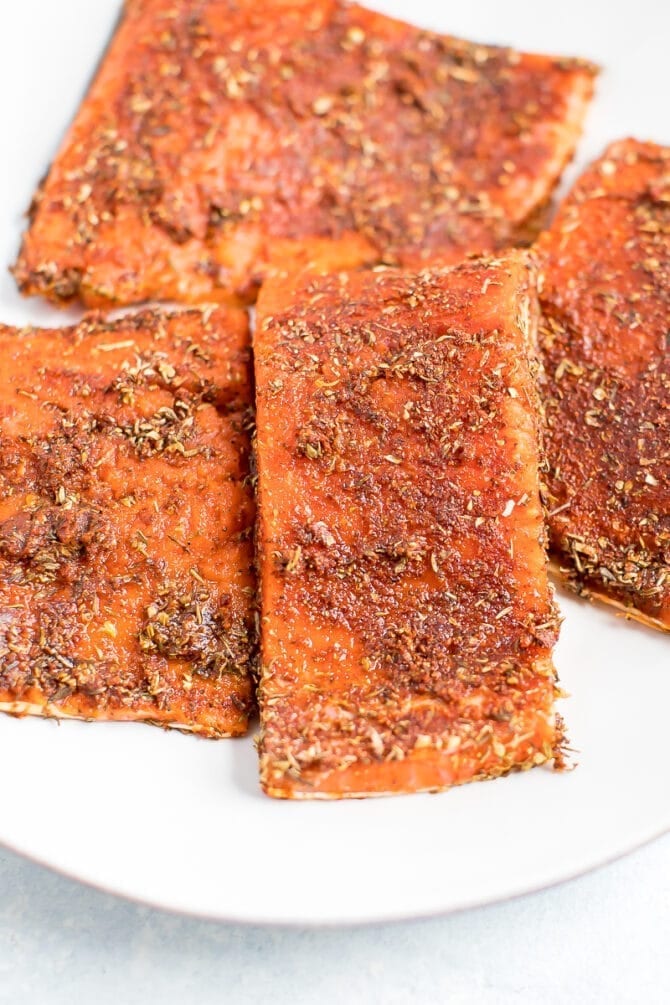
I personally love using blackened seasoning rather than a marinade because it takes no time to prep! I don’t have to think about marinating hours ahead of schedule, which is helpful for my brain. Not to mention the fact that it’s such a delicious seasoning for salmon! Health Benefits of SalmonI’m sure you’re aware, but salmon is an incredible food to add to your diet. It’s rich in omega-3 fatty acids which our body can’t create… aka we have to eat them! Salmon is also a great source of protein, vitamins and minerals and studies have shown it reduces inflammation throughout the body. You can cook salmon in a variety of ways – steam, smoke, grill, bake – or even eat it raw if you’re a sushi fan. How to Make Blackened SalmonIt doesn’t get much easier than this… ready? If you don’t have your blackened seasoning mixed already, mix up the spices in a small bowl. Liberally rub the seasoning on the flesh side of each salmon filet.
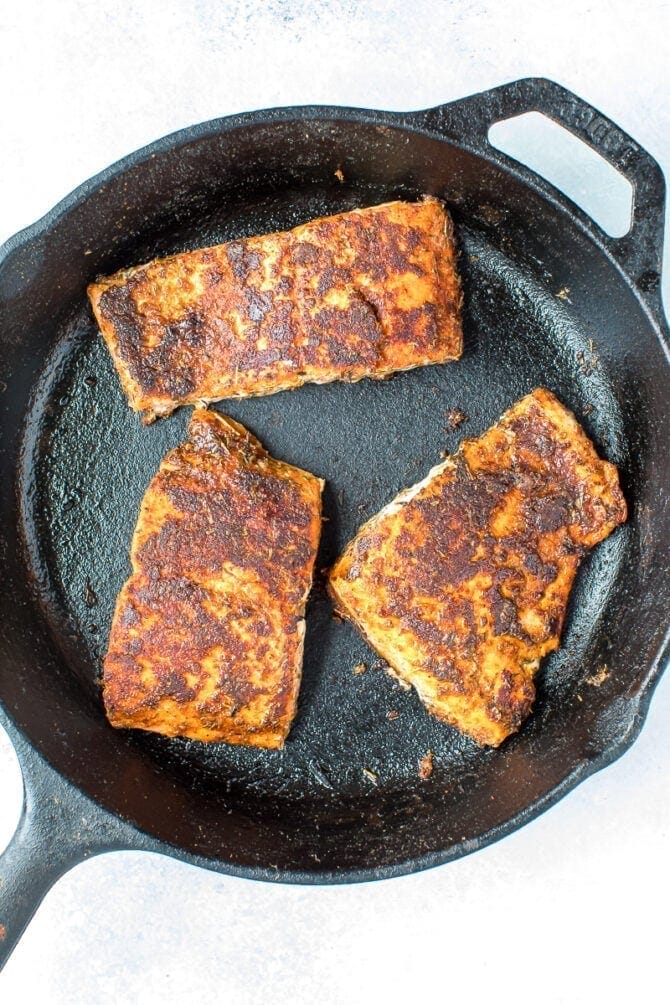
Heat oil or butter in a large non-stick or cast iron skillet over medium heat. Place the salmon fillets skin-side up in the skillet and cook for about 3 minutes. You know the salmon is ready to flip when the meat releases from the pan easily. Flip so the skin is now on the pan and cook for another 5-7 minutes until salmon is just cooked through. Be sure not to overcook the salmon. Overcooked salmon is super dry and not very tasty.
This blackened salmon is amazing to make ahead of time to enjoy on salads, with roasted veggies, or in a grain bowl – the options are endless. I chose to serve this salmon over regular rice, topped with pineapple salsa. This combo is perfect because the rice and pineapple salsa tame the heat from the blackened salmon and make for such a refreshing meal. And did I mention that this meal takes only 20 minutes to make if you have your blackened seasoning, pineapple salsa, and rice ready to go? Yup, it’s such an easy dinner recipe for busy weeknights. Want to know my secret (not so secret) time saver? I keep cooked frozen rice from Trader Joe’s or Whole Foods in the freezer at all times for meals like this. It tastes great and takes only 3 minutes to heat up in the microwave. Easy peasy!
If you make this blackened salmon recipe, please be sure to leave a comment and star rating below. Your feedback is super helpful for the EBF team and other readers who are thinking about making the recipe. Print Blackened Salmon
DescriptionNeed a quick and easy salmon recipe? You’ll love this flavorful blackened salmon that comes together in less than 20 minutes. Ingredients
Instructions
Nutrition
Keywords: blackened salmon More Healthy Salmon Recipes:
The post Blackened Salmon appeared first on Eating Bird Food. Recipes via Eating Bird Food https://ift.tt/1L45wsH July 26, 2019 at 07:09AM
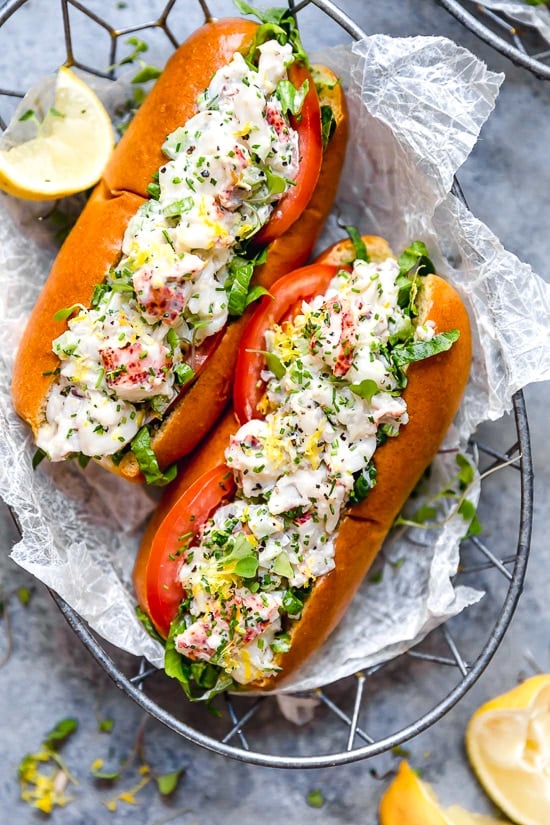
Lobster Rolls
https://ift.tt/2K1UutF Lobster Rolls scream summer to me! Made with chunks of chilled lobster tossed with celery, shallots, chives, light mayonnaise and a little lemon zest served on a hot dog bun – delicious!
When you want an extra special lunch, this is it! This easy lobster roll recipe starts with fresh steamed lobster, if live lobsters aren’t available near you, frozen tails or fresh lump crab or even shrimp would be great! To keep it light, I mix in a little 0% Greek yogurt with the mayo, you can’t tell! The post Lobster Rolls appeared first on Skinnytaste. Recipes via Skinnytaste https://ift.tt/2ix3Luq July 25, 2019 at 10:47AM
Ginger Pork Rice Bowls
https://ift.tt/2JYIj0S
There are so many meal combinations you can make with a protein, rice, and vegetables, but if I’m cooking, then this Ginger Pork Rice Bowl is way up there on the list. It uses simple ingredients, but the flavors are way better than the sum of its parts. The bowl is also a fun and accessible kid meal! Kids can customize their own bowls so they feel involved in the prep, and then either stir everything together or keep things separate (which is what my kids do, much to my chagrin). WHAT KIND OF GINGER TO USE?Sometimes you will see pickled ginger in rice bowls, but I tend to think of that as more of a palate cleanser like you would see with a poke bowl or sushi. For big flavors like the pork in this recipe, I like to use freshly grated ginger, and a lot of it. I used about an inch of fresh ginger, which equals about a tablespoon of freshly grated ginger. 
WHAT GOES INTO A RICE BOWL?I love the combination of cucumber and carrot in my rice bowl, but let your imagination run wild here OR use this recipe as a base to clean out the fridge a bit. You could put almost any veggie in this bowl to accompany the pork and rice. Here are a few ideas:
I also like to garnish with sesame seeds, scallion, cilantro, and sweet soy sauce. Lee Kum Kee makes a sweet soy sauce that is available in most stores and is great. It’s just what it sounds like—regular soy sauce that’s been sweetened and thickened a bit. If you don’t have it or can’t find sweet soy sauce, stir a tablespoon of honey into about 1/3 cup regular soy sauce. That’ll get you close. Of course, if you’re eating gluten-free, swap traditional soy sauce for a wheat-free option like tamari. WHAT KIND OF RICE IS BEST?Almost any long-grain white rice will work great for these bowls. Personally, I like jasmine rice because a) I have a 20-pound bag of it in my pantry, and b) it has a light, almost-floral flavor that goes well with so many recipes, from stir-fries to rice puddings. It’s my go-to for dishes like this even though it is slightly more expensive than bulk white rice. WHAT KIND OF PORK IS BEST?I wouldn’t get too fancy with the pork for this recipe. I used just a basic ground pork mix that you can get at any butcher (unseasoned). If you wanted to change it up, you could grill a pork tenderloin, slice it thin, and add that to the bowl! MAKING AHEAD AND STORINGFeel free to make the pork in advance along with the rice. You can reheat both in the microwave in 30-second bursts until they are warm, and then assemble your bowl by adding the vegetables and toppings. Leftovers keep great for five days or so in the fridge. 
THE DAD ADD: LEFTOVER PORK PITA SANDWICHES When eating leftovers from this recipe, I like to change up the fillings by stuffing them into a pita. It’s a nice mash-up of Asian and Mediterranean flavors and works really well. Don’t forget the yogurt and sriracha! When eating leftovers from this recipe, I like to change up the fillings by stuffing them into a pita. It’s a nice mash-up of Asian and Mediterranean flavors and works really well. Don’t forget the yogurt and sriracha!
REPORT CARD I only got to test this recipe on one of my children because my older one was having a special dinner date with Grammie. (Lucky!) But, my two-year-old is always the tougher judge anyway and she was surprisingly into this dish. I only got to test this recipe on one of my children because my older one was having a special dinner date with Grammie. (Lucky!) But, my two-year-old is always the tougher judge anyway and she was surprisingly into this dish.
She started by shoving rice in her mouth by the handful. This is her normal move with rice. It’s almost like she is worried someone else will eat it if she doesn’t eat it all RIGHT AWAY. Then she moved on to the cucumbers and housed all those. She was very skeptical of the pork until I bribed her with one jelly bean. Nobody is perfect, people. Once she tried it, she had a few more bites and proclaimed, “I do like that meat!” And for once, we agreed on a thing! YAY! RICE, RICE, AND MORE RICE: 5 WAYS TO LOVE RICE IN BOWLS!Recipes via Simply Recipes https://ift.tt/2F9fkDA July 24, 2019 at 09:10AM
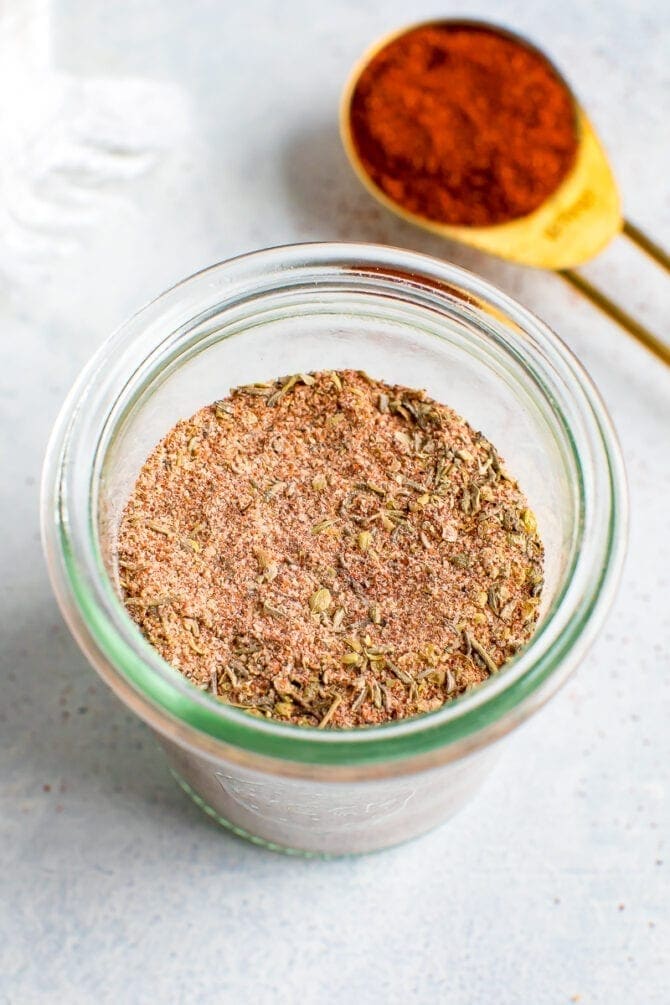
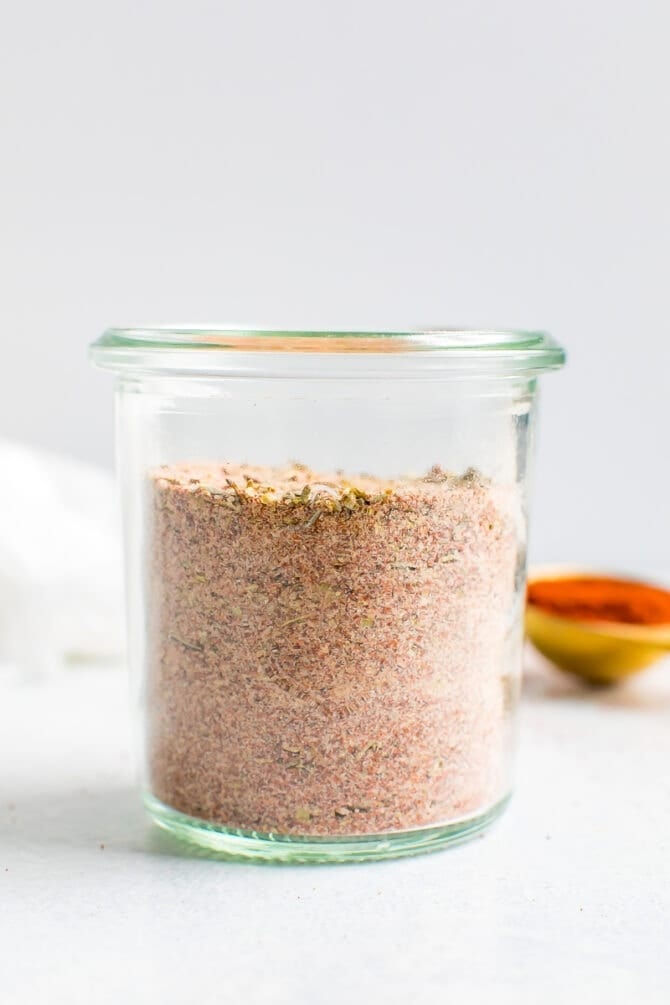
Blackened Seasoning
https://ift.tt/2SByMAF
I’m so excited to share this seasoning blend with you! It’s super simple, but a recipe I think everyone needs to have in their kitchen. It’s so versatile and can be used on essentially any protein! If you are frying, baking or grilling protein without marinating or seasoning first, you’re totally missing out. A little marinade or seasoning goes a long way and will really step up your cooking game. Once you start taking a little time to season your protein, you will be impressing your family and friends with delicious, flavorful food. Promise.
What is “Blackened Food”?If your mind immediately goes to burnt food, get that out of your mind! Blackened food traditionally means coating food in melted butter and then a mixture of spices. The spices stick to the butter, darken in color and create an incredibly delicious crust to the food. If you want to make blackened food a little healthier (or dairy-free), you can use olive oil or avocado oil in place of the butter and it’s still super flavorful!
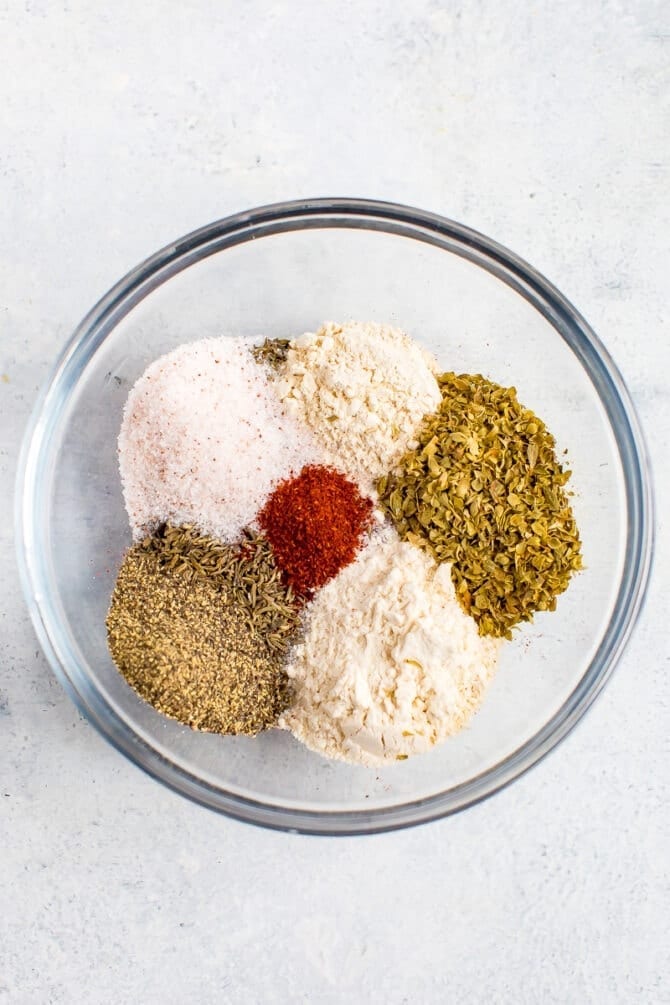
Ingredients in Blackened SeasoningBlackened seasoning is just a spice blend – so everything you need for this recipe is in your spice cabinet.
There’s a good chance you have all of these ingredients in your pantry, but if need blackened seasoning for a recipe and don’t have time to make this blend you can buy cajun seasoning at the store! It’s a premixed spice blend that includes a lot of the same ingredients in this blackened seasoning blend. This blend does have a little kick from the cayenne pepper. I LOVE the spicy flavor but if you don’t like spicy foods, you can omit the cayenne pepper from the blend.
How to Use Blackened SeasoningOne of the best things about blackened seasoning is that you don’t have to remember to prep it in advance like you do with marinating! If I want to pre-season a protein for grilling, I’ll typically measure out all of the spices into a ziplock baggie, coat my protein with olive oil, add the protein to the spice mixture and shake it up! If I’m cooking something in a pan (like shrimp), I’ll just add the butter or oil as well as the seasoning blend and toss to coat. It’s so easy and super flavorful. If you make this blackened seasoning, please be sure to leave a comment and star rating below letting me know how it turns out. Your feedback is so helpful for the EBF team and other EBF readers. Print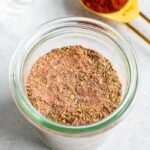 Blackened Seasoning
DescriptionA staple recipe for homemade blackened seasoning that’s savory and spicy at the same time! Season any protein with this spice mixture for a major flavor upgrade. Ingredients
Instructions
Nutrition
Keywords: blackened seasoning Try these Blackened Recipes:Like this recipe? Here are some more EBF staple recipes you might like:
The post Blackened Seasoning appeared first on Eating Bird Food. Recipes via Eating Bird Food https://ift.tt/1L45wsH July 24, 2019 at 07:28AM
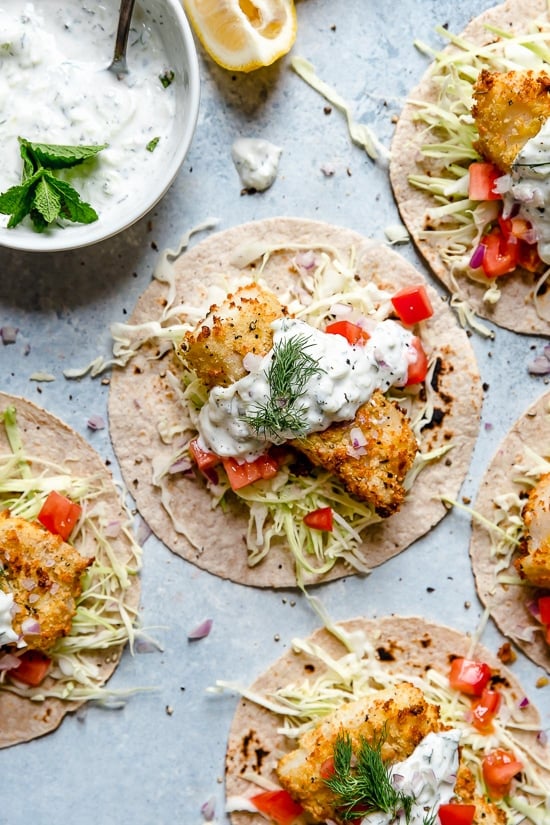
Tzatziki Fish Tacos
https://ift.tt/2XX8I97 Tzatziki Fish Tacos have a Greek twist! Crisp breaded fish fillets served on tortillas topped with tzatziki sauce made with Greek yogurt, cucumbers and fresh herbs.
I love fish tacos, some favorites are Cilantro Lime Fish Tacos, Blackened Fish Tacos and Lobster Tacos. Since my family is obsessed Tzatziki sauce (we eat it with everything!) I thought why not make fish tacos with a Greek twist. Bake them in the oven or make them in the air fryer! Directions provided both ways. The post Tzatziki Fish Tacos appeared first on Skinnytaste. Recipes via Skinnytaste https://ift.tt/2ix3Luq July 23, 2019 at 09:22AM
10 Best Side Salads for Summer BBQs, Potlucks, and Parties
https://ift.tt/2LDKWIK  10 Best Side Salads for Summer BBQs, Potlucks, and PartiesNeed an awesome side dish for your next summer get-together? Look no further! We've got suggestions ranging from classic macaroni salad to Asian coleslaw! Potlucks really are the best, aren’t they? It seriously boggles my mind that you only have to make one dish and then end up tasting a fantastic variety of other dishes. Minimal effort with maximum rewards! I’m also going to let you in on a little secret… I love bringing new dishes to potlucks! There’s just something so satisfying about having people come up to you after they’ve enjoyed every last bite of your side dish and ask you for the recipe. In choosing the recipes for this round-up, I wanted sides that go beyond the traditional and get everyone’s taste buds buzzing. Each one of these sides really is meant for summer potlucks because they’re hearty and easy to make. I’m going to sound like a broken record, but it’s all about minimal effort in making the sides and maximum rewards with flavor, right? The hardest thing for you will be deciding which one to make! Products We LoveThis post may contain links to Amazon or other partners; your purchases via these links can benefit Simply Recipes. Read more about our affiliate linking policy. Recipes via Simply Recipes https://ift.tt/2F9fkDA July 23, 2019 at 09:11AM
'Pan-Bang' Chocolate Chip Cookies (with Tofu!)
https://ift.tt/2Gp2ELF These(Pan-Banged) Vegan Chocolate Chip Cookies are browned and crispy on the edges and bottoms, while super moist, buttery and gooey in the center. Melty puddles of chocolate chips in every bite. Crunchy walnuts and a hint of vanilla. Get this recipe, plus a very loud cookie-baking trick!..Read more » This is a summary, images and full post available on HHL website! Recipes via Healthy. Happy. Life. https://ift.tt/ygHPsr July 22, 2019 at 05:17PM
Dad’s Ratatouille
https://ift.tt/2Y4OLbG  1 Preheat oven to 400° F. 2 Sauté onions and garlic: Using a large oven-proof pan over medium high heat, sauté onions in 2 tablespoons of olive oil until they begin to soften, about 5 minutes. Add garlic and reduce heat to low. 3 Sauté zucchini: While the onions and garlic are cooking over low heat, heat 2 tablespoons of olive oil in another frying pan over high heat. As soon as oil starts to smoke, quickly add enough zucchini cubes all at once to cover the bottom of the pan. Keep on cooking over high heat, stirring, until zucchini is lightly browned on all sides. Remove zucchini cubes, and add them to pan with the onions. Working in batches, repeat this process until all of the zucchini cubes have been cooked. 4 Sauté the remaining veggies: Cook the yellow squash in the same manner as the zucchini. Make sure to add a little olive oil between each new batch. Continue with the bell peppers, then the eggplant cubes, adding the browned vegetables to the onion pan as soon as they are cooked. 5 Season: When all the vegetables (except the tomatoes) are browned and in the pan with the onions, increase the heat to high and stir, making sure they don't stick to the bottom of the pan. Add salt to taste, along with thyme, bay leaf, rosemary, and the vegetable stock. Stir well. 6 Cook the veggies in the oven: Place the pan in a 400°F oven, and cook, uncovered, for 30 minutes. Alternatively, you can cook them on the stovetop on low heat for 30 minutes. 7 Prep the tomatoes: If using fresh tomatoes, boil water in a saucepan. Remove the stems from tomatoes, and crisscross the bottoms with a knife. Plunge the tomatoes into boiling water for a minute or two, until skin starts to fall away. Rinse in cold water and remove the skin. Cut tomatoes in half lengthwise, remove seeds, chop coarsely, and set aside. 8 Make a glaze: After the vegetables have been in the oven for a half hour, remove from oven, drain vegetables in a colander set over a bowl to catch the juices. Clean browned bits (if any) off the bottom of pan with a paper towel. Return any liquid to the pan and reduce to a thick glaze over medium-high heat. Keep on adding juices to the pan as they run out of the vegetables into the bowl. 9 Combine cooked vegetables with chopped tomatoes: When all the juices have been reduced, return vegetables to the heavy pan. At this point the ratatouille should be moist and shiny, with very little liquid. Turn heat off. Add the chopped tomatoes and cover. 10 Serve: Remove the bay leaf, and season to taste with salt and pepper. If serving as a warm side dish, let the ratatouille stand for 10 minutes, just enough to "cook" the tomatoes. The ratatouille can be served at room temperature or refrigerated and reheated the next day. Recipes via Simply Recipes https://ift.tt/2F9fkDA July 22, 2019 at 04:02PM
Copycat Chipotle Guacamole
https://ift.tt/2ObUgWq The saying goes: “Imitation is the sincerest form of flattery.” In the case of this Copycat Chipotle Guacamole, however, imitation is the sincerest form of my needing to have access to mind-blowing guacamole 24/7. I give Chipotle Mexican Grill credit for inspiring my version, which came about out of desperation when their business hours didn’t jive with my cravings. WHAT’S SO GREAT ABOUT CHIPOTLE’S GUACAMOLE?Uh, everything! Whereas most chain restaurants’ guacamole seems to be squeezed from a plastic bag, or worse yet, scraped from an industrial tub, Chipotle’s guac is full of avocado chunks and speckled with fresh produce. For me, the selling points of Chipotle’s guacamole have always been the hint of spice from the jalapeños and that shot of lime that hits you in the back of your jaw (in the best way possible, of course). Those are the flavors you won’t taste from a bucket of mass-produced dip. 
HOW TO MAKE COPYCAT CHIPOTLE GUACAMOLEMost restaurant recipes are easily replicated at home—you just need to have the right recipe in order to replicate it and make it as authentic as possible. I sacrificed myself for you and gorged on an obscene amount of Chipotle’s guacamole, because exhaustive research is important! I even sifted through the original dip to decode all of the ingredients. The results were in! And they revealed that I didn’t need to exert that much effort. The ingredients were straightforward and easily identifiable: ripe avocados, red onions, fresh garlic and cilantro leaves, and that vibrant lime juice, of course. HOW TO PICK THE BEST AVOCADOS FOR GUACThe main ingredient in Chipotle’s guacamole is buttery-soft Hass avocado. Many people stress over how to pick the perfect avocado, and I’m here to give you my best tips. Not to brag, but I’ve been referred to as the avocado-whisperer. Picking the perfect avocado is an easy task:
HOW TO KEEP GUACAMOLE FROM TURNING BROWNYou can’t prevent the inevitable. Avocados will brown when exposed to air. It’s just the nature of the beast. Delaying that process is possible, but I believe that the oxidation of avocados motivates us to eat the guacamole quicker, so is that really a bad thing? To keep your guacamole from turning brown quickly, refrain from making it too far in advance. Once you’ve cut and mashed the avocado, the clock starts ticking. Try to eat your prepared guacamole soon after it’s assembled (that shouldn’t be too hard). If you must store it, though, press a piece of plastic wrap against the surface of the guacamole, then wrap the bowl in more plastic film, or cover it with a lid. This is the best way to prevent your avocado from browning excessively. Acid from the lime juice in this recipe will also help delay oxidation of the guacamole. But, if you do end up with a layer of guacamole turned brown from the air, just use the edge of your spoon to scrape it off and discard. Wanna know the best way to slice an avocado? We have a nice refresher here. HOW SHOULD I STORE GUACAMOLE?Prepared guacamole should be stored in the refrigerator with plastic wrap pressed against the surface of the dip. It will keep for no longer than three days. Any longer, and you’re condemned to scooping up dismally greyish brown guacamole. LOVE GUAC? TRY THESE OTHER RECIPES!Products We LoveThis post may contain links to Amazon or other partners; your purchases via these links can benefit Simply Recipes. Read more about our affiliate linking policy. Recipes via Simply Recipes https://ift.tt/2F9fkDA July 22, 2019 at 09:03AM |
|


 RSS Feed
