
|
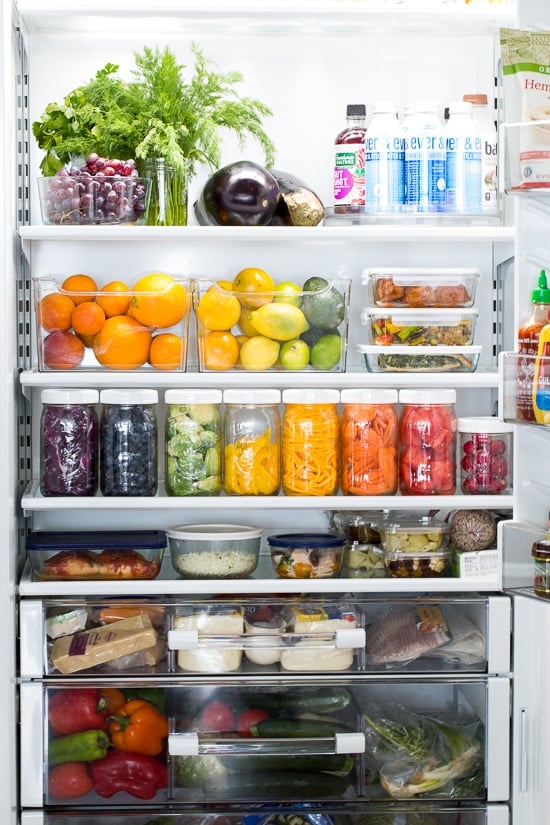
5 Tips For Organizing Your Refrigerator
https://ift.tt/3hNRnEH 5 Tips For Organizing Your Refrigeratorposted September 20, 2020 by Gina 5 Tips For Organizing Your Refrigerator for easy meal prep to save time and money, so food stays fresh all week.
|


 Kale Salad with Carrot Ginger Dressing |
 Vegan Mac and Cheese |
 Sustenance Sweet Potato Soup |
 Homemade Taquitos |
 Curried Lentil Salad |
 What are Capers + 10 Caper Recipes |
The post Sweet Potato Salad appeared first on Love and Lemons.
Recipes
via Love and Lemons https://ift.tt/2h2Uz32
September 20, 2020 at 07:55AM
#recipies
Roasted Sweet Potatoes
https://ift.tt/2FCbfha
Click here to browse more recipes!
Click here to browse more recipes!
Recipes
via Love and Lemons https://ift.tt/2h2Uz32
September 20, 2020 at 07:48AM
#recipies
https://ift.tt/2FCbfha
Who else loves roasted sweet potatoes?! I don’t know what it is about fall weather, but when the air gets cool and crisp at this time of year, I start cooking sweet potatoes like crazy. I bake them, I noodle them, I blend them into cozy sauces and toss them into soups. But most often, I roast them.
Why? First, roasted sweet potatoes are so darn easy to make! Just chop them up, toss them with some olive oil, salt, and pepper, and bake! The oven does most of the work for you. Second, they’re delicious. The salt and pepper accent the potatoes’ sweetness, creating a delectable sweet and savory flavor. I also love how the cubes puff up as they bake, becoming lightly crisp and caramelized on the outside and tender in the middle. And third, they’re just so versatile. You can toss them into salads, top them onto bowls, stuff them into tacos, and serve them as a side dish. Did I mention they’re pretty great straight off the sheet pan, too?
Below, you’ll find my simple method for how to roast sweet potatoes, as well as a host of suggestions for serving them. For the next few months, I’ll be making this roasted sweet potato recipe on repeat. I hope it becomes a standby in your kitchen, too!

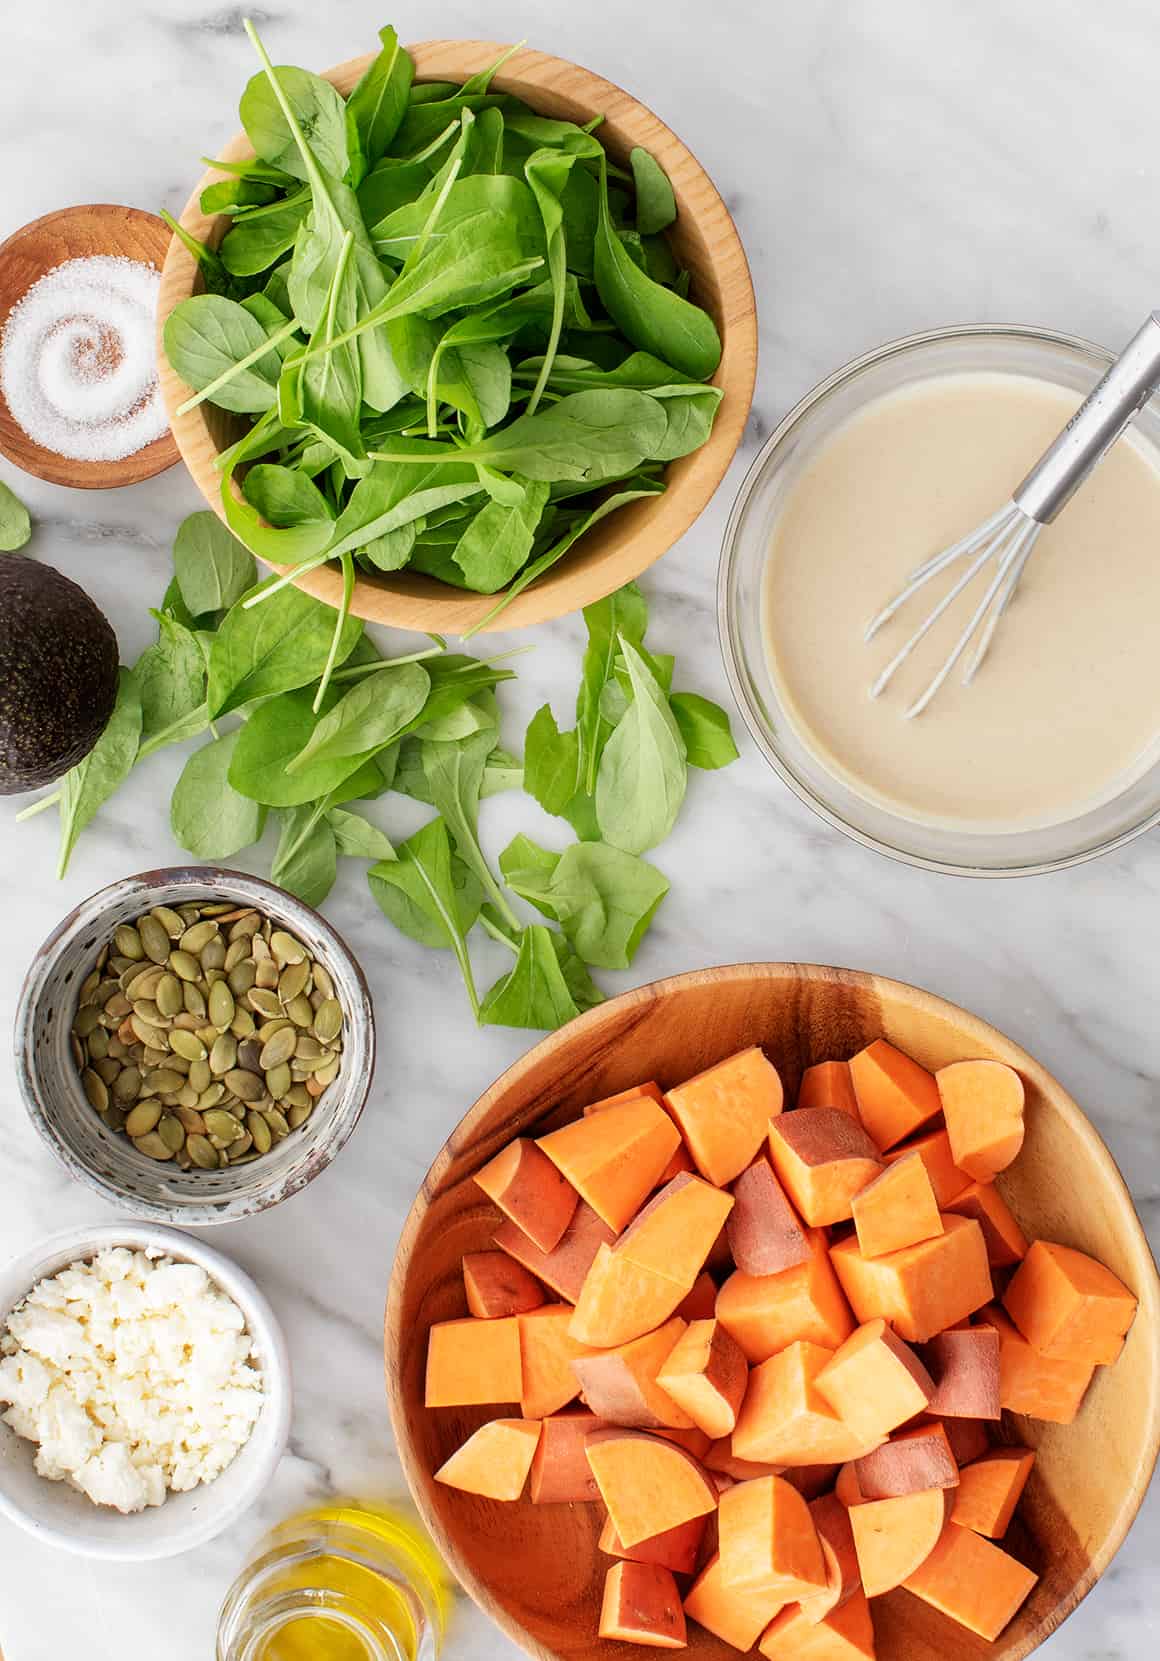
Roasted Sweet Potato Recipe Ingredients
You only need a handful of ingredients to make oven roasted sweet potatoes:
- Sweet potatoes, of course! Look for ones that are firm, without any soft or damp spots.
- Extra-virgin olive oil – It adds a little richness and helps the potatoes soften and brown in the oven.
- And salt and pepper – They contrast wonderfully with the potatoes’ natural sweetness, making the roasted sweet potatoes deliciously sweet and savory.
That’s it! If you like, you can toss the sweet potatoes with additional seasonings before or after they come out of the oven, like I do in this taco recipe. Chili powder, cumin, cayenne, smoked paprika, or the shawarma spice blend from this recipe would all be great choices.

How to Roast Sweet Potatoes
There’s a reason I make oven roasted sweet potatoes so often: it’s super easy! Here’s what you need to do:
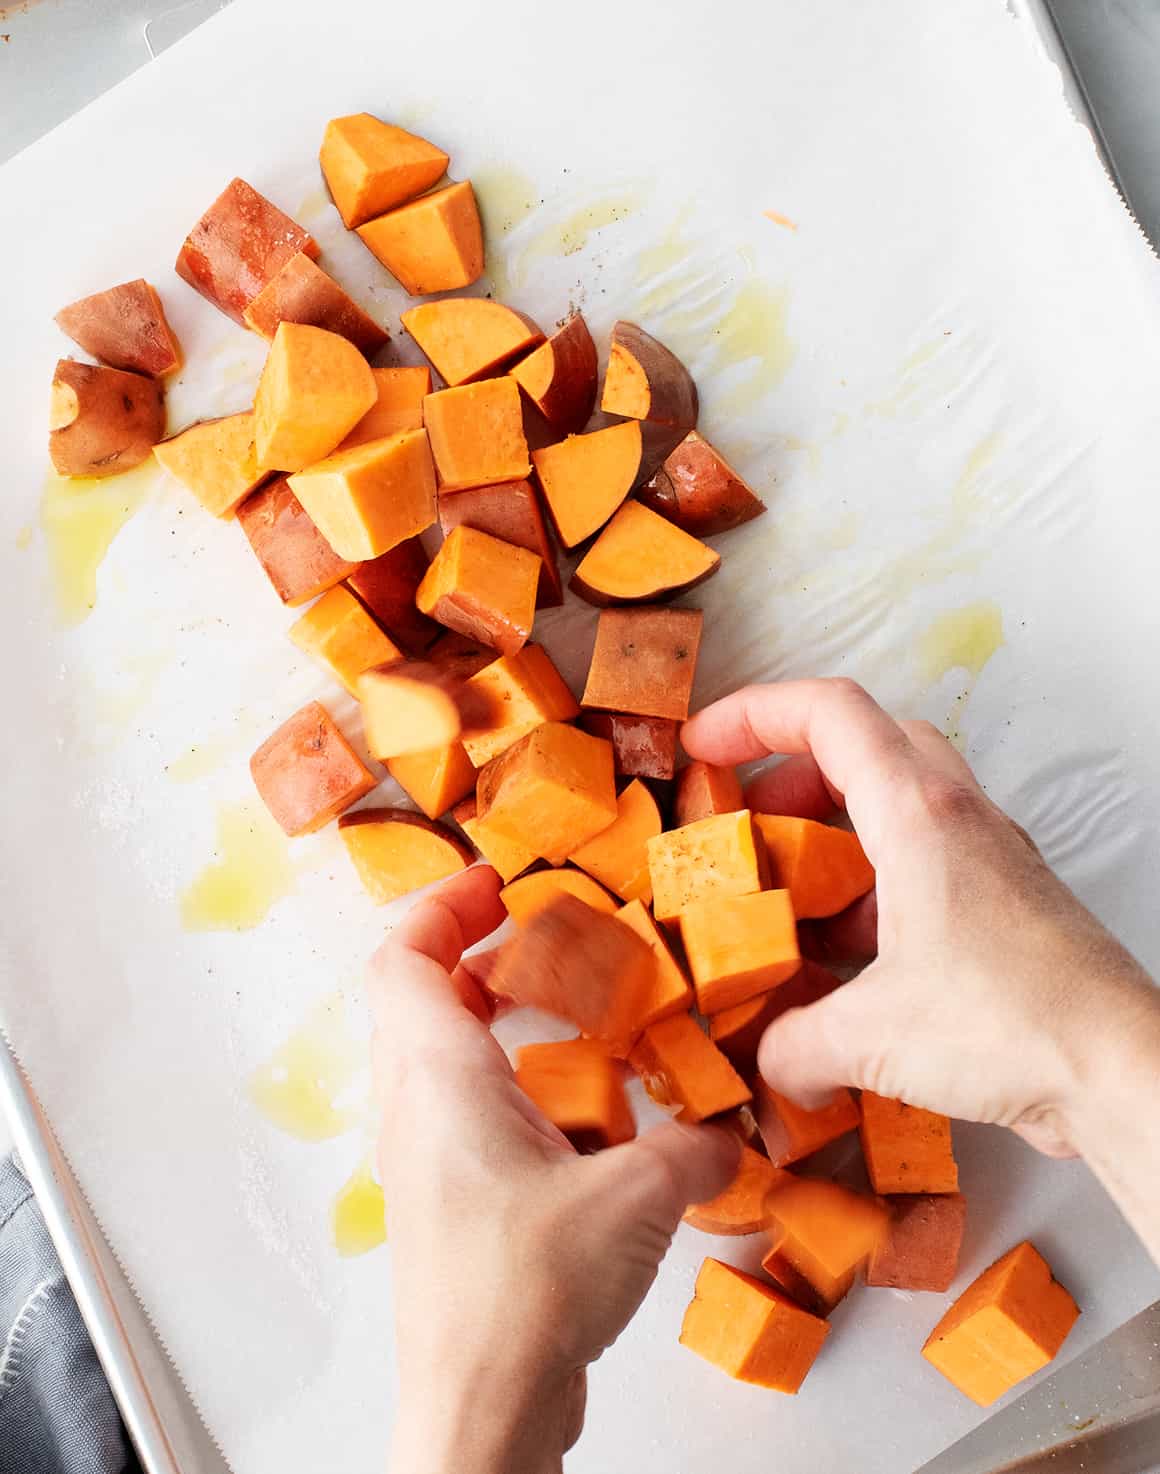
First, chop the potatoes. Do your best to cut all the pieces to a similar size so that they cook evenly in the oven. And if you don’t mind it, I definitely recommend leaving the sweet potato skin on. It’s full of nutrients, and it helps the cubes crisp up as they bake!

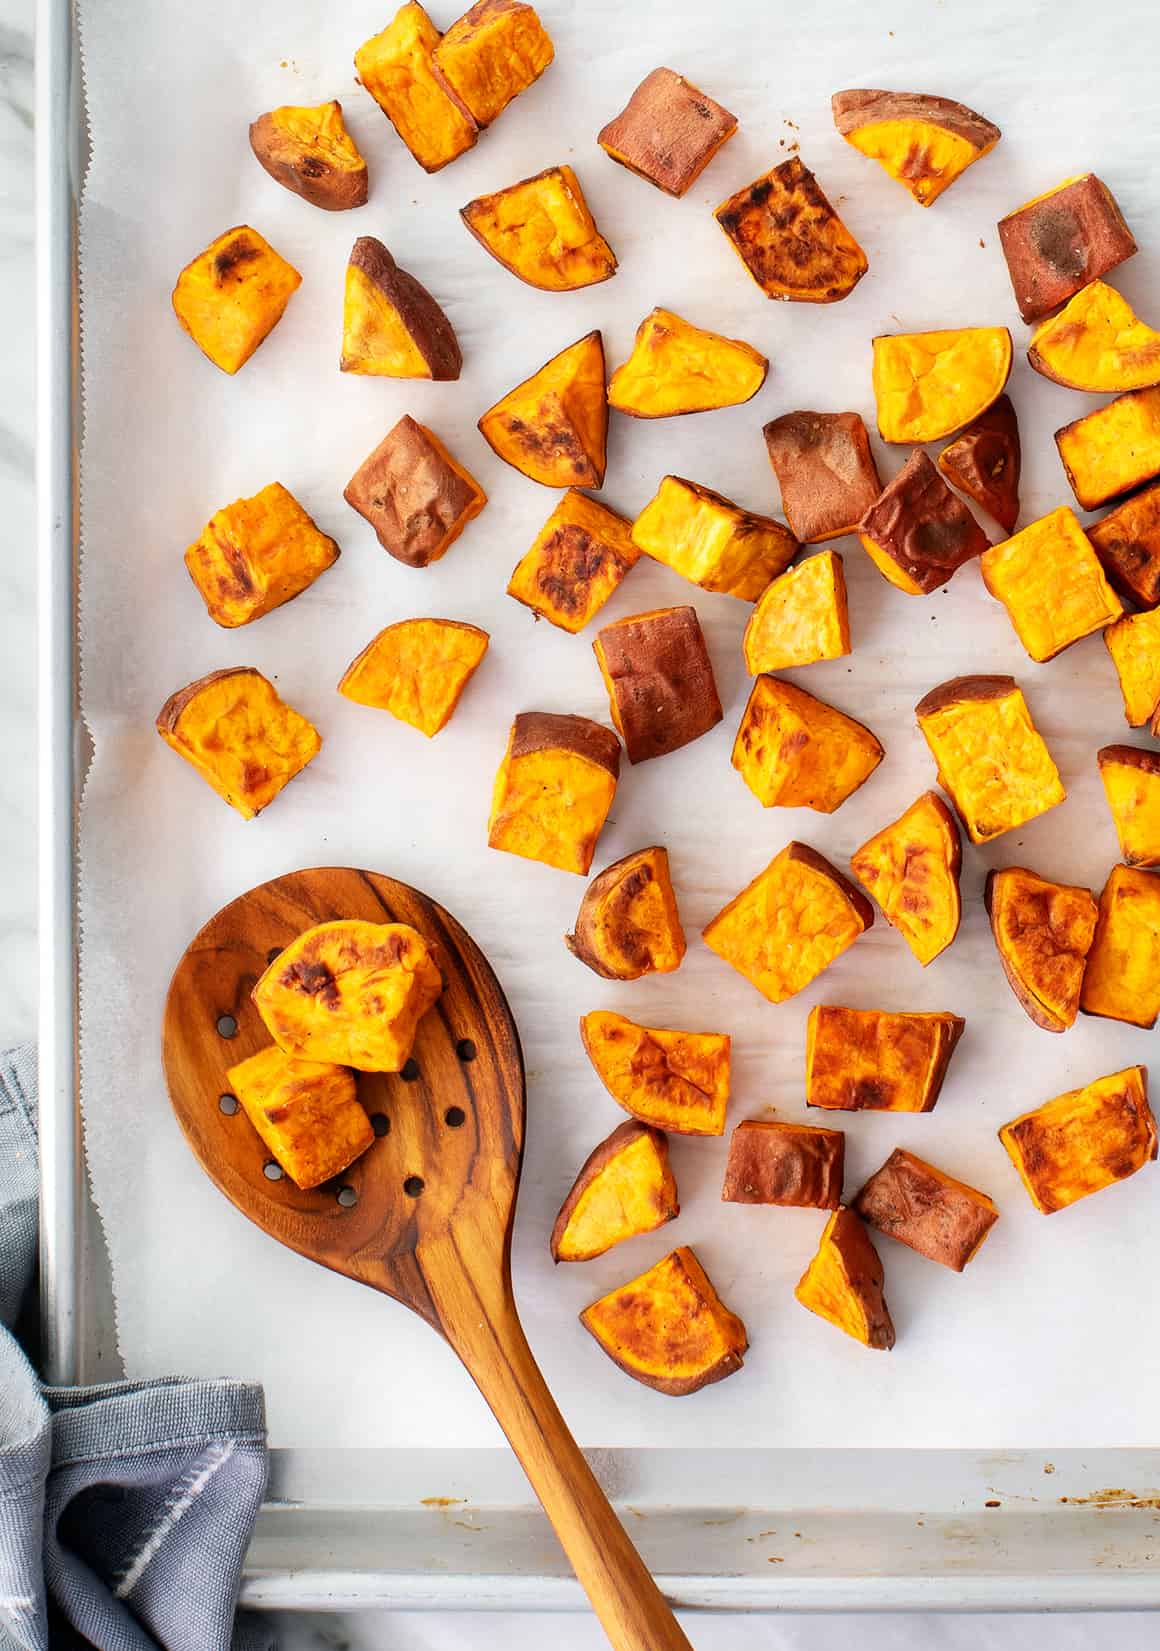
Next, season them. Spread the cubed potatoes on a parchment-lined baking sheet. Drizzle them with olive oil…

…and season them with salt and pepper…

And toss! Your goal is to coat the potatoes evenly in the oil, salt, and pepper.
Arrange the cubes on the baking sheet with a little space between each one. Don’t skip this step! If the potatoes are too crowded, they’ll steam in the oven, and they won’t get crisp and browned around the edges.
Finally, bake. Transfer the baking sheet to a 425° oven. Roast for about 25 minutes, until the potatoes are browning around the edges. The exact cooking time will vary depending on the size of your cubes and the freshness of your potatoes. Enjoy!

Oven Roasted Sweet Potatoes Serving Suggestions
In the fall and winter, I make roasted sweet potatoes nonstop, but I never get bored with them. That’s because there are so many ways to use them! Here are a few of my favorites:
- As a side dish. I especially love to serve roasted sweet potatoes with veggie burgers or black bean burgers, BBQ jackfruit sandwiches, chili, and tacos, but really, they’re great with just about anything.
- In a grain bowl. Use them in this buddha bowl or this sweet potato quinoa bowl, or build your own bowl with the roasted sweet potatoes, a grain like farro, quinoa, or brown rice, a protein like baked tofu or lentils, and a punchy sauce. Cilantro lime dressing, chipotle sauce, chimichurri, and tahini sauce are some of my favorites. Round out your bowl with whatever veggies you like best!
- In tacos or burritos. Stuff roasted sweet potatoes into a breakfast burrito, breakfast tacos, or these vibrant collard green wraps. They’re also fantastic in my Avocado Sweet Potato Tacos.
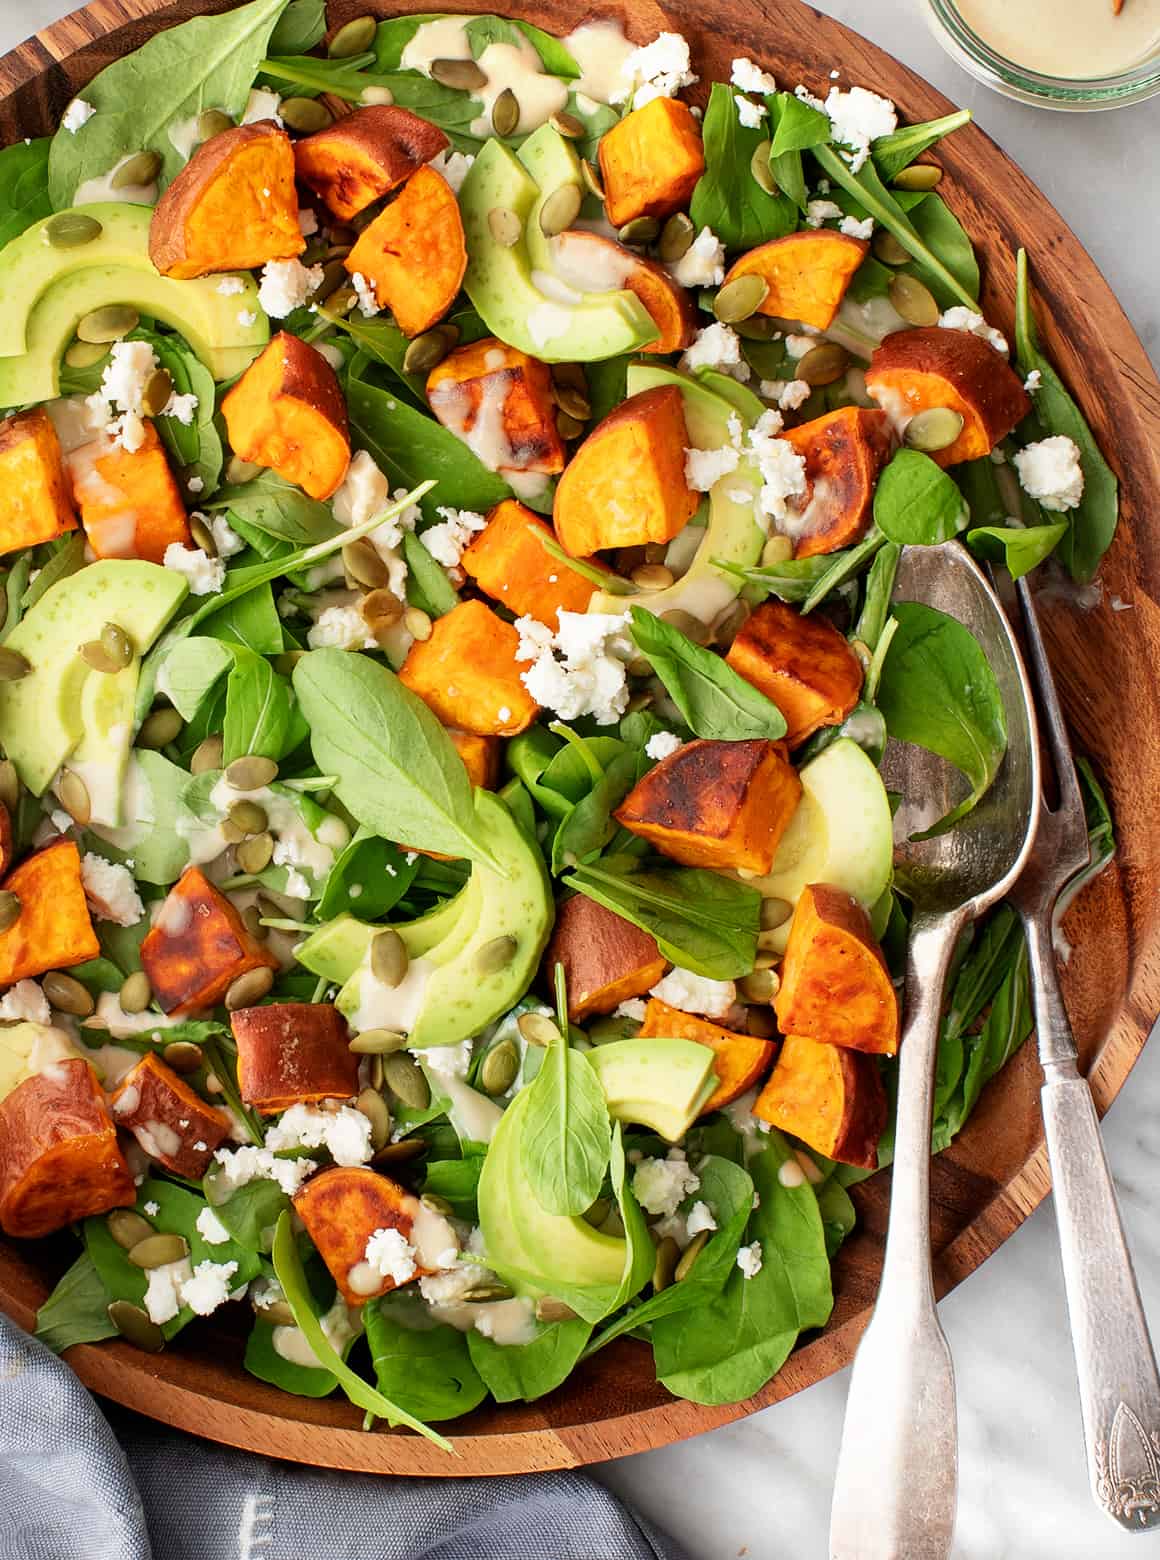
- In a salad. Make your own salad with roasted sweet potatoes, greens, and a flavorful dressing like tahini dressing, homemade Italian dressing, or lemon vinaigrette, or try my Sweet Potato Salad or Farmhouse Farro Salad.
- On avocado toast. With pickled red onions, pepitas, and a dash of adobo sauce? Yes, please!
- For breakfast! A hidden layer of roasted sweet potatoes is what makes my mom’s Healthy Breakfast Casserole so darn good! I also love tossing them into mini frittata muffins or a regular frittata with fresh sage and feta cheese.
How do you like to eat roasted sweet potatoes? Let me know in the comments!

More Favorite Roasted Veggies
If you love this recipe, try roasting one of these veggies next:
- Acorn Squash
- Beets
- Broccoli
- Brussels Sprouts
- Butternut Squash
- Cauliflower
- Potatoes
- Radishes
- Spaghetti Squash
- Tomatoes
Other posts you may enjoy...
 Vegan Cheese |
 How to Make Veggie Noodles |
 Sweet Potato Avocado Tartare |
 Vegan Bacon |
 Sauteed Mushrooms |
 How to Cook Rice on the Stove |
The post Roasted Sweet Potatoes appeared first on Love and Lemons.
Recipes
via Love and Lemons https://ift.tt/2h2Uz32
September 20, 2020 at 07:48AM
#recipies
Creamy Tahini Dressing
https://ift.tt/3hISMMB
Click here to browse more recipes!
Click here to browse more recipes!
Recipes
via Love and Lemons https://ift.tt/2h2Uz32
September 20, 2020 at 07:48AM
#recipies
https://ift.tt/3hISMMB

Of all of the homemade salad dressings out there, this lemon tahini dressing might be the one I make most often. It’s really versatile – it tastes just as good with tomatoes and cucumbers in the summer as it does with roasted sweet potatoes, cauliflower, or broccoli in the fall. It consists of a short list of ingredients that I always keep on hand, and it’s super easy to stir together. No blender or food processor required!
Nowadays, most home cooks I know are familiar with tahini, but in case you haven’t heard of it, it’s a paste made from ground sesame seeds that originated in the Middle East. It’s what makes dips like hummus and baba ganoush so velvety and rich, and if you’re a fan of falafel, there’s a good chance you’ve drizzled nutty tahini sauce on top. In my kitchen, I use tahini in oatmeal, cookies, ice cream, and more, but I especially love it in this simple tahini dressing recipe. It’s creamy, rich, nutty, and bright. I like to keep it on hand at all times, and once you try it, I think you will, too.

Tahini Dressing Recipe Ingredients
Ready to make tahini salad dressing? You’ll need these simple ingredients:
- Tahini – It makes up the dressing’s creamy base. For the best results, use really smooth, runny tahini here, not the dry, stiff stuff that you might find at the bottom of a jar. Tahini’s consistency can also vary from brand to brand; my favorites are Soom, Cedar’s, Trader Joe’s, and Seed+Mill.
- Fresh lemon juice – It makes the dressing nice and bright.
- Sesame oil – It highlights the tahini’s rich, nutty flavor.
- Garlic – For sharp depth of flavor.
- Maple syrup – For balance! It tames the bright lemon juice and sharp garlic.
- Extra-virgin olive oil – It adds body and richness.
- And sea salt – To make all the flavors pop!
Find the complete recipe with measurements below.

Add the ingredients to a small bowl along with 3 tablespoons of water, and whisk to combine.

As the dressing starts to come together, the tahini will seize up, and the sauce will thicken. Don’t worry about it! It’s totally normal. Keep whisking, and you’ll have a smooth, creamy tahini salad dressing in no time.
If the dressing is still thicker than you’d like it to be, add more water, 1/2 tablespoon at a time, until it reaches your desired consistency. Season to taste with more lemon juice, salt, maple syrup, or sesame oil, and enjoy!

How to Use Lemon Tahini Dressing
Clearly, this lemon tahini dressing is fantastic on salads. I call for it in this Sweet Potato Salad recipe, but it’d also be great on this kale salad, this roasted cauliflower salad, this pomegranate salad, this beet salad, or this butternut squash salad. Not in the mood for salad? No problem. Here are a few more delicious ways to use this tahini dressing:
- Drizzle it over roasted veggies like Brussels sprouts, butternut squash, acorn squash, cauliflower, broccoli, tomatoes, or beets. I also love it with grilled eggplant, zucchini, and mixed grilled vegetables in the summertime.
- Spoon it over falafel or a chickpea shawarma wrap.
- Add it to a bowl. Try it in this Buddha bowl or this Sweet Potato Quinoa Bowl, or make your own bowl with your favorite veggies, a grain like farro, quinoa, or brown rice, and a protein like baked tofu, lentils, or roasted chickpeas.
How do you like to use lemon tahini dressing? Let me know in the comments!

More Favorite Dressings and Sauces
If you love this tahini dressing recipe, try one of these flavorful dressings next:
- Lemon Vinaigrette
- Homemade Italian Dressing
- Greek Salad Dressing
- Vegan Ranch
- Green Goddess Dressing
- Homemade Caesar Dressing
- Cilantro Lime Dressing
- Coleslaw Dressing
Other posts you may enjoy...
 Lemon Vinaigrette |
 Homemade Italian Dressing |
 How to Make Cashew Cream |
 Greek Salad Dressing |
 BEST Hummus |
Vegan Cheese |
The post Creamy Tahini Dressing appeared first on Love and Lemons.
Recipes
via Love and Lemons https://ift.tt/2h2Uz32
September 20, 2020 at 07:48AM
#recipies
Cream Cheese Frosting
https://ift.tt/3hOoW9D
Recipes
via Simply Recipes https://ift.tt/2F9fkDA
September 19, 2020 at 05:07PM
#recipies
https://ift.tt/3hOoW9D
Cream cheese frosting is so easy to make! This is a classic cream cheese frosting with cream cheese, butter, powdered sugar, and vanilla. It's perfect for icing carrot cake, cupcakes, and cookies. Nothing beats homemade frosting.
Photography Credit: Elise Bauer
Cream cheese frosting is a baking classic!
It’s perfect for practically any cake and any leftovers are great dolloped onto some freshly cut fruit.
VIDEO! How to Make Cream Cheese Frosting
Swaps & Suggestions for Cream Cheese Frosting
This is the basic recipe, you can reduce the amount of butter if you want a bit more tang, and increase or decrease the sugar according to your taste. Dress up with ginger, vanilla bean, or coconut flakes.
Here are some fun variations!
- Add 1/2 a cup of unsweetened cocoa powder and a pinch of salt for a chocolate cream cheese frosting
- Mix freshly grated or dried, flaked coconut to the frosting to make a coconut frosting
- Intensify a vanilla frosting by adding some scrapings from a fresh vanilla bean to the frosting
- Add some blueberry syrup for blueberry cream cheese frosting
- Add a tablespoon of Amaretto or a quarter teaspoon of almond extract for an almond flavored cream cheese frosting
From the editors of Simply Recipes
How to Make This Frosting Thicker
If the frosting is too thin, beat in powdered sugar one tablespoon at a time. It may require more powdered sugar than you'd think, so be patient.
Do You Have to Refrigerate Cream Cheese Frosting?
If your kitchen is around 70°F, then you can leave desserts with cream cheese frosting sitting out for up to a day. If your kitchen is warmer, or your dessert has been out for a while, refrigerate it.
How to Store & Freeze
Refrigerate leftover cream cheese frosting in a tightly covered container for up to one week. Let it soften on the counter 15-30 minutes before spreading. Freeze cream cheese frosting for up to 2 months. (Try leftovers sandwiched between graham crackers and frozen like ice cream sandwiches. Divine!)
Use Cream Cheese Frosting with These Recipes
Cream Cheese Frosting Recipe
This recipe makes enough frosting to frost one single layer round cake, a 9x13 quarter sheet cake, or 12-18 cupcakes.
To frost a double layer cake, use 3/4 cup butter, 12 ounces cream cheese, 4 1/2 cups powdered sugar, 1 1/2 teaspoons vanilla extract.
Ingredients
- 1/2 cup butter (1 stick, 4 ounces, 115g), room temperature
- 8 ounces Philadelphia cream cheese (1 package, 224g), room temperature
- 2 to 3 cups (360g) powdered sugar (also known as confectioner's sugar), sifted
- 1 teaspoon vanilla extract
Method
1 Beat the cream cheese and butter together: Using an electric mixer, beat the cream cheese and butter together until completely smooth, about 3 minutes on medium speed. Use a rubber spatula to scrape down the sides of the mixing bowl to ensure that the mixture is mixed evenly.
2 Beat in vanilla extract and powdered sugar: Beat in the vanilla extract. With the mixer running on low speed to start, slowly add in 2 cups of the powdered sugar.
Powdered sugar has cornstarch in it that will thicken the frosting as well as making it sweet. Add more powdered sugar 1 tablespoon at a time to the frosting until you get your desired level of sweetness and thickness.
3 Spread or pipe the frosting to decorate: Use a blunt knife or spatula to spread the frosting, or spoon the frosting into a piping bag to decorate your cupcake or cake.
Hello! All photos and content are copyright protected. Please do not use our photos without prior written permission. Thank you!
Products We Love
This post may contain links to Amazon or other partners; your purchases via these links can benefit Simply Recipes. Read more about our affiliate linking policy.
Recipes
via Simply Recipes https://ift.tt/2F9fkDA
September 19, 2020 at 05:07PM
#recipies
Red Velvet Cupcakes with Cream Cheese Frosting
https://ift.tt/3kwbR6t
Recipes
via Simply Recipes https://ift.tt/2F9fkDA
September 19, 2020 at 04:08PM
#recipies
https://ift.tt/3kwbR6t
1 Preheat the oven to 350°F. Line a muffin tin with cupcake papers.
2 Make the cupcake batter: Beat the butter and sugar in an electric mixer for 3 minutes on medium speed until light and fluffy.
Add the eggs, one at a time, beating until each is fully incorporated. Be sure to scrape down the sides of the bowl to ensure even mixing.
In a large bowl, sift together the cake flour, cocoa powder, baking soda, baking powder, and salt. In another bowl whisk together the buttermilk, vinegar, vanilla extract, and red food coloring.
Add a fourth of the dry ingredients and mix, then add a third of the wet. Continue adding in a dry, wet, dry pattern, ending with the dry ingredients.
3 Divide the cupcake batter: Scoop into cupcake papers, about 1/2 to 3/4 of the way full.
4 Bake the cupcakes: Bake for 18-22 minutes or until a toothpick comes out clean. Rotate the pan after the first 15 minutes of baking to ensure even baking.
5 Cool the cupcakes: Allow the cupcakes to cool for one minute in the pan then transfer to a wire rack to cool completely.
6 Make the frosting: Beat the butter and cream cheese for the frosting together, about 3 minutes. Scrape down the sides and bottom of the bowl to ensure even mixing. Add the vanilla extract and mix. Add the powdered sugar, continually taste to get to desired sweetness. (See Cream Cheese Frosting for full instructions.)
7 Frost the cupcakes: Pipe onto cooled cupcakes and enjoy!
Recipes
via Simply Recipes https://ift.tt/2F9fkDA
September 19, 2020 at 04:08PM
#recipies
Got Kitchen Gadgets? Make These 5 No-Stove, No-Oven Dinners
https://ift.tt/33Fwg2p
Recipes
via Simply Recipes https://ift.tt/2F9fkDA
September 19, 2020 at 09:04AM
#recipies
https://ift.tt/33Fwg2p
This month welcome Sara Bir. Sara Bir is the author of two cookbooks, Tasting Ohio and the IACP award-winning The Fruit Forager’s Companion. She also moderates and replies to your comments here on Simply Recipes. Follow her @sausagetarian.
I love my gadgets and think they earn their keep. Or do they? I have a high-speed blender, a food processor, two Instant Pots, a portable induction burner, a waffle iron, a stand mixer, a sous vide circulator, a food dehydrator, an immersion blender, and…hmm. That’s a lot.
When was the last time I pureed food in a blender? Or grilled a panini? Okay, so maybe I don’t fire these up daily, but I like having them. It’s always inspiring to spy a cool recipe that reminds me to play with my toys.
This meal plan gives you a nudge to dust off a few of those nifty appliances you may be neglecting. And if you don’t have an Instant Pot, (or a slow cooker or sous vide machine, don’t worry—all the recipes below offer alternative cooking methods for your trusty old range.
One last thing: Looking for dinner ideas? You’re in the right spot! We have delicious meal plans to suit every taste and lifestyle—Healthy Eating, Family Favorites, and Vegetarian just to name a few. These one-month plans are $6.95 and, with them, you get a dessert and weekend prep recipe and a shopping list. They’re beautifully designed and perfect to print and save or simply load and cook right from your computer!
This post may contain links to Amazon or other partners; your purchases via these links can benefit Simply Recipes. Read more about our affiliate linking policy.
Recipes
via Simply Recipes https://ift.tt/2F9fkDA
September 19, 2020 at 09:04AM
#recipies
7 Day Healthy Meal Plan (Sept 21-27)
https://ift.tt/35OyH5e
Recipes
via Skinnytaste https://ift.tt/2ix3Luq
September 18, 2020 at 09:40AM
#recipies
https://ift.tt/35OyH5e
7 Day Healthy Meal Plan (Sept 21-27)
posted September 18, 2020 by Gina
A free 7-day, flexible weight loss meal plan including breakfast, lunch and dinner and a shopping list. All recipes include calories and updated WW Smart Points.
7-Day Healthy Meal Plan
I cannot thank you all enough for making my new
Skinnytaste- Meal Prep cookbook#1 on Amazon this week!!!! Your support means so much to me, thank you for allowing me do a job that I love! Let me know what recipes you can’t wait to make, and then tell me your favorites as you make them!
Why Should Everyone Meal Plan?
Meal planning is a great way to organize your meals for the week ahead. You also save time and money in the supermarket! And of course, planning ahead helps you stick to your goals!
About The Meal Plan
If you’re new to my meal plans, I’ve been sharing these free, 7-day flexible healthy meal plans (you can see my previous meal plans here) that are meant as a guide, with plenty of wiggle room for you to add more food, coffee, beverages, fruits, snacks, dessert, wine, etc or swap recipes out for meals you prefer, you can search for recipes by course in the index. You should aim for around 1500 calories* per day.
There’s also a precise, organized grocery list that will make grocery shopping so much easier and much less stressful. Save you money and time. You’ll dine out less often, waste less food and you’ll have everything you need on hand to help keep you on track.
Lastly, if you’re on Facebook join my Skinnytaste Facebook Community where everyone’s sharing photos of recipes they are making, you can join here. I’m loving all the ideas everyone’s sharing! If you wish to get on the email list, you can subscribe here so you never miss a meal plan!
Also, if you don’t have the Skinnytaste Meal Planner, now would be a great time to get one to get organized for 2020! There was a print error last year, but it’s perfect now! You can order it here!
THE DETAILS:
Breakfast and lunch Monday-Friday, are designed to serve 1 while dinners and all meals on Saturday and Sunday are designed to serve a family of 4. Some recipes make enough leftovers for two nights or lunch the next day. While we truly believe there is no one size fits all meal plan, we did our best to come up with something that appeals to a wide range of individuals. Everything is Weight Watchers friendly, I included the updated WW Blue SP for your convenience, feel free to swap out any recipes you wish or just use this for inspiration!
The grocery list is comprehensive and includes everything you need to make all meals on the plan. I’ve even included brand recommendations of products I love and use often. Cross check your cabinets because many condiments you’ll notice I use often, so you may already have a lot of them.
And last, but certainly not least, this meal plan is flexible and realistic. There’s plenty of wiggle room for cocktails, healthy snacks, dessert and dinner out. And if necessary, you can move some things around to make it work with your schedule. Please let me know if you’re using these plans, this will help me decide if I should continue sharing them!
MONDAY (9/21)
B: Pumpkin Cream Cheese Muffins* (7B 7G 7P) with a banana (0B 0G 0P)
L: Chickpea Tuna Salad (0B 8G 0P) over 2 cups mixed greens (0B 0G 0P)
D: Dad’s Creamy Cauliflower Soup (2B 2G 2P) with ½ grilled cheese* (7B 7G 7P)
Totals: WW Points 16B 24G 16P, Calories 873**
TUESDAY (9/22)
B: Pumpkin Cream Cheese Muffins (7B 7G 7P) with a pear (0B 0G 0P)
L: Chickpea Tuna Salad (0B 8G 0P) over 2 cups mixed greens (0B 0G 0P)
D: Turkey Taco Spaghetti Squash Boats (4B 4G 4P) with Quick and Delicioso Cuban Style Black Beans (1B 3G 1P)
Totals: WW Points 12B 22G 12P, Calories 897**
WEDNESDAY (9/23)
B: Pumpkin Cream Cheese Muffins (7B 7G 7P) with a banana (0B 0G 0P)
L: LEFTOVER Turkey Taco Spaghetti Squash Boats (4B 4G 4P) with an apple (0B 0G 0P)
D: Chicken and Broccoli Noodle Casserole (7B 8G 8P)
Totals: WW Points 18B 19G 19P, Calories 901**
THURSDAY (9/24)
B: Cinnamon Apple Yogurt Bowls (6B 9G 6P)
L: LEFTOVER Chicken and Broccoli Noodle Casserole (7B 8G 8P)
D: Korean Beef Rice Bowls (10B 10G 5P)
Totals: WW Points 23B 27G 19P, Calories 990**
FRIDAY (9/25)
B: Cinnamon Apple Yogurt Bowls (6B 9G 6P)
L: LEFTOVER Chicken and Broccoli Noodle Casserole (7B 8G 8P)
D: Air-Fryer Basil Parmesan Salmon (3B 6G 3P) with Broccoli and Orzo (4B 4G 4P)
Totals: WW Points 20B 27G 21P, Calories 1,044**
SATURDAY (9/26)
B: Swiss Chard Eggs Benedict (4B 3G 3P)
L: Paprika Chicken Stew (7B 7G 7P)
D: ORDER IN!
Totals: WW Points 11B 10G 10P, Calories 605**
SUNDAY (9/27)
B: Baked Oatmeal with Blueberries and Bananas (6B 6G 4P)
L: Antipasto Salad (recipe x 4) (6B 6G 6P)
D: Dominican Beans (1B 4G 1P) with ¾ cup white rice (4B 4G 4P), 2 tablespoons Colombian Aji Picante (0B 0G 0P)
and 1 ounce avocado (1B 1G 1P)
Totals: WW Points 18B 21G 16P, Calories 829**
*Freeze any leftover muffins you/your family won’t eat. Grilled cheese includes 1 slice whole grain bread and 1 ounce cheddar cheese.
**This is just a guide, women should aim for around 1500 calories per day. Here’s a helpful calculator to estimate your calorie needs. I’ve left plenty of wiggle room for you to add more food such as coffee, beverages, fruits, snacks, dessert, wine, etc.
Shopping List
Produce
- 4 medium bananas
- 1 medium pear
- 2 medium apples (any variety)
- 1 dry pint fresh blueberries
- 1 medium lemon
- 4 medium limes
- 1 medium jalapeño
- 1 small red bell pepper
- 1 medium red or yellow bell pepper
- 1 medium green bell pepper
- 1 cubanelle pepper
- 1 small (4-ounce) Hass avocado
- 1 (1-inch) piece fresh ginger
- 2 large heads garlic
- 1 medium shallot
- 2 small cucumbers
- 1 ½ pounds broccoli florets
- 1 medium head cauliflower
- 4 ½ pounds (3 small) spaghetti squash
- 2 medium bunches scallions
- 1 large bunch fresh cilantro
- 1 small bunch fresh basil
- 1 (5-ounce) container mixed baby greens
- 1 medium bunch Swiss chard
- 1 small head Romaine lettuce
- 1 medium and 1 large vine-ripened tomatoes
- 1 dry pint cherry or grape tomatoes
- 1 small and 1 medium red onion
- 2 small and 1 large yellow onions
- 1 small white onion
Meat, Poultry and Fish
- 1 small package turkey pepperoni
- 1 small package thinly sliced prosciutto
- 1 small package Canadian bacon
- 1 pound 93% lean ground beef
- 1 pound 93% lean ground turkey
- 1 rotisserie chicken (can sub and cook 1 pound [raw] boneless, skinless chicken breasts in Chicken and Broccoli Casserole, if desired)
- 4 medium bone-in chicken thighs
- 4 chicken drumsticks
- 1 ¼ pounds (4) wild salmon fillets
Grains*
- 1 loaf whole grain sliced bread
- 1 medium package unbleached, all-purpose flour (I like King Arthur)
- 1 small package white whole wheat flour (I like King Arthur)
- 1 package light multigrain English muffins
- 1 small package dry brown rice (or 3 cups pre-cooked)
- 1 small package dry white rice (or 3 cups pre-cooked)
- 1 small package quick oats
- 1 package seasoned whole wheat breadcrumbs
- 1 package orzo pasta
- 1 package Ronzoni Smart Taste or No-Yolk egg white pasta
Condiments and Spices
- Extra virgin olive oil
- Canola oil
- Coconut oil
- Cooking spray
- Olive oil spray (or get a Misto oil mister)
- Kosher salt (I like Diamond Crystal)
- Pepper grinder (or fresh peppercorns)
- White vinegar
- Red wine vinegar
- Adobo seasoning
- Vanilla extract
- Cinnamon
- Honey or agave
- Bay leaves
- Hungarian paprika
- Mayonnaise
- Sesame seeds
- Gochujang
- Crushed red pepper flakes
- Sesame oil
- Reduced sodium soy sauce*
- Nutmeg
- Oregano
- Chili powder
- Cumin
- Garlic powder
- Pumpkin pie spice
Dairy & Misc. Refrigerated Items
- 1 dozen large eggs
- 1 small package sliced cheddar cheese
- 1 small box regular or unsalted butter
- 1 small wedge Parmesan cheese
- 1 (8-ounce) package part-skim shredded mozzarella (I like Polly-O)
- 1 (8-ounce) package shredded reduced fat sharp cheddar (I like Sargento)
- 1 (8-ounce) package shredded reduced fat Mexican blend cheese (can sub ¾ cup cheddar in Spaghetti Squash Boats, if desired)
- 1 (32-ounce) container nonfat plain yogurt (I like Stonyfield)
- 1 quart 1% milk
- 1 package 1/3 less fat cream cheese (block, not tub)
Canned and Jarred
- 1 small jar pitted green olives
- 1 small jar pepperoncini
- 1 small jar roasted red peppers in water
- 1 small jar capers
- 1 small jar Giardiniera (I like Victoria brand)
- 1 (15-ounce) can chickpeas
- 1 (15-ounce) can black beans (I like Goya)
- 1 (15-ounce) can pumpkin puree
- 1 (8-ounce) can tomato sauce
- 1 (32-ounce) carton chicken broth
- 1 (32-ounce) carton reduced sodium chicken or vegetable broth
- 1 (6-ounce) can albacore tuna (I like American Tuna)
- 1 (4-ounce) can or (4.5-ounce) tube tomato paste
Misc. Dry Goods
- Baking soda
- Baking powder
- 1 small package raw sugar
- 1 small package light brown sugar
- 1 small package golden raisins (if buying from bulk bin, you need 1 tablespoon)
- 1 small package chicken bouillon cubes (I use Maggi)
- 1 pound dried red kidney beans
- 1 medium bag chopped walnuts or pecans
*You can buy gluten free, if desired
posted September 18, 2020 by Gina
Recipes
via Skinnytaste https://ift.tt/2ix3Luq
September 18, 2020 at 09:40AM
#recipies
Why I Love the OXO Fat Separator
https://ift.tt/33Jvq4N
Recipes
via Simply Recipes https://ift.tt/2F9fkDA
September 18, 2020 at 09:30AM
#recipies
https://ift.tt/33Jvq4N
Welcome to One Simply Terrific Thing, our ongoing series highlighting the small tools and kitchen goods that make life better!
Separating the fat out of cooking liquids is a kitchen task that I wouldn’t have thought could be streamlined in such a delightful way. But now that I have such a nice fat separator, I’m much more inclined to make dishes that require that step.
WHAT IS A FAT SEPARATOR?
Growing up, and then in my own kitchens as a young adult, I always had a small, very simple fat separator. If you don’t know what I mean by fat separator, it’s basically a clear plastic measuring cup with a pour spout that, with the help of gravity, separates the fat from the rest of the cooking liquid when you’re making a soup, stew, or braise.
When I was writing my Instant Pot cookbooks I found that I was using my fat separator a lot — so many pressure cooker recipes are for meats that release a lot of fat when cooked, and you need to separate the fat out of the cooking liquid to finish making the sauce.
With my old-fashioned fat separator, it was very tedious to pour the liquid through a strainer into a bowl or pitcher and then run it through the separator, one cup or so at a time. It made a lot of extra dishes, too. The frustration of repeating that task so many times inspired me to search online for a better fat separator — surely the designs must have improved since I was a kid, right?
Yep, they sure had.
OXO MAKES THE BEST FAT SEPARATOR
The OXO Good Grips Fat Separator is OXO’s most expensive fat separator model, but not outrageously so, priced at $25. It would make a great housewarming gift or holiday present for that friend who is really into making their own bone broth. (I’m sure you know someone in that category, right?)
I like a lot of things about this fat separator. For one thing, it has a 4-cup capacity, which is very generous, plenty large for one pass when I’m separating out the drippings from a chicken or turkey.
Another nice design feature is the strainer attachment on top, so there’s no need to strain everything separately into another container first.
And finally, my favorite innovative feature is the release mechanism, wherein you squeeze the trigger handle to open a silicone valve, pouring the liquid out of the bottom of the fat separator. This method makes it much easier to tell when you’ve strained off all the fat down to that last drop of cooking liquid – way better than traditional fat separators that pour out of a spout.
My favorites pressure cooker recipes are short ribs, oxtails, pork loin roasts, and beef bone broth. If you like to make these sorts of recipes, do yourself a favor and upgrade your fat separator! You won’t regret it.
Products We Love
This post may contain links to Amazon or other partners; your purchases via these links can benefit Simply Recipes. Read more about our affiliate linking policy.
Recipes
via Simply Recipes https://ift.tt/2F9fkDA
September 18, 2020 at 09:30AM
#recipies

The Flat Belly Fix
This is the only 21-day rapid weight loss system that allows you to easily lose an average of 1 lb a day for 21 days without feeling hungry or deprived. The unique and brand new techniques used in this System are proven SAFE. And they do not cause the rebound weight gain common to all the other rapid weight loss systems that are not backed by the latest science. The Flat Belly Fix System takes advantage of a recent scientific discovery that proves the effective weight loss power of an ancient spice. Combined with other cutting-edge ingredients in the patent-pending Flat Belly Fix Tea™ — that you can make right in your own kitchen in minutes — this System is the quickest, easiest and most enjoyable way to quickly get the body you desire and deserve. Click Here
Categories
All
Gluten Free
Pancakes
Protein
Archives
November 2020
October 2020
September 2020
August 2020
July 2020
June 2020
May 2020
April 2020
March 2020
February 2020
January 2020
December 2019
November 2019
October 2019
September 2019
August 2019
July 2019
June 2019
May 2019
April 2019
March 2019
February 2019
January 2019
December 2018
November 2018
October 2018
September 2018
August 2018
July 2018
June 2018
May 2018
April 2018
March 2018
February 2018
January 2018
December 2017
November 2017
 RSS Feed
