
|
Twice Baked Southwestern Sweet Potatoes
https://ift.tt/2UKeQf7 Sometimes meals can be stressful because you have to have multiple things on the plate. A piece of chicken is not a meal. It needs a salad or some other sides along with it. This full dinner plate issue gets compounded with kids, because they might reject the stuff you worked hard to make! But, take a breath! These Twice Baked Southwestern Sweet Potatoes are literally an entire meal in one. You put this on the plate, and it is a FULL MEAL. It requires no sides or other things. It is filling, delicious, and easy. If your kids are picky about food touching or food stuffed with other food (mine apparently are—see the report card below), then you can keep the filling and sweet potato separate, of course, or break it apart for them. Ideally, they would just dive in and realize how wonderful these savory ingredients pair with sweet potatoes. TWICE BAKED POTATOES: ROASTED OR MICROWAVEDThere’s an ideal way to make these sweet potatoes: Roast them in the oven. This does require about an hour of time, though. If you have the time (or can plan in advance), I recommend it, because it cooks out a lot of the water in the potatoes and concentrates the flavors. Plus, the skin on the potatoes becomes crispy and delicious! Of course, I’m a believer that the perfect is the enemy of the good in the kitchen, and so you can microwave these as well! To cook sweet potatoes in the microwave, poke a bunch of holes in them with a fork and zap them for about 10 minutes, in five-minute increments. They will be VERY hot when they come out, but once they cool off, you can split them just like the roasted ones and stuff them full. 
A VEGETARIAN TEX-MEX FILLINGThis is a very simple vegetarian Tex-Mex filling with corn, black beans, and red peppers, but I find that the flavors go really well with the slightly sweet potato flesh and creamy queso fresco. If you can’t find queso fresco, you could substitute grated Monterey jack cheese. Kids also tend to be okay with all the stuff in this filling (or you can push their palates a bit, which is always good). Of course, you could jazz up the filling more if you wanted to. A pinch of mild chili powder is a decent idea, or you could add some browned meat, like ground beef, if you wanted it to be more of a taco filling situation. If you did that, you would probably have leftover filling which can be eaten for lunch as a taco salad! But you can’t go wrong with the basic vegetarian approach. It’s healthy, fast, and the flavors pair well. MAKING THESE IN ADVANCEThese are sturdy things, and they can easily be made in advance, entirely or in part. Roasting the potatoes and making the filling can be done a day or two in advance. Then you can assemble them right away, or refrigerate the potatoes and filling separately, and then assemble them while your oven preheats. If you are warming these up from the fridge, add 10 minutes onto the baking time, or bring them to room temperature beforehand if you have time. I think these are best eaten within four to five days, and we have no problem going through a batch in that amount of time. FREEZER INSTRUCTIONSThese would also freeze okay, but they are dense, and you would need to wrap them in foil, fully assembled, and bake them for about 45 to 60 minutes at 350°F to totally thaw and warm them back up. The DAD ADD: Primo Tex-Mex Toppings!
These sweet potatoes are already pretty stuffed, but I like to reduce some of the bean/corn mixture and add some other flavors in my version. If you have the time, some browned chorizo goes well on them. Otherwise, I also like to top them with pickled jalapeños, sour cream, and scallions when they come out of the oven. Honestly, one of these stuffed to the max is a FULL MEAL even for a dad. 
THE REPORT CARD
While the flavors in these sweet potatoes were all things my kids have had before (and eaten!), piling them all together was a step too far for my little ones. Even after I suggested I disassemble them for the kiddos, the damage was done, and they looked at their plates like, well, damaged goods. If you anticipate this problem, feel free to keep all the fillings separate in small bowls for your kiddos, and they can assemble them to their liking! We are all friends here, so I can admit that I eventually bribed my four-year old with an M&M if he tried the sweet potato. You can see the look of skepticism on his face. Of course, once he tried it, he agreed that it was, in fact, something he had eaten before and proceeded to eat more bites. I would venture that he even liked it! My two-year-old looked at her plate as if it were straight from another planet. She’s a stubborn one, and no amount of bribery would bring her to touch this situation. Fine. Tube yogurt for dinner it is. MORE GREAT SWEET POTATO RECIPES!Recipes via Simply Recipes https://ift.tt/2F9fkDA March 20, 2019 at 09:02AM
0 Comments
String Bean Salad
https://ift.tt/2HJgIBc
One of my favorite ways to enjoy green beans–in a chilled green bean salad recipe! The delicious flavors of these balsamic green beans made with black olives, scallions and eggs complement any meal or holiday potluck.
This easy green bean salad is so good, and tastes even better the next day which would make this a great lunch option too! A few other green bean recipes I love, Skillet Chicken with Bacon and Green Beans, Roasted Parmesan Green Beans and Potato and Green Bean Salad. Recipes via Skinnytaste https://ift.tt/2ix3Luq March 20, 2019 at 08:46AM
Baby Bok Choy with Cashews
https://ift.tt/2FonA5A Bok choy is quick and easy! Learn how to make this bok choy that is simple, yet delicious, in just 15-minutes. All you need is baby bok choy, olive oil, garlic, green onions, and roasted, salted cashews. Photography Credit: Elise Bauer “Simple is Best” Bok ChoySometimes the simplest things are the most enjoyable. My mother whipped up this quick and easy baby bok choy dish the other night. This bok choy was so good I made her make it again the next day so I could watch with pad and pen in hand. Making My Mom’s Bok ChoyGetting a “recipe” is hard on my mom actually, as she never makes anything the same way twice, and she never measures (obviously not a baker). I make her weigh things. “How much bok choy is that mom?” She looks at me as if I’ve just asked her how many miles there are to the moon. I get the kitchen scale down from the cabinet. 
What Does Baby Bok Choy Taste Like?Bok choy is in the cabbage family, but doesn’t have the same spiciness that members of that family often have. Cooked, bok choy is mild and sweet. The leaves wilt like spinach while the stalks stay crisp-tender, somewhat like celery. Ways to Adapt this RecipeWhy cashews? Because that’s what we had on hand. Almonds would work too. If you want, you could jazz the bok choy up a bit with a little freshly grated ginger and a shake of chili pepper flakes. Tips for Preparing Bok Choy
More Recipes with Bok Choy!Updated March 20, 2019 : We spiffed up this post to make it sparkle. No changes to the original recipe. Baby Bok Choy with Cashews RecipePrintIngredients
Method1 Sauté onions, garlic, bok choy: Heat olive oil in a large sauté pan on medium high heat. Add onions, then garlic, then bok choy. Sprinkle with sesame oil and salt. 2 Cover, and let the baby bok choy cook down for approximately 3 minutes. (Like spinach, when cooked, the bok choy will wilt a bit.) 3 Remove cover. Lower heat to low. Stir and let cook for a minute or two longer, until the bok choy is just cooked. 4 Gently stir in cashews. Hello! All photos and content are copyright protected. Please do not use our photos without prior written permission. If you wish to republish this recipe, please rewrite the recipe in your own unique words and link back to Baby Bok Choy with Cashews on Simply Recipes. Thank you! PrintThis post may contain links to Amazon or other partners; your purchases via these links can benefit Simply Recipes. Read more about our affiliate linking policy. Recipes via Simply Recipes https://ift.tt/2F9fkDA March 20, 2019 at 08:07AM
10 Easy Recipes to Use Up a Bunch of Potatoes
https://ift.tt/2Hwd927  10 Easy Recipes to Use Up a Bunch of PotatoesHave a bunch of potatoes that need using up? Sweet or Russet, big or small – we have plenty of ideas for turning this starchy staple into a meal that everyone will love. I know you like potatoes and saving money. I know this because you walked into your local supermarket and couldn’t help yourself. You had to buy a 5-pound sack of potatoes because they were on sale for $1.99. You looked at that sack of potatoes I thought to yourself, “I can buy 5 pounds of potatoes. I love French Fries! I’ll make tons of French Fries in that air fryer I got for Christmas.” But you never made the French Fries and those potatoes look awfully close to sprouting. But no need to break out the gardening tools just yet! I’ve complied 10 recipes to use up potatoes so you can keep your New Year’s Resolution to reduce food waste. If all else fails, quarter them and plant them in your garden so you can have lots of potatoes later on when you will be in a better position to make lots of French Fries. This post may contain links to Amazon or other partners; your purchases via these links can benefit Simply Recipes. Read more about our affiliate linking policy. Recipes via Simply Recipes https://ift.tt/2F9fkDA March 19, 2019 at 09:07AM
Deviled Eggs with Horseradish and Dill
https://ift.tt/2ueS83g Be the superstar of your next potluck by giving your deviled eggs a kick! A touch of horseradish spices things up, while a sprig of dill cools things down! Make them for Passover, Easter, or any spring gathering. Photography Credit: Coco Morante Deviled eggs make so much sense to serve as an appetizer at a Passover gathering. After all, the egg is a symbolic Passover food, with its own spot on the Seder plate. DEVILED EGGS FOR PASSOVERTo give classic deviled eggs a Passover makeover, I give them a kick of horseradish—an ingredient representing the bitterness of slavery in Egypt, and a traditional Seder plate staple. Minced shallots aren’t particularly symbolic of anything, but they do add lots of flavor and a little crunch to the creamy filling! When my family had Seder dinners growing up, we didn’t serve appetizers before we read the Haggadah. As children we would get antsy at the table while we made our way through the story of how the slaves escaped Egypt. If these deviled eggs had been passed around beforehand, I would’ve been one happy kid! 
LOOK FOR KOSHER MAYONNAISEThere’s just one caveat to making deviled eggs at Passover: if your family observes strict rules of kosher law, you’ll need to track down a kosher-for-Passover mayonnaise (Gefen makes one), or make your mayo from scratch. Mayo isn’t difficult to make (here’s a recipe from my blog, Lefty Spoon). To make homemade mayo acceptable for Passover, leave out the Dijon mustard or use imitation mustard such as Haddar. EASY-PEEL HARD BOILED EGGSTo hard boil the eggs and ensure you can easily remove the shells, you can either steam them on the stovetop or in a pressure cooker. (You can also cook your eggs using the traditional boiling method, but the results don’t always peel easily.) You can do this a few days in advance, and even peel the eggs a few days in advance too. Just keep peeled eggs in the fridge covered with cold water, and replace the water every day to keep the eggs nice and fresh. HOW FAR AHEAD CAN YOU MAKE DEVILED EGGS?You can also assemble the deviled eggs up to one day ahead of time. Just keep them covered in the fridge, either loosely covered with plastic wrap (not too tight or you will smush them), or stored in one of those handy deviled egg storage containers. Wait ‘til the last minute to top the eggs with the paprika and dill. They’re prettier when the garnishes are added just before serving. LOOKING FOR MORE DEVILED EGG RECIPES?Deviled Eggs with Horseradish and Dill RecipePrintIngredients
To garnish:
Method1 Hard boil the eggs: To hard boil the eggs and ensure you can easily remove the shells, you can either steam them on the stovetop or in a pressure cooker. (You can also cook your eggs using the traditional boiling method, but the results don’t always peel easily.) 2 Prepare the eggs: Peel the eggs. Using a sharp knife, slice each egg in half, lengthwise. Gently remove the yolks and place in a small mixing bowl. Arrange the egg white halves on a serving platter. 3 Make the deviled egg filling: Using a fork, mash up the yolks and add mayonnaise, horseradish, shallots, and salt. Add more mayonnaise as necessary to get to the creamy consistency you want. Taste for seasoning, adding more salt if needed. 4 Pipe or spoon the mixture into egg white halves: Use a spoon to transfer the egg yolk mixture into the egg white halves, or pipe the mixture through a piping bag with a star tip. 5 Garnish and serve: Sprinkle the deviled eggs with paprika, and top each one with a small piece of dill. Hello! All photos and content are copyright protected. Please do not use our photos without prior written permission. If you wish to republish this recipe, please rewrite the recipe in your own unique words and link back to Deviled Eggs with Horseradish and Dill on Simply Recipes. Thank you! PrintProducts We LoveThis post may contain links to Amazon or other partners; your purchases via these links can benefit Simply Recipes. Read more about our affiliate linking policy. Recipes via Simply Recipes https://ift.tt/2F9fkDA March 18, 2019 at 09:01AM
Penne Pasta with Meat Sauce
https://ift.tt/2Wbg57D 1 Cook the penne pasta: Heat to boiling a large pot with 4 quarts of water in it. Once the water is boiling, salt it with 2 Tbsp of salt. Once the water returns to a boil add the pasta to the pot. Leave uncovered, let cook on high heat with a vigorous boil. Put the timer on for 8-10 minutes, or whatever your pasta package says is appropriate for al dente (cooked but still a little firm). Drain. 2 Sauté onions, garlic, with seasonings: Once you've started to heat the water, start working on the sauce. Heat olive oil in a very large skillet on medium heat. Add the chopped onion, Italian seasoning and red pepper flakes. Cook for 5 minutes, stirring occasionally, until the onions are softened. Add the garlic, fresh thyme, season with salt and pepper. Cook for an additional minute, until the garlic is fragrant. Remove from heat and set aside. 3 Brown the ground beef: Heat a large cast iron pan on high heat. Salt the bottom of the pan generously. Once the pan is hot, break up small chunks of ground beef and add them to the pan, without stirring. (You may need to work in batches; do not crowd the pan.) You want the meat to get well browned. If the pan is too hot and the meat is burning, not browning, take the pan off the heat for a little, and reduce the heat to medium high. On our coil electric stove, it takes the high heat setting for the meat to brown sufficiently, but your stove may be different. Once the meat is browned on one side (a couple of minutes), use a metal spatula to flip the meat over to brown on the other side. At this point, assuming you are using a cast iron pan, you can remove the pan from the heat. The residual heat in the pan will finish cooking the meat. 4 Add beef and tomato sauce to onions: Use a slotted spoon to lift the meat from the cast iron pan and add it to the pan with the seasoned onions. Add tomato sauce. Use the edge of your metal spatula to break up the bigger chunks of meat into smaller pieces. Add basil. Add a teaspoon of sugar. Bring to a simmer on low heat, let cook, uncovered, for 15 minutes. 5 Adjust seasonings and add the pasta: Once the sauce has simmered for 15 minutes, adjust seasonings. Add salt and pepper to taste. Add a little more sugar if the sauce is too acidic. Add more tomato sauce if the sauce is a little dry. Stir in the cooked penne pasta. Sprinkle with chopped parsley. Serve immediately. Recipes via Simply Recipes https://ift.tt/2F9fkDA March 18, 2019 at 09:01AM
Yogurt Waffles
https://ift.tt/2Oj3dcZ Whip up these protein-packed Yogurt Waffles for breakfast and freeze the rest for easy meal prep!
These delicious blender waffles made with yogurt in the batter are so easy to make and come out perfect with wheat or gluten-free flour. Make a double-batch for meal prep freezer meals for homemade waffles in minutes. Recipes via Skinnytaste https://ift.tt/2ix3Luq March 18, 2019 at 07:50AM
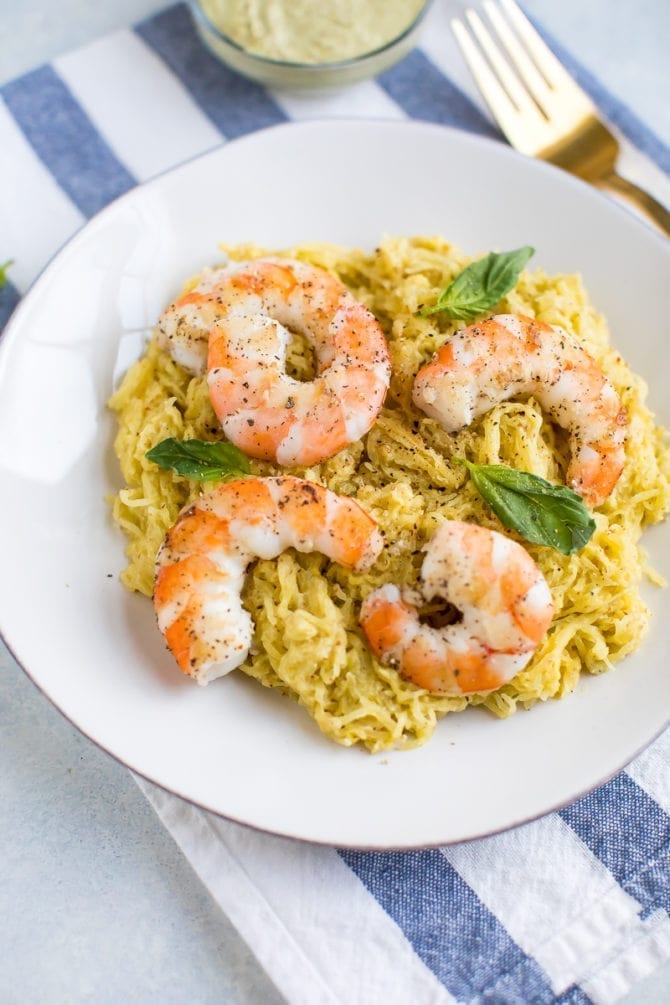
Almond Pesto Spaghetti Squash with Shrimp
https://ift.tt/2W7IwDu This 4-ingredient pesto spaghetti squash features a creamy almond pesto sauce and is topped with cooked shrimp for a low-carb, protein-packed meal. Diary-free and gluten-free. This recipe is inspired by a couple reader requests: meal prep tips and simple weeknight recipes!
It takes some time to master, but I love meal prepping certain ingredients that can be used in a variety of ways. This almond pesto dip (which is a homemade version of pesto Bitchin’ Sauce) is the perfect example of that. You can make this pesto dip/sauce once and use it in soooo many different ways. I love it as a snack with veggies or crackers, for breakfast on toast with eggs and for dinner as a pizza or pasta sauce. So many uses! Because you’re enjoying it in so many ways and pairing it with different ingredients, you can rest assured that won’t dread eating it at the end of the week. Promise. And I should mention that this pesto sauce isn’t your traditional herby pesto sauce. It’s almond based so it’s extra creamy with a little punch and tang.
This recipe obviously also falls under the category of simple weeknight recipes because it’s only 4 ingredients (once the sauce is made!). Of course, we’re not counting olive oil, salt and pepper. I used roasted spaghetti squash as the base, but if you’re craving actual pasta, you can always swap in the Barilla legume pasta that I’ve been raving about. It tastes just like “regular” pasta but has a ton of added nutrients. I paired this with shrimp because I love how quickly it cooks up, but I’d be willing to bet any protein source would pair well with this sauce! Lastly, we’re topping the dish with fresh basil to really bring all of the flavors together. If you try this simple spaghetti squash pesto recipe be sure to leave a comment and star rating below letting me know how it turned out. Your feedback is so helpful for the EBF team and other EBF readers. Print DescriptionThis 4-ingredient pesto spaghetti squash uses a bright and fresh diary-free almond pesto and is topped with cooked shrimp for a low-carb, protein-packed meal. Ingredients
Instructions
Nutrition
Keywords: almond pesto spaghetti squash Looking for other simple recipes with less than 10 ingredients? Check these out:
I also have an eCookbook filled with 35 recipes all made from 5 ingredients or less. Check out Fit With Five here! Simple meals FTW!
The post Almond Pesto Spaghetti Squash with Shrimp appeared first on Eating Bird Food. Recipes via Eating Bird Food https://ift.tt/1L45wsH March 18, 2019 at 07:24AM
Chicken Curry with Sweet Potato and Lemongrass
https://ift.tt/2JjTkgf Many people compare Vietnamese food with that of Thailand. It’s natural, because the two countries are neighbors and countless ideas have flowed back and forth, intermingling as people cooked and shared. Given that, you’d think that Viet and Thai curries would have lots in common. They do, with regards to the use of coconut milk and aromatics. But interestingly, Viet cooks prefer curry that features Indian-style spice blends, like the madras curry powder used in this recipe. India has also influenced Viet culture for millennia, particularly through the Cham Kingdom long ago. For this chicken curry, called cà ri gà in Vietnamese, the curry powder is combined with lots of lemongrass and ginger to create a heady paste. Black pepper and cayenne inject pungent heat. By adding extra spices and aromatics, you can more easily finesse things to your liking. 
WHAT IS MADRAS CURRY POWDER?If you travel to Saigon (a.k.a. Ho Chi Minh City) and wander the popular Ben Thanh market, you’ll see several spice vendors who offer individual spices as well as signature spice blends. Each cook has her or his preferences, and as a Vietnamese-American who’s lived in the States for over 40 years, I adore Sun Brand’s Madras-style curry powder. It’s well balanced, with lots of citrusy coriander and zippy turmeric along with warm spice notes in the background. My mom used to hunt it down at Asian markets, buying several metal cans at a time to avoid running out. Nowadays, it’s stocked in the spice section of many supermarkets and is sold online, too! It’s my go-to and thank goodness, it’s easy to find. Despite its name, Madras curry powder is not a true Indian ingredient. The spice blend was inspired by Madras, a city in south India that’s now called Chennai. However, like with all “curry powders,” the spice blend was invented and popularized by the British. India does produce curry powder, much of which is exported. Yes, commercialism and colonialism have complicated many things but they’ve also helped to spread ideas around the globe. Back to the spice blend itself. Madras curry powder can be mild, moderate, or hot, depending on the brand. Sun is a moderately spicy blend that allows me to control the heat source and heat level. 
TIPS FOR MAKING THIS CHICKEN CURRY
For a more savory curry, you can also substitute regular potatoes—choose a potato suitable for boiling or roasting, such as red, white, or Yukon gold. WHAT TO SERVE WITH THIS CURRYRustic yet elegant, this fragrant curry may be served with baguette for dipping or with rice; add a mild vegetable side, such as sauteed chard, to let the curry shine. If the curry is too hot, squirt on some lime juice to cut the heat. However you serve this curry, it is a seamless blending of cultures that reflects the unique amalgam that is Vietnam. I hope you enjoy it as much as I do. WANT MORE GREAT VIETNAMESE RECIPES?First of all check out my book, Vietnamese Food Any Day! Also, try these other recipes here on Simply Recipes:
Chicken Curry with Sweet Potato and Lemongrass RecipePrintTo divide each chicken thigh into three equal pieces, cut the flat side as one piece, then halve the thicker portion. If large thighs are unavailable, use smaller ones and cut each into two pieces. Reprinted with permission from Vietnamese Food Any Day: Simple Recipes for True, Fresh Flavors by Andrea Nguyen, copyright ©2019. Published by Ten Speed Press, an imprint of Penguin Random House LLC. Ingredients
Method1 Make the curry paste: In a food processor, whirl the lemongrass into a fine texture, about 3 minutes, pausing occasionally to scrape down the bowl. Add the ginger and pulse to finely chop. Add the onion and pulse again to chop. Add the curry powder, black pepper, and cayenne (if using) and whirl until you have a fragrant yellow paste, about 30 seconds. 2 Prep the coconut milk: Do not shake the can of coconut milk. Open the can and remove 1/3 cup of the thick cream at the top of the coconut milk. Stir the remaining lighter milk, and set both aside. 3 Begin cooking the curry: In a 3- to 4-quart pot over medium-high heat, melt the coconut oil. Add the lemongrass paste and cook for 3 to 5 minutes, stirring frequently, until fragrant and no longer raw and harsh smelling. Lower the heat as needed to avoid scorching. Add the chicken and 1/2 teaspoon salt, stir to combine, and cook for 1 minute to meld the flavors. Add the coconut milk and a little water to cover the chicken. Bring to a simmer over medium-high heat, cover, and adjust the heat to gently simmer for 15 minutes, stirring occasionally. 4 Add the sweet potatoes: Uncover the pot, add the sweet potatoes, and return the curry to a simmer. Continue cooking for 10 to 12 minutes, uncovered and stirring occasionally, until the potatoes are tender. 5 Finish the curry: Turn off the heat, stir the coconut cream into the sauce, and let rest on the burner’s receding heat for 10 minutes, uncovered, to blend and mature flavors. Taste and season with salt (unsalted curry powder may require an additional teaspoon) and splash in a bit of water if the flavors are too strong. Serve immediately, garnished with the cilantro. Hello! All photos and content are copyright protected. Please do not use our photos without prior written permission. If you wish to republish this recipe, please rewrite the recipe in your own unique words and link back to Chicken Curry with Sweet Potato and Lemongrass on Simply Recipes. Thank you! PrintProducts We LoveThis post may contain links to Amazon or other partners; your purchases via these links can benefit Simply Recipes. Read more about our affiliate linking policy. Recipes via Simply Recipes https://ift.tt/2F9fkDA March 17, 2019 at 09:02AM
Use-It-Up Meal Plan! Pork Chops, Quesadillas, and Fried Rice
https://ift.tt/2TNJrvj  Use-It-Up Meal Plan! Pork Chops, Quesadillas, and Fried RiceWondering what to do with leftover ingredients? This meal plan is all about creating tomorrow's delicious meals from the remains of last night's inspired creation! This week, we're focusing on pork chops, quesadillas, and fried rice. The joy of cooking can lead to the headache of using up half of a leftover pepper from one meal, the broccoli from another, and a quarter head of cabbage from that slaw you made last week. Sometimes we just don’t have the mental energy to figure how to reinvent all of those lingering parts and pieces. The 3-day meal plan below is meant to help you make some great meals and use up your odds and ends in the process. I start this week with a robust dinner of cabbage and pork chops, and follow it up the next day with quesadillas–which can be customized to whatever you have lying around. The quesadilla recipe calls for broccoli, but you can easily add spinach, black beans, or that half an avocado you have 30 seconds to use before it goes bad. I round out the meal plan with vegetable stir fried rice. Toss in the remaining cabbage from your pork chop dinner and any broccoli left over from the quesadillas along with any other odds and ends you might have lingering in your fridge. Crack a couple of eggs and dinner is done! You can even add left over pork if your heart desires! Let the recipes be your guide not your dictator! Consider this mini-meal plan our ode using things up. This post may contain links to Amazon or other partners; your purchases via these links can benefit Simply Recipes. Read more about our affiliate linking policy. Recipes via Simply Recipes https://ift.tt/2F9fkDA March 17, 2019 at 09:02AM |
|


 RSS Feed
